
A Detailed VPNa Fake GPS Location Free Review On Tecno Pop 8 | Dr.fone
A Detailed VPNa Fake GPS Location Free Review On Tecno Pop 8
As I stumbled upon this query that has been recently posted on a leading online forum, I realized that so many people don’t know about the VPNa Fake GPS app. If you are also an Android user who would like to change your device’s location, then VPNa Fake GPS APK might meet your requirements. Since there are so many location spoofing tools out there, I decided to give VPNa Fake GPS location app a try and have come up with its genuine review here.
Part 1: VPNa Fake GPS Location Free: Features, Pros, Cons, and More
Developed by XdoApp, VPNa Fake GPS is a popular application that can change the location of your Android virtually. Using it, you can spoof your device location to almost anywhere in the world. This would be reflected in almost all the installed gaming, dating, and other apps on your phone automatically.
- You can look for any location on the interface of VPNa Fake GPS by entering keywords (name/address) or the exact coordinates (longitude and latitude) of the place.
- To fake GPS using VPNa, you would be presented with a map-like interface and can easily move the pin around to spoof your location to an exact place.
- Besides that, if there is a location that you change frequently, then you can also mark it as a favorite.
- The VPNa fake GPS location APK would also maintain the record of the past locations that you have spoofed.
- Using VPNa Fake GPS, you can change your location as many times as you want without paying anything.
Pros
- The changed location would be reflected in almost every dating and gaming app.
- The basic version of VPNa Fake GPS is available for free and doesn’t need root access.
- The overall interface of VPNa Fake GPS APK is pretty user-friendly and smooth.
Cons
- At times, some advanced apps (like Pokemon Go) can detect it and might get your account banned.
- While using the free VPNa fake GPS version, you would get in-app ads.
- Sometimes, the location is not spoofed even after consecutive attempts.
Pricing: While you can access the basic version of VPNa Fake GPS for free, you can pay $2.99 for an ad-free experience.
Compatibility: Android 4.4 and newer versions
Play Store Rating: 3.6/5
Important Note
Don’t get confused by the name of VPNa Fake GPS as it is not a VPN, but only a location spoofing solution. If you are looking for a VPN app, then you should consider other options.
Final Verdict
Overall, VPNa Fake GPS location free is worth a try. It is pretty lightweight, easy-to-use, and supports almost all the prominent apps. Since you don’t have to pay anything to use VPNa Fake GPS, you can give it a try, and explore it on your own.
Part 2: How to Use VPNa Fake GPS Location Free to Spoof Your Location?
Now when you know how VPNa fake GPS Location Free works, let’s quickly understand how to use it to change the location on any Android phone.
Step 1: Enable Developer Options on your phone
To set up a mock location app, you need to first enable the Developer Options on your device. To do this, just go to its Settings > About Phone and tap on the “Build Number” feature 7 consecutive times.
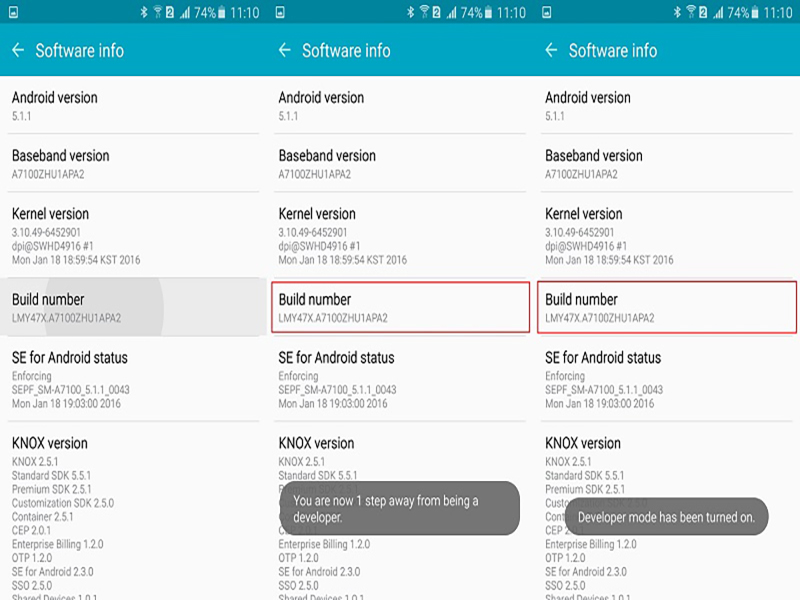
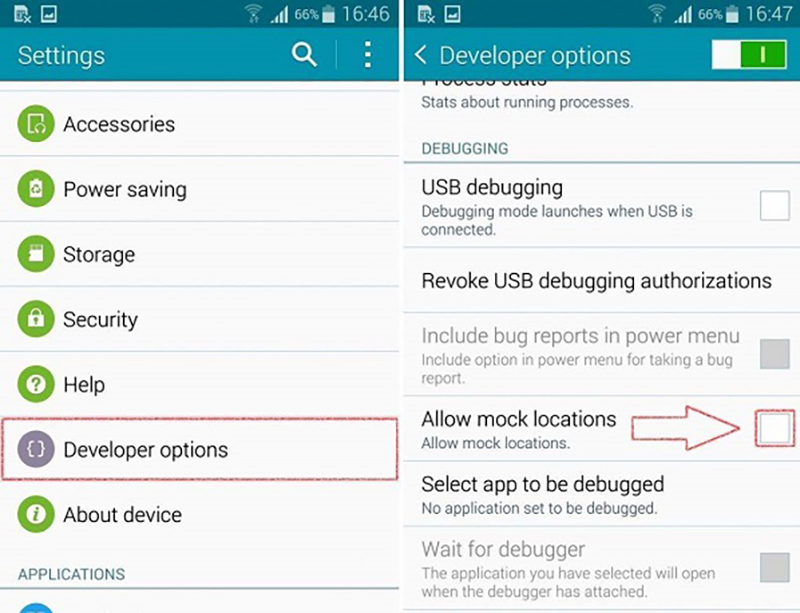
Once it is done, go to its Settings > Developer Options and turn on the option to set a mock location on your phone.

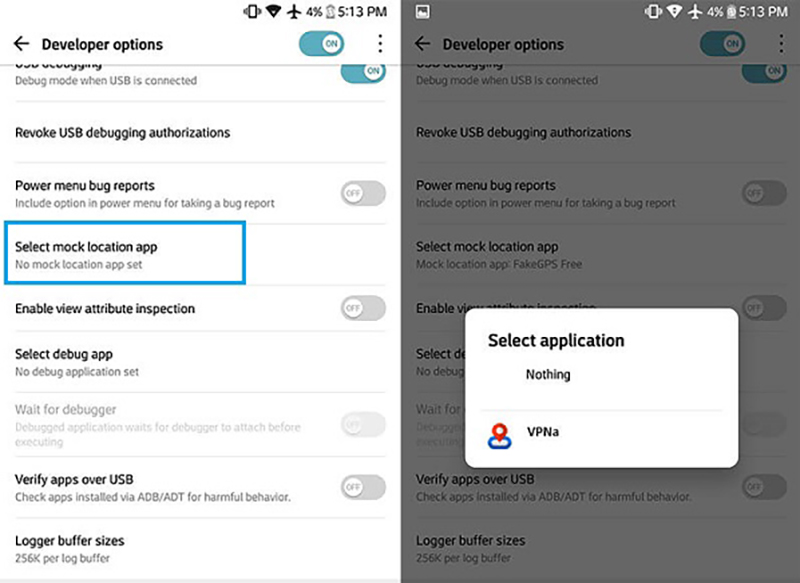
Step 2: Make VPNa Fake GPS as the default mock location app
Now, you can just go to the Play Store and download the VPNa Fake GPS Location app on your device. After the app is installed, you can just go to its Developer Options again and set it as a default mock location app.
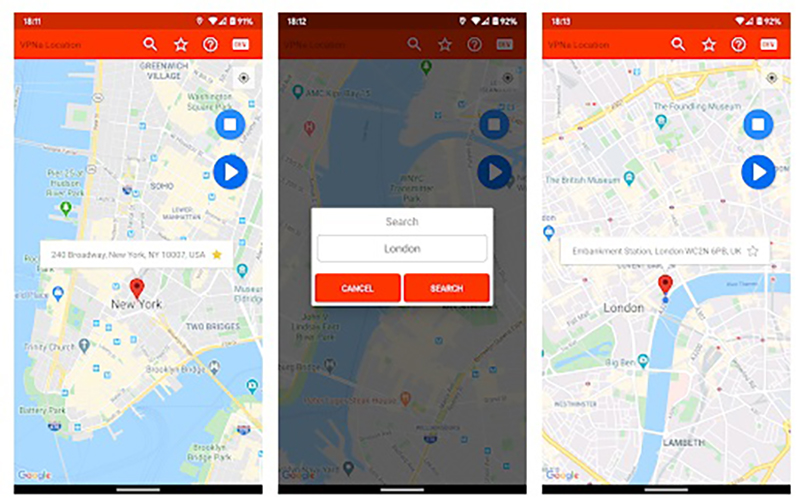
Step 3: Spoof your Android’s location
That’s it! Whenever you wish to change the location of your device, simply launch VPNa Fake GPS APK. You can enter any location’s address or coordinates in the search bar and wait for it to be loaded on the interface.
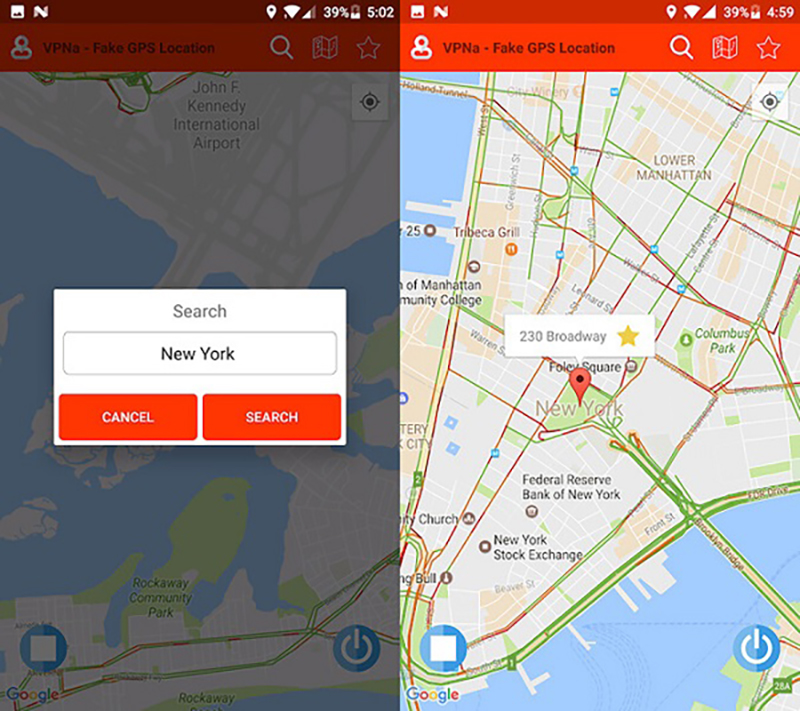
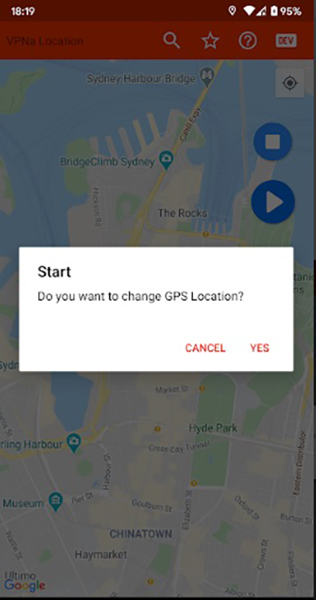
Later, you can move the pin around and drop it anywhere you like. Tap on the Start button and confirm your choice to spoof your device’s location.
Part 3: Bonus Tip: How to Spoof an iPhone Location without Jailbreak
While Android users can take the assistance of VPNa Fake GPS, iOS users often find it hard to change their device location. Well, in this case, you can consider Dr.Fone - Virtual Location(iOS) . It is a user-friendly application that can spoof your iPhone location to any other place by entering its address or exact coordinates. Besides that, you can also simulate the movement of your device between different spots.
Step 1: Connect your iPhone and launch the tool
At first, you can just connect your iPhone to your computer and launch the Dr.Fone toolkit. Select the “Virtual Location” feature from its home and click on the “Get Started” button.

Step 2: Look for a location to spoof
The application will automatically detect your device’s location and would display it. To change it, click on the Teleport Mode icon from the top, and enter the address/coordinates of the place in the search bar.

Step 3: Change your iPhone’s location
After entering the target location, the interface would also change. You can move the pin, zoom in/out, and drop it to the designated place. In the end, just click on the “Move Here” button to spoof your iPhone’s location.

This brings us to the end of this detailed VPNa Fake GPS Location Free review. To help you use the VPNa Fake GPS APK, I have listed its features, pros, cons, and even a detailed tutorial. On the other hand, if you are an iPhone user, then you can simply use Dr.Fone - Virtual Location(iOS) and change your device’s location to anywhere you want.
Thinking About Changing Your Netflix Region Without a VPN On Tecno Pop 8?
Netflix is easily one of the most popular streaming apps available today. It offers a huge library of movies, TV shows, documentaries, and more. However, the content you want to watch on Netflix depends on the country where you live.
The traditional method of circumventing region-locked content on Netflix is simply utilizing a VPN. You can also change Netflix country restrictions without it, but it will require a bit of work. If you’re interested to know how to change the Netflix region without a VPN, follow our quick article below to learn more.
Part 1: Netflix and Geo-Restrictions
Netflix offers subscribers a wide range of content, but their library varies per region due to licensing and copyright agreements. The service price sometimes costs less in other countries, which is why using VPNs to save money on subscriptions are highly popular.
Using VPNs and other methods to change your region is not illegal, but it violates Netflix’s Terms of Use. If you’re caught using VPNs or other means to bypass their geo-restrictions, Netflix can suspend or terminate your account. This is why you should always take caution when navigating the streaming giant’s Terms of Use.
Part 2: Will Netflix Ban My Account If I Use a VPN?
If you’re wondering if Netflix bans accounts that use VPN, the answer is “No, they don’t”. On the other hand, Netflix will block access to content if it detects that you’re connected to VPN. If this happens, simply turn off your VPN or try connecting to different servers on your VPN and retry.
Part 3: Can You Change Your Netflix Region Without a VPN?
There are multiple ways to change your location on Netflix without a VPN, whether you’re on your computer, iPhone, or Android. You can use a smart DNS service, a Proxy Server, or a Tor browser to connect to a country you want to access. Follow our guide below to change country on Netflix now without a VPN.
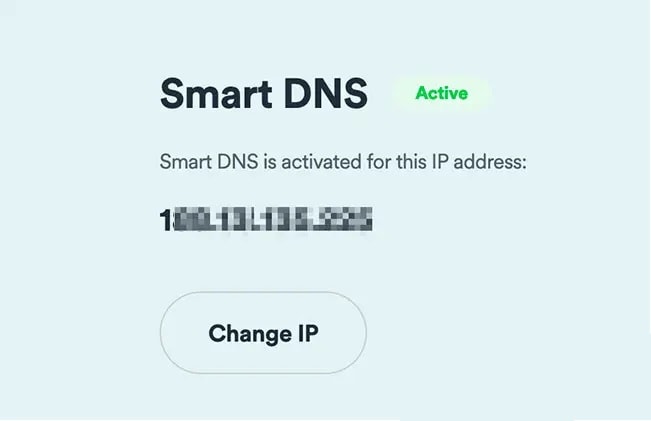
Method 1: Using a Smart DNS
Utilizing Smart DNS to change country on Netflix without VPN actually works in the same way. This is because Smart DNS re-routes your connection through a server in a different country. Keep in mind that Smart DNS is still a service and will require a subscription from a Smart DNS provider.
Step 1: Find and select a DNS Server address from different online DNS providers. In this example, you’ll see using SurfShark .
Step 2: Register your IP address on your selected provider and obtain the appropriate DNS Server Address on your account.
Step 3: Open Networking settings on your computer, iPhone, PlayStation, or Xbox and find DNS Settings (the image below is an example for the Windows system).
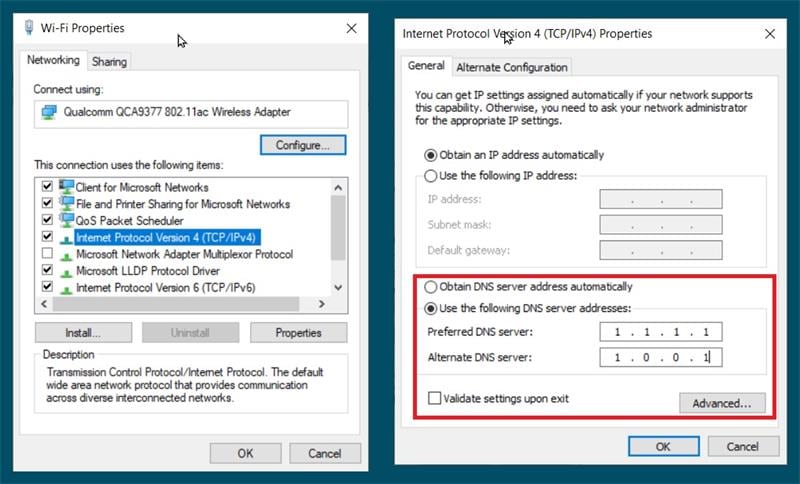
Step 4: Input your DNS Server address. Click Ok once done and restart your computer. The DNS address should activate once you reconnect to the internet.
Pros
- DNS servers are faster than a usual internet connection, so you can enjoy streaming at high connection speeds.
- DNS Servers don’t encrypt your traffic or hide your IP address.
Cons
- DNS doesn’t carry your information, as the server side will only see the IP address where the query came from, which hackers can manipulate.
Method 2: Using a Proxy Server
Proxy Servers work the same as VPNs as it routes traffic to a third-party server. However, like DNS, Proxy Servers don’t encrypt data but can mask your IP address. Here are the steps to watch NetFlix with a Proxy Server.
Step 1: Search for Proxy Settings on your computer.
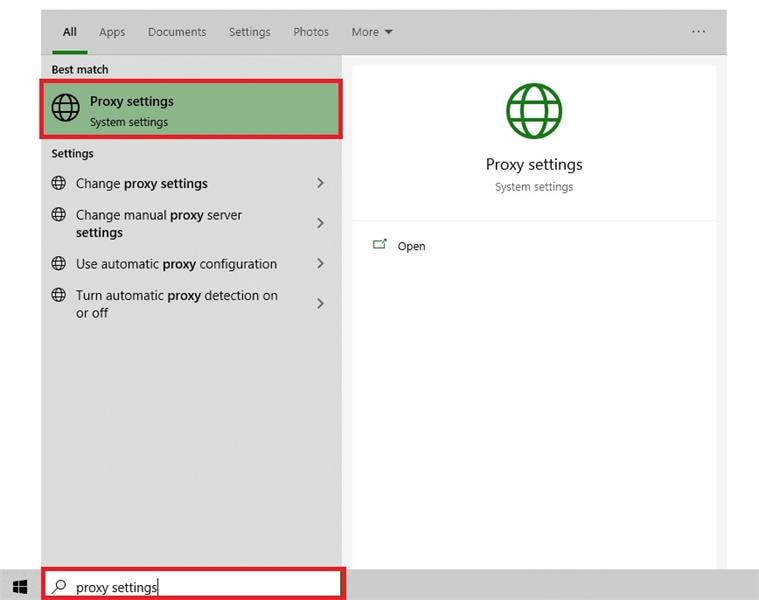
Step 2: Choose between Automatic or Manual proxy setup.
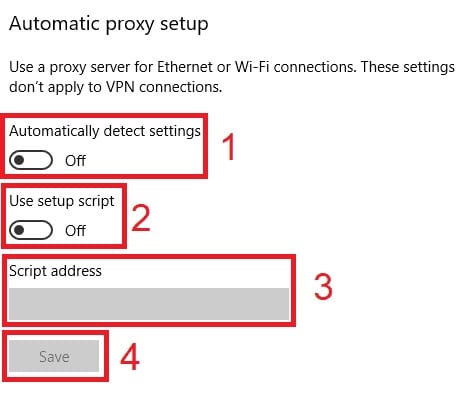
Step 3A: For Automatic proxy setup, turn on Automatically detect settings and Use setup script. Afterward, enter the Script address and click Save.
Step 3B: For Manual proxy setup, click Use a proxy server. Input Address and Port numbers. Click Save afterward.

Note
To change Proxy on mobile phones, change your phone’s proxy settings. Your Netflix app will automatically copy your phone’s proxy settings if done correctly.
Pros
- Proxy Servers mask your IP address retaining anonymity.
- Proxies improve web browsing performance, especially when downloading large files.
Cons
- Proxy Servers don’t encrypt data.
Method 3: Using a Tor Browser
For the unfamiliar, Tor is an open-source network that encrypts your connection while stopping trackers from following your activity. Here are the steps to start using Tor Browser to watch Netflix without a VPN.
Step 1: Download and install Tor Browser.

Step 2: Launch Tor Browser and click Connect.
Step 3: Go to Netflix.com and log in to your account.
Note
Tor Browser is available across all major platforms, including Windows, macOS, Linux, and Android.
Pros
- Tor is completely free to use.
- Your browsing history automatically gets deleted.
Cons
- You can’t control the region you have access to, so your Netflix content is not guaranteed to have what you’re looking for.
Conclusion
Changing your Netflix region with or without a VPN certainly has its perks. This is because you can watch your favorite series unavailable to your country to maximize your streaming access. Choosing a country with a lower subscription price also saves you money.
While it’s not illegal to change your Netflix region, it does violate the streaming giant’s Terms of Use. You should always research and know the pros and cons when circumventing Netflix’s terms so your account doesn’t get suspended or terminated.
Dr.Fone - Virtual Location
1-Click Location Changer for both iOS and Android
- Teleport from one location to another across the world from the comfort of your home.
- With just a few selections on your computer, you can make members of your circle believe you’re anywhere you want.
- Stimulate and imitate movement and set the speed and stops you take along the way.
- Compatible with both iOS and Android systems.
- Work with location-based apps, like Pokemon Go , Snapchat , Instagram , Facebook , etc.
3981454 people have downloaded it
How To Use Special Features - Virtual Location On Tecno Pop 8?
Wondershare Dr.Fone - Virtual Location comes with multiple unique features that can be used to enhance the flow of spoofing location. With all these amazing features, you can easily change your iOS location without blinking an eye. Rather than making things complicated, Dr.Fone makes it easy for you to manage operations when you perform actions like changing Android locations.
Part 1: Circle Route (For Multi-Stop Route)
The circle route feature is under the multi-stop route mode. When your starting point is close to the ending point, a pop-up asks if you want to set up a circle route. Click Yes to create a circular path on the map.

Part 2: Realistic Mode (For One-Stop Route and Multi-Stop Route)
This particular feature makes the simulation look realistic with the ability to fluctuate the speed of the simulation. If you wish to turn on realistic mode for the one-stop or multi-stop route, look for the respective checkmark option in the panel on the left.

Part 3: Fluctuation Mode (For Teleport Mode)
Whenever you are teleporting your smartphone device to another location, you can try using the fluctuation mode feature offered against it. As you activate Teleport Mode from the top-right section and search for a location, you will discover the Fluctuation Mode toggle in the confirmation tab. Turn on the toggle to slightly switch the location from the selected point to show realistic motion.

Part 4: Cooldown Timer (For Teleport Mode and Jump Teleport Mode)
While teleporting the location of your smartphone to different places for playing games like Pokemon Go, you are bound to activate a cooldown timer within your location-changing app to show realistic movement. By locating the Cooldown Timer on the right pane of icons, activate it, and this feature will automatically calculate the cooling time by measuring the distance between your destination and the starting point.

It is recommended not to start the movement until the cooldown time is completed to avoid unnecessary bans. Moreover, you can also activate the Auto jump after cooldown in the Jump teleport mode after turning on the Cooldown Timer.
This option will automatically jump you to the next destination once the timer ends. It is helpful for games like Pokemon Go, where the game servers can detect frequent jumps with no cooldown time.
Part 5: Import/Export GPX File
You can also import and export specific navigated locations from Dr.Fone in the form of GPX files. While you can export GPX files for keeping a record of your location, you can also import such files for inserting specific locations to simulate or teleport to. Find out how you can import and export GPX files with this location-changing application:
Step 1Export the GPX File
If you have defined a proper location to simulate at a particular instant using Dr.Fone - Virtual Location, you can have this location exported by clicking the Export icon on the top of the left panel. This will open a window where you can set the location for saving the GPX file.

Step 2Import a GPX File
For importing a GPX file on the platform, click the Import button on the right pane. As this opens a window, select the GPX file you wish to import to the platform.

Step 3Wait for the File to be Read
Wait for a moment until Dr.Fone - Virtual Location recognizes the specific locations within the GPX file and displays them on the map.

Part 6: Historical Records
If you want to use a similar track record on your smartphone again, you can access the historical records saved on the platform for easy access.
Step 1Open Historical Records
Click the Historical Records button on the right pane to access the entire history involving the connected smartphone and the location spoofing platform.

Step 2Access Any Location from the History
Select the Go button adjacent to any particular historical record to re-launch a similar simulation for the Tecno Pop 8 device. You can also click Clear All to delete all historical records.

Part 7: Favorite List
You can also set up favorite locations within the platform to define quick accessibility to your favorite locations. To do that, you have to follow the guidelines shown next:
Step 1Favorite Specific Locations
While setting up locations in Jump Teleport Mode, One-Stop Route, or Multi-Stop Route, you can tap on the Favorite icon adjacent to every marked location or favorite an entire route with the Favorite icon on the top of the left panel.

Step 2Access your Favorite Section
To look for your favorite locations, look for the Favorite icon on the right pane to open a list containing all locations you have marked. You can choose the Move option to automatically move into a particular location in no time.

Also read:
- [New] In 2024, FB Live Streaming to Perfect MP3 Format - 2023 Converter
- [New] Vimeo Chapter How to Add Chapters to Vimeo Video?
- [Updated] Monitoring Lost Instagram Connections for 2024
- Expert Advice on iPhone Ringtones & Customization for 2024
- How to Change Netflix Location to Get More Country Version On Itel P55 5G | Dr.fone
- In 2024, How To Fix OEM Unlock Missing on Sony?
- iSpoofer is not working On Vivo Y100i? Fixed | Dr.fone
- Methods to Change GPS Location On Realme Narzo 60 5G | Dr.fone
- Read This Guide to Find a Reliable Alternative to Fake GPS On Tecno Pova 5 Pro | Dr.fone
- Unique Images, Unique Voice Podcast Graphic Principles
- Why Upgrading to ChatGPT Plus Makes Sense: Unveiling 9 Compelling Reasons
- Title: A Detailed VPNa Fake GPS Location Free Review On Tecno Pop 8 | Dr.fone
- Author: Ava
- Created at : 2024-11-08 17:34:33
- Updated at : 2024-11-12 16:37:20
- Link: https://fake-location.techidaily.com/a-detailed-vpna-fake-gps-location-free-review-on-tecno-pop-8-drfone-by-drfone-virtual-android/
- License: This work is licensed under CC BY-NC-SA 4.0.