
Complete Tutorial to Use GPS Joystick to Fake GPS Location On Motorola Moto E13 | Dr.fone
Complete Tutorial to Use GPS Joystick to Fake GPS Location On Motorola Moto E13
The web world offers many apps, including Google, Facebook, Uber, etc. that provide location-based services. This means such apps will need your location to work. However, there are some rare occasions when users don’t find this service welcoming and thus, they wish to fake GPS location.
One of the instances comprises a well-known location-based game – Pokemon Go, where users might want to mislead the app and make the phone not understand where they exactly are. There might be other cases as well. No matter what reason you want this to be done, we are here to introduce you GPS joystick app that helps you for the same. Here we go!
Part 1: Fake GPS Location - GPS JoyStick the App
GPS joystick is an app that helps the users to fake GPS with the help of an overlay joystick control. It is easy to use and works instantly when you wish to modify the GPS location. Providing a unique “Joystick” option, this app can be considered a useful fake GPS joystick apk. On a plus, the app has the best algorithm so that it can offer realistic GPS values.
Features:
- Able to make modifications in the location wherever you point the joystick.
- You can choose the current location with the help of a map or joystick.
- You can also get the GPX files imported and exported to favorites, routes, or custom markers.
- It offers a good amount of setting options to provide complete user customization.
- You can manage the settings regarding size, type, and opacity for the joystick.
- With the help of this fake GPS joystick apk, you can get an opportunity to show the distance and cool-down time information.
- There is also a hide option available to help you decide whether you want to hide or show the joystick on your screen.
- Moreover, you get 3 customizable speeds for the joystick.
Disadvantages:
- It requires a hell lot of steps that are confusing and tough to perform.
- Users have reported that the app only works for a few minutes after the first time of installation. Afterward, the app function to fake GPS location dies and is then good for nothing.
- You need to be tech-savvy to fake GPS location with a GPS joystick.
- Fake GPS joystick for Pokemon Go cannot perform well for it as reported by the users. Also, it drives the same result for other popular location-based apps or games.
Part 2: How to set up GPS JoyStick
Though, it is quite difficult to get through the process of setting up the GPS joystick apk to a fake GPS location. Remember, we’ve always got your back. Therefore, we would like to bring you up with a detailed streak of steps (if followed properly) to install and set up the fake GPS joystick apk easily.
Basically, the tutorial is categorized into 3 different streaks depending upon the different Android OS security patches and OS version. Therefore, before we begin with steps, let’s understand what you need to do to find your Android OS version or the Security Patch. Depending on the Security Patches or Android OS version, follow the tutorials mentioned below with falls compatible for your device.
- Take your Motorola Moto E13 handy and launch the “Settings”.
- Now, scroll down to the “About phone” option at the bottom and then hit on it.
- Lastly, look for the “Android version” entry and “Android security patch level” entry from the information displayed over your screen.
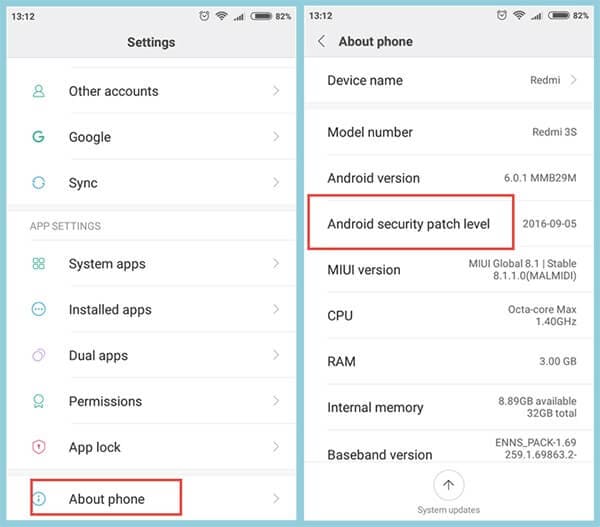
Note: Remember the date mentioned besides the “Android security patch level” is when it was first released. Please do not take it otherwise, that it is the date when you might have installed Google’s security patch.
2.1 For Android 6.0 and Above (New Security Patch) - AFTER March 5, 2017
If you own an Android device that runs on the Android OS version 6.0 or higher updated to “New Security Patch” released “AFTER March 5, 2017”. You need to follow the steps mentioned below.
First, you need to make sure that the Google Play Services app installed over your Motorola Moto E13 is running on version 12.6.85 or lower. If that’s the case, you no longer require performing the lengthy steps below. Instead, directly skip stepping number 7 below.
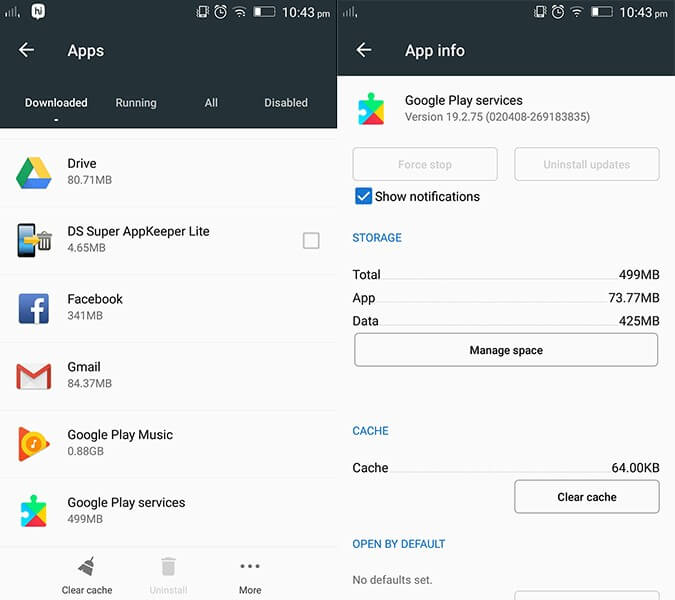
Note: To verify the Play Services version, launch “Settings” followed by selecting “Apps/Applications”. Scroll down to “Google Play Services” and hit on it. You will then see the app version at the top of the screen.

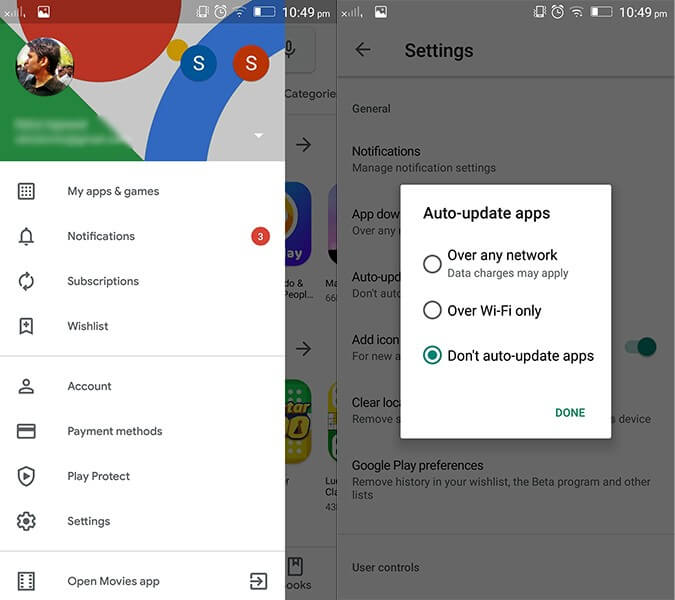
But if that’s not the case, you’re required to disable the Play Store’s auto-updates. For this, launch the Play Store and hit the “3 horizontal bars” at the top. Then, tap on “Settings” option from the appearing left panel followed by Auto-update apps available under “General” settings. Lastly, hit on the “Do not auto-update apps” option.
Next, get hold of Google Play Services (an older version) from the link here: https://www.apkmirror.com/apk/google-inc/google-play-services/google-play-services-12-6-85-release/
Note: Ensure to download the Google Play Services apk file that is closest to your Android version. But, remember not to install it now.
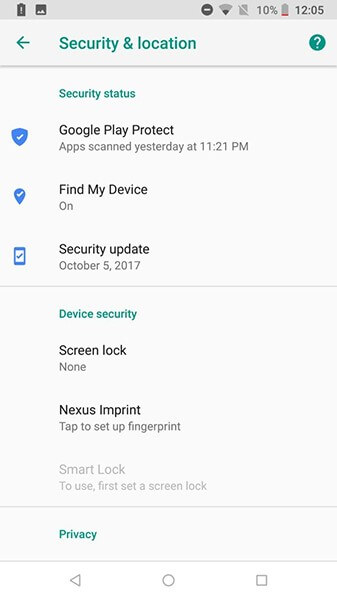
Once done, if “Find My Device” is enabled over your device, you need to get it disabled too. To do this, get into “Settings” followed by “Security & Location”. Now, hit on “Find my device” and toggle it off.
Likewise, disable “Google Play” and uninstall all its updates as well. To remove updates, get into “Settings” followed by “Apps/Applications”. Scroll down to “Google Play Services” and hit on “Uninstall updates”.
Note: If you’re unable to get this done, then you may need to disable the Android device manager in the first place. For this, get to “Settings” > “Security” > “Device Administrators” > disable “Android Device Manager first”.
Now is the time when you should install the Google Play Services apk (downloaded in step 3 above). Reboot your device afterwards.
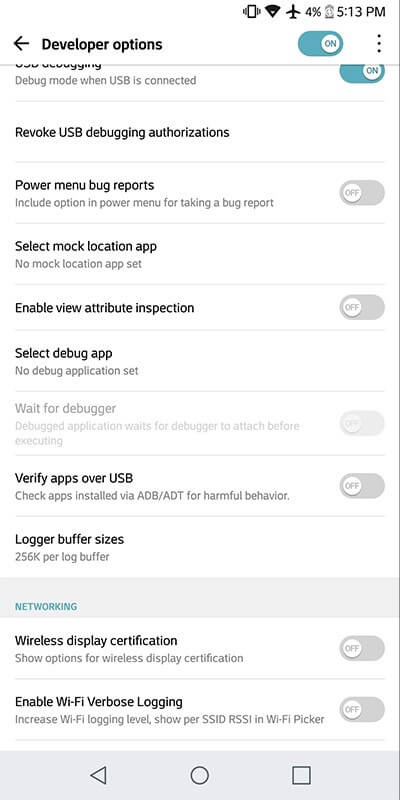
Subsequently, you need to again get into the “Settings” and then opt for “Developer Options”. Now, hit on “Select mock location app” and opt for “GPS JoyStick” here.
Lastly, launch the “GPS JoyStick app” and navigate to “Settings” followed by toggling on the “Enable Suspended Mocking” switch.

2.2 For Android 6.0 and Above (Old Security Patch) - BEFORE March 5, 2017
That was a detailed tutorial about the Android security patch level released “AFTER March 5, 2017”. But if your Android security patch level is before March 5, 2017, what would you have to do? Well, worry not, here is exactly what steps you need to follow to make use of the GPS joystick app to fake GPS location.
First, you need to navigate to the “Settings”. Then, opt for “Developer Options” and hit on “Select mock location app” followed by selecting the “GPS JoyStick” app here.

Lastly, launch the “GPS JoyStick app” to fake GPS location and navigate to “Settings”. Thereafter, toggle on the “Indirect Mocking” switch, and you’re done.

2.3 For Android 4 or 5
For the users of Android OS version 4 or Android OS version 5, there’s not much you need to do. Here is the exact method that you need to get through.
Get the “GPS JoyStick apk” installed over your device and then proceed to “Developer Options” available under the “Settings” menu. Then, hit on the “Select mock location app”.

Now, “GPS JoyStick app” to fake GPS location and get started with the FGL pro joystick control.
You will then have the FGL pro joystick control is visible on your Android screen. Thereafter, head back to the “Developer Options” and get the “Mock Locations” disabled.
Lastly, launch the “Pokemon GO” and you’re all set to fake GPS go with a joystick.
Part 3: How to bypass the blacklist of games like Pokemon GO
There are chances when you get caught by Pokemon Go for spoofing GPS location and get blocked/blacklisted for making use of fake GPS location apk. Here’s a workaround for bypassing the blacklist of games like Pokemon Go.
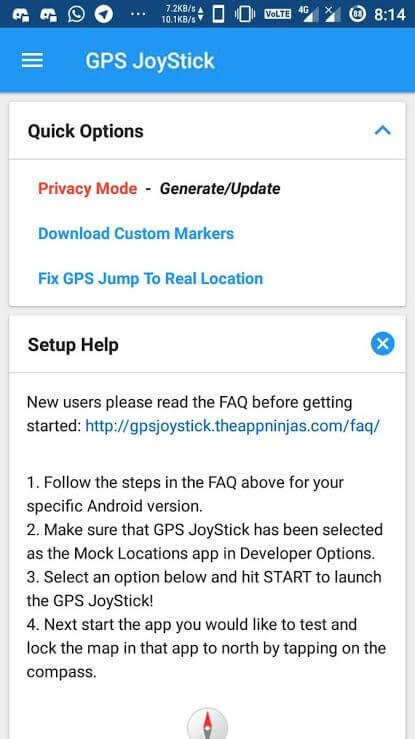
Download and then install the most recent version of GPS JoyStick apk. Now, launch it, and then hit on the “Privacy Mode” link available under the “Quick Options” section on the home screen. This will generate a unique copy of the app specifically for you.
Next, you need the generated app installed and get through with the setup process with the streak of steps listed below.
Now, you need to uninstall the original fake GPS joystick for Pokemon Go. Also, ensure that to uninstall every other spoofing/fake GPS apps that can potentially be on the Pokemon GO blacklist.
Thereafter, make use of the specifically generated GPS joystick on Pokemon Go to bypass the blacklist warning!
Lastly, utilize the “Update” button after hitting on the “Privacy Mode” link under the “Quick Options”. Then, navigate to the previously generated app from the appearing pop up. This will generate the update for it, and you’re all done.

Part 4: How to Use GPS Joystick to Fake Location on iPhone
When you fake GPS Joystick location, you can double the joy in playing location-based games like Pokemon go, Ingress, Zombies, Run, Geocaching, etc. All these games make use of the phone location, and it will be quite interesting if you move on with exciting places worldwide.
Do you want to fake GPS Joystick on iPhone?
Are you tired of searching for an effective GPS Joystick to fake location on the iPhone?
You would have ended up with a conclusion that there are no reliable and effective apps to fake location on the iPhone.
Dr. Fone’s specialist team presents Dr.Fone - Virtual Location for the gaming lovers to fake GPS Joystick on iPhone. You can now move the joystick to the desired location in no time using Dr.Fone.
Stepwise procedure to fake GPS with a joystick on iPhone
Step 1: Launch the app
After a successful download, install the app through the guiding wizard. Click the Dr.Fone app icon to explore its features. Using a USB cable, attach your iPhone with your PC.

Step 2: Set a virtual location
On the first screen of Dr.Fone app, choose the ‘Virtual Location’ option.

Step 3: Modify the location address
Tap ‘Get Started’ option then add a new address in the ‘Teleport’ mode. To choose ‘Teleport’ mode, you have to select the first icon at the top-right screen. Next, enter the address at the top left side of the window. You can enter any address around the globe to fake GPS joystick location.

Step 4: Changed Location in the app
Now the Dr.Fone app displays your desired address as your current location. You can verify it by spotting the location on the map view.

Step 5: Location on iPhone
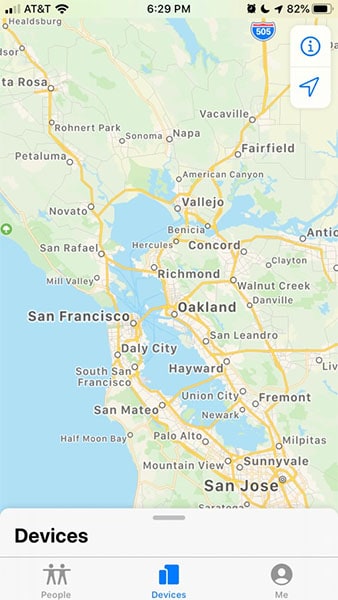
Next, you must check your default current location in map view on iPhone, and you will witness the modified location in pace with your desired address.

Step 6: Play Pokemon Go without moving
Now use the “one-stop route” or “multi-stop route” to simulate the real-world movement without moving. Just play Pokemon go to explore new Pokemons on different locations and gain more points through an effective fake GPS joystick location app Dr.Fone.
5 Hassle-Free Solutions to Fake Location on Find My Friends Of Motorola Moto E13
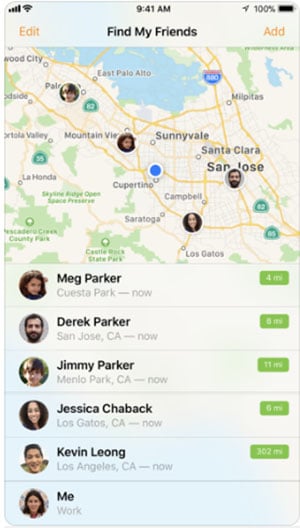
Find My Friends is an app developed for Android and iOS devices. You can say it as a location-sharing application. This app can be used to share the location of each other among the friends. When your contacts install the app on their device, the application makes everyone eligible to share their location with you and you can too share the location with your friends.
It is helpful if you are having a hang out plan with your friends. And if you friend is on the way, he or she can share their location. Or it is a great way to catch if someone is lying about their location.
Part 1: About Find My Friends app
When location sharing is enabled in the Motorola Moto E13 device, the map will show the current locations. The Find My Friends app also has an inbuilt chat option where you can contact your friend and interact about with them. It also automatically informs you when your friend reaches at the target location, leave a location etc. You can customize and configure the alerts as per your choice.
How it is different in iOS 13
You can find yourself confused if you are using iOS 13 and looking for Find My Friends app. You may not be able to find it on your device running on iOS 13. To your information, Apple has decided to combine the Find My iPhone and Find My Friends app into one. And they have named it as “Find My”. This new named app has everything what Find My Friends and Find My iPhone has. When you’ll open it, you will find the “People” tab on the bottom. Using this, you can get your friends as you used to get before.
Part 2: What Are the Against Voices of the Find My Friends App?
Look at some of the things we feel not beneficial about Find My Friends.
- No doubt you can have great advantage of an app that can tell you location of your friends, fiancée or spouse. However, the app is not free. You need to pay a small amount of 99 cents to use this.
- Another thing that might bother you is that there are a lot of people who will be knowing where you exactly are. And this could be a little annoying.
- Also, it is possible to get unnecessary requests from the unknown people. This can also be bothersome.
- Apart from this, the app if in wrong hands like an abuser can be used for wrong purposes and harmful for their partners.
- Not to forget, hackers are everywhere and the app is prone to get accessed by any of them.
In such cases, the need of hiding or faking Find My Friends location rises. This is because we are sharing some ways to fake location on Find My Friends on your iOS and Android.
Part 3: 4 Solutions to Fake Find My Friends Location on iOS
We know how important it is to trick your device deceiving with the location. You might be curious now to learn the methods that can meet the objective of yours. Let us begin with the section that introduces you four ways to fake Find My Friends location.
3.1 Use virtual location tool to fake Find My Friends location on iOS
One of the useful ways to learn faking location on Find My Friends is using a professional tool like dr.fone – Virtual Location (iOS) . This tool helps you to teleport your iOS device’s GPS anywhere. Also, with this, you can get your speed of movement customized easily. It is one of the trusted tools you can use. Here are the steps to be followed to fake location on Find My Friends.
Step 1: Follow the Installation Process
From the main page of dr.fone – Virtual Location (iOS), download it. After this, install the tool on your system and then launch it. Now, click on “Virtual Location” option.
Step 2: Set up Phone’s Connection
Now, take your iPhone and keep it connected with the system. After this is done, click on the “Get Started” button to move ahead.
Step 3: Look for Location
After following the second step, all you need is to look for your actual location. To make this happen, click on the “Center On” icon given at lower right of screen.

Step 4: Enable Teleport Mode
In this step, you should activate the teleport mode. This will be done by clicking the third icon in the upper right of the screen. You can now input the place you want to teleport.
Step 5: Fake Find My Friends Location
Now, the program will get your location and click on “Move Here” that comes in the next dialog box. The location will be changed now. You can see that in your iPhone and its location-based app.

3.2 Use a burner iPhone to fake location in Find My Friends
Using a burner can also be a good option to take help of when your goal is to fake GPS on Find My Friends. It is nothing but a secondary device where the Find My Friends app can be downloaded and used it to swindle the people you want. This will allow you to keep more privacy as no one will be able to peep into your matter or location.
- All you need is to log out of Find My Friends app on your main phone.
- Install the app on your burner phone and log in it with the same account as your iPhone.
- That is it! You can now plainly leave your burner phone on the location you want. In other words, you can create your own story. Simply put the Motorola Moto E13 device where you want the others to think about your visit.
In spite of the fact that this way is helpful, there could be some shortcomings associated with it. Firstly, your friend might try to connect with your through Find My Friends app’s chat feature. And since you have kept your burner device somewhere else and you don’t have it right now, you can miss the chat. This may make your friends a little doubtful.
Secondly, it could be perplexed and draining at the same time to keep checking that the entire settings are accurately set up.
3.3 Use FMFNotifier to help you on Find My Friends
If still you wonder how to fake your location on Find My Friends, FMFNotifier can help you. Before you use this, let us inform you that this application can run on a jailbroken iPhone. So, if you have a device that is old and you don’t mind jailbreaking it, you are good to go with this app to fake Find My Friends location. Moreover, you will need Cydia to get this app. Cydia can be said as the App Store alternative. It is a platform for installation of software or apps on jailbroken iOS devices. The apps that are not authorized by Apple can be found on Cydia’s package manager.
If you have done jailbreaking, you can have FMFNotifier. Jailbreaking will be worthy as FMFNotifier contains many great features.
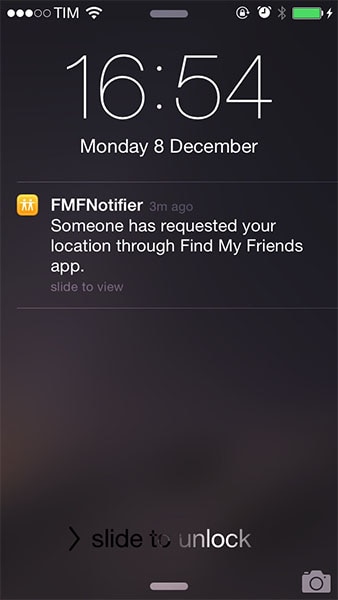
- One of the amazing things about this app to fake Find My Friends location is it sends you the notification each time when someone want to track your location. Whenever your friend attempts to ping your location, it will notify you as “Someone has requested your location through Find My Friends app”. And this is the moment where you can fake your location on Find My Friends. You can right away set a fake location when you know someone requires your location.
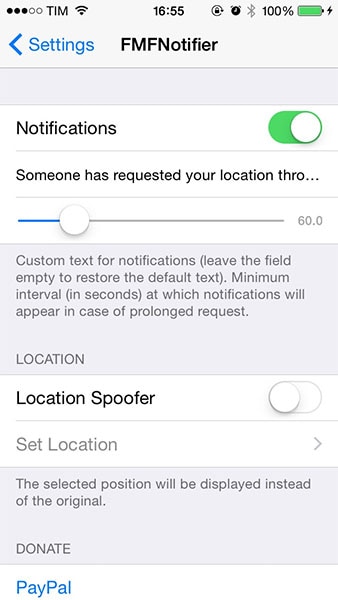
- Secondly, you can do configurations from the Settings app easily. Like, you can customize the text of the notification. Besides, the app allows you to set and save several false locations preset.
Guide on How to Use FMFNotifier
Step 1: Firstly, open Cydia and go to Sources.
Step 2: Look for FMFNotifier package which can be available on BigBoss repo.
Step 3: Lastly, install the package. Now, you can go to “Settings” on your device. Go to FMFNotifier and configure the settings as you want to fake location on Find My Friends.
3.4 Use AntiTracker to protect your location privacy
When privacy is everything for you, you cannot tolerate anyone peeping into your life, especially your location. Find My Friends lets people doing that. You can take help of AntiTracker which is another jailbreak tweak. With this, you will be helped by faking location on Find My Friends. Like the above app, this will also notify you when someone is going to know your location through Find My Friends.
You will get the notification no matter your screen is locked or not. A notification that is “You’re being tracked” along with the Find My Friends icon will appear when someone tries to track you.
![]()
Guide on How to Use AntiTracker
Step 1: It is available free on Cydia’s Bigboss repo to download. S, go to CYdia and look for AntiTracker.
Step 2: Download the package and the app icon will be added on your Home screen of iPhone. You can now configure the tweak from Settings. The settings allow you to:
- Turn on and off tweak whenever you want
- Hide the location
- Select the sound that will play when the notification comes
- Select the message to be appeared in notification
- Have a look on the location request logs i.e. each time when the location is pinged
![]()
Part 4: How to Fake Find My Friends location on Android
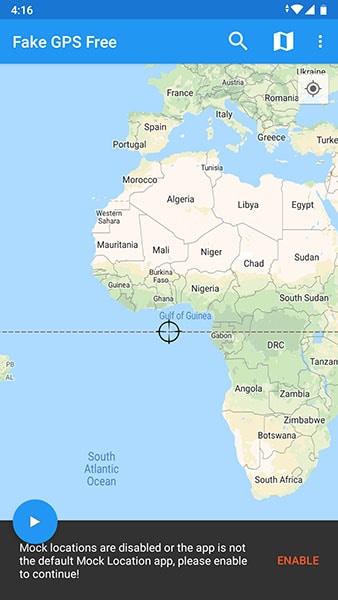
If you want to fake Find My Friends location on Android, you can easily configure Android devices to do it. For this, you can take help of an Android spoofer app. There are plenty of them available in Play Store. We will be using “Fake GPS GO Location Spoofer Free”. This is how to fake location on Find My Friends on Android.
Step 1: To use this, you don’t need to jailbreak or root your device until your Android is running on 6 and higher versions.
Step 2: Go to Play Store and search for the app. Install it after downloading.
When you install it rightly, this is how to do a little twisting to set it up with Find My Friends.
Step 1: To spoof people about the location, enable the developer settings in the first place. Simply head to “Settings” for this and go to “About Phone”.
Step 2: In the “Software Info”, you will see a build number. Tap on it nearly 6-7 times. The Developers options will be enabled now. This step is important because it will alter the security settings in your phone. As a result, tricking about the location will become easier.
Step 3: When developer options are enabled, launch the app. You will see an “ENABLE” option at the bottom. Tap on it to turn on mock locations feature.
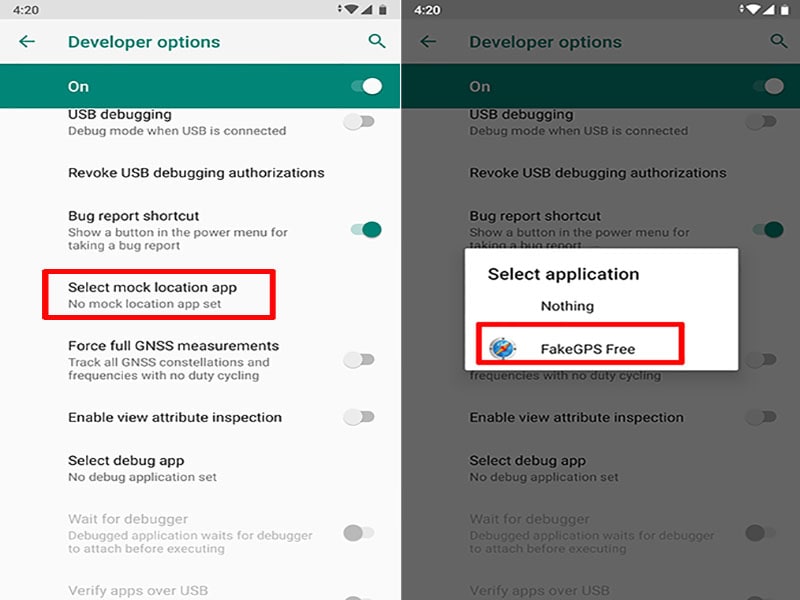
Step 4: Under the Developer options page, click on “Select mock location app”. Now, select “FakeGPS Free” from the list.
Step 5: Return to Fake GPS Free and long press the two spots on map to set the route. Take help of the play button given at the bottom. This will enable the location spoofing. You will see, “Fake location engaged…”. This will show your fake location on Find My Friends app.
How to Change Netflix Location to Get More Country Version On Motorola Moto E13
Many people nowadays idle away the hours watching films and TV shows on Netflix. Well, it’s not that hard to see why. First and foremost, Netflix is readily available and easily accessible in different parts of the world. All you have to do is set up an account and browse the selections afterward. Another thing is that Netflix offers a very large catalog of television programs to match your current mood. From romance and adventure to thrillers and documentaries, you will not run out of options. Netflix has got you covered.
At a glance, it looks like the entertainment materials that Netflix has to offer are boundless. Scrolling through its program categories feels like a never-ending loop. But in actuality, there is something important you need to know. Netflix actually provides a different set of movie selections for each region. That means there are certain TV shows and films that are not universally available worldwide. But don’t worry. There are lots of tutorials online on how to change your location on Netflix. Surely, one of them can help you gain access to geo-exclusive Netflix content that is currently unavailable in your country.
In this article, we will discuss the main reasons why some Netflix shows are not widely accessible. We will also provide some effective methods on how to change your Netflix location on mobile and other electronic devices. Continue reading below to learn more.
Part 1. Why Netflix Offers Different Shows in Every Country
Netflix is definitely one of the largest video streaming services of our time. It’s currently available in over 190 countries globally. The majority of its content is widely accessible regardless of location. You can binge-watch on them anytime and anywhere so long as their individual broadcast license remains active. But as mentioned earlier, there are some Netflix shows that are not available worldwide.
There are many potential reasons why Netflix shows vary from one region to another. One of them is cultural influence. Of course, Netflix prioritizes the screening of shows that are highly relatable for the target audience. Hence, the content available in certain locations is locally sourced or regionally concentrated. But that’s not all. There are other reasons why Netflix offers different shows in every country. Check out the list below to understand it better.
The theme of the Netflix show contradicts certain government rules or traditional beliefs

Netflix holds traditional beliefs in high regard and abides by government rules. If the show depicts sensitive topics that certain countries don’t openly discuss, its viewing is immediately restricted in the region. That’s probably the reason why a particular Netflix show is unavailable in your region. Is there a way to access it without traveling anywhere? Luckily, there is. Find a tutorial online on how to change your location on Netflix. Follow the steps accordingly until your Netflix location is modified. After that, the restricted show must be available now on your end.
There are some issues regarding copyright ownership

In simple terms, copyright ownership is enforced separately in each country. That means Netflix must secure individual licenses for every region. Sometimes, certain countries fail to acquire copyright ownership due to the cost and other factors. As a result, the content becomes unavailable in that particular location. We cannot do anything about it unless you’re willing to shell out money for the license. But if you’re really eager to get hold of the restricted Netflix show, try to modify your device’s primary location. Don’t worry. There are many tutorials online on how to change your Netflix location. Just choose one and follow the instructions indicated.
The Netflix show has varying release dates for each region

Maybe there is no complicated issue behind the geo-blocking of a particular Netflix show in your region. It’s possible that the release date is actually different in every country. If that’s the case, there is nothing to worry about. It’s just another marketing tactic to add an element of surprise for the fans. All you have to do now is sit back and wait as patiently as you can. If you’re too excited to be counting down the days, you may try to alter the location settings on your device. Find the most suitable guide on how to change your location on Netflix.
Part 2. How to Change Your Netflix Region?
If you wish to explore other Netflix collections, the best way you can try is to alter your Netflix region. Is it possible? Of course, it is. There are many tutorials that provide easy steps on how to change your Netflix region. If you successfully complete them, your Netflix location will be changed immediately as though you’ve traveled somewhere. Don’t worry. Most of them are not that complicated to implement. In actuality, it only takes a few minutes or even seconds to accomplish the entire instructions. Just make sure to choose the best guide that works perfectly with your situation. To help you out, below is the list of methods you can try.
Method 1: Activate VPN before streaming Netflix shows
Virtual Private Networks generally mask your IP address by directing your internet traffic to a server from a different location. Thus, your location settings show modified coordinates whenever you browse the internet with a VPN enabled. That also works with streaming Netflix shows that are currently restricted in your region. Do you want to try it? Here’s a short guide on how to change your location on Netflix using Virtual Private Networks.
- Step 1: First and foremost, check the current standing of your Netflix account and make sure it is active. Once confirmed, choose your preferred VPN.

- Step 2: Then, download and install your selected Virtual Private Network. Register an account afterward and subscribe to a paid plan if necessary.
- Step 3: Activate the VPN on your device. From there, choose a country where you wish to direct your internet traffic.

- Step 4: Once successfully activated, you can now access Netflix on your device and search for the restricted TV show you want to watch.
Method 2: Stream Netflix shows with a web proxy server
For the most part, a web proxy server basically works like a Virtual Private Network. It reroutes your internet traffic to a particular server from a different location. Through this tactic, Netflix fails to detect that you’re using its service from a restricted region. A web proxy server is often free of charge. Thus, it’s a great alternative to VPNs if you don’t want to spend money just to access unavailable content on your device. Do you want to try it now? Here’s how to change your Netflix location using a web proxy server.
- Step 1: Choose your preferred web proxy server and then visit its official website. Create an account if necessary.
- Step 2: After that, select a server from the available options. Make sure that the server you’re going to choose is not geologically blocklisted on Netflix.

- Step 3: Enter the official web address of Netflix into the URL bar and then proceed immediately.
- Step 4: Wait while the web proxy server is loading up your request. After a few minutes, the Netflix dashboard must be displayed on your computer screen. From there, you can now browse its catalog and binge-watch the content currently restricted in your region. That’s exactly how to change your location on Netflix with a web proxy server.

Method 3: Stream Netflix shows from the Tor browser
Tor browser is primarily used for ultra-private internet browsing. Your online activities on this platform are encrypted and directed to about three various servers located worldwide. Although you cannot actually change your location settings, your actual IP address will be masked and routed somewhere else. This way, you get a higher chance of accessing restricted Netflix shows from the comfort of your own home. Do you want to try it now? Here’s the guide on how to change your Netflix region using the Tor browser.
- Step 1: Download Tor browser from its official website. After that, install it on your computer.
- Step 2: Launch the Tor browser on your desktop and hit Connect. Make sure that Tor has been successfully configured on your device. Once confirmed, visit the official website of Netflix.

- Step 3: Browse through the wide content selections on Netflix dashboard and find the restricted content you want to watch.
Part 3. Things to Remember When Modifying Location Settings For Netflix Streaming
The tutorials above on how to change your location on Netflix are undeniably helpful for many people. The three of them are effective in this regard, depending on your situation. However, don’t forget that engaging in this kind of modification entails some risk. That’s why you should be careful and vigilant when you decide to implement the methods above. To understand it better, check out the list below.

- Avoid using VPNs or web proxy servers with unverified origin. You never know. Instead of providing solutions, these illegitimate tools might cause serious problems on your end. It’s better to pay for a subscription if it’s going to help you secure your usage.
- According to some users, Tor browsers run too slow. If you’re not patient enough, you might struggle to stream Netflix shows on this platform. That’s why you only resort to this option if all available alternatives have been exhausted.
- Take note that Virtual Private Networks sometimes downgrade the network bandwidth. As a result, internet speed gets affected, and data transmission slacks off than usual. If you cannot stand this kind of scenario, it’s best to tick off the use of VPN from your list of options.
- It rarely happens, but there is a possibility that data breaches might occur. That’s why you should first check the security protocols that VPNs and web proxy servers implement. Make sure that their data protection is powerful enough to keep your personal information safe and private.
Part 4. How to Change Your Netflix Location on Mobile Devices
The first three tutorials above on how to change your location on Netflix work pretty well on personal computers. Do they work too on mobile devices? Well, you can try and see what’s going to happen. However, a positive result is not a hundred percent guaranteed. Is there any other way? Fortunately, there is. Wondershare Dr.Fone can absolutely help you with that. It offers a potent Virtual Location feature capable of simulating GPS movements and modifying your location settings in a snap/ Don’t sweat it. It’s very easy to get started. Check out the tutorial below on how to change your location on Netflix using Wondershare Dr.Fone.
- Step 1: Download Wondershare Dr.Fone for free from its official website. Right after, install it on your computer.
- Step 2: Launch the newly installed software on your desktop. Once it fully loads up, connect your smartphone using a data cable. Follow the on-screen instructions carefully and execute each step properly to ensure the connection between the two devices is stable enough to handle the succeeding procedures.
- Step 3: Access the left-side panel afterward and then click Toolbox. On the main dashboard, click Virtual Location. Is it your first time using this feature? If so, let Wondershare Dr.Fone download additional resources. Don’t worry. It will only take a few minutes to complete.
- Step 4: Once the downloading process has concluded, Wondershare Dr.Fone - Virtual Location will immediately open on a separate window. From there, hover over to the top-right menu bar and then click Teleport Mode. It is the first icon in the row.
- Step 5: After that, find the search at the top-left corner of your screen and type in your desired location. Choose one from the suggested results. Then, click the Enter icon to proceed.
- Step 6: The essential details referring to your chosen location will be displayed on your computer screen, along with a map marker. Read the information very well and make sure that it is exactly the place you’re looking for. Once confirmed, click Move Here.
- Step 7: The location settings on your mobile devices will be immediately changed to your chosen coordinates. Verify that the changes have already been applied by simply checking out your Maps mobile app. It must not show your real current location.
- Step 8: Open the Netflix application on your smartphone and then browse through its catalog. Find the restricted content you want to watch and try to stream it on your device. To restore your original location settings, simply close the Wondershare Dr.Fone on your computer and then restart your device.
Conclusion
Netflix is definitely at the forefront of modern entertainment. It is the go-to app of many people whenever they are bored and want to binge-watch TV shows. However, it is sometimes infuriating if the movie you want to stream is restricted in your location. If you’re experiencing anything similar, you can refer to the discussions above. The provided tutorials on how to change your location on Netflix can surely help you in this regard. For mobile devices, follow the guide on how to change your Netflix location using Wondershare Dr.Fone. It has a powerful Virtual Location feature capable of modifying your whereabouts and simulating GPS movements.
Also read:
- [New] 2024 Approved Elite Streamer’s Guide for Secure Viewing
- [New] In 2024, HDR Techniques for Photoshop Pros A Step-by-Step Guide
- [Updated] 2024 Approved The Ultimate Guide to FCP Freebies
- [Updated] Boosting Visual Impact Incorporate Apple Music
- [Updated] Puzzle Prints Crafting Hilarity in Minutes
- 2024 Approved Unlocking the Potential of Mobile Platforms for Personal/Business YT
- Access the Latest Free M-Audio Fast Track Ultra Drivers Here!
- Best 10 Mock Location Apps Worth Trying On Vivo S17e | Dr.fone
- Fake the Location to Get Around the MLB Blackouts on Oppo A79 5G | Dr.fone
- How To Fake GPS On Samsung Galaxy XCover 7 For Mobile Legends? | Dr.fone
- How to Fix My Honor X8b Location Is Wrong | Dr.fone
- Looking For A Location Changer On Vivo X100? Look No Further | Dr.fone
- Prevent Cross-Site Tracking on Lenovo ThinkPhone and Browser | Dr.fone
- Snippet Screenplay Guide
- Will iSpoofer update On Oppo Find X6 Pro | Dr.fone
- Will the iPogo Get You Banned and How to Solve It On Motorola Moto G84 5G | Dr.fone
- YL Software's Ultimate Strategies for Protecting Your Bitcoin and Alt-Coins Wallet
- Title: Complete Tutorial to Use GPS Joystick to Fake GPS Location On Motorola Moto E13 | Dr.fone
- Author: Ava
- Created at : 2025-01-03 02:00:23
- Updated at : 2025-01-08 07:54:16
- Link: https://fake-location.techidaily.com/complete-tutorial-to-use-gps-joystick-to-fake-gps-location-on-motorola-moto-e13-drfone-by-drfone-virtual-android/
- License: This work is licensed under CC BY-NC-SA 4.0.