
Complete Tutorial to Use GPS Joystick to Fake GPS Location On Nokia XR21 | Dr.fone
Complete Tutorial to Use GPS Joystick to Fake GPS Location On Nokia XR21
The web world offers many apps, including Google, Facebook, Uber, etc. that provide location-based services. This means such apps will need your location to work. However, there are some rare occasions when users don’t find this service welcoming and thus, they wish to fake GPS location.
One of the instances comprises a well-known location-based game – Pokemon Go, where users might want to mislead the app and make the phone not understand where they exactly are. There might be other cases as well. No matter what reason you want this to be done, we are here to introduce you GPS joystick app that helps you for the same. Here we go!
Part 1: Fake GPS Location - GPS JoyStick the App
GPS joystick is an app that helps the users to fake GPS with the help of an overlay joystick control. It is easy to use and works instantly when you wish to modify the GPS location. Providing a unique “Joystick” option, this app can be considered a useful fake GPS joystick apk. On a plus, the app has the best algorithm so that it can offer realistic GPS values.
Features:
- Able to make modifications in the location wherever you point the joystick.
- You can choose the current location with the help of a map or joystick.
- You can also get the GPX files imported and exported to favorites, routes, or custom markers.
- It offers a good amount of setting options to provide complete user customization.
- You can manage the settings regarding size, type, and opacity for the joystick.
- With the help of this fake GPS joystick apk, you can get an opportunity to show the distance and cool-down time information.
- There is also a hide option available to help you decide whether you want to hide or show the joystick on your screen.
- Moreover, you get 3 customizable speeds for the joystick.
Disadvantages:
- It requires a hell lot of steps that are confusing and tough to perform.
- Users have reported that the app only works for a few minutes after the first time of installation. Afterward, the app function to fake GPS location dies and is then good for nothing.
- You need to be tech-savvy to fake GPS location with a GPS joystick.
- Fake GPS joystick for Pokemon Go cannot perform well for it as reported by the users. Also, it drives the same result for other popular location-based apps or games.
Part 2: How to set up GPS JoyStick
Though, it is quite difficult to get through the process of setting up the GPS joystick apk to a fake GPS location. Remember, we’ve always got your back. Therefore, we would like to bring you up with a detailed streak of steps (if followed properly) to install and set up the fake GPS joystick apk easily.
Basically, the tutorial is categorized into 3 different streaks depending upon the different Android OS security patches and OS version. Therefore, before we begin with steps, let’s understand what you need to do to find your Android OS version or the Security Patch. Depending on the Security Patches or Android OS version, follow the tutorials mentioned below with falls compatible for your device.
- Take your Nokia XR21 handy and launch the “Settings”.
- Now, scroll down to the “About phone” option at the bottom and then hit on it.
- Lastly, look for the “Android version” entry and “Android security patch level” entry from the information displayed over your screen.
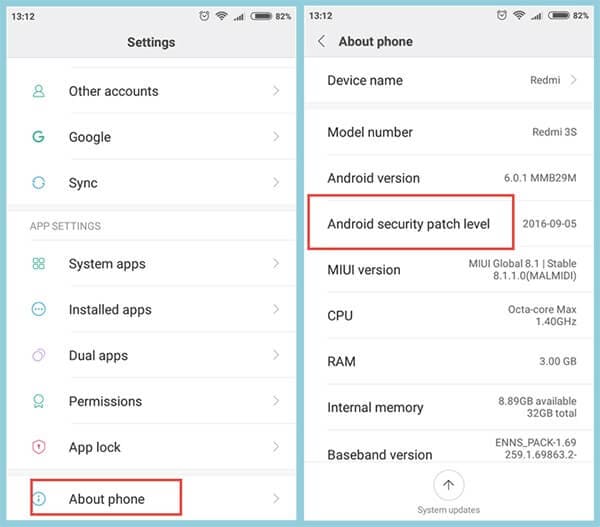
Note: Remember the date mentioned besides the “Android security patch level” is when it was first released. Please do not take it otherwise, that it is the date when you might have installed Google’s security patch.
2.1 For Android 6.0 and Above (New Security Patch) - AFTER March 5, 2017
If you own an Android device that runs on the Android OS version 6.0 or higher updated to “New Security Patch” released “AFTER March 5, 2017”. You need to follow the steps mentioned below.
First, you need to make sure that the Google Play Services app installed over your Nokia XR21 is running on version 12.6.85 or lower. If that’s the case, you no longer require performing the lengthy steps below. Instead, directly skip stepping number 7 below.
Note: To verify the Play Services version, launch “Settings” followed by selecting “Apps/Applications”. Scroll down to “Google Play Services” and hit on it. You will then see the app version at the top of the screen.

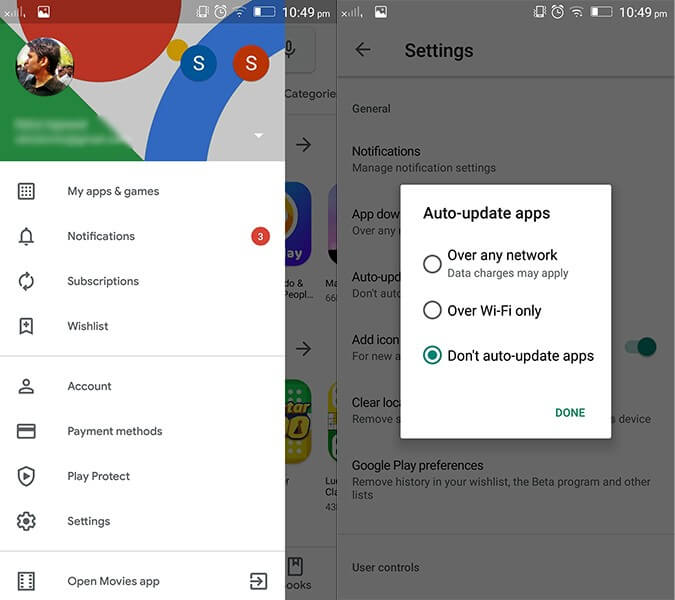
But if that’s not the case, you’re required to disable the Play Store’s auto-updates. For this, launch the Play Store and hit the “3 horizontal bars” at the top. Then, tap on “Settings” option from the appearing left panel followed by Auto-update apps available under “General” settings. Lastly, hit on the “Do not auto-update apps” option.
Next, get hold of Google Play Services (an older version) from the link here: https://www.apkmirror.com/apk/google-inc/google-play-services/google-play-services-12-6-85-release/
Note: Ensure to download the Google Play Services apk file that is closest to your Android version. But, remember not to install it now.
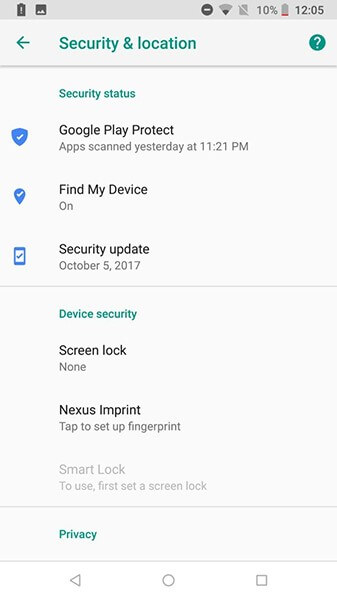
Once done, if “Find My Device” is enabled over your device, you need to get it disabled too. To do this, get into “Settings” followed by “Security & Location”. Now, hit on “Find my device” and toggle it off.
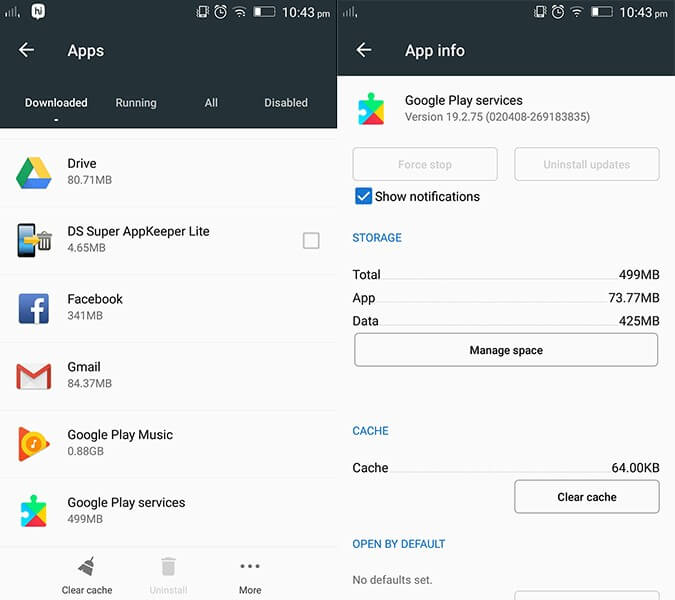
Likewise, disable “Google Play” and uninstall all its updates as well. To remove updates, get into “Settings” followed by “Apps/Applications”. Scroll down to “Google Play Services” and hit on “Uninstall updates”.
Note: If you’re unable to get this done, then you may need to disable the Android device manager in the first place. For this, get to “Settings” > “Security” > “Device Administrators” > disable “Android Device Manager first”.
Now is the time when you should install the Google Play Services apk (downloaded in step 3 above). Reboot your device afterwards.
Subsequently, you need to again get into the “Settings” and then opt for “Developer Options”. Now, hit on “Select mock location app” and opt for “GPS JoyStick” here.
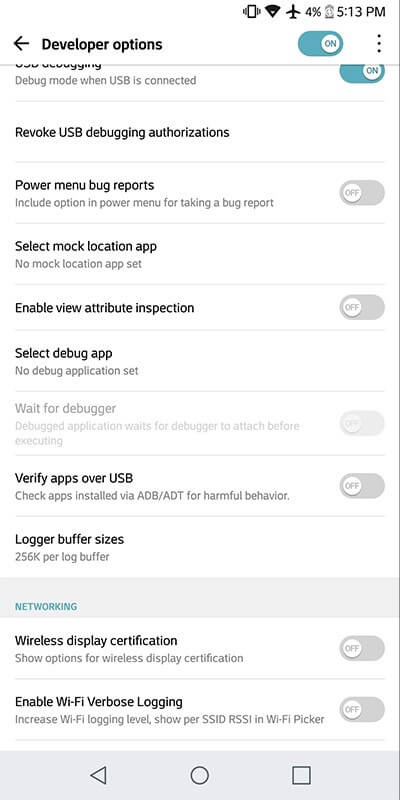
Lastly, launch the “GPS JoyStick app” and navigate to “Settings” followed by toggling on the “Enable Suspended Mocking” switch.

2.2 For Android 6.0 and Above (Old Security Patch) - BEFORE March 5, 2017
That was a detailed tutorial about the Android security patch level released “AFTER March 5, 2017”. But if your Android security patch level is before March 5, 2017, what would you have to do? Well, worry not, here is exactly what steps you need to follow to make use of the GPS joystick app to fake GPS location.
First, you need to navigate to the “Settings”. Then, opt for “Developer Options” and hit on “Select mock location app” followed by selecting the “GPS JoyStick” app here.

Lastly, launch the “GPS JoyStick app” to fake GPS location and navigate to “Settings”. Thereafter, toggle on the “Indirect Mocking” switch, and you’re done.

2.3 For Android 4 or 5
For the users of Android OS version 4 or Android OS version 5, there’s not much you need to do. Here is the exact method that you need to get through.
Get the “GPS JoyStick apk” installed over your device and then proceed to “Developer Options” available under the “Settings” menu. Then, hit on the “Select mock location app”.

Now, “GPS JoyStick app” to fake GPS location and get started with the FGL pro joystick control.
You will then have the FGL pro joystick control is visible on your Android screen. Thereafter, head back to the “Developer Options” and get the “Mock Locations” disabled.
Lastly, launch the “Pokemon GO” and you’re all set to fake GPS go with a joystick.
Part 3: How to bypass the blacklist of games like Pokemon GO
There are chances when you get caught by Pokemon Go for spoofing GPS location and get blocked/blacklisted for making use of fake GPS location apk. Here’s a workaround for bypassing the blacklist of games like Pokemon Go.
Download and then install the most recent version of GPS JoyStick apk. Now, launch it, and then hit on the “Privacy Mode” link available under the “Quick Options” section on the home screen. This will generate a unique copy of the app specifically for you.
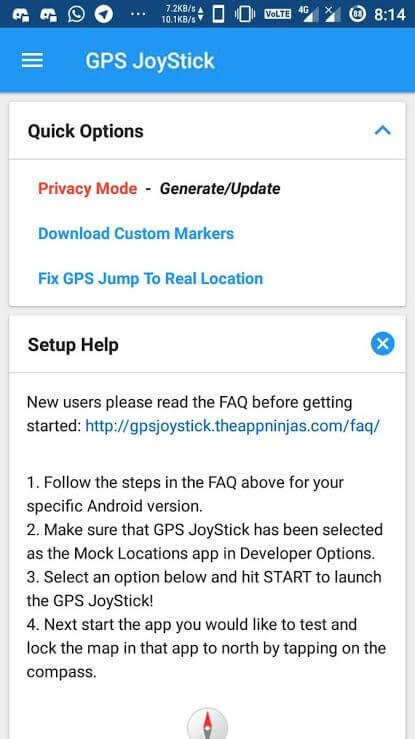
Next, you need the generated app installed and get through with the setup process with the streak of steps listed below.
Now, you need to uninstall the original fake GPS joystick for Pokemon Go. Also, ensure that to uninstall every other spoofing/fake GPS apps that can potentially be on the Pokemon GO blacklist.
Thereafter, make use of the specifically generated GPS joystick on Pokemon Go to bypass the blacklist warning!
Lastly, utilize the “Update” button after hitting on the “Privacy Mode” link under the “Quick Options”. Then, navigate to the previously generated app from the appearing pop up. This will generate the update for it, and you’re all done.

Part 4: How to Use GPS Joystick to Fake Location on iPhone
When you fake GPS Joystick location, you can double the joy in playing location-based games like Pokemon go, Ingress, Zombies, Run, Geocaching, etc. All these games make use of the phone location, and it will be quite interesting if you move on with exciting places worldwide.
Do you want to fake GPS Joystick on iPhone?
Are you tired of searching for an effective GPS Joystick to fake location on the iPhone?
You would have ended up with a conclusion that there are no reliable and effective apps to fake location on the iPhone.
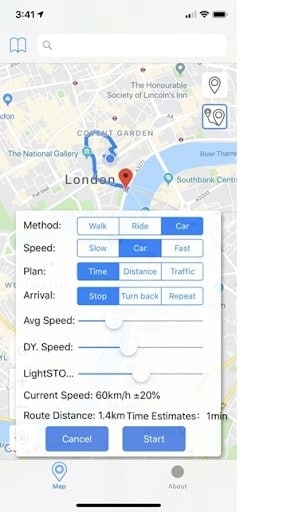
Dr. Fone’s specialist team presents Dr.Fone - Virtual Location for the gaming lovers to fake GPS Joystick on iPhone. You can now move the joystick to the desired location in no time using Dr.Fone.
Stepwise procedure to fake GPS with a joystick on iPhone
Step 1: Launch the app
After a successful download, install the app through the guiding wizard. Click the Dr.Fone app icon to explore its features. Using a USB cable, attach your iPhone with your PC.

Step 2: Set a virtual location
On the first screen of Dr.Fone app, choose the ‘Virtual Location’ option.

Step 3: Modify the location address
Tap ‘Get Started’ option then add a new address in the ‘Teleport’ mode. To choose ‘Teleport’ mode, you have to select the first icon at the top-right screen. Next, enter the address at the top left side of the window. You can enter any address around the globe to fake GPS joystick location.

Step 4: Changed Location in the app
Now the Dr.Fone app displays your desired address as your current location. You can verify it by spotting the location on the map view.

Step 5: Location on iPhone
Next, you must check your default current location in map view on iPhone, and you will witness the modified location in pace with your desired address.

Step 6: Play Pokemon Go without moving
Now use the “one-stop route” or “multi-stop route” to simulate the real-world movement without moving. Just play Pokemon go to explore new Pokemons on different locations and gain more points through an effective fake GPS joystick location app Dr.Fone.
Methods to Change GPS Location On Nokia XR21

The Internet is a vast space and you have a plethora of content on different websites and platforms. You can call it a two-way - give and take relationship when it comes to the dynamics of data exchange between the world wide web and the users.
When you visit websites, they use cookies to track your activities. When you visit a restaurant, the phone detects and saves the GPS in the memory. You click a picture in the Maldives, your phone seeks out geographic points to prepare the right time and date stamps.
You need your GPS to download and use certain apps. Similarly, your GPS might be the reason you are unable to play some games or use some applications. Change GPS Location Nokia XR21 and this won’t be a problem for you.
But if you are wondering how can I change my location on my iPhone? These 5 methods will help you get fruitful results.
Part 1: Change GPS Location on Nokia XR21 using a Professional PC Program
The PC Programs are entirely Software based and do a tremendous job to spoof Nokia XR21 iOS 16 Location . You don’t have to buy any new equipment and you will be operating using your computer.
You can get this done within minutes if you have the right program with you. One of the best options in the market is Wondershare’s Dr.Fone. This is how you use Dr. Fone Virtual Location spoofer for GPS Spoofing iPhone.
Dr.Fone - Virtual Location
1-Click Location Changer for both iOS and Android
- Teleport from one location to another across the world from the comfort of your home.
- With just a few selections on your computer, you can make members of your circle believe you’re anywhere you want.
- Stimulate and imitate movement and set the speed and stops you take along the way.
- Compatible with both iOS and Android systems.
- Work with location-based apps, like Pokemon Go , Snapchat , Instagram , Facebook , etc.
3981454 people have downloaded it
Step 1: Go to the official website of Dr.Fone - Virtual Location (iOS) . This is easily available when you google it or you can also follow this link here. Then you can download the executive file, install and then launch the application. Once the home page opens, you will find several options - Opt for ‘Virtual Location’. It is usually at the bottom of the page.
Step 2: Now take your Nokia XR21 device and connect it to the computer that has Dr. Fone. Then click on ‘Get Started’.
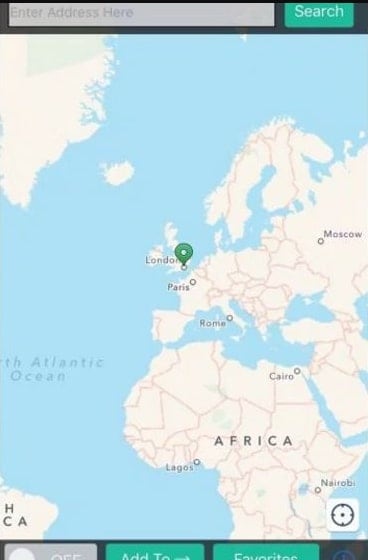
Step 3: Now, the world map will display on the screen and you can clearly see the coordinates and directions as well. On the top right corner, the third icon is called the ‘Teleport Mode’. Click on that and enter the name of the place in the search box. You can even pinpoint it, if you are sure about the place.
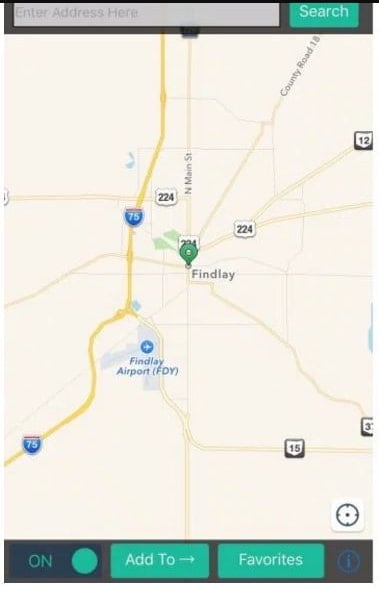
Step 4: If you are completely sure that you got the address right, click on the ‘Move Here’ option. It moves your Pin from your present location to your new virtual location.
If you are looking for a way to change Nokia XR21 Location without Jailbreak, then this is one of the safest options for you. Also, you have other additional features like Phone Transfer, and Whatsapp Transfer along with Location spoofing. The application will never go to waste, won’t occupy much of your computer/PC/Laptop’s space and you can get the fake location iOS within minutes.
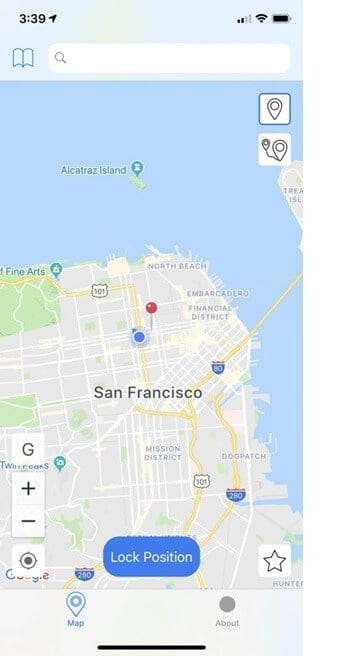
Part 2: Change GPS Location on Nokia XR21 using External Device
You can achieve the iOS Spoof Location using External devices as well. These devices do not cause any inconvenience to you. They are meant to be small, fit into the lightning port of your iPhone, and act as an external source that will spoof the Nokia XR21 location and the same will reflect in every app that uses or detects your iPhone’s geographic location.
The best external device to change phone location Nokia XR21 is Double Location Dongle. This simple device can be utilized by following the steps below -
Step 1: The Double Location Dongle is a very small, white rectangle that connects to your iPhone’s port. But along with it, you also have to install the Companion app for location spoofing. Once you have both of them ready, connect the Nokia XR21 device to your iPhone.
Note: The Companion App is not available on the App store. You have to download it from Double Location’s official website.
Step 2: The next step is to open the Double Location iOS companion app and then settle on the Map Tab.
Step 3: Unlike what we had seen in the Dr. Fone step, we cannot enter the location into any search box. You should move the pin to the location that you want to virtually shift to. Double Location provides some very good options that will help you during gaming. You can change all the appropriate settings and proceed.
Step 4: On the bottom of the screen, Go for the lock position option. Once you do that, there will be a virtual shift in your geographic position and all your apps will register your new coordinates.
Part 3: Change GPS Location on Nokia XR21 using XCode
You can change the geolocation Nokia XR21 by using your coding expertise as well. That is why XCode exists. This Computer Program lets you change your Location in Nokia XR21 by giving some GIT Commands to the PC while your Nokia XR21 stays connected to it. By following these steps, you can understand how to do it. But if you’ve never had a liking for programming and coding languages, then you should probably skip this -
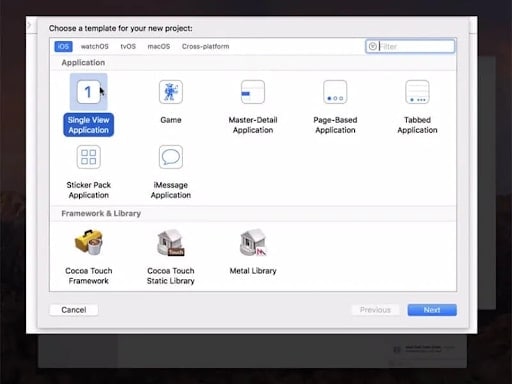
Step 1: Download and install XCode from the AppStore, directly to your Mac device. Launch the application.

Step 2: Once you see the XCode window open, Go for the ‘Single View Application’ to start a new Project and go on by clicking on ‘Next’. You can set up a name and details for this particular project.
Step 3: A screen display will appear asking you about your identity. This is where the minimal coding part starts. You need to enter some GIT Commands to continue with the project.
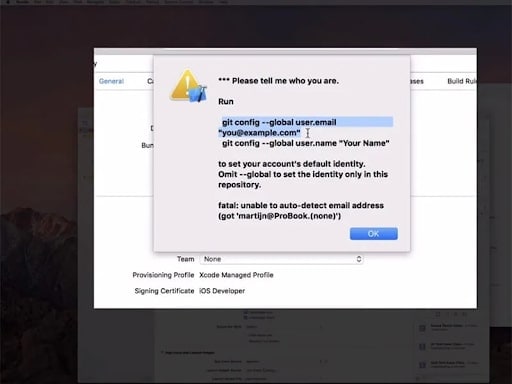
Step 4: Launch and run the terminal on your Mac device and enter these commands - git config –global user.email “[email protected]“ and git config –global user. name “your name”.You need to add your own details in the quoted space and continue to verify your identity.
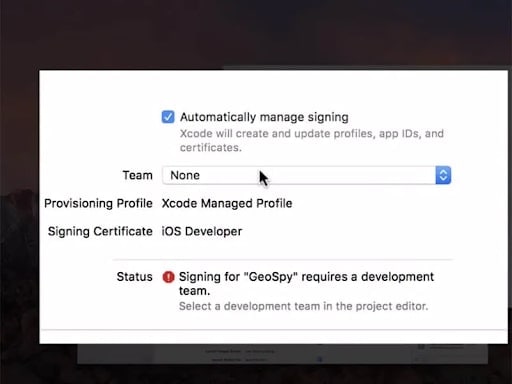
Step 5: Once you enter the commands, go to the next step and establish the Development Team. Then you can proceed to connect your Nokia XR21 device to your Mac device. Use the normal cable to do that.
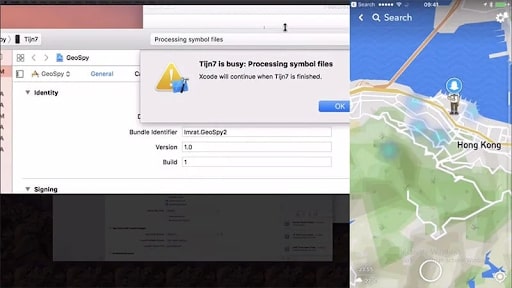
Step 6: To allow the program to process the Symbol Files, you will have to choose the model of your device. Go to the ‘Build Device’ option and continue as per the prompts. However, make sure that you keep your Nokia XR21 unlocked for quick detection by the computer software.
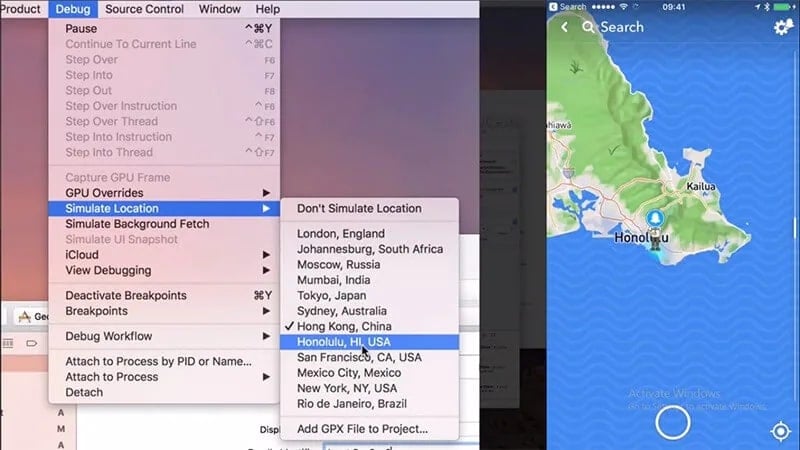
Step 7: Once that is done, you can come back to the actual location spoofing part. Go to the debug Menu > Simulation Location and specify the exact location that you want to virtually shift to. Once you are okay with it, the same will reflect on your Nokia XR21 as well.
Part 4: Change GPS location on Nokia XR21 using Cydia Location Faker App
Cydia is also based on software applications and changes location in seconds, However, you need to note that you have to jailbreak your phone. If you don’t know how to do it or do not want to take the risk, Cydia’s LocationFaker app may not be the right fit for you. But if you are a jailbreak expert, this is a very comfortable GPS Changer for iPhone.
Step 1: Download the Cyndia LocationFaker app from the official website. LocationFaker8 is available for the iOS 8.0 model.
Step 2: After launching the app, enter the virtual location into the search box.
Step 3: If you are done with choosing the new location, shift the toggle from ‘OFF’ to ‘ON’ at the bottom of the page.
Step 4: Now we can decide which apps can access our new virtual location. At the bottom of the page, you will find an ‘i’ icon. Go click on it and choose the ‘White List’ option. This one will then take you to the app list and you can decide which of them will have access to the phone’s location.
Part 5: Change GPS Location on Nokia XR21 using Location Handle
Location Handle is another useful application that you can use to change your location by a few meters or simply go with an automated movement system that changes your location gradually as if you are moving from one place to another. This is how you use it -
Step 1: Download the Location Handle app from the website or App store
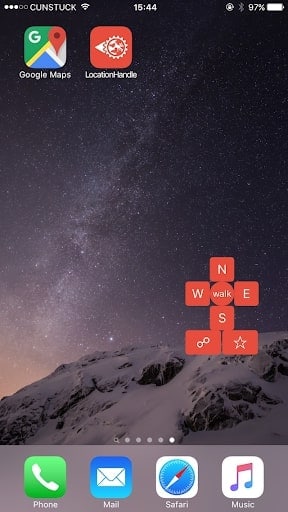
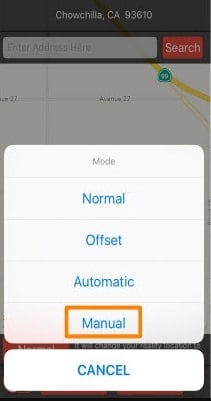
Step 2: There are four different types - Normal Mode - teleport to a new location; Offset Mode - Move a few feet away from the present location ; Automatic Mode - Slowly change your location from one point to another, as if walking ; Manual Mode - Change your location using a joystick.
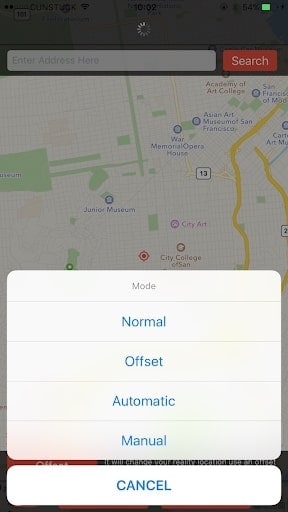
Step 3: Consider the Manual mode, because we want to change location to a far-off place and not necessarily for gaming.
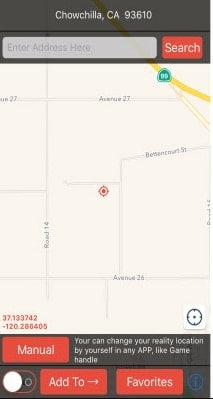
Step 4: Once the Manual mode is activated, the map will be displayed and you can change the pin location. You can enter the location name in the search box.
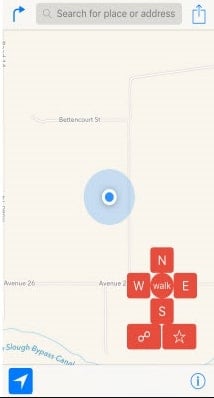
Step 5: The Joystick will appear on the page and you can use it to shift your location to wherever you want. Once you fix on the location, proceed and the new location will be updated.
Conclusion
We hope you are no longer wondering How to change Location services on Nokia XR21. These 6 methods are very effective and you can always opt for the one that is most comfortable for you. If you want a hassle-free PC program, we have that narrowed down for you. If you are a coding enthusiast, then we’ve listed a method that best fits you. Whatever the reason, with an iOS Fake GPS, life becomes much easier and sometimes even safe on the internet. You can explore beyond the boundaries without moving from your couch!
5 Hassle-Free Solutions to Fake Location on Find My Friends Of Nokia XR21
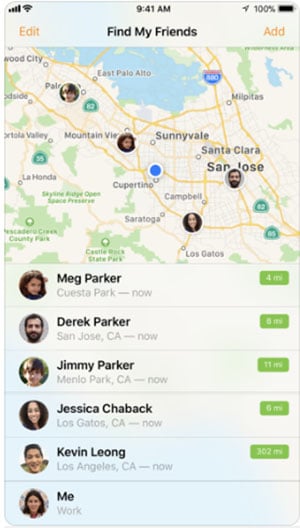
Find My Friends is an app developed for Android and iOS devices. You can say it as a location-sharing application. This app can be used to share the location of each other among the friends. When your contacts install the app on their device, the application makes everyone eligible to share their location with you and you can too share the location with your friends.
It is helpful if you are having a hang out plan with your friends. And if you friend is on the way, he or she can share their location. Or it is a great way to catch if someone is lying about their location.
Part 1: About Find My Friends app
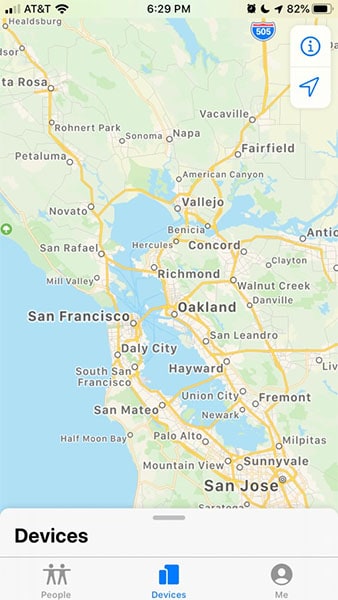
When location sharing is enabled in the Nokia XR21 device, the map will show the current locations. The Find My Friends app also has an inbuilt chat option where you can contact your friend and interact about with them. It also automatically informs you when your friend reaches at the target location, leave a location etc. You can customize and configure the alerts as per your choice.
How it is different in iOS 13
You can find yourself confused if you are using iOS 13 and looking for Find My Friends app. You may not be able to find it on your device running on iOS 13. To your information, Apple has decided to combine the Find My iPhone and Find My Friends app into one. And they have named it as “Find My”. This new named app has everything what Find My Friends and Find My iPhone has. When you’ll open it, you will find the “People” tab on the bottom. Using this, you can get your friends as you used to get before.
Part 2: What Are the Against Voices of the Find My Friends App?
Look at some of the things we feel not beneficial about Find My Friends.
- No doubt you can have great advantage of an app that can tell you location of your friends, fiancée or spouse. However, the app is not free. You need to pay a small amount of 99 cents to use this.
- Another thing that might bother you is that there are a lot of people who will be knowing where you exactly are. And this could be a little annoying.
- Also, it is possible to get unnecessary requests from the unknown people. This can also be bothersome.
- Apart from this, the app if in wrong hands like an abuser can be used for wrong purposes and harmful for their partners.
- Not to forget, hackers are everywhere and the app is prone to get accessed by any of them.
In such cases, the need of hiding or faking Find My Friends location rises. This is because we are sharing some ways to fake location on Find My Friends on your iOS and Android.
Part 3: 4 Solutions to Fake Find My Friends Location on iOS
We know how important it is to trick your device deceiving with the location. You might be curious now to learn the methods that can meet the objective of yours. Let us begin with the section that introduces you four ways to fake Find My Friends location.
3.1 Use virtual location tool to fake Find My Friends location on iOS
One of the useful ways to learn faking location on Find My Friends is using a professional tool like dr.fone – Virtual Location (iOS) . This tool helps you to teleport your iOS device’s GPS anywhere. Also, with this, you can get your speed of movement customized easily. It is one of the trusted tools you can use. Here are the steps to be followed to fake location on Find My Friends.
Step 1: Follow the Installation Process
From the main page of dr.fone – Virtual Location (iOS), download it. After this, install the tool on your system and then launch it. Now, click on “Virtual Location” option.
Step 2: Set up Phone’s Connection
Now, take your iPhone and keep it connected with the system. After this is done, click on the “Get Started” button to move ahead.
Step 3: Look for Location
After following the second step, all you need is to look for your actual location. To make this happen, click on the “Center On” icon given at lower right of screen.

Step 4: Enable Teleport Mode
In this step, you should activate the teleport mode. This will be done by clicking the third icon in the upper right of the screen. You can now input the place you want to teleport.
Step 5: Fake Find My Friends Location
Now, the program will get your location and click on “Move Here” that comes in the next dialog box. The location will be changed now. You can see that in your iPhone and its location-based app.

3.2 Use a burner iPhone to fake location in Find My Friends
Using a burner can also be a good option to take help of when your goal is to fake GPS on Find My Friends. It is nothing but a secondary device where the Find My Friends app can be downloaded and used it to swindle the people you want. This will allow you to keep more privacy as no one will be able to peep into your matter or location.
- All you need is to log out of Find My Friends app on your main phone.
- Install the app on your burner phone and log in it with the same account as your iPhone.
- That is it! You can now plainly leave your burner phone on the location you want. In other words, you can create your own story. Simply put the Nokia XR21 device where you want the others to think about your visit.
In spite of the fact that this way is helpful, there could be some shortcomings associated with it. Firstly, your friend might try to connect with your through Find My Friends app’s chat feature. And since you have kept your burner device somewhere else and you don’t have it right now, you can miss the chat. This may make your friends a little doubtful.
Secondly, it could be perplexed and draining at the same time to keep checking that the entire settings are accurately set up.
3.3 Use FMFNotifier to help you on Find My Friends
If still you wonder how to fake your location on Find My Friends, FMFNotifier can help you. Before you use this, let us inform you that this application can run on a jailbroken iPhone. So, if you have a device that is old and you don’t mind jailbreaking it, you are good to go with this app to fake Find My Friends location. Moreover, you will need Cydia to get this app. Cydia can be said as the App Store alternative. It is a platform for installation of software or apps on jailbroken iOS devices. The apps that are not authorized by Apple can be found on Cydia’s package manager.
If you have done jailbreaking, you can have FMFNotifier. Jailbreaking will be worthy as FMFNotifier contains many great features.
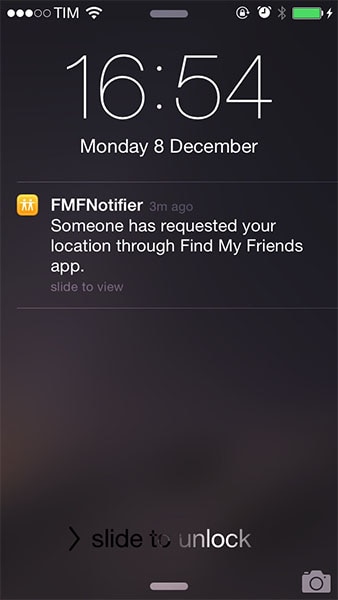
- One of the amazing things about this app to fake Find My Friends location is it sends you the notification each time when someone want to track your location. Whenever your friend attempts to ping your location, it will notify you as “Someone has requested your location through Find My Friends app”. And this is the moment where you can fake your location on Find My Friends. You can right away set a fake location when you know someone requires your location.
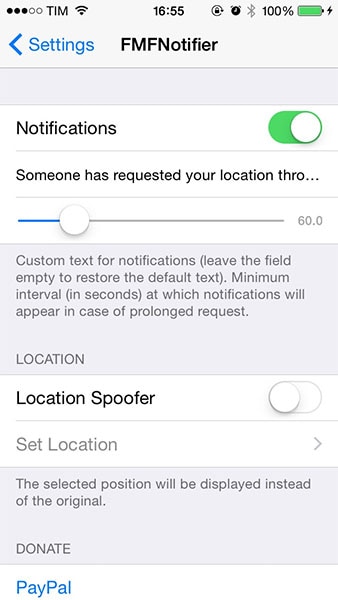
- Secondly, you can do configurations from the Settings app easily. Like, you can customize the text of the notification. Besides, the app allows you to set and save several false locations preset.
Guide on How to Use FMFNotifier
Step 1: Firstly, open Cydia and go to Sources.
Step 2: Look for FMFNotifier package which can be available on BigBoss repo.
Step 3: Lastly, install the package. Now, you can go to “Settings” on your device. Go to FMFNotifier and configure the settings as you want to fake location on Find My Friends.
3.4 Use AntiTracker to protect your location privacy
When privacy is everything for you, you cannot tolerate anyone peeping into your life, especially your location. Find My Friends lets people doing that. You can take help of AntiTracker which is another jailbreak tweak. With this, you will be helped by faking location on Find My Friends. Like the above app, this will also notify you when someone is going to know your location through Find My Friends.
You will get the notification no matter your screen is locked or not. A notification that is “You’re being tracked” along with the Find My Friends icon will appear when someone tries to track you.
![]()
Guide on How to Use AntiTracker
Step 1: It is available free on Cydia’s Bigboss repo to download. S, go to CYdia and look for AntiTracker.
Step 2: Download the package and the app icon will be added on your Home screen of iPhone. You can now configure the tweak from Settings. The settings allow you to:
- Turn on and off tweak whenever you want
- Hide the location
- Select the sound that will play when the notification comes
- Select the message to be appeared in notification
- Have a look on the location request logs i.e. each time when the location is pinged
![]()
Part 4: How to Fake Find My Friends location on Android
If you want to fake Find My Friends location on Android, you can easily configure Android devices to do it. For this, you can take help of an Android spoofer app. There are plenty of them available in Play Store. We will be using “Fake GPS GO Location Spoofer Free”. This is how to fake location on Find My Friends on Android.
Step 1: To use this, you don’t need to jailbreak or root your device until your Android is running on 6 and higher versions.
Step 2: Go to Play Store and search for the app. Install it after downloading.
When you install it rightly, this is how to do a little twisting to set it up with Find My Friends.
Step 1: To spoof people about the location, enable the developer settings in the first place. Simply head to “Settings” for this and go to “About Phone”.
Step 2: In the “Software Info”, you will see a build number. Tap on it nearly 6-7 times. The Developers options will be enabled now. This step is important because it will alter the security settings in your phone. As a result, tricking about the location will become easier.
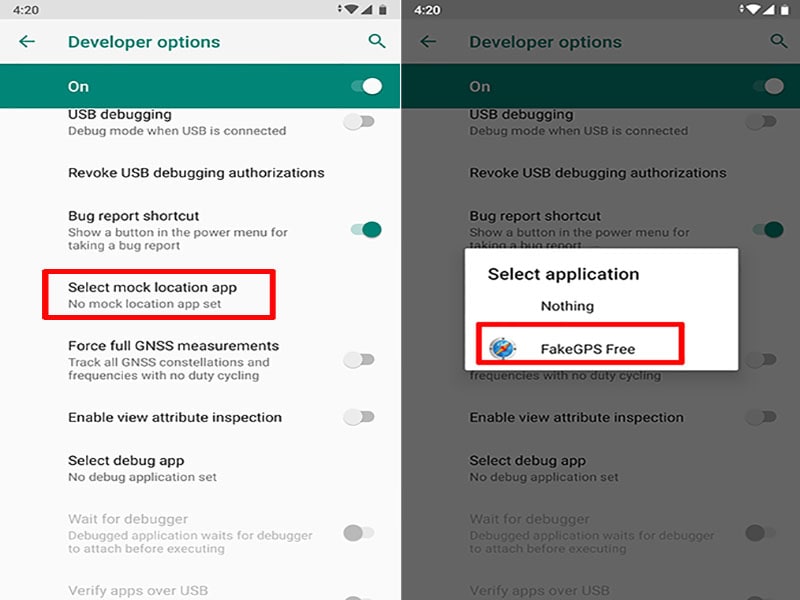
Step 3: When developer options are enabled, launch the app. You will see an “ENABLE” option at the bottom. Tap on it to turn on mock locations feature.
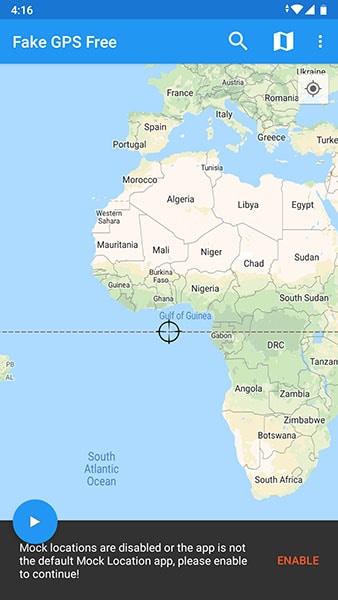
Step 4: Under the Developer options page, click on “Select mock location app”. Now, select “FakeGPS Free” from the list.
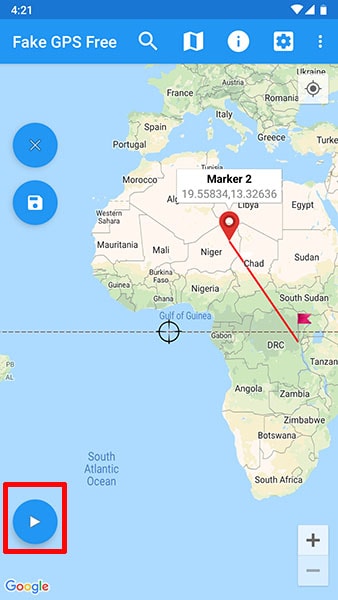
Step 5: Return to Fake GPS Free and long press the two spots on map to set the route. Take help of the play button given at the bottom. This will enable the location spoofing. You will see, “Fake location engaged…”. This will show your fake location on Find My Friends app.
Also read:
- [Updated] From Amateurs to Experts KineMaster’s Step Guide
- [Updated] Preventing Disorientation in Virtual Environments
- [Updated] Streamlining Your Social Media Presence with ZOOM & FB Live
- Access and Conquer: Mastering Windows 11 Printer Control (Max 50 Chars)
- All Must-Knows to Use Fake GPS GO Location Spoofer On Oppo A1x 5G | Dr.fone
- Best 10 Mock Location Apps Worth Trying On Xiaomi Redmi K70 | Dr.fone
- How to Change Spotify Location After Moving to Another Country On Honor X9b | Dr.fone
- How to Fix My Realme Narzo 60 5G Location Is Wrong | Dr.fone
- How to Simulate GPS Movement in AR games On Nokia C02? | Dr.fone
- In 2024, Best Ways to Bypass iCloud Activation Lock from iPhone 12/iPad/iPod
- In 2024, Expert Breakdown VSDC Review & Alternative Comparisons
- In 2024, Top Apps and Online Tools To Track Itel A60 Phone With/Without IMEI Number
- Prevent Cross-Site Tracking on Honor 80 Pro Straight Screen Edition and Browser | Dr.fone
- Sticky Keyboard Issues in Windows? Here's How You Can Get Them Working Smoothly Again!
- Thinking About Changing Your Netflix Region Without a VPN On Motorola Razr 40 Ultra? | Dr.fone
- Want to Uninstall Google Play Service from Xiaomi Redmi Note 12 Pro 5G? Here is How | Dr.fone
- Title: Complete Tutorial to Use GPS Joystick to Fake GPS Location On Nokia XR21 | Dr.fone
- Author: Ava
- Created at : 2025-01-01 20:10:09
- Updated at : 2025-01-08 05:40:11
- Link: https://fake-location.techidaily.com/complete-tutorial-to-use-gps-joystick-to-fake-gps-location-on-nokia-xr21-drfone-by-drfone-virtual-android/
- License: This work is licensed under CC BY-NC-SA 4.0.