
Complete Tutorial to Use GPS Joystick to Fake GPS Location On Xiaomi Redmi A2+ | Dr.fone
Complete Tutorial to Use GPS Joystick to Fake GPS Location On Xiaomi Redmi A2+
The web world offers many apps, including Google, Facebook, Uber, etc. that provide location-based services. This means such apps will need your location to work. However, there are some rare occasions when users don’t find this service welcoming and thus, they wish to fake GPS location.
One of the instances comprises a well-known location-based game – Pokemon Go, where users might want to mislead the app and make the phone not understand where they exactly are. There might be other cases as well. No matter what reason you want this to be done, we are here to introduce you GPS joystick app that helps you for the same. Here we go!
Part 1: Fake GPS Location - GPS JoyStick the App
GPS joystick is an app that helps the users to fake GPS with the help of an overlay joystick control. It is easy to use and works instantly when you wish to modify the GPS location. Providing a unique “Joystick” option, this app can be considered a useful fake GPS joystick apk. On a plus, the app has the best algorithm so that it can offer realistic GPS values.
Features:
- Able to make modifications in the location wherever you point the joystick.
- You can choose the current location with the help of a map or joystick.
- You can also get the GPX files imported and exported to favorites, routes, or custom markers.
- It offers a good amount of setting options to provide complete user customization.
- You can manage the settings regarding size, type, and opacity for the joystick.
- With the help of this fake GPS joystick apk, you can get an opportunity to show the distance and cool-down time information.
- There is also a hide option available to help you decide whether you want to hide or show the joystick on your screen.
- Moreover, you get 3 customizable speeds for the joystick.
Disadvantages:
- It requires a hell lot of steps that are confusing and tough to perform.
- Users have reported that the app only works for a few minutes after the first time of installation. Afterward, the app function to fake GPS location dies and is then good for nothing.
- You need to be tech-savvy to fake GPS location with a GPS joystick.
- Fake GPS joystick for Pokemon Go cannot perform well for it as reported by the users. Also, it drives the same result for other popular location-based apps or games.
Part 2: How to set up GPS JoyStick
Though, it is quite difficult to get through the process of setting up the GPS joystick apk to a fake GPS location. Remember, we’ve always got your back. Therefore, we would like to bring you up with a detailed streak of steps (if followed properly) to install and set up the fake GPS joystick apk easily.
Basically, the tutorial is categorized into 3 different streaks depending upon the different Android OS security patches and OS version. Therefore, before we begin with steps, let’s understand what you need to do to find your Android OS version or the Security Patch. Depending on the Security Patches or Android OS version, follow the tutorials mentioned below with falls compatible for your device.
- Take your Xiaomi Redmi A2+ handy and launch the “Settings”.
- Now, scroll down to the “About phone” option at the bottom and then hit on it.
- Lastly, look for the “Android version” entry and “Android security patch level” entry from the information displayed over your screen.
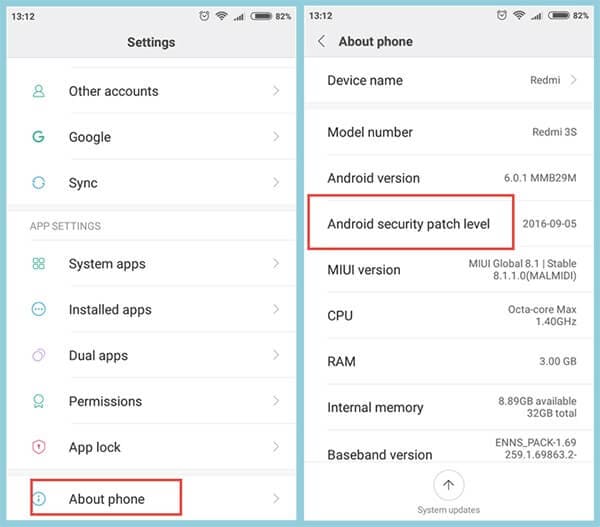
Note: Remember the date mentioned besides the “Android security patch level” is when it was first released. Please do not take it otherwise, that it is the date when you might have installed Google’s security patch.
2.1 For Android 6.0 and Above (New Security Patch) - AFTER March 5, 2017
If you own an Android device that runs on the Android OS version 6.0 or higher updated to “New Security Patch” released “AFTER March 5, 2017”. You need to follow the steps mentioned below.
First, you need to make sure that the Google Play Services app installed over your Xiaomi Redmi A2+ is running on version 12.6.85 or lower. If that’s the case, you no longer require performing the lengthy steps below. Instead, directly skip stepping number 7 below.
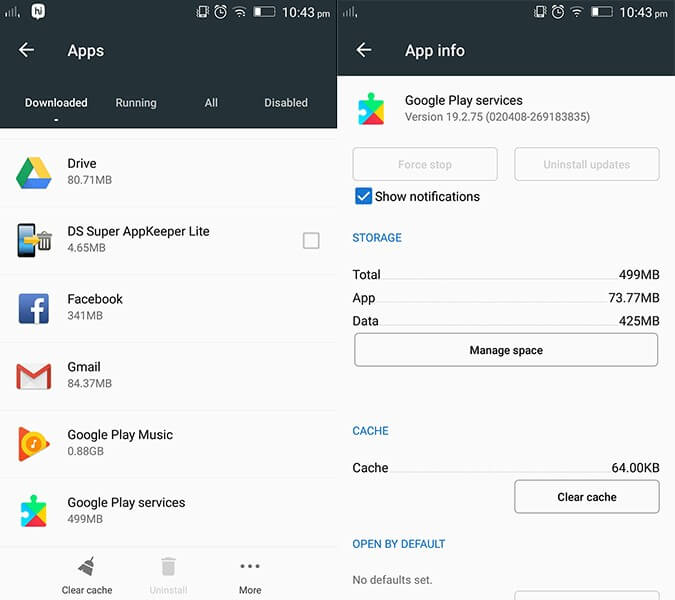
Note: To verify the Play Services version, launch “Settings” followed by selecting “Apps/Applications”. Scroll down to “Google Play Services” and hit on it. You will then see the app version at the top of the screen.

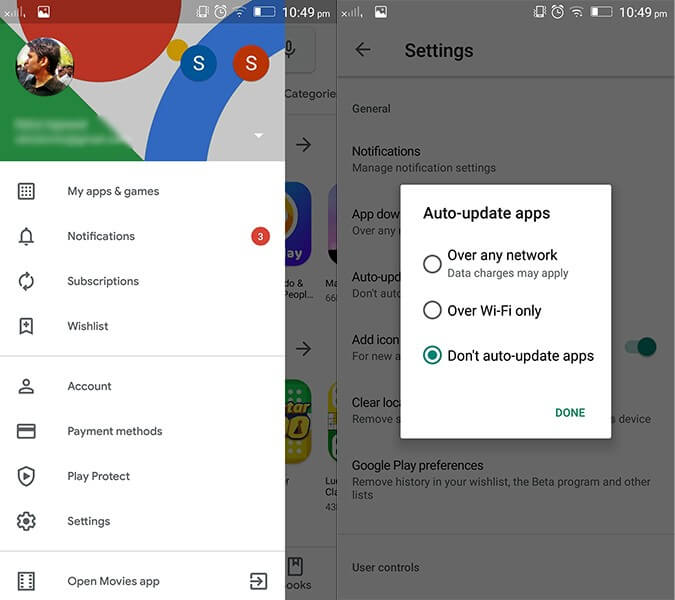
But if that’s not the case, you’re required to disable the Play Store’s auto-updates. For this, launch the Play Store and hit the “3 horizontal bars” at the top. Then, tap on “Settings” option from the appearing left panel followed by Auto-update apps available under “General” settings. Lastly, hit on the “Do not auto-update apps” option.
Next, get hold of Google Play Services (an older version) from the link here: https://www.apkmirror.com/apk/google-inc/google-play-services/google-play-services-12-6-85-release/
Note: Ensure to download the Google Play Services apk file that is closest to your Android version. But, remember not to install it now.
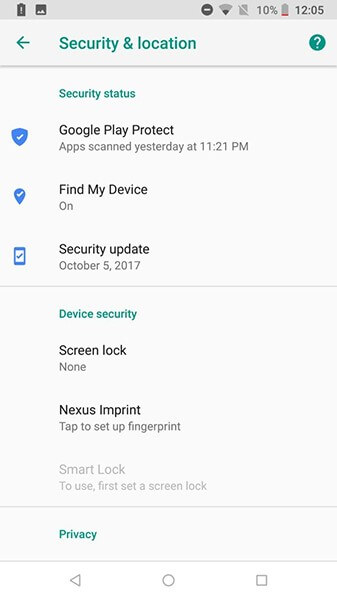
Once done, if “Find My Device” is enabled over your device, you need to get it disabled too. To do this, get into “Settings” followed by “Security & Location”. Now, hit on “Find my device” and toggle it off.
Likewise, disable “Google Play” and uninstall all its updates as well. To remove updates, get into “Settings” followed by “Apps/Applications”. Scroll down to “Google Play Services” and hit on “Uninstall updates”.
Note: If you’re unable to get this done, then you may need to disable the Android device manager in the first place. For this, get to “Settings” > “Security” > “Device Administrators” > disable “Android Device Manager first”.
Now is the time when you should install the Google Play Services apk (downloaded in step 3 above). Reboot your device afterwards.
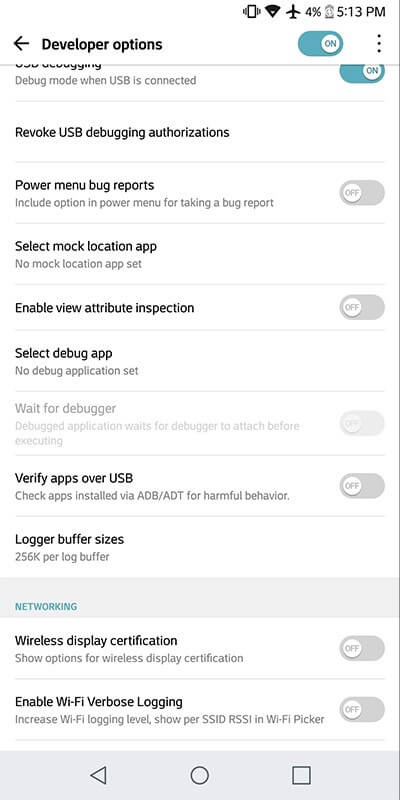
Subsequently, you need to again get into the “Settings” and then opt for “Developer Options”. Now, hit on “Select mock location app” and opt for “GPS JoyStick” here.
Lastly, launch the “GPS JoyStick app” and navigate to “Settings” followed by toggling on the “Enable Suspended Mocking” switch.

2.2 For Android 6.0 and Above (Old Security Patch) - BEFORE March 5, 2017
That was a detailed tutorial about the Android security patch level released “AFTER March 5, 2017”. But if your Android security patch level is before March 5, 2017, what would you have to do? Well, worry not, here is exactly what steps you need to follow to make use of the GPS joystick app to fake GPS location.
First, you need to navigate to the “Settings”. Then, opt for “Developer Options” and hit on “Select mock location app” followed by selecting the “GPS JoyStick” app here.

Lastly, launch the “GPS JoyStick app” to fake GPS location and navigate to “Settings”. Thereafter, toggle on the “Indirect Mocking” switch, and you’re done.

2.3 For Android 4 or 5
For the users of Android OS version 4 or Android OS version 5, there’s not much you need to do. Here is the exact method that you need to get through.
Get the “GPS JoyStick apk” installed over your device and then proceed to “Developer Options” available under the “Settings” menu. Then, hit on the “Select mock location app”.

Now, “GPS JoyStick app” to fake GPS location and get started with the FGL pro joystick control.
You will then have the FGL pro joystick control is visible on your Android screen. Thereafter, head back to the “Developer Options” and get the “Mock Locations” disabled.
Lastly, launch the “Pokemon GO” and you’re all set to fake GPS go with a joystick.
Part 3: How to bypass the blacklist of games like Pokemon GO
There are chances when you get caught by Pokemon Go for spoofing GPS location and get blocked/blacklisted for making use of fake GPS location apk. Here’s a workaround for bypassing the blacklist of games like Pokemon Go.
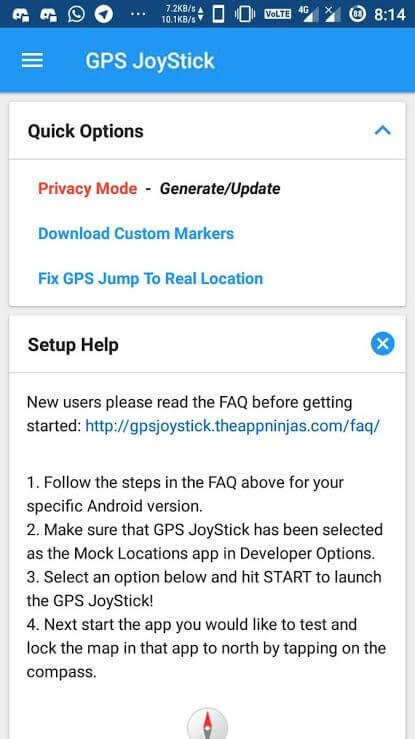
Download and then install the most recent version of GPS JoyStick apk. Now, launch it, and then hit on the “Privacy Mode” link available under the “Quick Options” section on the home screen. This will generate a unique copy of the app specifically for you.
Next, you need the generated app installed and get through with the setup process with the streak of steps listed below.
Now, you need to uninstall the original fake GPS joystick for Pokemon Go. Also, ensure that to uninstall every other spoofing/fake GPS apps that can potentially be on the Pokemon GO blacklist.
Thereafter, make use of the specifically generated GPS joystick on Pokemon Go to bypass the blacklist warning!
Lastly, utilize the “Update” button after hitting on the “Privacy Mode” link under the “Quick Options”. Then, navigate to the previously generated app from the appearing pop up. This will generate the update for it, and you’re all done.

Part 4: How to Use GPS Joystick to Fake Location on iPhone
When you fake GPS Joystick location, you can double the joy in playing location-based games like Pokemon go, Ingress, Zombies, Run, Geocaching, etc. All these games make use of the phone location, and it will be quite interesting if you move on with exciting places worldwide.
Do you want to fake GPS Joystick on iPhone?
Are you tired of searching for an effective GPS Joystick to fake location on the iPhone?
You would have ended up with a conclusion that there are no reliable and effective apps to fake location on the iPhone.
Dr. Fone’s specialist team presents Dr.Fone - Virtual Location for the gaming lovers to fake GPS Joystick on iPhone. You can now move the joystick to the desired location in no time using Dr.Fone.
Stepwise procedure to fake GPS with a joystick on iPhone
Step 1: Launch the app
After a successful download, install the app through the guiding wizard. Click the Dr.Fone app icon to explore its features. Using a USB cable, attach your iPhone with your PC.

Step 2: Set a virtual location
On the first screen of Dr.Fone app, choose the ‘Virtual Location’ option.

Step 3: Modify the location address
Tap ‘Get Started’ option then add a new address in the ‘Teleport’ mode. To choose ‘Teleport’ mode, you have to select the first icon at the top-right screen. Next, enter the address at the top left side of the window. You can enter any address around the globe to fake GPS joystick location.

Step 4: Changed Location in the app
Now the Dr.Fone app displays your desired address as your current location. You can verify it by spotting the location on the map view.

Step 5: Location on iPhone
Next, you must check your default current location in map view on iPhone, and you will witness the modified location in pace with your desired address.

Step 6: Play Pokemon Go without moving
Now use the “one-stop route” or “multi-stop route” to simulate the real-world movement without moving. Just play Pokemon go to explore new Pokemons on different locations and gain more points through an effective fake GPS joystick location app Dr.Fone.
How to Change Spotify Location After Moving to Another Country On Xiaomi Redmi A2+
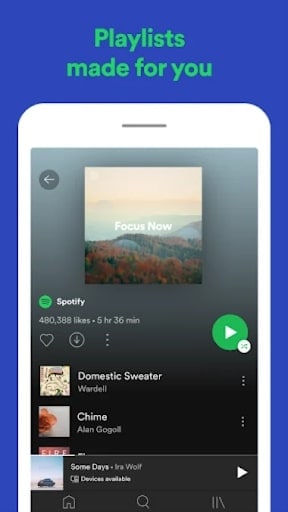
Spotify is one of the best apps to access quality music and podcasts. Be it in your car while you commute from the workplace to home or simply when you are home with your latte, the music is made for every mood. Spotify is easy to use, you can make your own playlist and you have access to a lot of musical content.

But this depends on the country you are staying in. And if you’ve recently shifted your base, it can be tricky to change spotify region. But if you opt for the manual methods, it is a breeze to update location spotify. We will teach you how that is done effectively using different resources available to you.
Part 1: Reasons for changing Location on Spotify
But why to Change Location Spotify in the first place? Is it important to change your location if you are changing countries? Will that affect the music on the streaming app? Yes! It certainly will. Before we discuss the different ways to change country on spotify, let us understand why we should do it at all.
Region specific Content
Everything is not available everywhere. If you are looking for a specific motivational podcast that is a hit in the US, it might not be available in your region. You like that new Arabic song, maybe it won’t stream in your Australian lanes. The content can be restricted to a specific region and if you don’t stay there, it is far away from your reach. You have to rely on Spotify Change Location to access that musical content.
Playlists and Recommendations
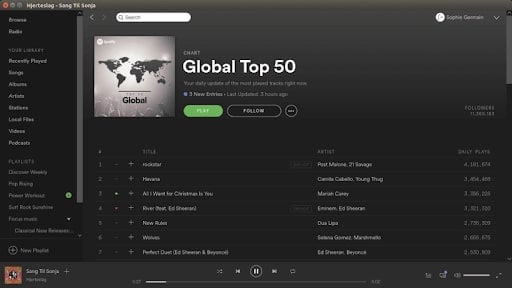
Spotify uses your coordinates to provide the right music content for you. There are people who jump up and down and say that the app suggests songs that are their absolute favorite! As if it has read their minds. This is possible because Spotify identifies the most played songs in the region, detects the language and delivers these suggestions to you.
So, the content that you receive depends on the place that you are staying in.
Payment Plans
The Spotify premium account provides more benefits than the normal free version that people use. But what many of us are not aware of is that the premium version’s cost differs from place to place. If you can manage a spotify location update, you can save yourself some bucks.
Spotify Unavailable

Spotify did gain a lot of popularity in a very short period of time. People are making money, uploading their own content and even exploring newer genres of music. However, Spotify is not available world-wide. Currently, it is only accessible from 65 countries. If you hail from a region where Spotify hasn’t launched yet, you need to update spotify location to a place where it is fully functional.
Part 2: How To Edit Your Country on Spotify?
You can change region spotify manually by directly tweaking a few settings in the Account Overview section. If you are using a Free Spotify account, then you will have to manually change your location. But a person who has a Premium Spotify account can access all the content from all those countries where spotify is legally available. Here’s how you can change the location using the Spotify settings -
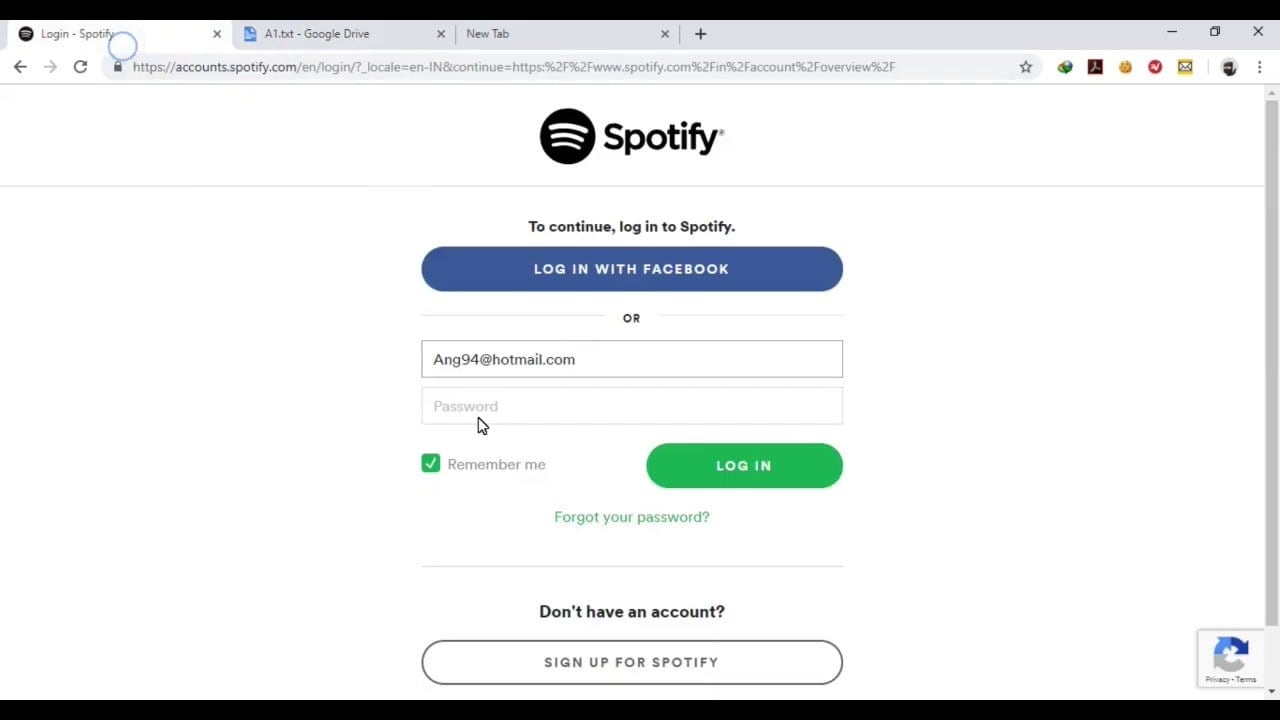
Step 1: Go to the Spotify Homepage on your desktop and Log into your account. This is how you do it if you happen to have a free account. Premium accounts don’t need it. After you Log in, go to the ‘Accounts’ section.
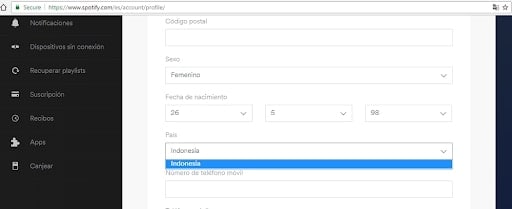
Step 2: From the sidebar, go to the ‘Account Overview’ option. When you click on it, you will find the ‘Edit Profile’ option on the screen. Go for it.
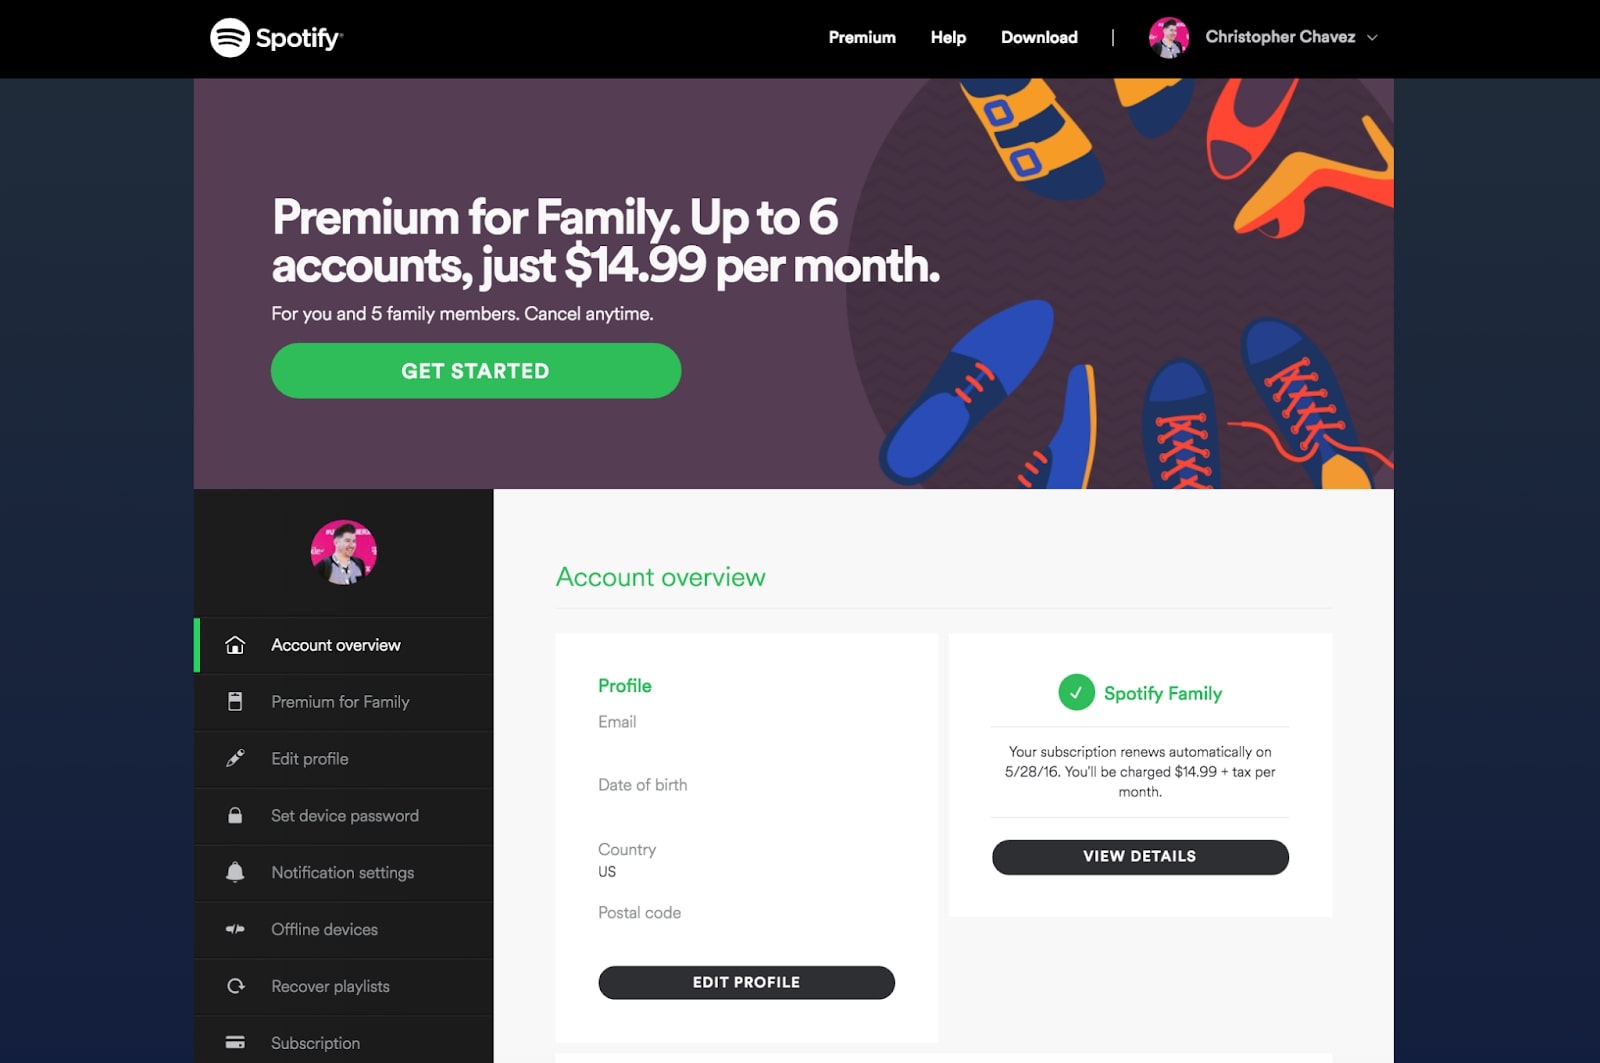
Step 3: Once you click on theEdit Profile option, there will be several categories that display your personal information. If you scroll down, you will find the ‘Country’ Option. Select the country of your choice there.
If you are a Spotify Free user, then you will have to go by the above mentioned method. But if you are a Spotify premium user, you don’t need to change location to access content. However, you can change it to update the Payment plans.
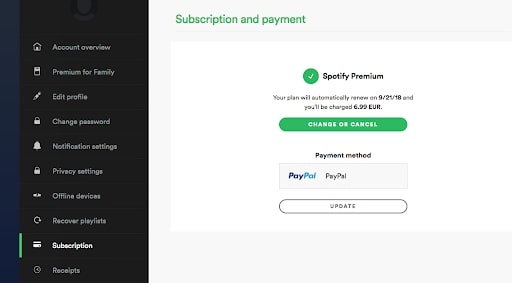
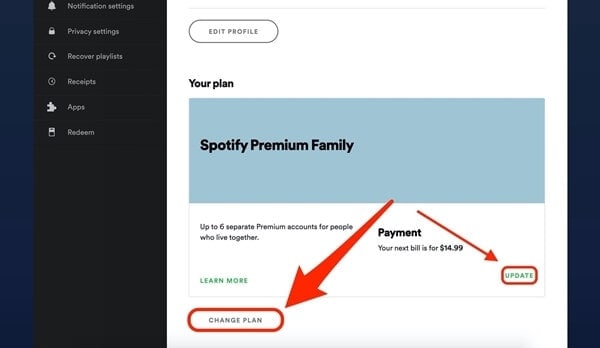
Step 4 (Premium): In the same Account Overview option, you can either ‘Update’ your new location and spotify works accordingly. Otherwise, you can completely Change your Plan as well.
Part 3: How to Use Apps to Fake Spotify Location?
Now you know that by Spotify Change Country, you can get more benefits and you can enjoy podcasts, music and other audio content that is otherwise unavailable in your region. So, it is understandable that you’d want to deliberately fake spotify location. This is possible when you use some of the best Location Spoofer softwares available on the internet. Our best suggestion would be Wondershare’s Dr.Fone. It is easy to use and your location will be changed within a few minutes in minimal steps.
Step 1: You need to download the executive file of the WondershareDr. Fone’s Virtual Location Spoofer. The android and even Windows compatible files are available on the website. Choose appropriately and download - and launch them.
Step 2: Once you launch the application, the homepage will open and several options will display on the screen. Choose the Virtual Location option that is usually at the end of the page.
Step 3: To Change Location on Spotify Mobile, connect your Xiaomi Redmi A2+ to your computer - both Android and iPhones can detect the virtual location change. Then click on Get Started.
Step 4: A map will appear on the screen. You can change the pi to a new location or you can enter the new location into the search box displayed on top of the page. You can do this by going to the ‘Teleport Mode’ on the top right corner of the page.
Step 5: Once you are sure about the new virtual location, click on ‘Move Here’ option.

The New Location will now display on your iPhone/Android Device’s GPS system too. And Spotify will reflect it too. So, when you decide to change location on spotify using this method, the new location will reflect in all your apps. So, it’s hard to figure out that you’ve deliberately changed the location.
Part 4: How to Use a VPN to change Spotify Location?
A Virtual Private Network App is also very useful for the Spotify change Region. But you need to keep two important points in mind - The Trial Versions do not provide complete protection and the features aren’t satisfactory. If you go for free VPNs available on the internet, you cannot be 100% sure that your data is safe. So, we have narrowed down the safest option for you. We suggest that you use Nord VPN if you cannot get your hands on a Location Spoofer.
Location Spoofers are much safer because they don’t maintain Log data like the VPNs. But if you have no other option left for Spotify update Location, then you can rely on NordVPN.
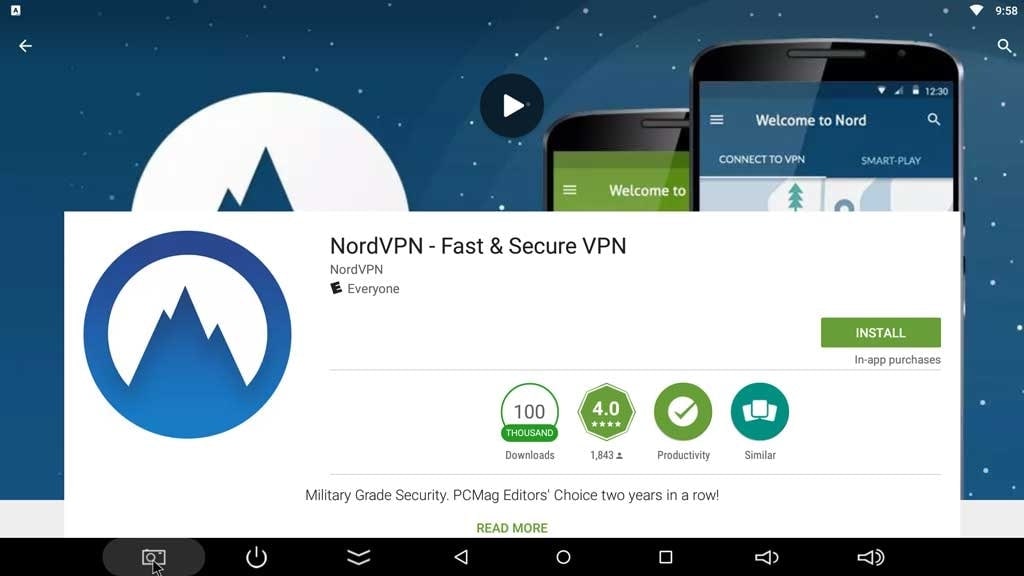
Step 1: Go to the AppStore or Google Play Store and choose NordVPN from the different VPN options available.
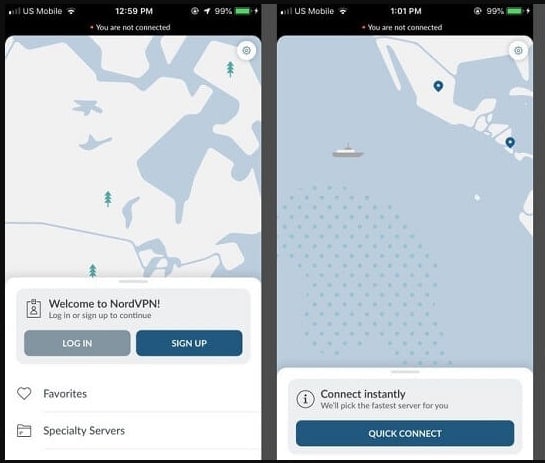
Step 2: Sign Up and create your account on the app. The main use of a VPN is to mask your IP and give you a new server for internet surfing. So, once you log in, NordVPN will find the closest server for you.
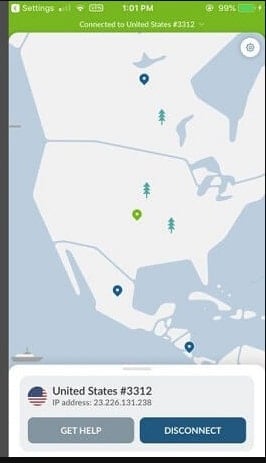
The automatic connect was made to United States - the closest server
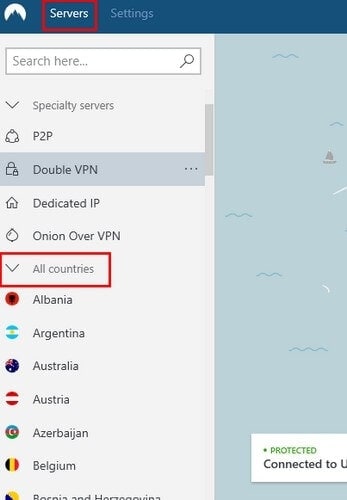
Step 3: In case you want to change to a specific country, You can go to ‘More Options’ and then choose Servers. Then go to All Countries and choose the country of your choice. Once you launch Spotify, the same will reflect there too.
The VPN works for all kinds of mobiles and it is very convenient to use. This is a good way to mask your IP address completely, so that no one can track your location change activity either. You can change servers several times a day to access content from across the world.
Conclusion
If you know the right way to do it, changing Spotify Location After Moving to Another Country is no big deal. You have several tools that will assist you in the job. Unless you are faking your location, you can change location directly from Spotify Account Overview too. But if you want to Change Location in Spotify for more benefits, then you can use the tools we have mentioned to get the job done. You can cut down the premium payment prices, listen to exotic music from across the world and also stay up to date with the podcast releases too.
Dose Life360 Notify Me When Someone Checks My Location On Xiaomi Redmi A2+?
Have you ever had your phone stolen and someone got to see where you live? Did you want to know so you could file a police report and get it back before they try to sell it?
You probably also have many applications installed, such as WhatsApp, Google maps, Facebook, etc. So how do you get notifications from all these apps without having to check each one individually?
Life360 can help. It is a location-based app that lets you check the location of your device, your family members, and even your friends via push notifications. Does life360 tell you when someone checks your location? Read to learn more.
Part 1: How Does Life360 Work?
While it’s logical that users would want to take extra precautions to protect their personal information, using this software eliminates the need to turn off their devices entirely. In this part, we describe the Life360 app’s features in further depth, including how to use them.
If you want to know how Life360 stacks up against the competition, these are some features you can typically find on the platform.
- After installation, you can either join an existing community or create your own by entering an invitation code and connecting the Xiaomi Redmi A2+ devices you choose.
- If you choose the location feature, you will be able to share your location with the other people in the Circle and see the whereabouts of the people whose tracing is currently turned on.
- Whether you receive alerts or not, you will be alerted in a specific manner when one of the team members arrives at their designated location, and conversely.
- Activating the panic button will enable you to be ready to give or seek emergency services for the community or call immediate assistance.
- To help you locate your group members, you may use this map option to create a map that shows where you are and where they are.
- You may also converse with other Circle members in a specific fashion using the “Chat” feature.
- At speeds over 25 mph, automatic accident arrest sensors try to make touch with the vehicle to prevent an accident.
- The battery level of the participants will be shown, and then action will be conducted that will not result in any reason for alarm.
Part 2: Does Life360 Tell You When Someone Checks Your Location?
Life360 is a service that allows you to follow a person’s whereabouts if they permit you to do so. Knowing where your loved ones are in the event of an emergency is critical in today’s world of increasing security considerations.
You won’t be able to see this app if someone verifies your authorization to use it. Afterward, when you’ve granted the third user permission. Life360 enables you to see other people’s movements, but only if the person has provided you consent to do otherwise.
It would be difficult for you to realize that you are being followed if the tracking software was launched on your device without your approval. To make matters worse, you won’t be able to stop it, and your location will be constantly updated.
With this software, you’ll be able to keep tabs on your adolescent or youngsters at all times. The purpose of this software is not to dig into the personal lives of its users. Instead, because of the current state of global instability, this software was developed to assist users in maintaining checks on the whereabouts of those they care about.
Part 3: How Do I Stop Sharing My Location Without Them Knowing
Does life360 notify when you turn off your location, and what can life360 monitor? As a parent, you want to know where your children are. Thus a frequent notification of location on Life360 may assist. However, there are situations when users feel uneasy about disclosing their whereabouts, and as a result, they might stop the feature from running.
Life360 hack - Here are some methods to stop sharing your location without them knowing.
Method 1: Invest in a Burner Phone
Using an anonymous burner phone purchased with cash is a standard plot device in espionage movies and programs. There is a method that is the same as this for faking Life360.
Step 1. Your existing log-in information will work just as well when installing Life360 on your backup phone.
Step 2. When you arrive at your destination, connect your burner phone to the Wi-Fi network.
Step 3. Don’t use Life360 anymore on your phone.
Method 2: Disable Wi-Fi and Cellular Data Access
Turning down the Xiaomi Redmi A2+ device’s potential to interact with Wi-Fi and cellular networks is another option for generating a false location.
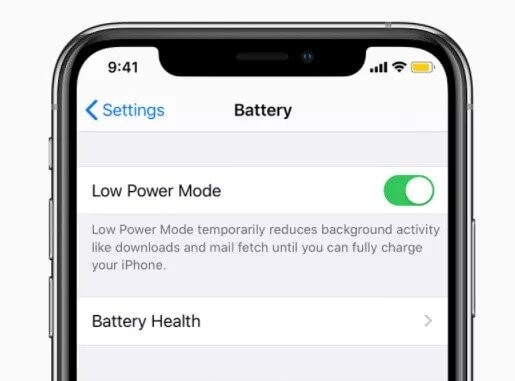
Step 1. To prevent applications from renewing themselves in the background, you must use the option that saves battery life.
Step 2. Disconnect from the internet through Wi-Fi and cellular data if you have them. For example, rather than disabling the whole Android system on an iPhone, you may simply disable the Life 360 app.
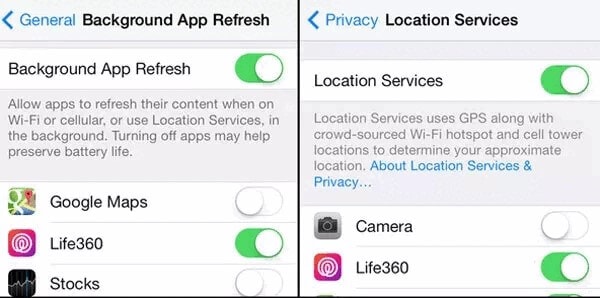
Step 3. Navigate to the settings menu, look for the Life360 option, and then off cellular data, background refresh, and the Motion & Fitness feature.
Once these services are no longer active, your location data will no longer change.
Method 3. Go For Dr.Fone
This is one of the best products to spoof or stop your location immediately. In addition, you can alter your GPS position whenever it is necessary with the help of Dr.Fone - Virtual Location (iOS/Android) ,.
Changing the Xiaomi Redmi A2+ device’s location info to improve it seems to be in another area or region is known as GPS spoofing. Using the program, you may enter and walk around any Phone location in virtual reality.
As a direct result of this, you will have access to all of the banned applications and will be able to have entertainment without having to move physically.
Dr.Fone - Virtual Location
1-Click Location Changer for both iOS and Android
- Replicate the location of an iPhone/Android by simulating it along a predetermined path and at a certain pace.
- Routes may be saved by importing or exporting GPX files.
- Using this app, you can change your Phone’s location to any place on the globe.
- You don’t have to leave your house if you want to fool location-based applications or games.
- You can keep track of up to five devices at a time with Dr.Fone.
- Work with location-based apps, like Pokemon Go , Snapchat , Instagram , Facebook , etc.
3981454 people have downloaded it
Here are the steps you can follow to stop sharing your location on your iPhone devices with Dr.Fone:
Step 1. Start by downloading and installing Dr.Fone - Virtual Location.
Step 2. Using Dr.Fone on a PC is as simple as opening the software and selecting Virtual Location.
Step 3. You’ll be presented with a new window called “Virtual Location.”
Step 4. Make sure you have a USB cable for your iPhone or iPad or Android that is compatible with your computer. Take a moment to unlock the Xiaomi Redmi A2+ device, if necessary, and then press the Trust Device option.

Step 5. You may then identify your Phone.
Step 6. To teleport your Phone to a specific place, type its address into the address bar. Next, choose an area from the drop-down menu that appears.
Step 7. Make a selection and then touch “Move here.”

Step 8. Tap Still Move after you agree to the instructions.
When you use this software, your Phone’s GPS location will be faked. To navigate your new surroundings, just press and hold the left joystick.
Conclusion
Can you tell when someone checks your location on life360? To stay safe, you should know what apps are accessing your location. There are several ways to stop sharing your location, but Dr.Fone - Virtual Location (iOS/Android) is undoubtedly the best and most convenient. This software can also fake your location and stop the location-sharing process within minutes.
Also read:
- [New] Free YouTube Channel Art Templates
- [Updated] 2024 Approved Cost-Effective Growth Tactic for YouTube Fanbases
- [Updated] 2024 Approved Turning TikTok Hits Into Personal Cellphone Chimes
- 2024 Approved Different Versions of Windowed Movie Crafting
- 5 Best Route Generator Apps You Should Try On Vivo X90S | Dr.fone
- All About Apple iPhone 14 Unlock Chip You Need to Know
- Best 10 Mock Location Apps Worth Trying On Apple iPhone 11 | Dr.fone
- Does Life360 Notify When You Log Out On Motorola Moto G84 5G? | Dr.fone
- Expert Guide to Optimal Tripod Setup for High-Quality Vlogs for 2024
- How To Simulate GPS Movement With Location Spoofer On Vivo Y77t? | Dr.fone
- In 2024, Enhance Visibility Top 9 Thumbnail Design Tools for Creators
- Update Your Epson WF-352 0 Printer Driver for Optimal Windows Performance
- What is Geo-Blocking and How to Bypass it On Nokia G42 5G? | Dr.fone
- What is Geo-Blocking and How to Bypass it On Samsung Galaxy F34 5G? | Dr.fone
- Title: Complete Tutorial to Use GPS Joystick to Fake GPS Location On Xiaomi Redmi A2+ | Dr.fone
- Author: Ava
- Created at : 2025-01-02 08:35:53
- Updated at : 2025-01-07 18:50:33
- Link: https://fake-location.techidaily.com/complete-tutorial-to-use-gps-joystick-to-fake-gps-location-on-xiaomi-redmi-a2plus-drfone-by-drfone-virtual-android/
- License: This work is licensed under CC BY-NC-SA 4.0.