
Complete Tutorial to Use VPNa to Fake GPS Location On Nubia Z50 Ultra | Dr.fone
Complete Tutorial to Use VPNa to Fake GPS Location On Nubia Z50 Ultra
In the present day, there’s barely any webpage or app that may not require your Geological location. This has been a major strategy of the site/app owners to push only the content that is relevant to your needs or may interest you. Therefore, every other webpage or app first fetches your Geological location and then behave accordingly.
For instance, there are several apps that only work in the US and not outside of it. But there is workaround for it too. You can actually make the app “think” that your Geological location is somewhere in US currently, instead of where you actually are. You can achieve this with a powerful vpna fake gps location apk. You may now wonder, hot to set it up and make use of it. So, without much delay, let’s now understand step by step tutorial on vpna fake gps location.
Part 1. About VPNa
Before we move any further with the tutorial, it is vital to understand what vpna fake gps location apk is! Just a small halt, though. But it’s worth the time. Out of the several apps available for your mobile devices to spoof your GPS location, VPNa fake gps apk is certainly the safest bet.
It is a known fact that your simply cannot alter the actual GPS location of your device but yes there is little workaround (a function) in Android that is utilized to test the GPS locations settings. And it is how VPNa fake gps location apk spoofs your device location with any preferred location on the face of the Earth. It makes use of “Enable Mock Locations” feature in the “Developer Settings” of your Nubia Z50 Ultra. Be it London, New York, Paris or Rome or any other location. Eventually, hiding your identity and furnishing you with absolute anonymity and online privacy.
Here are some of the main highlights of the VPNa fake gps location apk:
- First and foremost, you do not actually need to root your device to make use of this app.
- You can play prank with your friends by spoofing your location and making them believe that you’re travelling out of the country.
- Extremely user friendly app. Simply, look up for the desired fake location and hit Start.
- What’s more? Well, you can even save locations to make use of them later like a one click thing.
Part 2. Where to Download VPNa?
When it comes to downloading VPNa, the process is a breeze as far as Android users are concerned. The app is available on the Google Play Store , and all the Android users need to do is search it and download it. Moreover, it lies on the lighter end when it comes to app size, meaning users don’t need to have large free space.
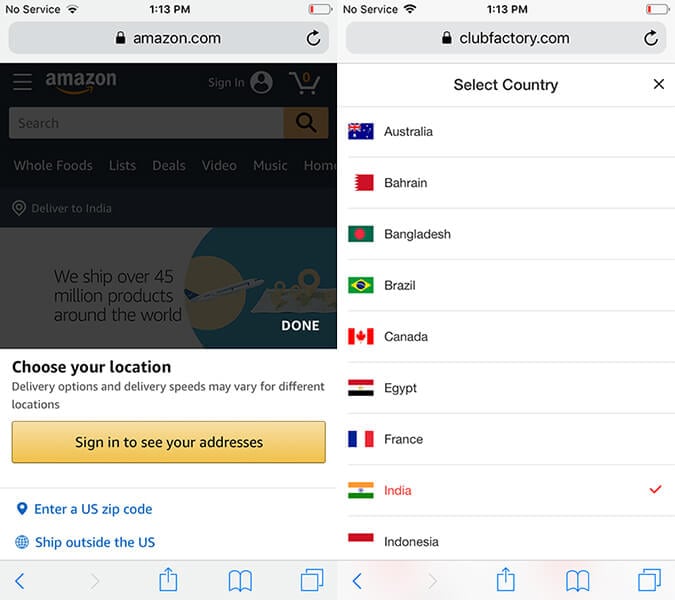
For iOS users, however, this app no longer exists. The app has discontinued its support for iOS devices and is no longer available on the Apps Store. However, there is no need to be disappointed as many better and well-reputed alternatives exist. Read the article till the end to discover the best location spoofer for iOS devices.
Part 3. Must-reads before using VPNa
Here in this section, we’re going to critically determine both the goods and bad of the vpna fake gps location apk. Let’s explore!
Pros of VPNa
- The app works at a lightning fast speed and is extremely useful to fake gps location for free.
- Functionality to save locations for further utilization in the near future makes it a one click solution.
- The best thing about vpna fake gps location apk is don’t actually have to Root your Nubia Z50 Ultra!
- Extremely simple process. Opt for the desired location and get started.
Cons of VPNa
- Reportedly, the newer version of the VPNa app is not able to spoof location in Pokemon Go, like the way it used to do.
- VPNa fake gps location free apkrequires the Google Play Service version 12.6.88. But upon installing the aforementioned version, reportedly, usersstarted to experience other issues like YouTube isn’t launching.
- Moreover, even if the newer version of the app does spoof the geological location properly. It is just not able to maintain it any longer than a few seconds. Implies, your spoofed location returns back to your actual location after a few seconds.
- You may get banned or suspended by some games or apps for spoofing your location. Making use of this app isn’t advised at all.
Part 4. How to set up VPNa on your Android to fake GPS
Ah! There we are. After acquiring all this valuable information, we’re now finally proceeding to learning about the step by step process on setting up and activating the vpna fake gps location free apk. Here’s all that you need to do on your Nubia Z50 Ultra to fake GPS.
Step 1: Download the vpna fake gps location free apk
- Visit the Google Play Store and navigate to the “vpna fake gps location” app. The search results may get piled up with several similar options, both paid and free.
Note: If you get along with any other app, it may require your Nubia Z50 Ultra to be rooted in the first place.
- Ensure to opt for the “vpna fake gps location” listing only as this app doesn’t require a rooted Android device. But your Nubia Z50 Ultra must be running on the OS version 4.0 or higher.
- Install the app and launch it afterwards.
Step 2: Enable Mock Location on Android
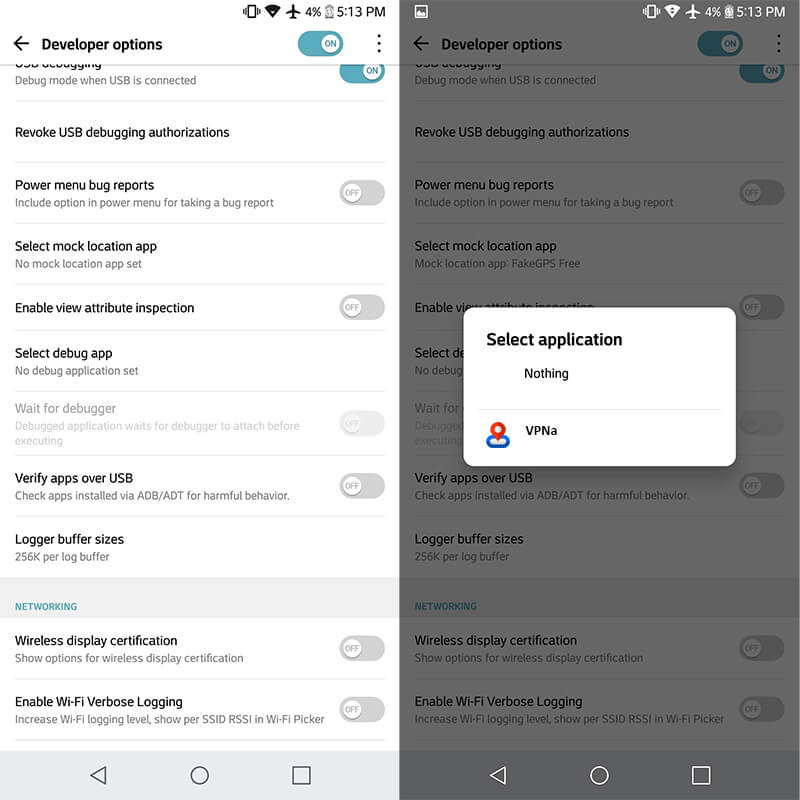
- When you’re on the mainscreen of the app, you’ll be asked to “ENABLE MOCK LOCATIONS”. Tap on the pop up and then the “Developer options” screen will come up.
Note: The “Developer options” aren’t pre-enabled, you may require enable it manually first. For this, head to the “Settings” > “About Phone” > hit on “Build Number” – x7 times.
- Now, on “Developer Settings” opt in for “Select Mock location App” followed by selecting the “VPNa” app from the appearing options.
Step 3: Search for a fake location and get started
- As soon as the fundamentals are set in place, you’re all ready to get started. Simply, hit the back button while on Developer Settings screen to get back into the vpna fake gps location app.
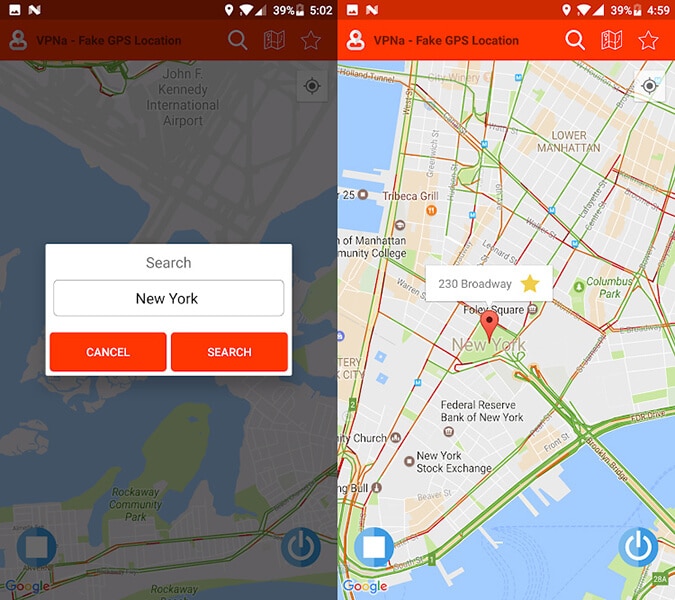
- Next, “Search” for the desired location using the search icon over the top. Lastly, push “Start/Power” button to activate the fake GPS location.
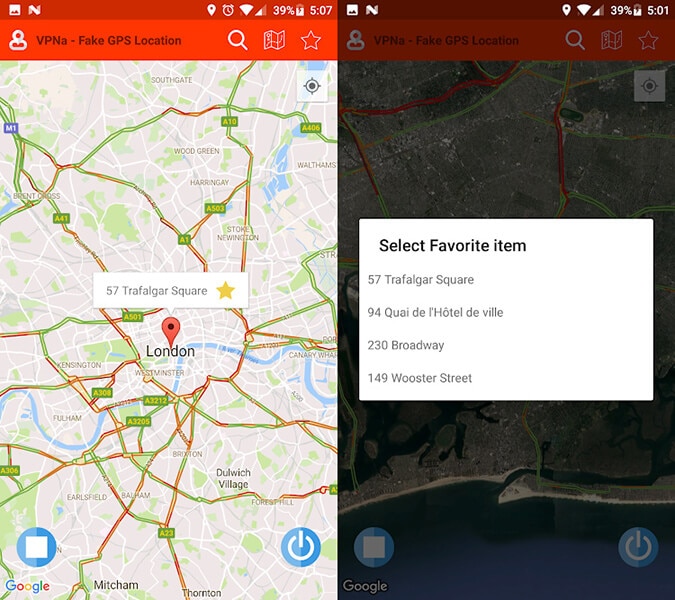
Note: You can also make use of the “Star” button on the “location marker”to pin the selected location over the map as your favorite.
Part 5. Example where VPNa does work
By faking GPS location with VPNa app, you can access desired content by bypass the Geo-restrictions. There are several instances where VPNa is successful solution for your GPS spoofing requirements. For instance, by spoofing location with VPNa you certainly:
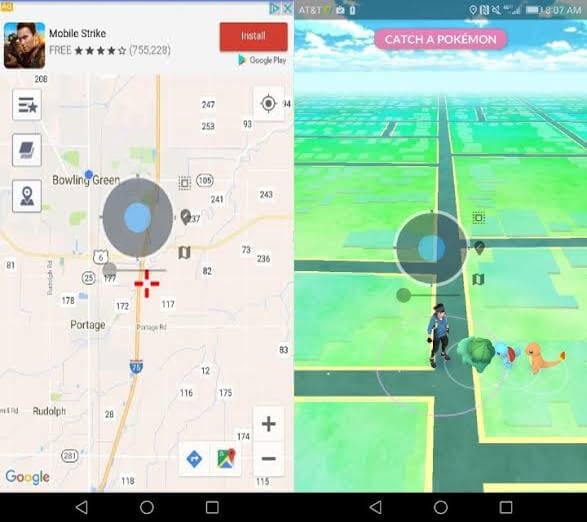
Can catch Pokemons of different variants in the Pokemon Go game. Without having to travel to several places.
Part 6: VPNa iOS version discontinued? How to fake GPS on iPhone?
Knowing that VPNa fake GPS location app no longer supports iOS can be a disappointment. However, we are at your rescue if you’re an iOS user. Wondershare has come up with a great tool named as Dr.Fone – Virtual Location (iOS&Android) that fulfills all your needs regarding faking location. In this section, we will learn about how you can fake location with this tool so that you don’t have to worry about the discontinuation of VPNa fake GPS apk’s iOS version. Here is how:
Mode 1: Teleport to Anywhere
Step 1: Download this VPNa fake GPS apk’s alternative on PC and install. Launch and hit “Virtual Location”.

Step 2: Establish connection between iPhone and PC. Click on “Get Started” right after that.

Step 3: You will be able to see the actual location on the map. Or you can hit “Center On” icon at the right side to get the accurate location displayed.

Step 4: Click on the “Teleport mode” which can be found as the first icon at the upper right corner. Put the place to teleport and hit on “Go” button.

Step 5: A pop up will appear once the system gets the place you want. From that pop-up, hit “Move Here” button.

Step 6: You are good to go now. The location will be changed as desired. You will see the chosen location fixed whenever you click the “Center On” icon. Also, the same location will be shown in the location-based apps. See, there is no need for any iOS version of VPNa fake GPS apk for the purpose when you have Dr.Fone - Virtual Location (iOS&Android).

Mode 2: Simulate Movement Between two Places
Step 1: You can choose the “One-stop route” i.e. the third icon in the upper right after launching the program.
Step 2: Please opt for the place where you wish to move and you will get aware of that place’s distance.
Step 3: Now, you need to set the speed for how fast you wish to travel. You can choose walk, cycling speed or car speed by sliding the slider given at the bottom. Once done, hit on “Move Here” from the pop-up.

Step 4: In the next pop-up, you are supposed to enter the number defining the number of times you wish to move between the two places. Once this gets done, click “March”.

Step 5: The simulation of the movement will now begin and you can track the position being moved with the selected mode of speed.

Mode 3: Simulate Movement for Multiple Places
Step 1: In this case, select the fourth icon at the upper right side. This icon denotes the “Multi-stop route”. Subsequently, select the locations one by one from where you want to travel.
Step 2: Note the pop-up box that now comes. It will make you know how far you are going to travel. Choose the moving speed.

Step 3: The next pop-up will ask you to enter the number for how many times you wish to show back and forth movements. Click “Start Moving” once done.

Step 4: The movement simulation will begin and your location will be seen moving as per your selected route.
Final Words
That was a completed tutorial about the vpna fake gps location apk, starting from gaining the insights of the app to understanding both the goods and bad of it. And finally the detailed step by step tutorial will help you get along with faking gps location smoothly.
5 Easy Ways to Change Location on YouTube TV On Nubia Z50 Ultra
Through YouTube TV, people can access different TV channels such as news, sports, and entertainment. However, as every YouTube TV works in accordance with the assigned home area, sometimes you can forget or are unable to change the home area, which can lead to certain restrictions. If you want to change the location of YouTube TV to access more services, this article is for you.
Continue reading this article to learn how to change your YouTube TV location with the help of easy methods so that you won’t tire yourself. You can easily bypass YouTube TV restrictions by following this authentic guide.
Part 1: Change your Home Area to Change Location on YouTube TV
Before jumping on the method to change YouTube TV location, keep in mind that YouTube only allows changing the location twice a year. In this part, we will provide a manual method to change location on YouTube TV for both iOS and Android devices:
How to Change Your Home Area on an iOS Device
Step 1: Start logging into your YouTube TV account and navigating to your profile icon. Select “Settings” and then tap on “Area.”
Step 2: Afterward, tap on “Home Area” and then choose the option “Update” right next to it.
How to Change Your Home Area on a Computer or Android
Step 1: Signing to your YouTube TV on your Nubia Z50 Ultra or through a web browser. Afterward, tap on your profile icon to proceed.
Step 2: Go to “Settings” from the profile and then select “Area.” Now, locate the “ Home Area” option and click on it.
Step 3: Tap on the “Update” option next to the “Home Area” option.
Part 2: Using VPN to Bypass YouTube TV Restrictions
Sometimes, users encounter certain YouTube TV restrictions due to their home area changes. This section will suggest four amazing VPNs to help you bypass any YouTube TV restrictions.
1. NordVPN
NordVPN is a well-trusted VPN that provides exceptional security and protection from malware attacks. Furthermore, by using this VPN, you can change your device or computer location to any country by selecting a fast and secure server from its available options. Hence, you can enhance your cyber security to a great level through this platform while accessing inaccessible content.

2. Surfshark
Do you want to encrypt your browsing activity on your devices? Use Surfshark to browse in a secure manner so that no one can steal or track your information. You can also change your location through this platform to strengthen your privacy across online sites. You can access any specific YouTube TV content by selecting any location from its US servers category.

3. ExpressVPN
ExpressVPN enables the users to change the server’s location anytime and from anywhere across the world. It gives great reliability access to the server location in 94 countries. Moreover, you can enjoy internet browsing with great network speed through it.

4. CyberGhost
To bring your digital security to the next level, CyberGhost is a good option to rely upon. It is a one-click location changer VPN that helps you connect anywhere within seconds with a secured IP address. After that, you can anonymously visit and use online sites through its encrypted VPN protocols and safely hide your identity.

NordVPN | Surfshark | ExpressVPN | CyberGhost | |
Ranking | 1 | 2 | 3 | 4 |
Max Contract Length | 24 Months | 24 Months | 12 Months | 39 Months |
Torrenting | ✔ | ✔ | ✔ | ✔ |
Monthly Plan Cost | $11.99 | $12.95 | $12.95 | $12.99 |
IP Addresses | 5000 Servers | 3200 Servers | 3000 Servers | 8000 Servers |
Support System | Windows, Mac, iOS, Android | Windows, Mac, iOS, Android | Windows, Mac, iOS, Android | Windows, Mac, iOS, Android |
Support Main Streaming Platforms | Netflix, Amazon Prime, Disney+ | Netflix, HBO Max, Hotstar | Netflix, Apple TV+, Hulu | Netflix, HBO Max, Disney+ |
Part 3: One-stop Tool to Change GPS Location on iOS and Android
Although VPNs provide a great way to change YouTube TV location through IP address, it still lacks accuracy with the location. To be more precise with region accuracy, Dr.Fone – Virtual Location changes GPS location to connect your Nubia Z50 Ultra with a particular area in a specific city. As VPNs change the location by connecting to the city’s server via IP address, Dr.Fone targets the exact location in any city by using GPS.
Dr.Fone - Virtual Location helps the users locate a precise location for YouTube TV to access specific TV channels and features. Moreover, you can instantly change your YouTube TV location with a single click. Using this tool, you can fake your location anywhere in the world with excellent speed.
For changing YouTube TV location through Dr.Fone, use the below instructions:
Step 1: Navigate Virtual Location
Download Dr.Fone on your computer and open its main home page. Select “Virtual Location” from the displayed options by clicking on it. Now connect your smartphone to your computer via a USB cable.
Step 2: Show Current Location
A new window will pop up displaying your current location on a map. However, if you cannot locate it, click on the “Center On” icon that will show your current location.
Step 3: Turn On Teleport Mode
To turn on the teleport mode, click on the second icon that you can locate on the top right. Then, type the area in the search box and press the “Go” button.
Step 4: Confirm Location
Confirm by clicking on the “Move Here” option on the pop-up message. Once done, your phone will be connected to the chosen location, and thus YouTube TV location will be changed automatically.
Part 4: FAQs
- Is it allowed to watch YouTube TV other than the home area?
Yes, it is allowed to watch YouTube TV other than the home area in the US, but the channels will differ from location to location. You can watch national programs, including local programs and other YouTube videos, while traveling domestically in the US.
- How to modify the time zone on YouTube TV?
To change the time zone on YouTube TV, open your YouTube TV and click on your profile icon. Next, go to the “Settings” and tap on the “Area.” Now, locate “Home Area” and upgrade the time zone concerning your home area.
- Is it possible to watch YouTube TV in multiple locations?
You can easily watch YouTube TV in multiple locations, but to be careful, you should check your home area frequently in a month to be aware of local networks.
- Are users allowed to watch YouTube TV at two different houses?
YouTube has provided easy access through membership that allows the users to watch YouTube TV at two different houses. You can create a family group and let 5 members watch YouTube TV.
Conclusion
This writing comprises a detailed guide regarding the YouTube TV change location and the exact steps. We have also mentioned some of the well-trusted VPNs to change YouTube TV location, but to be precise in the results, we have suggested Dr.Fone - Virtual Location as a complete and advanced tool for changing the location.
Spoofing Life360: How to Do it on Nubia Z50 Ultra?
In an era where location tracking has become a norm, many individuals value their privacy and wish to have more control over their location data. Whether you want to maintain your privacy, simulate being in a different place, or have other reasons for altering your Life360 location, this guide is here to help. We will explore the reasons why you might consider spoofing your Life360 location and provide you with step-by-step instructions on how to fake your location on Life360 on both iPhone and Android devices. Let’s delve into the world of location spoofing and regain control of your whereabouts.
Part 1: What is Life360?
Life360 is one of the admired apps known for tracking location. The app can be used as a location-sharing platform as well as you can chat with your friends via the in-app chat feature. Here are the basics. All this app suggests is that a group of people whether an office projects group or simply a college team or maybe the family members, download and install Life360 on their phones . Mind that the app supports iPhone and Android (6 and above) devices.
After the app gets installed, you can create a circle, which in other languages simply means a group, just like you create on Facebook or WhatsApp. This circle is having members who can share the information and location accountability with each other. You can also give invitations to other users by simply taking the help of their contact numbers or email addresses.
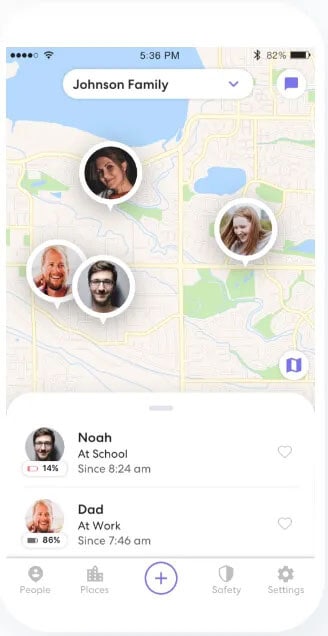
Using this app then, you can simply see the location of the other members as well as get notifications named Place Alerts. These notifications will tell you whether a user has arrived or left the selected location. This can be helpful if you are a parent and want your children to reach safely at a desired place.
Moreover, with the help of Life360, a user can easily control the ‘Check-in’ according to which he or she sends the alert to the circle to know them the exact location. You can also get to see the location history of the members to know their past locations.
Part 2: Why Do People Hate Being Tracked by Life360?
Unarguably Life360 can be considered one of the most helpful and fun apps. But the thing that sometimes or many times might bother people is the 24x7 interference with privacy.
For instance, spouses can monitor their better half and if any one of them does not understand enough, they can put various questions for your particular location and it may create chaos as a result. Not just it has a negative aspect, but it is possible that you are organizing a surprise for your partner, and for its execution; you are simply heading to a particular place. Having Life360 and being tracked by it can simply spoil the surprise as well.
For these reasons, a lot of people sum up the app as an intervention for their privacy. And for those who love their privacy, hating being tracked by Life360 is completely natural to them.
Part 3: Stop Life360 Tracking vs. Spoofing Life360
To stop or to spoof, that is the question! Yes, when you are annoyed with being tracked by Life360, you can have two options with you. Either you can stop Life360 tracking or spoof Life360 tracking. But what goes best? You might be wondering the same. For many of you, simply stopping the app and logging out from it can be a plain solution. However, we don’t support this. To us, the faking location on Life360 is much better.
- This is because firstly, if you log out and completely stop using the app, your members will get a notification for the same. To this, their curiosity will arise and none of them will stop questioning from you. To avoid this, we suggest spoofing Life360 location and not stopping it.
- Secondly, this may be fun as you can show off to your friends that you are traveling somewhere else. The list of friends may include those who are jealous of you. And this is the best way to double up their jealousy.
- Thirdly, if you tell the actual location of your device every time, many of the members, who are not having good intentions, can trace your routine and anything wrong can happen to you. Spoofing location can be a good way to trick them and catch their intentions.
Tips: Fake your Life360 location to any other address you require with Dr.Fone - Virtual Location! The Fake GPS feature for iPhone/Android prevents you from being tracked. Try it now and stop Life360 tracking you!
When it comes to learning how to trick Life360 on iOS or Android, the best option that should come to your mind should be Dr.Fone – Virtual Location (iOS/Android) . This tool comes to your rescue when you wish to change iOS location or Android location and keep your privacy on top. It helps you to simulate your movements along various routes. Apart from that, you can use it to make your virtual movement speed customized on the map. The tool is perfectly safe to use and carries a great reputation. Therefore, pondering over performance and success is not the thing you should fret upon. Here are the steps for Life360 spoofing location using Dr.Fone – Virtual Location (iOS/Android).
Step 1: Download Dr.Fone – Virtual Location (iOS/Android)
Get the tool on your computer for the process initiation. To do this, you can visit the official website and click the “Try It Free” button or you can directly click the “Download for PC” or “Download for Mac” as below. Next, install the tool and launch it. Choose the “Virtual Location” tab from the main screen.
Step 2: Get the Nubia Z50 Ultra device Connected
Take your iPhone now and connect it to the computer. Hit on “Get Started” once the phone is connected successfully.
Step 3: Find the Current Virtual Location
You will be shown a map on the next screen. Here, you can find your current virtual location. If the location is not showing, click on the “Current Virtual Location” icon that can be discovered at the lower right part.
Step 4: Enable Teleport Mode
You could observe the five icons at the top right of the screen. You need to click on the first icon which is to activate the Teleport Mode. After this, you can enter the place that you wish to teleport and press “Go”.
Step 5: Fake your Location on Life360
The program will make sure to recognize the place you have entered. A pop-up box will appear where the distance is mentioned. Click on “Move Here” and your location will be changed and shown as what you have selected.
Here is a video guide that helps you to fake your GPS location on Life360.
3,255,164
Part 5: How to Fake Location on Life360 Android
What if you want to know how to stop Life360 from tracking you? Well! You can go for a spoofing app for this too. There are lots of them available at the Google Play Store. For more clarity, we will help you know how you can use a spoofer app for Life360 fake location. Make sure to go along with the steps carefully.
Before you get the app worked, here is a requirement you need to follow. The requirement simply says you to enable the developer options in your Nubia Z50 Ultra. If you know how to do it, it’s good. But if you don’t here are the steps.
Step 1: Open “Settings” in the first place and tap on “System”.
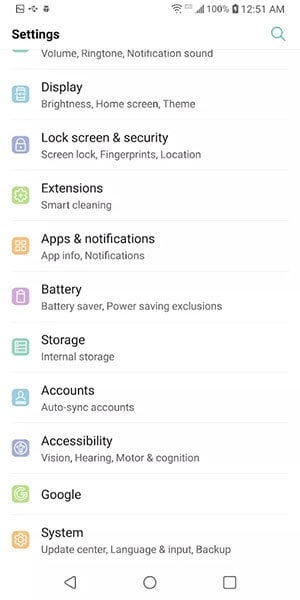
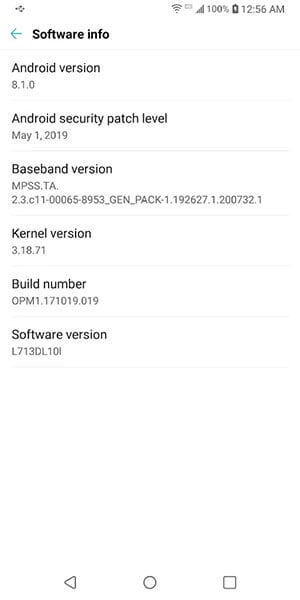
Step 2: Now, you need to go to the “About Phone” option. Followed by this, head to “Software info”.
Step 3: You will find the build number of your device here. You have to tap on it nearly 7 times.
Step 4: Now, enter the lock code when asked and the developer options will be enabled.
Step by Step Guide on how to fake your location on Life360 with Android Spoofer
Step 1: Now that you have turned on the developer options, you can visit the Play Store and look for Fake GPS Location app. Install it on your phone.
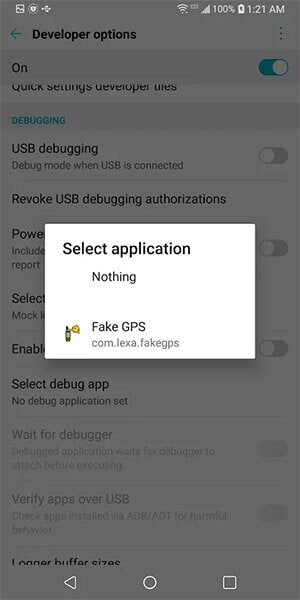
Step 2: Once installed, again go to “Settings” > “System” > “Developer Options”. Look for the “Select mock location app” and tap on it.
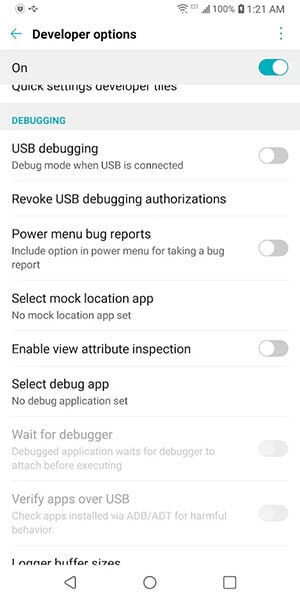
Step 3: Choose the Fake GPS app as the mock location app.
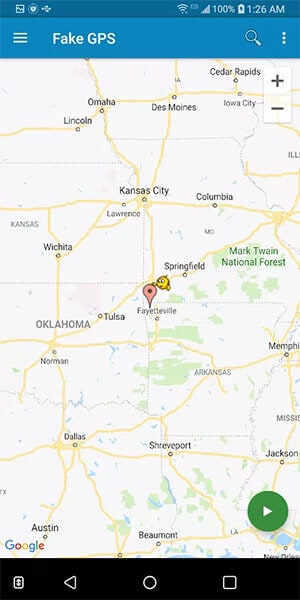
Step 4: Open the app now and choose the location you wish to fake and hit on the Play button. This was how to fake your location on Life360 on Android device.
If you want to find an easier way to fake location on life360 Android , you can also try to use Dr.Fone - Virtual Location(iOS/Android).
Dr.Fone - Virtual Location
1-Click Location Changer to Fake Your Location on Life360!
- Teleport from one location to another across the world from the comfort of your home.
- With just a few selections on your computer, you can make members of your circle believe you’re anywhere you want.
- Stimulate and imitate movement and set the speed and stops you take along the way.
- Compatible with both iOS and Android systems.
- Work with location-based apps, like Life360, Pokemon Go , Snapchat , Instagram , Facebook , etc.
3981454 people have downloaded it
Part 6: How to Stop Life360 from Tracking you
6.1 Use a burner phone
If you completely want Life360 to stop you from tracking, the very first method, and indeed a useful one is using a burner phone. This simply stands to have an extra phone with you and you can call it a burner phone. To have it, of course, you don’t have to spend much. Just have a cheap Android or iOS device with you. With this, you can easily trick your friends about your location.
- Now, all you have to do is to log out of the Life360 app from your main iPhone/Android.
- Install the app on the secondary or the burner phone and log in with the same account you were using on the original phone.
- There is nothing more to it. You can now abandon this burner phone and leave it for your work. This will make your friends or near ones think where you want them to show your location.
Note: As we have mentioned in the beginning, Life360 supports an inbuilt chat function. This is where the downside comes of having a burner phone as a solution. Putting simply, you may miss an important conversation if you have the app on a burner phone and you have left it at home when any of your friends try to chat with you. And this can cause doubts in their minds.
6.2 Pause Location Sharing in Life360 Settings
Here is another way to stop Life360 from tracking you. You can simply pause the location-sharing option from the settings. Let us mention the steps without any more discussion.
Step 1: At the lower right corner, hit on “Settings”.
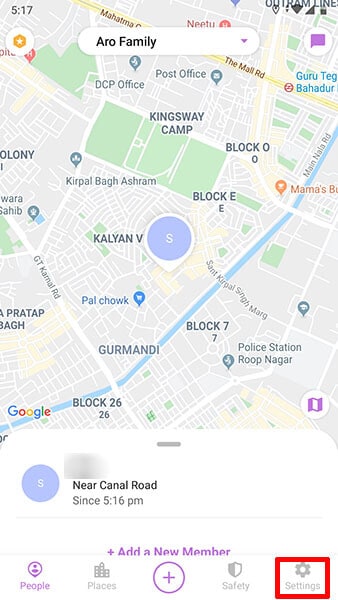
Step 2: Now, go to the Circle Switcher at the top and pick out the circle you wish not to share locations with.
Step 3: Hit on “Location Sharing”.
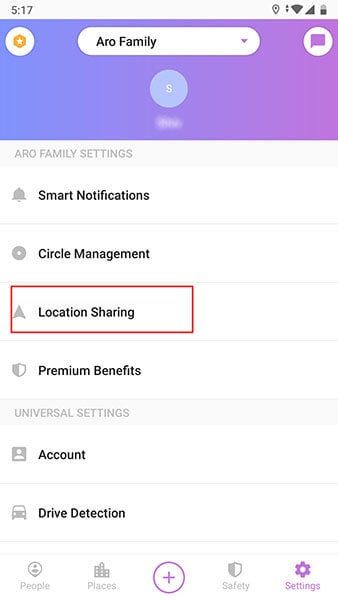
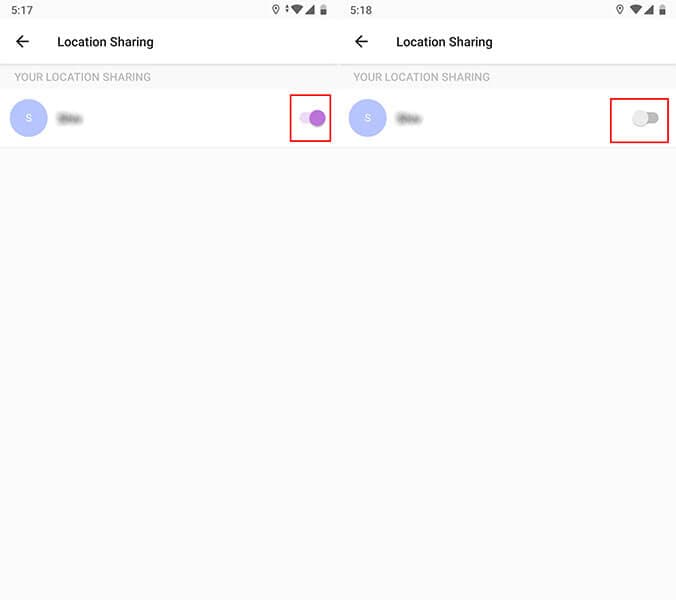
Step 4: Lastly, toggle off the slider and it will turn grey. You will see a message saying “Location Sharing Paused” and you are done.
Note: When you disable or pause location for a particular group, your location can still be tracked by other circles. Make sure to choose all or as per your needs.
FAQs
- How do I delete my history on Life360?
While it is technically possible, the method to accomplish this is improbable in yielding the intended outcome. Essentially, the sole means to entirely erase your history is by either deleting your Life360 account or departing from the Circle. Merely turning off your GPS or data connection on your phone won’t suffice.
- Can I fake location without jailbreaking my iPhone?
Yes, it’s possible to fake your location on an iPhone without jailbreaking using third-party tools like Wondershare Dr.Fone - Virtual Location. This tool allows you to simulate GPS movement and set a fake location on your iPhone without needing to jailbreak the Nubia Z50 Ultra device. With Dr.Fone - Virtual Location, users can easily change their GPS location to any desired spot.
- How to spoof the actual movement from one place to the fake location?
Wondershare Dr.Fone - Virtual Location is a tool that allows users to spoof actual movement from one place to another fake location on an iPhone. By using its features, users can simulate movement along a specified route, imitating real-life GPS movement from one location to another.
- If I turn off the Wi-Fi on my iPhone, will Life360 stop tracking me?
Disabling Wi-Fi on your iPhone might limit the accuracy of your location for Life360. However, Life360 can still track your location using cellular data and GPS. Turning off Wi-Fi alone might not entirely stop Life360 from tracking your location. It is especially true if other location services are still active on your device. To prevent tracking, you might need to adjust settings within your device’s location services.
Final Words
Life360 is no doubt a useful app that can help you know about the whereabouts of your near friends and family. However, when you hate being tracked on it, spoofing Life360 can come out as a great option. We discussed some helpful ways how to fake your location on Life360 in this article, including Dr.Fone - Virtual Location which allows you to manipulate your GPS location, simulate routes, and set up geofences, making it a versatile solution for your location spoofing needs. Hope you find this helpful.
Also read:
- [Updated] Navigating the Thin Line of VR Content Availability
- [Updated] Perfect Playback 5 Innovative Techniques for Gamers
- Daily Life Bots Clash: Claude Vs. Generative Pre-Trained Transformer
- Fake the Location to Get Around the MLB Blackouts on Oppo K11x | Dr.fone
- Fixing Foneazy MockGo Not Working On Google Pixel 7a | Dr.fone
- How To Fake GPS On Vivo S17t For Mobile Legends? | Dr.fone
- How to Use Life360 on Windows PC For Nokia C110? | Dr.fone
- How To Use Special Features - Virtual Location On Apple iPhone XR? | Dr.fone
- In 2024, 5 Hassle-Free Solutions to Fake Location on Find My Friends Of Tecno Pova 5 Pro | Dr.fone
- In 2024, Can Life360 Track Or See Text Messages? What Can You Do with Life360 On Realme GT 5? | Dr.fone
- In 2024, Mastering Lock Screen Settings How to Enable and Disable on Tecno Pova 5 Pro
- Power Up Your VMs in Windows Using These Top 6 Enhancers
- Top 7 Most Popular iMessage Games - Rank Your Picks
- Unveiling the Secrets of Advanced Camera Settings
- Windows Defender Whitelisting: How to Create Exceptions with YL Software's Comprehensive Tutorial
- Title: Complete Tutorial to Use VPNa to Fake GPS Location On Nubia Z50 Ultra | Dr.fone
- Author: Ava
- Created at : 2025-01-06 18:37:20
- Updated at : 2025-01-07 20:20:43
- Link: https://fake-location.techidaily.com/complete-tutorial-to-use-vpna-to-fake-gps-location-on-nubia-z50-ultra-drfone-by-drfone-virtual-android/
- License: This work is licensed under CC BY-NC-SA 4.0.