
Full Guide to Fix iToolab AnyGO Not Working On Realme C51 | Dr.fone
Full Guide to Fix iToolab AnyGO Not Working On Realme C51
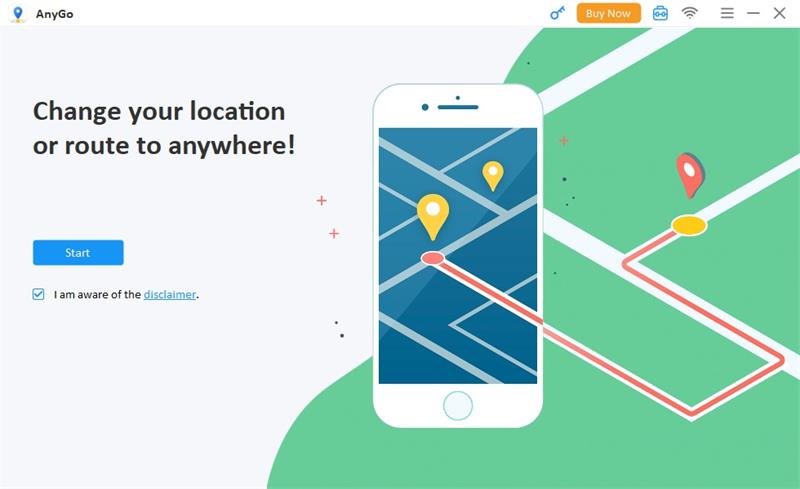
If you want to go anywhere in the world without moving an inch from your home and wondering how to change location on your iPhone, then iToolab AnyGO is the app for you. Not literally, but it allows you to teleport your current location anywhere around the globe. It is considered the most famous and widely used GPS spoofing locator, which offers various options than merely faking your current location.
It also allows you to simulate GPS movement, which helps you play games after importing GPX route files. You can use a joystick or keyboard to simulate easily anywhere. But users of this app are experiencing some technical problems and improper functionality and hence can not seem to get on with it. And if you are among those unlucky guys and wondering if iToolab AnyGO not working, how to fix it? Then you’re at the right place.
In this article, you will get to know exactly how to fake location on iPhone and fix iToolab AnyGO when it is not working. Though there are numerous problems that users are complaining about, here you will know the most common problems faced by many users. So stay tuned.
Part 1. What is iToolab AnyGo?
This app is a GPS spoofing app that changes location on iPhone anywhere around the globe. But the fun part with this app is that now you can gain access to the location-based games and apps that you normally could not access. This opens gates to endless possibilities where you can watch any TV show, download any location-based app, and play games. In short, this app removes any geo-based restrictions on you without jailbreaking your phone.
Here are some prominent pros of the app in a nutshell:
- Spoof GPS location on your iPad/iPhone with jump mode.
- Change locations multiple times.
- Works perfectly with geo-based games like Pokemon GO.
- Play AR games naturally.
- Enable 2-spot or multi-spot movement or follow the GPX route.
And here are some of the drawbacks:
- It is difficult to change locations multiple times and your account may also suspend.
Part 2. How to fix the iToolab AnyGo not working issue?
Issue 1: The map does not appear in the program
First, check your network connection if iToolab AnyGO doesn’t show on the map. Then, if the internet is available, download the latest iToolab AnyGO. You can check it out by clicking the menu and hitting the “Check for updates” button. Alternatively, you can uninstall and re-install AnyGO to acquire the latest version.
Issue 2: iPhone/iPad unable connecting AnyGO
Follow these step-by-step guides if your iPhone/iPad cannot connect with iToolab AnyGO.
- Try to re-plug and unplug your device, and connect again after restarting the program.
- Also, try different USB ports and original USB cables, as maybe there’s an issue with the USB connection.
- Also, make sure that your computer and your device are correctly connected. If not, then iTunes cannot detect your device.
Note: Make sure that your iOS version should be compatible with AnyGO. iOS 8 or the latest versions ensure compatibility.
Issue 3: AnyGO repeatedly crashes
If this issue still exists, try to re-open the program again and again. If crashing continues, send program log files to the support team.
For Mac:
Head to the top menu of Mac and click Go, then click the Options button over the keyboard. A drop-down menu will appear with library options. Go to library>logs>Diagnostic reports and find log file”iToolab AnyGO” for mac crash.
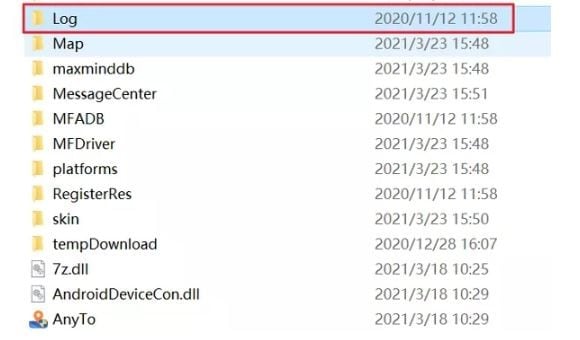
For Windows:
On AnyGO, Go to the installation path. Locate the log folder and compress it before sending it to the support team.
Tips: iToolab AnyGo still not working? Switch to Dr.Fone - Virtual Location for seamless and reliable location simulation. Say goodbye to issues and enjoy hassle-free location control. Try It now!
Part 3. Best iToolab AnyGo Alternative Program You Can Use in 2024
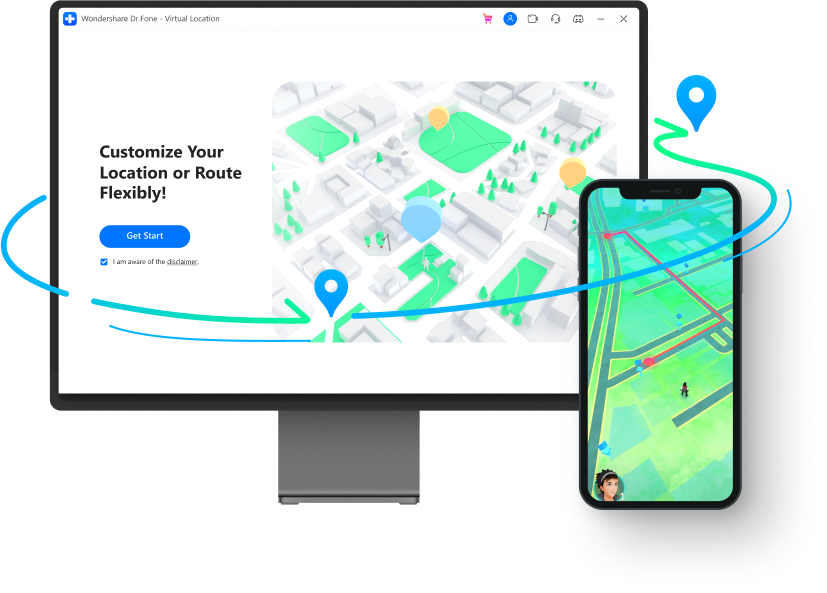
If you are searching for an alternative app to the iToolab AnyGo, look no further and check out the Dr.Fone - Virtual Location . It is similar to other GPS spoofing apps but promises a smooth, natural, and realistic simulation of any GPS location.
Games are always fun playing with joysticks. And if you play games like Pokemon GO with it, you will experience better and seamless control over your Pokemon character in the simulation.
The app has a low detection rate which prevents you from jailbreaking and avoids getting your account banned. The developers are always alert and constantly updating the app, so you get the most benefit from Dr. Fone Virtual Location. In addition, it is highly compatible with devices running the latest version, so you do not have to worry if the app will work on your device if you are running iOS 17 or Android 12 or later versions.
One great feature that Dr. Fone Virtual Location consists of is sharing your fake location with your family. So you can play pranks with them and have a great time. You can also connect with new friends and get to know their whereabouts.
So much of the talk. If you are wondering how to use Dr.Fone - Virtual Location app? Here’s what you should know. Follow the below step-by-step guide:
How to use the joystick for flexible and smooth GPS control
- The joystick feature is located in the teleport option at the upper-right corner in the 5th location.
How to simulate movement along the route using 2 spot location
- Go to “One-Stop mode” at the corner on top.
- Select the spot on the map you wish to go. The pop-up will tell you how far it is.
- Drag the slider to select how fast you wish to move. Choose between cycling, walking, and driving. Let’s take cycling for example.
- Enter a number to decide how many times you want to cycle between the two locations. Now click “Move Here”. Your character will start moving.
How to export and import GPX location
- Click the export button to store the path as a GPX file
- Import the shared GPX file to your Dr. Fone Virtual Location.
- Download it from another website. Now click the “Open” button.
- Wait some time to complete the import process. Once done, it is now ready for use.
How to teleport anywhere around the globe
Firstly download the Dr. Fone Virtual Location app. Though the app’s current version has an old interface, the functionality is cleared from any glitches. The latest interface will soon be available. Now click on the “Virtual Location” from the options and connect your Android/ iPhone to your computer, and hit “Get Started”.
Now in the window, find your existing location on your map with the help of the “center on” icon, which is located on the right sidebar. You will go to your current location upon clicking.
Now hit “teleport mode” at the top right. Enter your desired teleport located and hit the “Go” icon. Let’s visit Rome for this example.
You have successfully teleported to Rome. Click “Move Here”
Now your location is fixed to Rome.
How to add your route as a favorite
- On your virtual location screen, click on the five-star beside the route and add it to your favorite.
- Once you have added, hit the five-star icon again at the right-sidebar and locate the route you wish to use. Now hit the “Move” button and start walking along your favorite route again.
How to simulate movement along the route using multi-spot
- Choose multi-spot mode at the top right corner.
- The left sidebar tells how far it will travel to reach the location. Now set the moving speed and specify the number of times to cycle between the locations. Now click “Start Moving”.
You can watch the video below to fix iToolab AnyGo not working
Conclusion
If you are experiencing issues in the app and thinking iToolab AnyGo not working how to fix it? This is the answer. But if you are looking for an alternative, look no other than Dr.Fone - Virtual Location (iOS/Android). The app is very easy to use, teleports you in one click, and lets you use any location-based apps and games that are otherwise impossible to play.
 safe & secure
5 Hassle-Free Solutions to Fake Location on Find My Friends Of Realme C51
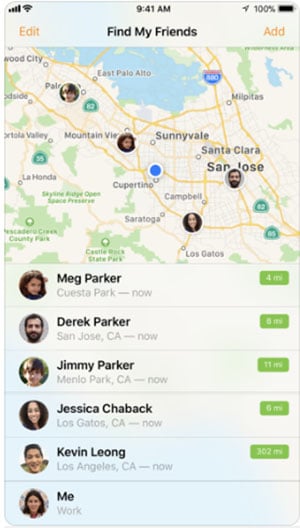
Find My Friends is an app developed for Android and iOS devices. You can say it as a location-sharing application. This app can be used to share the location of each other among the friends. When your contacts install the app on their device, the application makes everyone eligible to share their location with you and you can too share the location with your friends.
It is helpful if you are having a hang out plan with your friends. And if you friend is on the way, he or she can share their location. Or it is a great way to catch if someone is lying about their location.
Part 1: About Find My Friends app
When location sharing is enabled in the Realme C51 device, the map will show the current locations. The Find My Friends app also has an inbuilt chat option where you can contact your friend and interact about with them. It also automatically informs you when your friend reaches at the target location, leave a location etc. You can customize and configure the alerts as per your choice.
How it is different in iOS 13
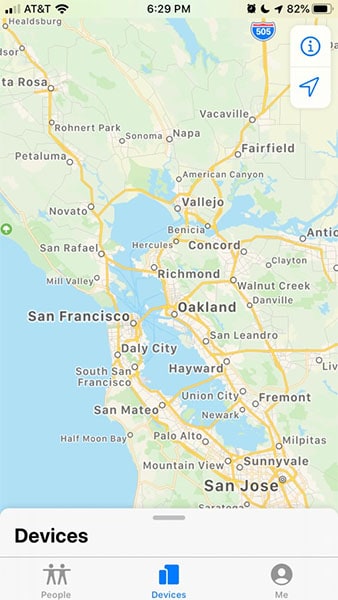
You can find yourself confused if you are using iOS 13 and looking for Find My Friends app. You may not be able to find it on your device running on iOS 13. To your information, Apple has decided to combine the Find My iPhone and Find My Friends app into one. And they have named it as “Find My”. This new named app has everything what Find My Friends and Find My iPhone has. When you’ll open it, you will find the “People” tab on the bottom. Using this, you can get your friends as you used to get before.
Part 2: What Are the Against Voices of the Find My Friends App?
Look at some of the things we feel not beneficial about Find My Friends.
- No doubt you can have great advantage of an app that can tell you location of your friends, fiancée or spouse. However, the app is not free. You need to pay a small amount of 99 cents to use this.
- Another thing that might bother you is that there are a lot of people who will be knowing where you exactly are. And this could be a little annoying.
- Also, it is possible to get unnecessary requests from the unknown people. This can also be bothersome.
- Apart from this, the app if in wrong hands like an abuser can be used for wrong purposes and harmful for their partners.
- Not to forget, hackers are everywhere and the app is prone to get accessed by any of them.
In such cases, the need of hiding or faking Find My Friends location rises. This is because we are sharing some ways to fake location on Find My Friends on your iOS and Android.
Part 3: 4 Solutions to Fake Find My Friends Location on iOS
We know how important it is to trick your device deceiving with the location. You might be curious now to learn the methods that can meet the objective of yours. Let us begin with the section that introduces you four ways to fake Find My Friends location.
3.1 Use virtual location tool to fake Find My Friends location on iOS
One of the useful ways to learn faking location on Find My Friends is using a professional tool like dr.fone – Virtual Location (iOS) . This tool helps you to teleport your iOS device’s GPS anywhere. Also, with this, you can get your speed of movement customized easily. It is one of the trusted tools you can use. Here are the steps to be followed to fake location on Find My Friends.
Step 1: Follow the Installation Process
From the main page of dr.fone – Virtual Location (iOS), download it. After this, install the tool on your system and then launch it. Now, click on “Virtual Location” option.

Step 2: Set up Phone’s Connection
Now, take your iPhone and keep it connected with the system. After this is done, click on the “Get Started” button to move ahead.

Step 3: Look for Location
After following the second step, all you need is to look for your actual location. To make this happen, click on the “Center On” icon given at lower right of screen.

Step 4: Enable Teleport Mode
In this step, you should activate the teleport mode. This will be done by clicking the third icon in the upper right of the screen. You can now input the place you want to teleport.

Step 5: Fake Find My Friends Location
Now, the program will get your location and click on “Move Here” that comes in the next dialog box. The location will be changed now. You can see that in your iPhone and its location-based app.

3.2 Use a burner iPhone to fake location in Find My Friends
Using a burner can also be a good option to take help of when your goal is to fake GPS on Find My Friends. It is nothing but a secondary device where the Find My Friends app can be downloaded and used it to swindle the people you want. This will allow you to keep more privacy as no one will be able to peep into your matter or location.
- All you need is to log out of Find My Friends app on your main phone.
- Install the app on your burner phone and log in it with the same account as your iPhone.
- That is it! You can now plainly leave your burner phone on the location you want. In other words, you can create your own story. Simply put the Realme C51 device where you want the others to think about your visit.
In spite of the fact that this way is helpful, there could be some shortcomings associated with it. Firstly, your friend might try to connect with your through Find My Friends app’s chat feature. And since you have kept your burner device somewhere else and you don’t have it right now, you can miss the chat. This may make your friends a little doubtful.
Secondly, it could be perplexed and draining at the same time to keep checking that the entire settings are accurately set up.
3.3 Use FMFNotifier to help you on Find My Friends
If still you wonder how to fake your location on Find My Friends, FMFNotifier can help you. Before you use this, let us inform you that this application can run on a jailbroken iPhone. So, if you have a device that is old and you don’t mind jailbreaking it, you are good to go with this app to fake Find My Friends location. Moreover, you will need Cydia to get this app. Cydia can be said as the App Store alternative. It is a platform for installation of software or apps on jailbroken iOS devices. The apps that are not authorized by Apple can be found on Cydia’s package manager.
If you have done jailbreaking, you can have FMFNotifier. Jailbreaking will be worthy as FMFNotifier contains many great features.
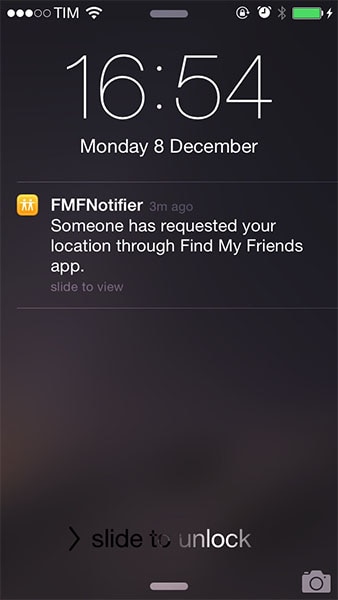
- One of the amazing things about this app to fake Find My Friends location is it sends you the notification each time when someone want to track your location. Whenever your friend attempts to ping your location, it will notify you as “Someone has requested your location through Find My Friends app”. And this is the moment where you can fake your location on Find My Friends. You can right away set a fake location when you know someone requires your location.
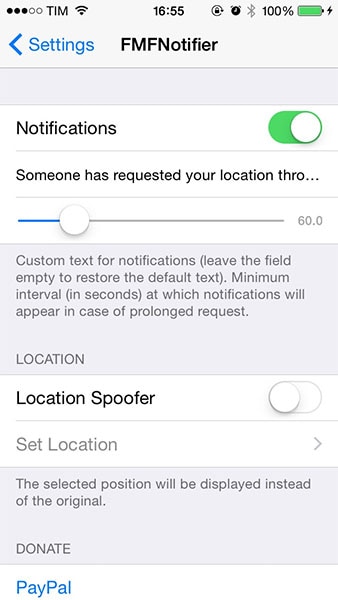
- Secondly, you can do configurations from the Settings app easily. Like, you can customize the text of the notification. Besides, the app allows you to set and save several false locations preset.
Guide on How to Use FMFNotifier
Step 1: Firstly, open Cydia and go to Sources.
Step 2: Look for FMFNotifier package which can be available on BigBoss repo.
Step 3: Lastly, install the package. Now, you can go to “Settings” on your device. Go to FMFNotifier and configure the settings as you want to fake location on Find My Friends.
3.4 Use AntiTracker to protect your location privacy
When privacy is everything for you, you cannot tolerate anyone peeping into your life, especially your location. Find My Friends lets people doing that. You can take help of AntiTracker which is another jailbreak tweak. With this, you will be helped by faking location on Find My Friends. Like the above app, this will also notify you when someone is going to know your location through Find My Friends.
You will get the notification no matter your screen is locked or not. A notification that is “You’re being tracked” along with the Find My Friends icon will appear when someone tries to track you.
![]()
Guide on How to Use AntiTracker
Step 1: It is available free on Cydia’s Bigboss repo to download. S, go to CYdia and look for AntiTracker.
Step 2: Download the package and the app icon will be added on your Home screen of iPhone. You can now configure the tweak from Settings. The settings allow you to:
- Turn on and off tweak whenever you want
- Hide the location
- Select the sound that will play when the notification comes
- Select the message to be appeared in notification
- Have a look on the location request logs i.e. each time when the location is pinged
![]()
Part 4: How to Fake Find My Friends location on Android
If you want to fake Find My Friends location on Android, you can easily configure Android devices to do it. For this, you can take help of an Android spoofer app. There are plenty of them available in Play Store. We will be using “Fake GPS GO Location Spoofer Free”. This is how to fake location on Find My Friends on Android.
Step 1: To use this, you don’t need to jailbreak or root your device until your Android is running on 6 and higher versions.
Step 2: Go to Play Store and search for the app. Install it after downloading.
When you install it rightly, this is how to do a little twisting to set it up with Find My Friends.
Step 1: To spoof people about the location, enable the developer settings in the first place. Simply head to “Settings” for this and go to “About Phone”.
Step 2: In the “Software Info”, you will see a build number. Tap on it nearly 6-7 times. The Developers options will be enabled now. This step is important because it will alter the security settings in your phone. As a result, tricking about the location will become easier.
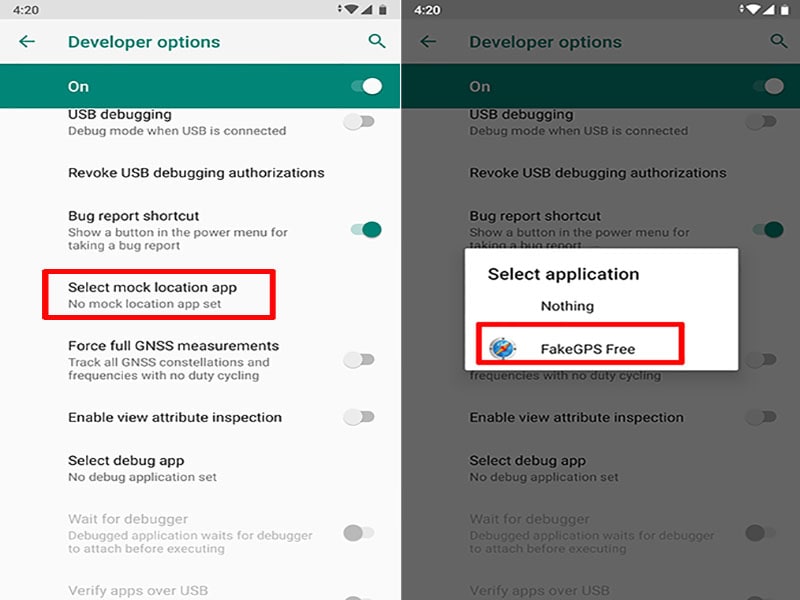
Step 3: When developer options are enabled, launch the app. You will see an “ENABLE” option at the bottom. Tap on it to turn on mock locations feature.
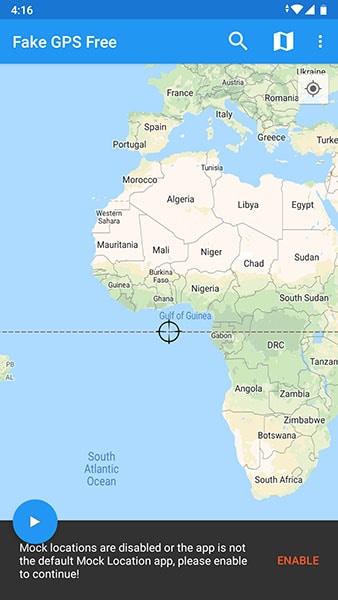
Step 4: Under the Developer options page, click on “Select mock location app”. Now, select “FakeGPS Free” from the list.
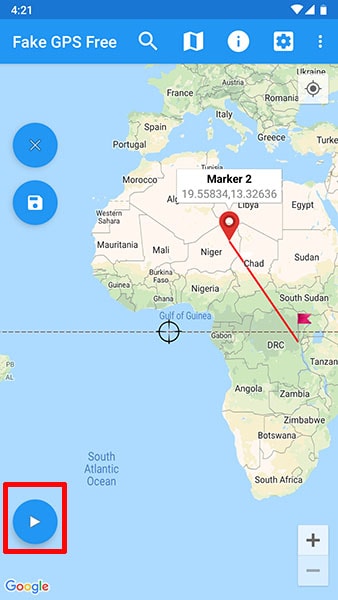
Step 5: Return to Fake GPS Free and long press the two spots on map to set the route. Take help of the play button given at the bottom. This will enable the location spoofing. You will see, “Fake location engaged…”. This will show your fake location on Find My Friends app.
3 Ways to Change Location on Facebook Marketplace for Realme C51
Facebook Marketplace is a hub designed within Facebook that enables Facebook users to buy and sell stuff online. This marketplace has optimized the chances of buying and selling legit stuff, including household appliances, clothes, and electronic devices. You must enter the pictures of that product and write a good description.
All the potential buyers from the nearest locations will access it. Moreover, you can look up stuff on the marketplace and order your favorite product with just simple clicks. It is also possible if you want to change the location of marketplace listings to attract buyers and sellers of your nearby areas.
The following discussed points in the article will teach you how to change location on the Facebook marketplace:
Part 1: How to Change Location on the Facebook Marketplace on iOS and Android Devices
The Facebook Marketplace is a feature that finishes the gap between social media and digital marketplaces. With this helpful feature, you can now buy and sell items on your Facebook account to other Facebook users. In addition, you can filter the listings and see the buyers from a specific location by changing to a location.
Here, we will teach you the steps involved in changing the FB Marketplace location on your Android and iOS devices:
Step 1: The first step requires you to open the Facebook app on your Realme C51 or iPhone. Login to your Facebook account to initiate the procedure.

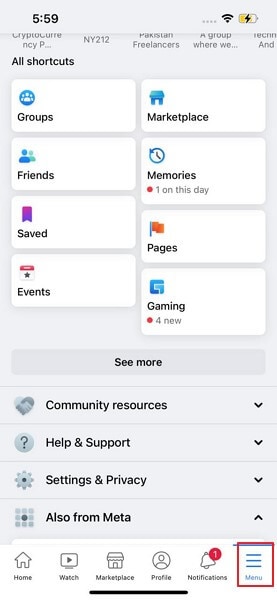
Step 2: If you have an Android device, you will see a hamburger icon situated at the top-right corner. You have to click on it to access the Facebook menu. Or, if you have an iPhone, click on the three dots on the bottom side of the application.
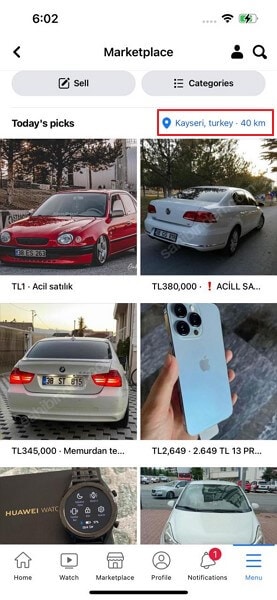
Step 3; After doing the prior step, you will now access the “Facebook Marketplace” feature. Your current location will be written in blue on the upper-right side of the existing Marketplace listings. You should click it to change your Marketplace location.

Step 4: Use the “Search Bar’ at the top of the screen to search and select the new location. After entering the target place, tap on the “Apply” button. You can also adjust the distance slider below “Custom radius” to change the location.

Step 5: Now, the Facebook Marketplace will refresh. You will now be able to see new listings for the selected location.
Part 2: How to Change Facebook Marketplace Location on Facebook Website
If you are using Facebook from a browser, it is also achievable to change the location and control the listings yourself. To perform this process on a browser, follow the given steps and achieve the Facebook marketplace change location:
Step 1: Access Facebook through the browser of your choice and sign in to your Facebook account.
Step 2: There will be a “Marketplace” icon; click on it. Now, the current location will be displayed on the screen. You have to tap on your current location to fake the location of your marketplace.

Step 3: Enter the desired location and hit the “Apply” button. The listing search radius can also be changed with the help of the dropdown button.

Step 4: Facebook marketplace will be refreshed, and your new listings for the selected location will be visible.

Part 3: Facebook Marketplace Location Won’t Change? One-Click to Solve It
Dr.Fone – Virtual Location is an application that allows users to change their device location virtually. You can quickly teleport the GPS location to places of your choice. It is now super-easy and secure to virtually change your current location, bypass all the restrictions, and filter the listings on your Facebook marketplace.
What Makes Dr.Fone – Virtual Location the Best Solution?
The application holds a wide range of uses and characteristics, so it is considered the best way to change location. The following key points are mentioned why it is the best location changing solution available:
Dr.Fone - Virtual Location
1-Click Location Changer for both iOS and Android
- Teleport from one place to another across the world from the comfort of your home.
- With just a few selections on your computer, you can change the location on your Facebook marketplace.
- Stimulate and imitate movement and set the speed and stops you take along the way.
- Compatible with both iOS and Android systems.
- Work with location-based apps, like Pokemon Go , Snapchat , Instagram , Facebook , etc.
3981454 people have downloaded it
Simple Steps to Fake your Location on Facebook Marketplace
The following step guide will assist you in changing the location of the marketplace listing to get targeted buyers or sellers for the Facebook marketplace:
Step 1: Install the Program
The first step requires downloading Dr.Fone- Virtual Location (iOS/Android). Now, install it and launch the software on your PC.
Step 2: Connect your Phone
Click on “Virtual Location” from the available options and connect your phone to the computer with a USB cable. IPhone users, once connected, can link the software with Wi-Fi without any USB cable. Now, press the “Get Started” button.
Step 3: Provide your Desired Location
Now, activate the “Teleport Mode” by clicking the first icon on the upper-right side. Next, enter the target place you want to teleport to and click on the “Go” button.
Step 4: Change your Location
Now, click on “Move Here” in the popup box, and your location will be changed. Your Android or iOS device location will be shifted to the added location now. Then, you can open Facebook and see the buyers and sellers of the given location in the Marketplace.
Part 4: FAQs about Facebook Marketplace
- What are the extra services for me after changing my location on Facebook Marketplace?
There are no extra services given on the Facebook Marketplace after changing the location. You will be able to access the audience of the selected location.
- Is it secure if I give my address on the Facebook marketplace?
You must not offer your full name and your contact details. Meet in a safe and public place such as a park, restaurant, shopping mall, or police station. However, you still should not give your details to the buyer.
- Why is my Facebook marketplace displaying the wrong address?
You might have used a VPN service in the past, which affected your actual address on the Facebook Marketplace. Don’t worry, as you can change the current location with a mere click.
- How to change the Facebook marketplace plan?
There is no plan required to use the Facebook Marketplace. This feature is entirely free for all Facebook users.
- How to maximize sales on the Facebook marketplace?
There are various methods to attract more buyers to you. First, try to optimize the Facebook listing by adding more keywords in the description and title. Also, write a longer description and explain more details about the item. You can also hire a photographer who will take good pictures of your product.
Conclusion
The article concludes with how to change location on the Facebook Marketplace to perceive buyers and sellers of your nearby areas. This way, you will be able to meet the buyer or seller yourself and discuss the product peacefully. With Dr.Fone - Virtual Location , you can change the location of the marketplace listing and teleport to a place you want to sell/buy in.
safe & secure
Also read:
- [New] Building Bridges Encouraging Dialogue in the YouTube Community for 2024
- [New] Overview and Assessment - Parrot's Advanced Edition
- [New] Prepare Yourself 7 Must-Have Tech in the Digital Frontier
- [Updated] In 2024, The Entrepreneur's Pathway to Profitable Vlogging
- Complete Tutorial to Use VPNa to Fake GPS Location On Oppo Find N3 Flip | Dr.fone
- Full Guide to Fix iToolab AnyGO Not Working On Meizu 21 Pro | Dr.fone
- In 2024, Action Camera Showdown SJ-CAM S6 Takes the Spotlight
- In 2024, How to Erase an iPhone 13 without Apple ID?
- In 2024, How to Use Pokémon Emerald Master Ball Cheat On Xiaomi Redmi K70E | Dr.fone
- iSpoofer is not working On Samsung Galaxy F14 5G? Fixed | Dr.fone
- Read This Guide to Find a Reliable Alternative to Fake GPS On Itel A70 | Dr.fone
- Spoofing Life360 How to Do it on Tecno Pop 8? | Dr.fone
- The Ultimate Guide to the Asus ROG Ally X - A Revolutionary Gaming Laptop for Gamers on the Move
- Title: Full Guide to Fix iToolab AnyGO Not Working On Realme C51 | Dr.fone
- Author: Ava
- Created at : 2024-11-15 02:30:06
- Updated at : 2024-11-22 02:53:58
- Link: https://fake-location.techidaily.com/full-guide-to-fix-itoolab-anygo-not-working-on-realme-c51-drfone-by-drfone-virtual-android/
- License: This work is licensed under CC BY-NC-SA 4.0.