How to Change Google Play Location On Itel A60s | Dr.fone
How to Change Google Play Location On Itel A60s
Google Account has unlimited advantages as it provides quick access to multiple platforms like Google Drive, Google Calendar, and Google Play Store. By accessing these platforms, users can increase their functionality to ease their daily tasks. For example, Google Play Store offers tons of apps and tools in every category that millions of people install on their devices.
However, some featured apps on the Play Store are restricted region-wise, and some users cannot download them. This article will guide you on how to change the country in Play Store to access all the apps.
Part 1: What Should We Know Before Changing Google Account Location?
By changing the country on Google Play Store, you can install some unavailable apps in your region. You can quickly enjoy the applications and services on your phone by simply changing the country’s location. Before knowing how to change location on Google, you should know some essential aspects.
Warnings About Changing your Location
- Often, users are deprived of some services and features apps if they are not available in the newly chosen region.
- Changing the Google Play Store location is easy, but you can only change the settings once a year. This depicts that you can change the location settings of your Google Account after 365 days.
- After changing the country’s location, you won’t be able to utilize the previous Google Play balance of the old country.
- Once you have changed your country’s server location in settings, the Google Play Store takes 48 hours to change the location.
Part 2: How to Change Google Account Location?
This section will offer easy ways to change play store country and location on Google in every circumstance. By doing so, you can easily install restricted applications in your region.
How to Change Location on Google on Android
Situation 1: How to Change Country in Google Play Store on Android
Through your Itel A60ss, you can change the location on both Google Play Store and Google Account easily. To know more details about how to change the country in Google Play Store, read the following guidelines:
Step 1: Open your Google Play Store from your Itel A60s. Navigate to the profile icon from the corner and select “Settings” from the displayed menu.
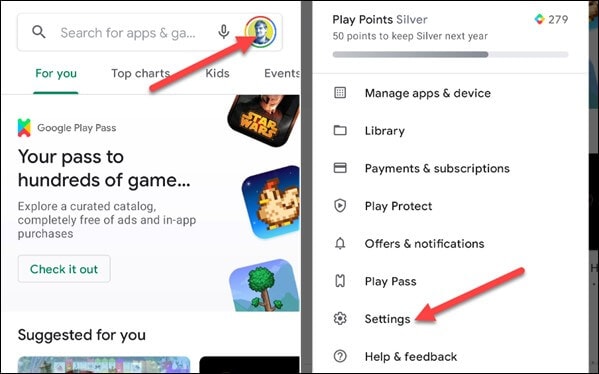
Step 2: Tap on the “General” section to locate the option of “Account and Device Preferences.” Afterward, find the “Country and Profiles” option by scrolling down. From there, you can see your current country location.
 PCDJ DEX 3 for Windows & MAC is the total entertainment DJ software solution, offering audio, video, and karaoke mixing ability. Automatic beat-sync, smart looping, 4 decks, DJ MIDI controller support, Karaoke Streaming and much more.
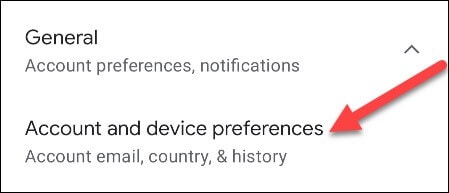
Step 3: Now click on “Switch to the Country Play Store” to change the location. For verification, click on “Continue” when a pop-up message appears on your screen asking if you want to change the location.
 OtsAV DJ Pro
Step 4: Now, you will be automatically assisted in changing the payment methods of the new country. However, if you don’t come across the option to change the country, either you have already changed the country location within a year or your IP address is not synchronized with your new country.
Situation 2: How to Change Google Account Location on Android
In this particular situation, you don’t have to change the Play Store country; instead, you can only change the Google location on your Itel A60s. We will recommend the VPN Proxy Master Lite , which works effortlessly to change Google‘s location. This tool flawlessly hides your IP address so that you can easily use any country’s location to access all the applications and services. Moreover, it’s highly secured and well-protected so that no virus can harm your Itel A60s.
To use this powerful VPN tool, we have jotted down some basic steps through which you can change the location on your phone easily:
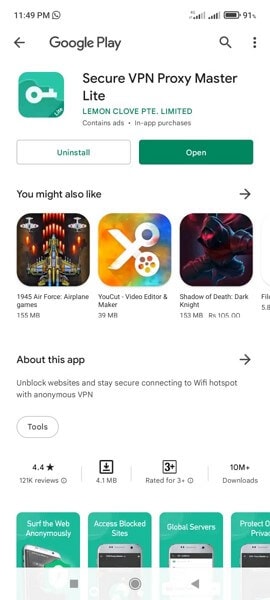
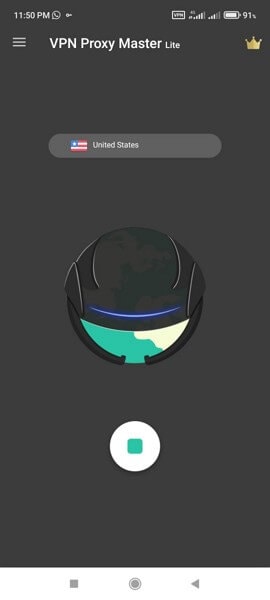
Step 1: Start installing VPN Proxy Master Lite on your Itel A60s from your Google Play Store. Once this app is successfully installed, open this app to proceed.
Step 2: After opening this app, tap on the country’s name list displayed above the picture of Earth. Tap on that list to view all the available countries.
 Easy GIF Animator is a powerful animated GIF editor and the top tool for creating animated pictures, banners, buttons and GIF videos. You get extensive animation editing features, animation effects, unmatched image quality and optimization for the web. No other GIF animation software matches our features and ease of use, that’s why Easy GIF Animator is so popular.
Step 3: Select any country from the displayed list by tapping on it. Meanwhile, make sure that your phone is connected to a strong internet connection. This tool will automatically change your Google location by tapping on the country’s name.

How to Change Location on Computer
Situation 1: How to Change Country in Google Play Store on Computer
In this situation, we will help you change the country’s location on your Google Play Store through your computer. Just follow the below-given steps.
Step 1: Start by navigating to your PC’s browser and then open Google Play . Once done, click on the “Settings” displayed on top of your screen.
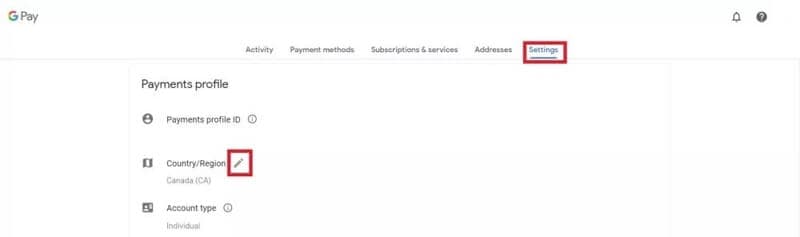
Step 2: After opening the settings menu, go to “Payments and Profile” and locate the option of “Country/Region.” Proceed by tapping the edit icon next to it.
Step 3: To connect with the new country’s location, tap on the option “Create a new profile.” Afterward, you can see the on-screen instructions on your computer, so follow them to complete the process. Once done, Google Play will change the location after 48 hours, and you can search for the applications you want to install.

Situation 2: How to Change Google Account Location on Computer
If you want to change Google location on your computer without changing country on Google Play Store, use ExpressVPN by downloading it. This tool is a well-trusted platform and offers an instant way to change Google location easily. In addition, you can rely on its platform to connect with more than 94 countries worldwide by changing the location anytime you want.
Moreover, the process is fast and fully secured to protect your computer from unwanted bugs. To change the location using ExpressVPN, the steps are:
Step 1: Begin launching ExpressVPN on your computer and open its interface. Once done, turn on the VPN button and tap on the “Location Bar” to change the location.
Step 2: You can explore regions by either navigating to the “Recommended” or “All Locations” tab. Select the location you want to change with from the displayed list.
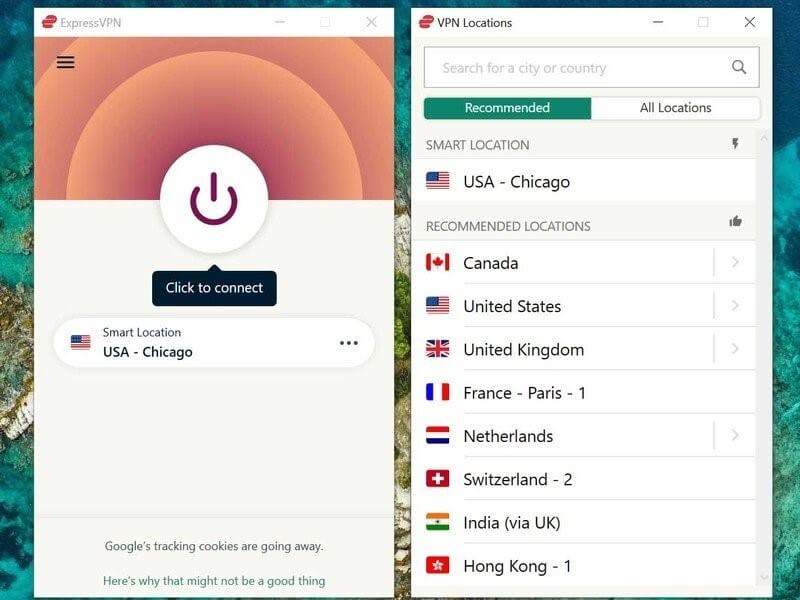
Step 3: After clicking on any country’s location, your computer’s Google Account location will be automatically changed.

Part 3: The Most Effective Way to Fake Location on iOS and Android
We have mentioned methods to change Play Store country manually and through VPN, but they still have a few limitations. Once you change the country’s location on Google Play manually, the Play Store requires 48 hours to accept this modification. Moreover, you can only change the country’s server location once a year. With VPN, many country servers are unreachable, and some servers can be reached only through a paid version. This makes the process expensive and time taking.
To avoid these hurdles and chaos, we recommend you to use Dr.Fone – Virtual Location to fake your location on both Android and iOS devices. This tool works in every situation and allows users to travel the globe through their phones free of cost. You can also travel with an exact GPS location just with a single click. Hence, this tool will work amazingly in faking your location without requiring you to change Google Play country’s location.

Dr.Fone - Virtual Location
1-Click Location Changer for both iOS and Android
- Teleport from one location to another across the world from the comfort of your home.
- Fake location on your phone with a few clicks.
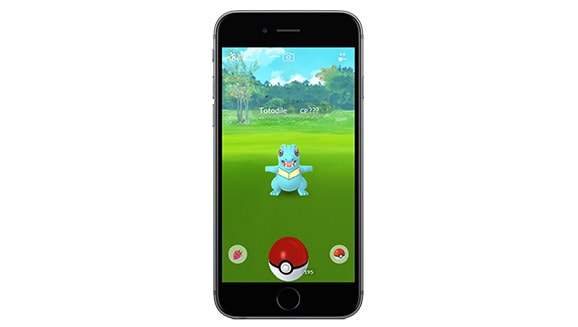
- Support most mainstreaming apps and geo-based games, including Pokemon Go, Snapchat, Tinder, and so on.
- Compatible with both iOS and Android systems.
3981454 people have downloaded it
To change country Google Play using Dr.Fone - Virtual Location, here are the steps:
Step 1: Choose Virtual Location Feature
Begin with launching the tool of Dr.Fone on your computer. Open its interface and tap on the “Virtual Location” option from the home page.

Step 2: Connect your Phone
Now connect your smartphone to the phone with the help of a USB cable. Once done, click on “Get Started” to proceed further.

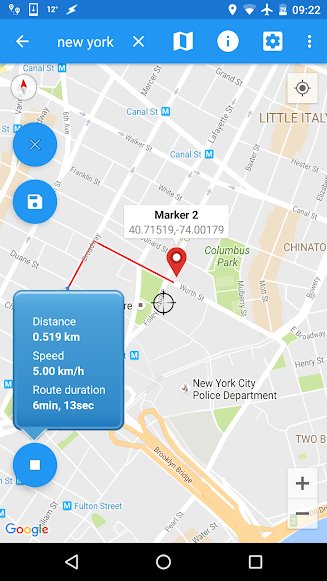
Step 3: Find your Current Location
After connecting your phone, you will be able to see your current location on the new window. If not, tap on the “Center On” icon displayed on the right side to find your current location.

Step 4: Enable Teleport Mode
Tap on the first icon displayed on the top right to enable the teleport mode. Now enter the location you want to navigate the search box and click on “Go” to continue.

Step 5: Change Location
A notification will pop up for confirmation once you have entered a new location. Tap on “Move here” to proceed. Once done, your new location will be set on your smartphone automatically. Now head back to Google Play Store and search for the applications you want to access.

 safe & secure
Conclusion
There are plenty of ways to execute Google One change location across various platforms to execute Google One change location. For example, people usually change Play Store country to access restricted applications in their region. This article will offer a detailed guide for changing Google location through manual and VPN means. However, to avoid any hassle, we recommend Dr.Fone - Virtual Location to change the location of your smartphone and Google Play instantly and conveniently.
 Simple and intuitive video editing
Is pgsharp legal when you are playing pokemon On Itel A60s?
Pokémon Go is the phenomenon that hit us in 2016 and made us obsessed with the AR game based on real-time location. If you are one of those players who have been to all the local PokeStops in hopes of finding your favorite rare Pokémon, then it might be time for you to consider spoofing your location while playing PoGo.
Pokémon Go relies on GPS coordinates and real-time tracking to let players catch Pokémon s in real locations. Hence, spoofing comes to the discussion of “catching them all.”
‘Spoofing’ location makes your phone, and thereby the game thinks that you’re in another location, which opens up the possibility to catch new and rare Pokémon s from gyms and PokeStops around the world.
## **Part 1: Is Pgsharp legal?**
No game developer likes to see their game played in unfair ways. Thus, Niantic (PoGo’s Dev) made some strict rules against exploiting their game, giving some players an unfair advantage over others.
So, is PGSharp legal? No, Spoofing location, in general, is illegal. Hence, any apps like PGSharp, or Fake GPS Go, used to disguise actual real-time location and fake it, will result in an account ban.
According to Niantic’s terms and conditions:
- “Using any techniques to alter or falsify a device’s location (for example through GPS spoofing).
- And _”_Accessing Services in an unauthorized manner (including using modified or unofficial third party software).”
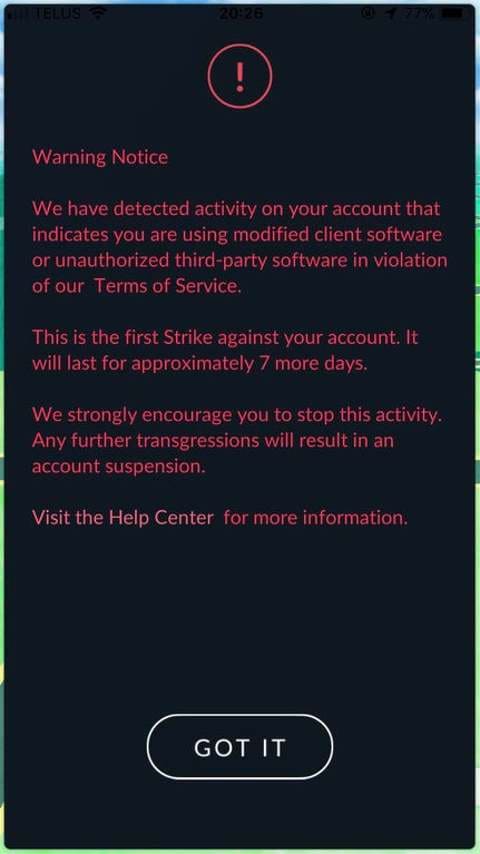
If Niantic detects usage of a fake location or GPS spoofing app while playing Pokémon Go, they will impose a strike on your account.
- The first strike would make rare Pokémon s not visible to you for seven days.
- The second strike would temporarily ban you from playing the game for 30 Days.
- The third strike will permanently ban your account.
You can appeal these strikes to Niantic if you think you’ve been banned without violation of any terms.
Part 2: Three ways to spoof on Android
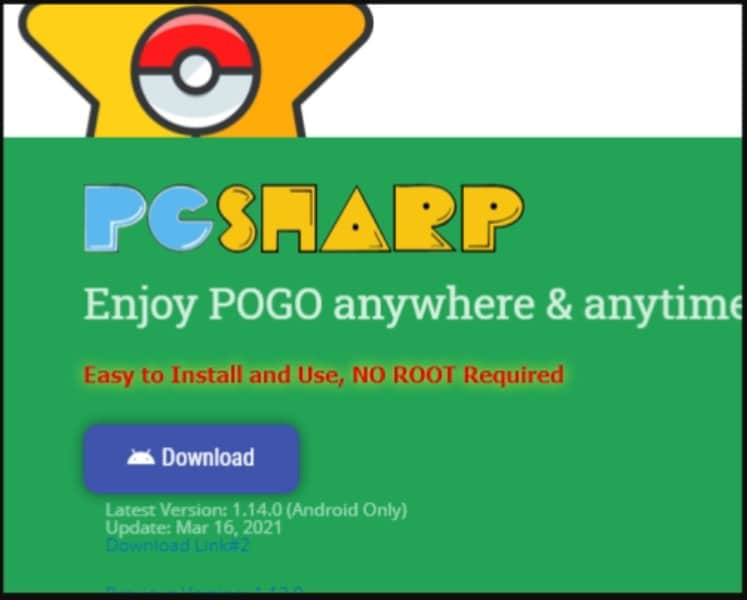
- PGSharp :

PGSharp is one of the most reliable ways to spoof your location while playing Pokémon Go. Niantic does not easily recognize its simple map-like UI as a fake location app.
Note: It is recommended not to use your main account while spoofing; rather, you should use your PTC (Pokémon Trainer Club) account.
- To spoof the location with PGSharp, go to Google’s “Play store,” search “PGSharp,” and install it.
- After installation, there are two versions: Free and Paid. For trying the app with the free version, a beta key is not required anymore, while for the paid version, a key from the developer is required.
- For the paid key, visit PGSharp’s official website and generate a license key.
You must note that it may take two or more tries to generate a working key, and often it may show an “out of stock.” message.
- After opening the app and applying the key, you can spoof the location with ease.
Note: You may need to allow “Mock location” from debugging options. For this, go to “Settings,” then to “About Phone,” then you need to tap on “Build number” seven times to enable developer’s mode, and finally go to “Debugging” to allow “Mock location.”
- Fake GPS Go:
Fake GPS Go is another location spoofer app for Android that is reliable and free. This app allows you to fake your real-time location and enables you to spoof it to any place in the world. This is one of the easiest solutions to playing Pokémon Go while spoofing location without getting detected with its real-map-like UI. Moreover, this app does not even require root access.
- To install Fake GPS Go, go to Google’s “Play store,” search “Fake GPS Go,” and install it.
- Then, go to your phone’s “Settings” and then “System” followed by “About Phone,” and tap on the “Build Number” 7 times to enable the Developer Options.
- Then you need to go to “Debugging” in “Developers Options” to allow “Mock location.”
- And then, you can use this app to not only spoof your location but virtually walk around a route at a designated pace to make it look as real as possible for being undetected by developers like Niantic.
- VPN:

Using a Virtual Private Network (VPN) App is the safest option to spoof your location while playing PoGo, as it masks your IP address and uses a server in any other location.
Moreover, some VPNs would also encrypt your data, so it would not be easy for Game Devs to track it.
- To install a VPN, go to Google’s “Play store,” search the VPN of your choice and install it.
- Close the Pokémon Go app from running in the background to prevent detection of the VPN.
- Now, select a location server to any place before opening the PoGo app again.
Note: Some Free VPNs only mask your IP address and do not spoof your location, nor do they encrypt your data. Hence, selecting a good VPN app is imperative, which will spoof GPS location and data encryption.
You can use both VPNs (which do not spoof GPS location themselves) and the Fake location app simultaneously for extra reliability.
 SwifDoo PDF Perpetual (1 PC) Free upgrade. No monthly fees ever.
Part 3: Best way to spoof on iOS – dr.fone Virtual Location
Spoofing the GPS location on iPhones is more difficult and much more complex than it is on Android. However, there is a solution. Dr.Fone comes to the rescue with their Virtual Location tool that works seamlessly. This program is easy to use and allows you to simulate your location between 2 and multiple spots with ease. Apart from that you can teleport anywhere with ease. Let us know how this tool works.
Step 1: Download the tool on your PC from the official website of drfone. Select “Virtual Location” given on the first page of the program.
Step 2: Now, have your iPhone connected to your computer. Then select “Get Started”. Now a map will open in a new window, showing your actual location.
Step 3: Enable the “teleport mode” by the third icon in the right-upper corner of the map. Then, enter the location you want to spoof your phone’s GPS to in the text box in the map’s left-upper section. Select “Go”.
Step 4: Now select “Move here.” And you will have successfully spoofed your location on your iOS device. To confirm, open the maps app on your device.
Pro-Tips:
- Do not spoof or change location very frequently, as this might raise suspicion to the Game Dev (Niantic), and the account may get terminated, stating violation of terms.
- Do not use spoofing too frequently. The best way to not get your account suspended is to replicate actual travel patterns.
- Please select a new spoof location and scout it for a couple of days before going to a close-by spoof location. After you are done with the country in the spoof-location, you can move on to neighboring countries before returning to your original location (i.e., switching off the spoof.)
- After you are done with your gaming, always remember to close the game from the background before turning off the spoof location.
- Do not always play with the spoof location. Play with your original location for a couple of weeks before spoofing your location.
- Do not spoof location to countries on different continents within a short time.
Following these tips will help you to behave like an actual traveler who’s on a Pokémon hunt. This will make it even harder for game devs to detect any discrepancies.

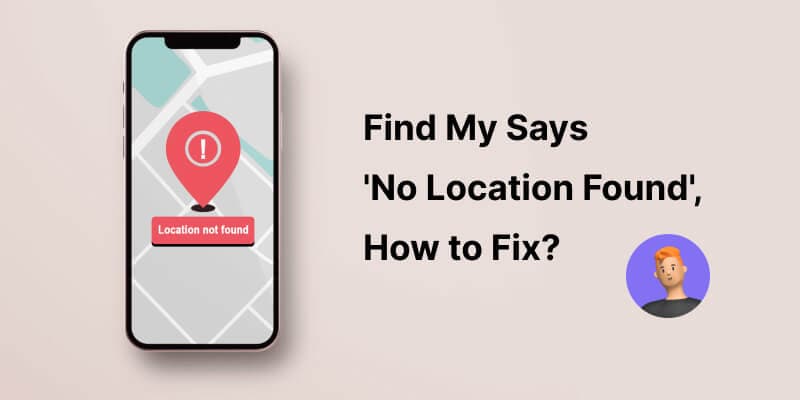
How to Fix Itel A60s Find My Friends No Location Found?

In this time of modern technology, it is hard to be away from your phone or even leave it at home. When any task that we plan to do, usually already have an application released for the sole purpose of doing that task and needing to do it on your phone. When we message our friends, have a video call with our family, or just simply order food to eat at home, you can do all of them on the Itel A60s device in your palm.
Another advantage of having our phones with us all the time is that you can also see the current location of either your friend or family. For Apple phone users, they have an app that is called “Find My Friends” that will show you the locations of the people that you are tracking. But what if you cannot find the location of the friend? We will find out the causes as to why no location can be found and how you can fix this in just a few simple steps.
Part 1: Why does an Itel A60s say “no location found”?
When you are searching for your friend’s current location and it shows that “no location found”, there could be numerous reasons as to why that is happening. We have listed down the possible reasons why there is no location found.
Option #1: Your friend has not signed in to the “Find My Friends” application. Make sure that they are registered in the application before tracking their location.
Option #2: The other person’s mobile is not connected to the internet or their phone is off. This could also be another common reason why you cannot see their location.
Option #3: Make sure that their “Location Services” is turned on. Some users would turn this feature off which hinders the application from checking their current location.
Option #4: The other user must have set up the wrong date and time. If the date and time do not correspond to the global time, then it will cause problems and difficulty with tracking that user.
Option #5: The application might not have been enabled under “Location Services”. Make sure that the application has the permission to track your current location and you can do this by following the steps below.
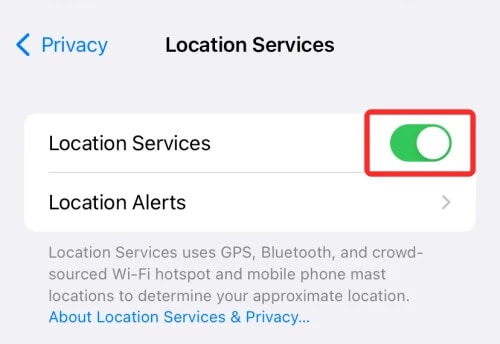
- Step 1: Go to “Settings” and then “Privacy”.
- Step 2: You can then go to “Location Services” and make sure that the application “Find My Friends” is enabled to track your location.
Part 2: Tips To Fix “No Location Found” Available
If you encounter an issue that says “No Location Found”, there are numerous ways you can fix the “No Location Found” message on “Find My Friends” and we will share them with you.
Option #1: Adjust your phone’s date and time. You can reset your time by following the steps.
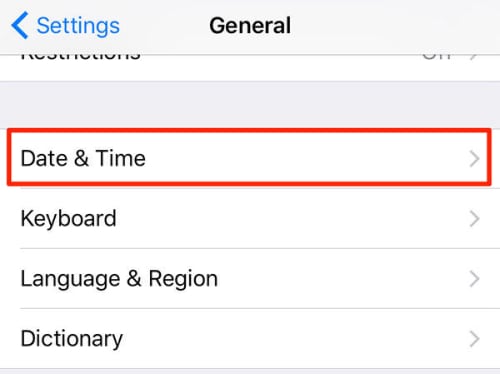
- Step 1: Go to “Settings” and choose “General”.
- Step 2: Then click on “Date & Time” and you can manually or automatically set the time.
Option #2: Make sure that you or the other user is connected to the internet. Double-check if your phone is connected to the internet.
 vMix Pro - Software based live production. vMix Pro includes everything in vMix 4K plus 8 channels of Replay and 8 vMix Call
Option #3: Turn off and turn on your “Location Services”. Usually, this simple troubleshooting can fix this issue, you can try this out and check if you can see their location now. They can turn it on by following the steps below.
 WonderFox DVD Ripper Pro
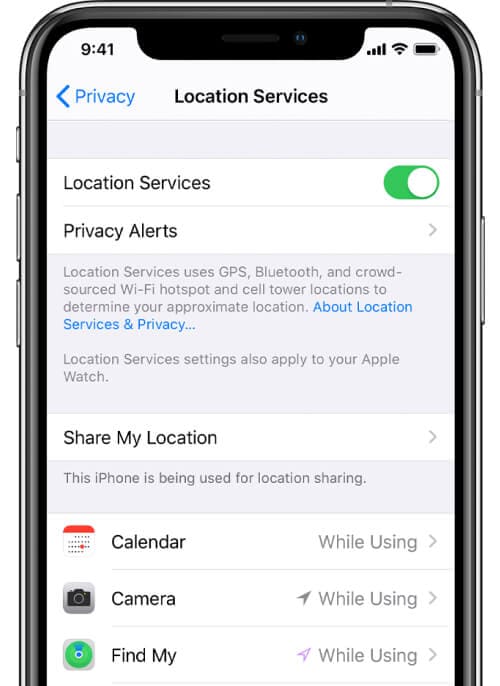
- Step 1: Go to “Settings” and choose “Privacy”.
- Step 2: After, you can look for “Location Services” and enable it.
Option #4: Enable “Location Services” for the “Find My Friends” application. There could be instances where your “Location Services” is not enabled for the application.
Part 3: How to Share Your Location with Find My Friends App?
If you want to share your location in the “Find My Friends” application, you can do that by following the steps below.
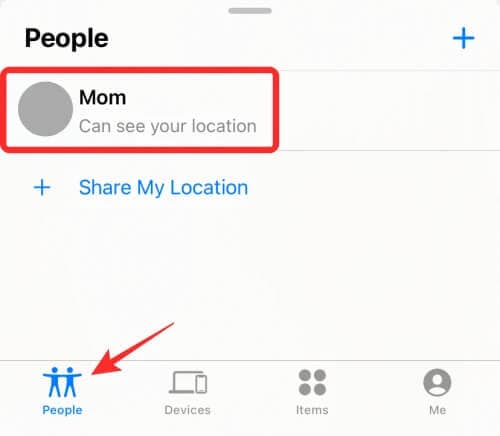
- Step 1: Open the “Find My Friends” application and select “People”.
- Step 2: Then you can tap on “Share My Location” and from there, you can type the phone number of the person you want to share your location too. You can also specify the amount of time you will share your location.
Part 4: How to Share a Fake Location to Others in Find App?
Sometimes we want our location to be kept secret and send a fake one to our friends and family. You can do that in our app, “Dr. Fone - Virtual Location “ which allows you to share a fake location with your friends.
Dr.Fone - Virtual Location
1-Click Location Changer for both iOS and Android
- Teleport from one location to another across the world from the comfort of your home.
- With just a few selections on your computer, you can make members of your circle believe you’re anywhere you want.
- Stimulate and imitate movement and set the speed and stops you take along the way.
- Compatible with both iOS and Android systems.
- Work with location-based apps, like Pokemon Go , Snapchat , Instagram , Facebook , etc.
3981454 people have downloaded it
You can use this application by following the steps below.
Step 1: Download the “Dr. Fone - Virtual Location” software on your laptop. Open and choose “Virtual Location”.
Step 2: You can then connect your phone to your computer and click on “Get Started”.
Step 3: You will then be redirected to your current location on the new page.
Step 4: If you want to change your location, you will need to turn on the “Teleportation” mode by clicking on the first icon, typing the location you want, and then clicking on the “Go” icon.
Step 5: Click on “Move Here” and your current location will show up as the location that you typed on Your Itel A60s.

Conclusion
We hope the tips we shared helped fix the “No Location Found” issue on your phone. Sometimes basic troubleshooting such as restarting your phone or turning off and on your GPS. You can also use our tip to use a fake location that you can send to your friends if you want to play a prank on them.
- Title: How to Change Google Play Location On Itel A60s | Dr.fone
- Author: Ava
- Created at : 2024-08-01 22:36:35
- Updated at : 2024-08-02 22:36:35
- Link: https://fake-location.techidaily.com/how-to-change-google-play-location-on-itel-a60s-drfone-by-drfone-virtual-android/
- License: This work is licensed under CC BY-NC-SA 4.0.