
:max_bytes(150000):strip_icc():format(webp)/tesla-bot-f6353f76ae214924916445da1da620ca.png)
How to Change Google Play Location On Nokia C210 | Dr.fone
How to Change Google Play Location On Nokia C210
Google Account has unlimited advantages as it provides quick access to multiple platforms like Google Drive, Google Calendar, and Google Play Store. By accessing these platforms, users can increase their functionality to ease their daily tasks. For example, Google Play Store offers tons of apps and tools in every category that millions of people install on their devices.
However, some featured apps on the Play Store are restricted region-wise, and some users cannot download them. This article will guide you on how to change the country in Play Store to access all the apps.
Part 1: What Should We Know Before Changing Google Account Location?
By changing the country on Google Play Store, you can install some unavailable apps in your region. You can quickly enjoy the applications and services on your phone by simply changing the country’s location. Before knowing how to change location on Google, you should know some essential aspects.
Warnings About Changing your Location
- Often, users are deprived of some services and features apps if they are not available in the newly chosen region.
- Changing the Google Play Store location is easy, but you can only change the settings once a year. This depicts that you can change the location settings of your Google Account after 365 days.
- After changing the country’s location, you won’t be able to utilize the previous Google Play balance of the old country.
- Once you have changed your country’s server location in settings, the Google Play Store takes 48 hours to change the location.
Part 2: How to Change Google Account Location?
This section will offer easy ways to change play store country and location on Google in every circumstance. By doing so, you can easily install restricted applications in your region.
How to Change Location on Google on Android
Situation 1: How to Change Country in Google Play Store on Android
Through your Nokia C210s, you can change the location on both Google Play Store and Google Account easily. To know more details about how to change the country in Google Play Store, read the following guidelines:
Step 1: Open your Google Play Store from your Nokia C210. Navigate to the profile icon from the corner and select “Settings” from the displayed menu.
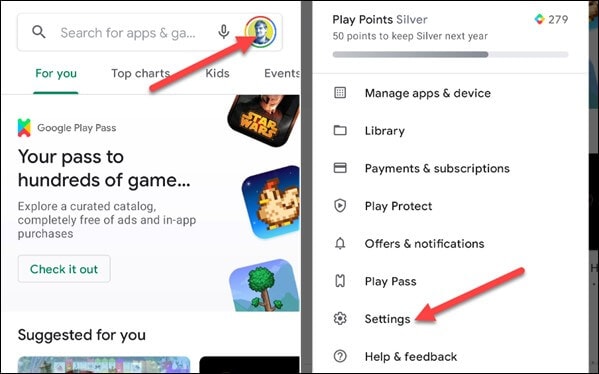
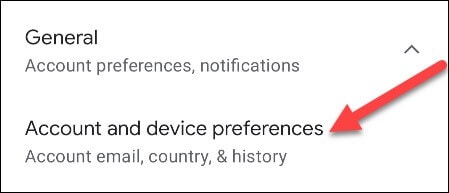
Step 2: Tap on the “General” section to locate the option of “Account and Device Preferences.” Afterward, find the “Country and Profiles” option by scrolling down. From there, you can see your current country location.
Step 3: Now click on “Switch to the Country Play Store” to change the location. For verification, click on “Continue” when a pop-up message appears on your screen asking if you want to change the location.

Step 4: Now, you will be automatically assisted in changing the payment methods of the new country. However, if you don’t come across the option to change the country, either you have already changed the country location within a year or your IP address is not synchronized with your new country.
Situation 2: How to Change Google Account Location on Android
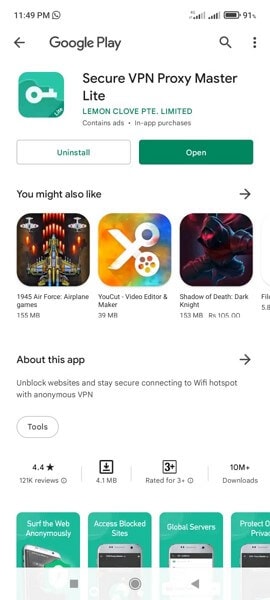
In this particular situation, you don’t have to change the Play Store country; instead, you can only change the Google location on your Nokia C210. We will recommend the VPN Proxy Master Lite , which works effortlessly to change Google‘s location. This tool flawlessly hides your IP address so that you can easily use any country’s location to access all the applications and services. Moreover, it’s highly secured and well-protected so that no virus can harm your Nokia C210.
To use this powerful VPN tool, we have jotted down some basic steps through which you can change the location on your phone easily:
Step 1: Start installing VPN Proxy Master Lite on your Nokia C210 from your Google Play Store. Once this app is successfully installed, open this app to proceed.
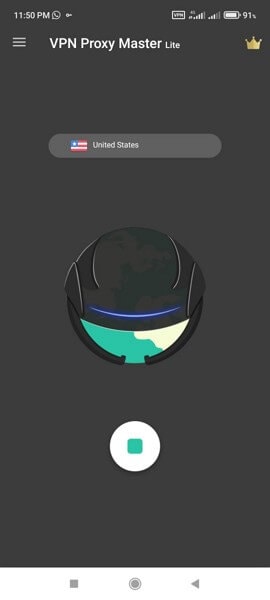
Step 2: After opening this app, tap on the country’s name list displayed above the picture of Earth. Tap on that list to view all the available countries.

Step 3: Select any country from the displayed list by tapping on it. Meanwhile, make sure that your phone is connected to a strong internet connection. This tool will automatically change your Google location by tapping on the country’s name.
How to Change Location on Computer
Situation 1: How to Change Country in Google Play Store on Computer
In this situation, we will help you change the country’s location on your Google Play Store through your computer. Just follow the below-given steps.
Step 1: Start by navigating to your PC’s browser and then open Google Play . Once done, click on the “Settings” displayed on top of your screen.
Step 2: After opening the settings menu, go to “Payments and Profile” and locate the option of “Country/Region.” Proceed by tapping the edit icon next to it.
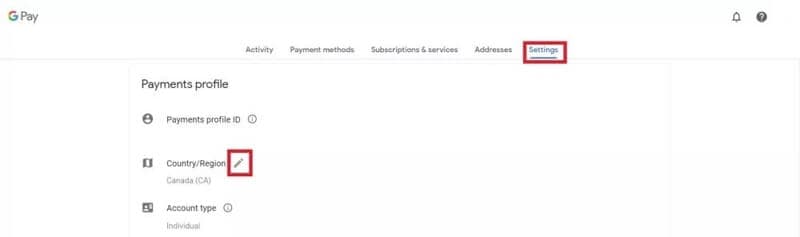
Step 3: To connect with the new country’s location, tap on the option “Create a new profile.” Afterward, you can see the on-screen instructions on your computer, so follow them to complete the process. Once done, Google Play will change the location after 48 hours, and you can search for the applications you want to install.

Situation 2: How to Change Google Account Location on Computer
If you want to change Google location on your computer without changing country on Google Play Store, use ExpressVPN by downloading it. This tool is a well-trusted platform and offers an instant way to change Google location easily. In addition, you can rely on its platform to connect with more than 94 countries worldwide by changing the location anytime you want.
Moreover, the process is fast and fully secured to protect your computer from unwanted bugs. To change the location using ExpressVPN, the steps are:
Step 1: Begin launching ExpressVPN on your computer and open its interface. Once done, turn on the VPN button and tap on the “Location Bar” to change the location.
Step 2: You can explore regions by either navigating to the “Recommended” or “All Locations” tab. Select the location you want to change with from the displayed list.
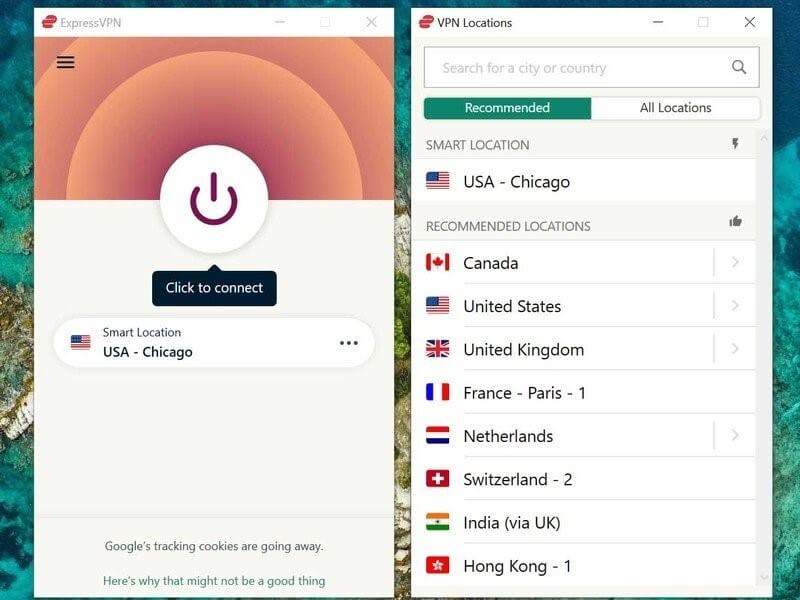
Step 3: After clicking on any country’s location, your computer’s Google Account location will be automatically changed.
Part 3: The Most Effective Way to Fake Location on iOS and Android
We have mentioned methods to change Play Store country manually and through VPN, but they still have a few limitations. Once you change the country’s location on Google Play manually, the Play Store requires 48 hours to accept this modification. Moreover, you can only change the country’s server location once a year. With VPN, many country servers are unreachable, and some servers can be reached only through a paid version. This makes the process expensive and time taking.
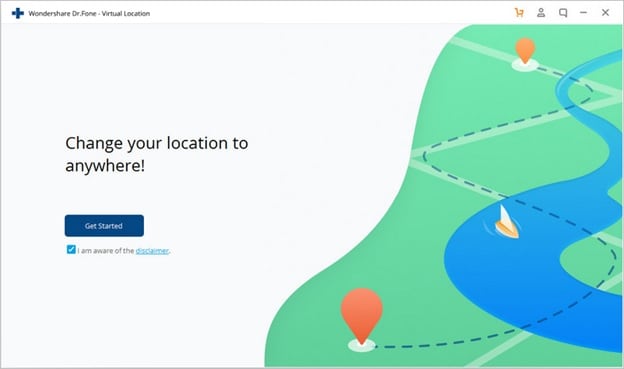
To avoid these hurdles and chaos, we recommend you to use Dr.Fone – Virtual Location to fake your location on both Android and iOS devices. This tool works in every situation and allows users to travel the globe through their phones free of cost. You can also travel with an exact GPS location just with a single click. Hence, this tool will work amazingly in faking your location without requiring you to change Google Play country’s location.
Dr.Fone - Virtual Location
1-Click Location Changer for both iOS and Android
- Teleport from one location to another across the world from the comfort of your home.
- Fake location on your phone with a few clicks.
- Support most mainstreaming apps and geo-based games, including Pokemon Go, Snapchat, Tinder, and so on.
- Compatible with both iOS and Android systems.
3981454 people have downloaded it
To change country Google Play using Dr.Fone - Virtual Location, here are the steps:
Step 1: Choose Virtual Location Feature
Begin with launching the tool of Dr.Fone on your computer. Open its interface and tap on the “Virtual Location” option from the home page.

Step 2: Connect your Phone
Now connect your smartphone to the phone with the help of a USB cable. Once done, click on “Get Started” to proceed further.

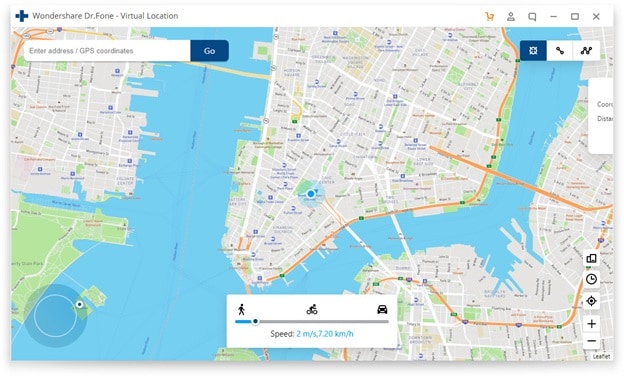
Step 3: Find your Current Location
After connecting your phone, you will be able to see your current location on the new window. If not, tap on the “Center On” icon displayed on the right side to find your current location.

Step 4: Enable Teleport Mode
Tap on the first icon displayed on the top right to enable the teleport mode. Now enter the location you want to navigate the search box and click on “Go” to continue.

Step 5: Change Location
A notification will pop up for confirmation once you have entered a new location. Tap on “Move here” to proceed. Once done, your new location will be set on your smartphone automatically. Now head back to Google Play Store and search for the applications you want to access.

 safe & secure
Conclusion
There are plenty of ways to execute Google One change location across various platforms to execute Google One change location. For example, people usually change Play Store country to access restricted applications in their region. This article will offer a detailed guide for changing Google location through manual and VPN means. However, to avoid any hassle, we recommend Dr.Fone - Virtual Location to change the location of your smartphone and Google Play instantly and conveniently.
How To Teleport Your GPS Location On Nokia C210?
While playing games like Pokemon Go, you are in desperate need of finding more Pokémon. If so, changing your location is a necessity that needs to be figured out. For that, teleporting the GPS location of the Nokia C210 device is the optimal solution. To carry this out, Wondershare Dr.Fone - Virtual Location provides a perfect system for fake locations.
Part 1: Teleport to Anywhere in the World (Teleport Mode)
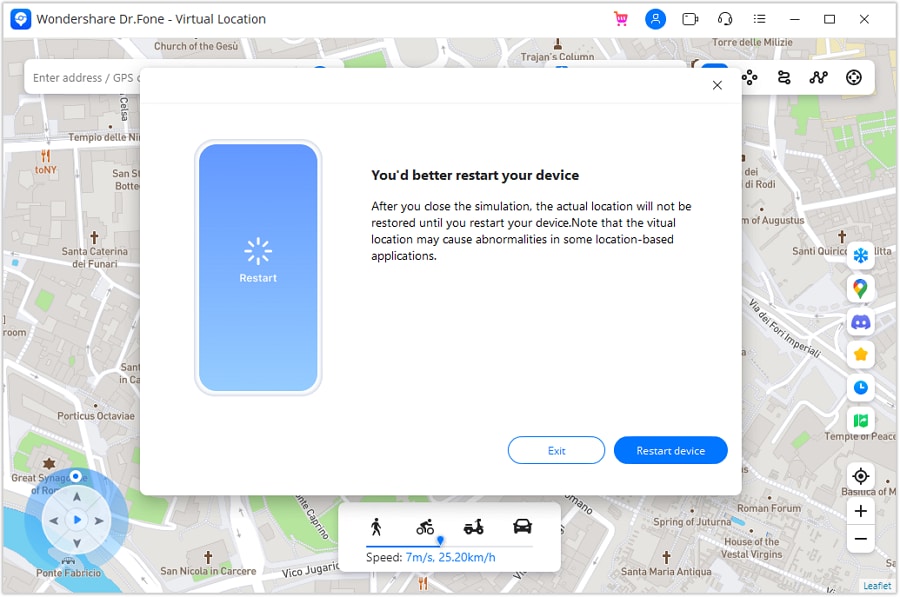
Note: Once you teleport or move to a virtual place, you can restore to the actual location by restarting the Nokia C210 device. You will see a prompt that reminds you to restart your device to restore the location of the connected device when you close the Virtual Location. Click Restart Device and close the program.
* Dr.Fone Mac version still has the old interface, but it does not affect the use of Dr.Fone function, we will update it as soon as possible.
The Teleport Mode offered in Virtual Location is a great way to change the location of iOS/Android devices. If you wish to show a different location to someone else, the best way is to use this mode on Virtual Location. This can be done by following the steps described below:
Step 1Activate Teleport Mode
Once you have connected your smartphone, continue to select the Teleport Mode option from the top-right section. The particular icon is represented by the first icon from the left in that section.
Step 2Add Location To Teleport
After activating Teleport Mode, click the search bar on the top-left to type in the location where you want to shift. After adding the location, hit Enter to proceed.
Note: If you can’t find your current location when searching spots on the map, you can click the Current Virtual Location icon on the right sidebar to show your current virtual location.
Step 3Confirm the Location For Teleporting
You will be directed to the particular, and the map will display it for confirmation. If you are willing to teleport to this specific location, click Move Here.
Step 4Location Successfully Changed On Computer
The location of the smartphone will be instantly changed to the selected location and will be displayed on the map.

Step 5Location Changed On the Smartphone
Open your smartphone and access its maps application. Look into the current location of the Nokia C210 device and verify it to be the same as the changed location on the computer.

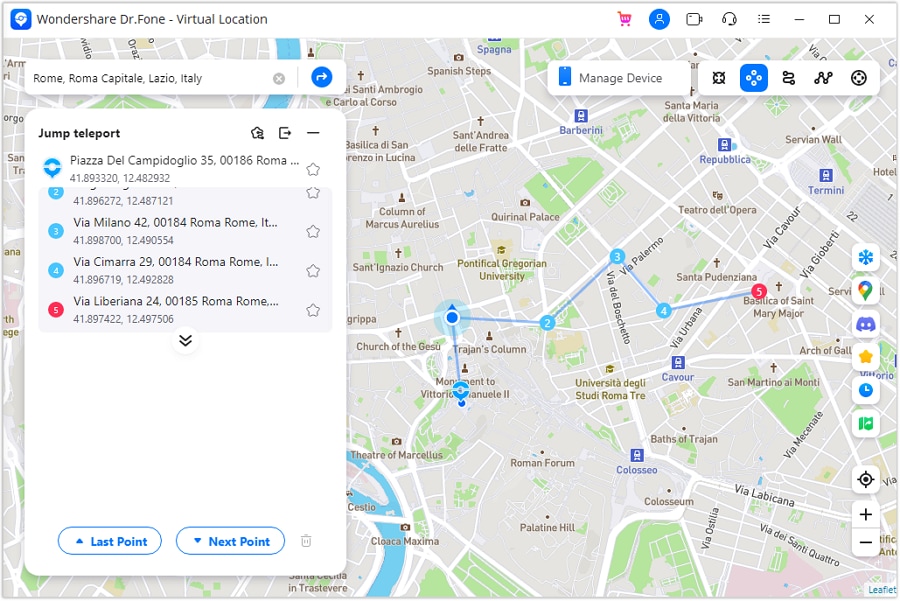
Part 2: Instantaneous Movement Between Multiple Points (Jump Teleport Mode)
Wondershare Dr.Fone - Virtual Location also allows the movement of the smartphone device between multiple places with the Jump Teleport Mode. If you want to make your location spoofing look realistic, the steps below will be beneficial:
Step 1Activate Jump Teleport Mode
You will have to first access the Jump Teleport Mode option from the second icon from the left in the top-right section. This can be done after teleporting the location of the smartphone device.
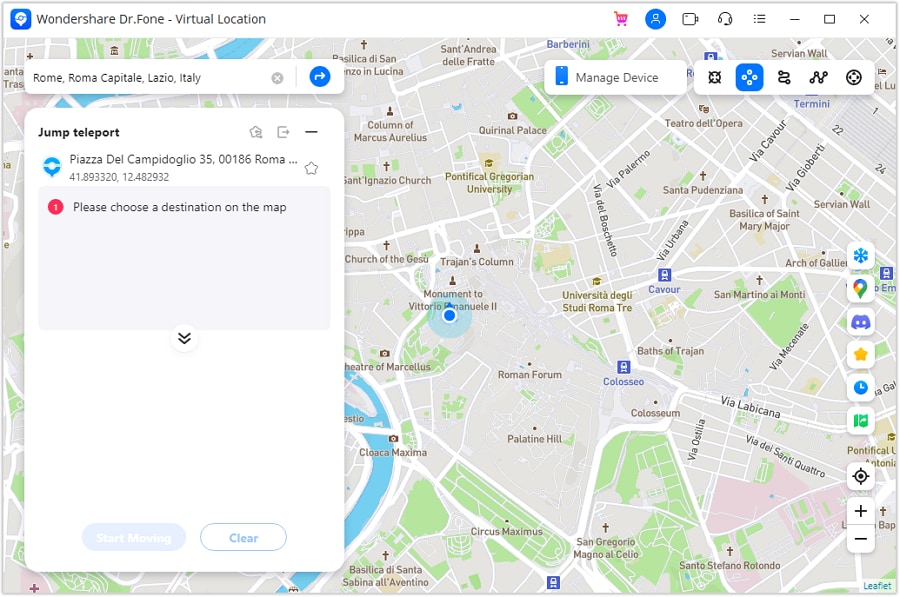
Step 2Set Spots to Jump Teleport
Continue to select the spots you want to pass one by one on the map by simply tapping on them with your mouse. After selecting multiple spots, click the Start Moving button at the bottom of the left panel to start the movement.

Step 3Change Location Between Set Spots
As prescribed, you can propagate amongst the set spots with the Jump Teleport Mode. Use the Next Point and Last Point buttons to shift your location.
Will iSpoofer update On Nokia C210
iSpoofer has been one of the most in-demand applications for changing your location while playing Pokemon Go. For all the right reasons, people wanted to stick to it to make sure that they catch the splendid Pokemon no matter where they are stationed. But the problems started when iSpoofer stopped working and there was no way anyone could continue to use or initiate iSpoofer update. When you open the application, you’d either see an error message, a subtle hint at an apology, or a pop-up that says that the app is under maintenance.
All of them are the alternative ways of saying - ‘We are not available anymore’. But will iSpoofer be back in the year 2021? Can we expect to revive our Pokemon catching abilities with the iSpoofer update? Even if it comes back, will it be available for Android and iPhone users? If not - then do we have any other application that we can use for this purpose? To get answers to all these questions, you have to continue to read this space.
Part 1: Why Can’t I update iSpoofer?

To put it very simple and upfront - The reason why you are unable to update iSpoofer is that it has been shut down. You can no longer use the existing application on the phone or download it from their website. Initially, when the app was down, people thought it could have been a Pogo update that is causing the error. So, they uninstalled the app and tried to download it again from the official website of the iSpoofer app. To their disappointment, the error message showed up even then. It took a while for everyone to accept that the application was no longer available and their desperate attempts to get it to work went in vain.
Undoubtedly, iSpoofer was a ‘game’ changer in the literal sense. You didn’t have to move from your place, you can catch some rare Pokemon and you get additional points for being the active wanderer. It’s of course a ‘cheat route’ to play the game and it has finally come to the notice of Niantic that a third-party app is being used to play the game.
Now that didn’t go down well with the makers. The whole essence of Pokemon Go is to ‘Go Out’ from the house to explore the presence of Pokemons in the surroundings. So, having a third-party application is going to change a lot of things. Pokemon blacklisted the app.
The main target users for iSpoofer were the Pokemon Go players. With them gone, the revenue and usage of the app have reduced to a great extent and the creators have decided to pull the app out. And that is why you will no longer find a new version of iSpoofer that will be compatible with the game. The older version has anyway been blacklisted and won’t be of any use for the players and no iSpoofer update information so far
Even in 2021, there is no guarantee that the app will be back so it’s better to not keep the hopes up. The major business for the app could have been in 2020 when the world stayed home. However, if everyone was unable to download and update the app in the year 2020, there are very bleak chances of having it back in 2021.
Part 2: Is there a good alternative for iSpoofer?
There are quite a few ways to spoof your location in the Pokemon Go Game but then they narrow down to even smaller numbers when we start searching for the ‘reliable’ options. So, here are a few ways you can find a good alternative for iSpoofer.
VPNs - There are certain VPNs that offer in-built location spoofing features that might come in handy for playing games like Pokemon Go. They change your location on the rest of the internet so it might be a little tricky for the makers to catch the foul play.
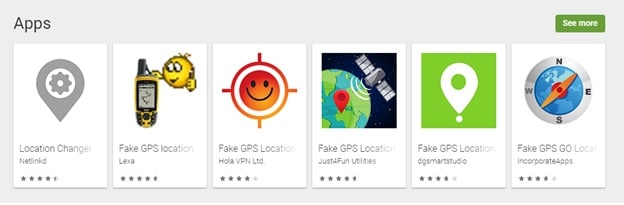
Google Play Store Apps - There are certain applications you will find on Google Play Store or even the App store that offer ‘Fake GPS’ changes. You simply have to search for ‘Fake GPS Location Changers’ and you get some options. Find the one with the best rating and this can work for a while. However, there is no guarantee of when they’ll abandon you.
The most reliable option that you can go for is using - Dr. Fone. It is Wondershare’s master app that changes your location on the world map, the very same will reflect on all your devices, social media accounts, and internet searches. It’s very hard to detect that you’ve used a spoofer. This is how to use it -
Step 1 - You can use the Dr.Fone Location Spoofer for both Android and iPhones. So, starting off, you need to connect your Nokia C210 (the phone) to your system - be it a laptop or a computer. You will be prompted to accept the ‘Terms and Conditions and then click on ‘Get Started’.
Step 2 - Once you are in, then the page will display a map and your location will be clearly mentioned. You need to go to the Teleport Mode you will find on the top right corner of the page. Enter your new location on the map.
Step 3 - You can use the coordinates to get to the location or once the map displays, you can zoom in and move the pointer from one place to another and then click on ‘Move Here’ so that the location will be shifted from the previous one to new.

Step 4 - Now it’s easier to launch Pokemon Go but give it a few minutes before your changed location is completely registered and keep the new location realistic.
As in, you can’t jump from Russia to America in 2 hours, can you?
It’s quite easy to spoof your location for games like Pokemon Go using Dr. Fone and it will even stay undetected if you do it the right way. Also, the whole process to change the location hardly takes a few minutes, so you don’t have to spend time understanding how it all works. While you wait for the iSpoofer update (which may or may not come) you can use this in the meantime.
- Title: How to Change Google Play Location On Nokia C210 | Dr.fone
- Author: Ava
- Created at : 2024-03-22 13:37:20
- Updated at : 2024-03-24 16:19:31
- Link: https://fake-location.techidaily.com/how-to-change-google-play-location-on-nokia-c210-drfone-by-drfone-virtual-android/
- License: This work is licensed under CC BY-NC-SA 4.0.
