
How to Change Google Play Location On Nubia Red Magic 9 Pro+ | Dr.fone
How to Change Google Play Location On Nubia Red Magic 9 Pro+
Google Account has unlimited advantages as it provides quick access to multiple platforms like Google Drive, Google Calendar, and Google Play Store. By accessing these platforms, users can increase their functionality to ease their daily tasks. For example, Google Play Store offers tons of apps and tools in every category that millions of people install on their devices.
However, some featured apps on the Play Store are restricted region-wise, and some users cannot download them. This article will guide you on how to change the country in Play Store to access all the apps.
Part 1: What Should We Know Before Changing Google Account Location?
By changing the country on Google Play Store, you can install some unavailable apps in your region. You can quickly enjoy the applications and services on your phone by simply changing the country’s location. Before knowing how to change location on Google, you should know some essential aspects.
Warnings About Changing your Location
- Often, users are deprived of some services and features apps if they are not available in the newly chosen region.
- Changing the Google Play Store location is easy, but you can only change the settings once a year. This depicts that you can change the location settings of your Google Account after 365 days.
- After changing the country’s location, you won’t be able to utilize the previous Google Play balance of the old country.
- Once you have changed your country’s server location in settings, the Google Play Store takes 48 hours to change the location.
Part 2: How to Change Google Account Location?
This section will offer easy ways to change play store country and location on Google in every circumstance. By doing so, you can easily install restricted applications in your region.
How to Change Location on Google on Android
Situation 1: How to Change Country in Google Play Store on Android
Through your Nubia Red Magic 9 Pro+s, you can change the location on both Google Play Store and Google Account easily. To know more details about how to change the country in Google Play Store, read the following guidelines:
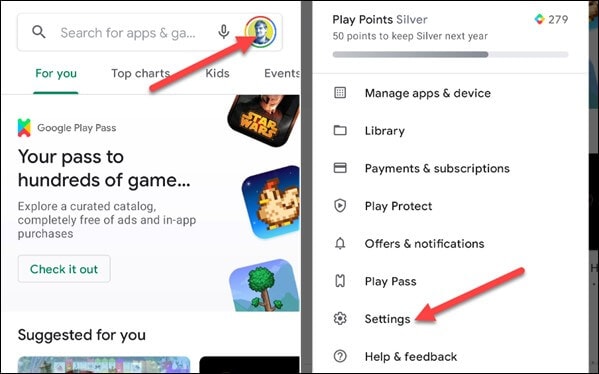
Step 1: Open your Google Play Store from your Nubia Red Magic 9 Pro+. Navigate to the profile icon from the corner and select “Settings” from the displayed menu.
 Project Manager - Asset Browser for 3Ds Max
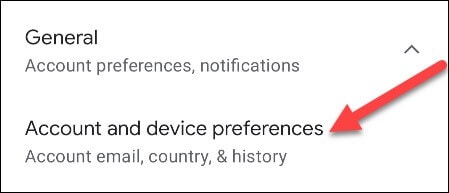
Step 2: Tap on the “General” section to locate the option of “Account and Device Preferences.” Afterward, find the “Country and Profiles” option by scrolling down. From there, you can see your current country location.

Step 3: Now click on “Switch to the Country Play Store” to change the location. For verification, click on “Continue” when a pop-up message appears on your screen asking if you want to change the location.

Step 4: Now, you will be automatically assisted in changing the payment methods of the new country. However, if you don’t come across the option to change the country, either you have already changed the country location within a year or your IP address is not synchronized with your new country.
Situation 2: How to Change Google Account Location on Android
In this particular situation, you don’t have to change the Play Store country; instead, you can only change the Google location on your Nubia Red Magic 9 Pro+. We will recommend the VPN Proxy Master Lite , which works effortlessly to change Google‘s location. This tool flawlessly hides your IP address so that you can easily use any country’s location to access all the applications and services. Moreover, it’s highly secured and well-protected so that no virus can harm your Nubia Red Magic 9 Pro+.
To use this powerful VPN tool, we have jotted down some basic steps through which you can change the location on your phone easily:
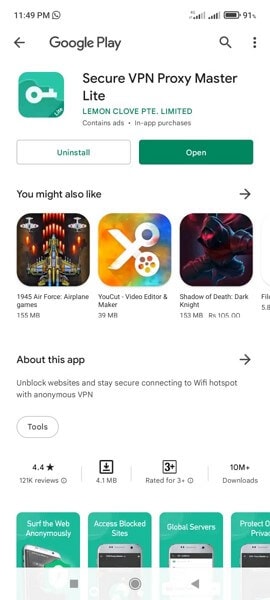
Step 1: Start installing VPN Proxy Master Lite on your Nubia Red Magic 9 Pro+ from your Google Play Store. Once this app is successfully installed, open this app to proceed.
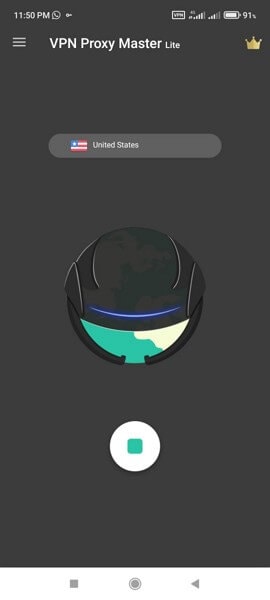
Step 2: After opening this app, tap on the country’s name list displayed above the picture of Earth. Tap on that list to view all the available countries.

Step 3: Select any country from the displayed list by tapping on it. Meanwhile, make sure that your phone is connected to a strong internet connection. This tool will automatically change your Google location by tapping on the country’s name.
How to Change Location on Computer
Situation 1: How to Change Country in Google Play Store on Computer
In this situation, we will help you change the country’s location on your Google Play Store through your computer. Just follow the below-given steps.
Step 1: Start by navigating to your PC’s browser and then open Google Play . Once done, click on the “Settings” displayed on top of your screen.
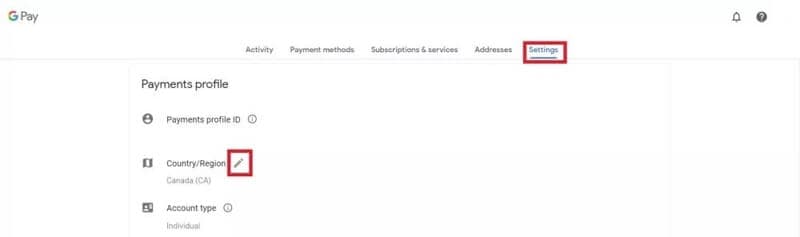
Step 2: After opening the settings menu, go to “Payments and Profile” and locate the option of “Country/Region.” Proceed by tapping the edit icon next to it.
Step 3: To connect with the new country’s location, tap on the option “Create a new profile.” Afterward, you can see the on-screen instructions on your computer, so follow them to complete the process. Once done, Google Play will change the location after 48 hours, and you can search for the applications you want to install.

Situation 2: How to Change Google Account Location on Computer
If you want to change Google location on your computer without changing country on Google Play Store, use ExpressVPN by downloading it. This tool is a well-trusted platform and offers an instant way to change Google location easily. In addition, you can rely on its platform to connect with more than 94 countries worldwide by changing the location anytime you want.
Moreover, the process is fast and fully secured to protect your computer from unwanted bugs. To change the location using ExpressVPN, the steps are:
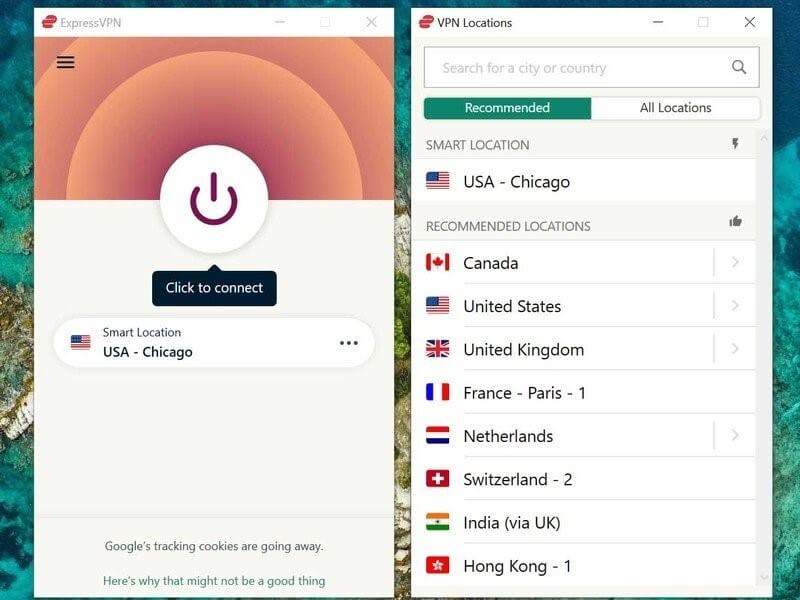
Step 1: Begin launching ExpressVPN on your computer and open its interface. Once done, turn on the VPN button and tap on the “Location Bar” to change the location.
Step 2: You can explore regions by either navigating to the “Recommended” or “All Locations” tab. Select the location you want to change with from the displayed list.
Step 3: After clicking on any country’s location, your computer’s Google Account location will be automatically changed.
 vMix Pro - Software based live production. vMix Pro includes everything in vMix 4K plus 8 channels of Replay and 8 vMix Call
Part 3: The Most Effective Way to Fake Location on iOS and Android
We have mentioned methods to change Play Store country manually and through VPN, but they still have a few limitations. Once you change the country’s location on Google Play manually, the Play Store requires 48 hours to accept this modification. Moreover, you can only change the country’s server location once a year. With VPN, many country servers are unreachable, and some servers can be reached only through a paid version. This makes the process expensive and time taking.
To avoid these hurdles and chaos, we recommend you to use Dr.Fone – Virtual Location to fake your location on both Android and iOS devices. This tool works in every situation and allows users to travel the globe through their phones free of cost. You can also travel with an exact GPS location just with a single click. Hence, this tool will work amazingly in faking your location without requiring you to change Google Play country’s location.
Dr.Fone - Virtual Location
1-Click Location Changer for both iOS and Android
- Teleport from one location to another across the world from the comfort of your home.
- Fake location on your phone with a few clicks.
- Support most mainstreaming apps and geo-based games, including Pokemon Go, Snapchat, Tinder, and so on.
- Compatible with both iOS and Android systems.
3981454 people have downloaded it
To change country Google Play using Dr.Fone - Virtual Location, here are the steps:
Step 1: Choose Virtual Location Feature
Begin with launching the tool of Dr.Fone on your computer. Open its interface and tap on the “Virtual Location” option from the home page.

Step 2: Connect your Phone
Now connect your smartphone to the phone with the help of a USB cable. Once done, click on “Get Started” to proceed further.

Step 3: Find your Current Location
After connecting your phone, you will be able to see your current location on the new window. If not, tap on the “Center On” icon displayed on the right side to find your current location.
 ZoneAlarm Extreme Security NextGen

Step 4: Enable Teleport Mode
Tap on the first icon displayed on the top right to enable the teleport mode. Now enter the location you want to navigate the search box and click on “Go” to continue.

Step 5: Change Location
A notification will pop up for confirmation once you have entered a new location. Tap on “Move here” to proceed. Once done, your new location will be set on your smartphone automatically. Now head back to Google Play Store and search for the applications you want to access.

 safe & secure
Conclusion
There are plenty of ways to execute Google One change location across various platforms to execute Google One change location. For example, people usually change Play Store country to access restricted applications in their region. This article will offer a detailed guide for changing Google location through manual and VPN means. However, to avoid any hassle, we recommend Dr.Fone - Virtual Location to change the location of your smartphone and Google Play instantly and conveniently.
How to Use Life360 on Windows PC For Nubia Red Magic 9 Pro+?
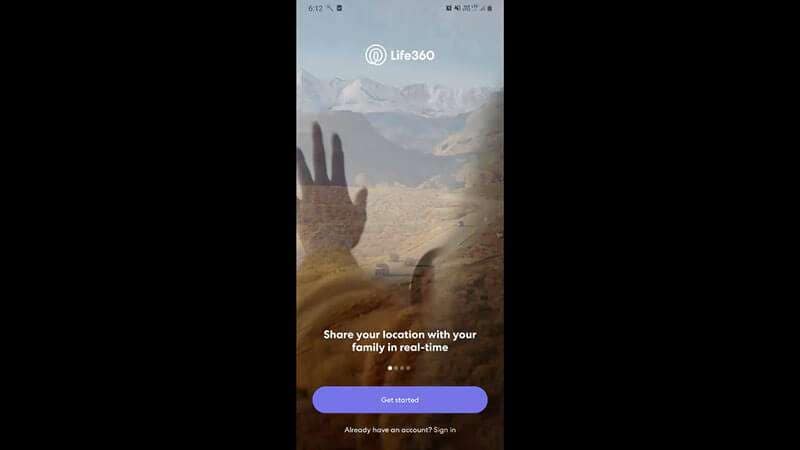
Life360 is an online platform that utilizes geo-location services to help users share their real-time location with friends and family. The app allows people to create a family group and stay connected to each other through features like chatting, sharing location, sending safety alerts, etc.
As of now, you cannot run Life360 on computer as it is only available for Android and iOS. Why? Because as opposed to a PC, one can easily carry their device everywhere! It means whether your kid is stuck in traffic and needs your help or your parents have lost their way back home, Life360 will instantly send you an alert on your device.
However, that doesn’t mean you cannot use Life360 on a PC. While it may seem a bit odd, there are a couple of methods that’ll allow you to get the Life360 app for Windows. In today’s guide, we are going to share some of these methods that’ll help you run the Life360 app on Windows.
So, without wasting another second, let’s dive straight into the guide.
Part 1: Why people seek to use Life360 on PC?
First things first; why would anyone want to use a family locator app like Life360 on their PC? Well, the truth is everyone has their own reason to get Life360 for PC. For instance, let’s say you are in the middle of an important project and don’t want to be bothered by alerts on your smartphone. However, you still don’t want to compromise with the safety of your family members.
In this situation, you can simply run the Life360 app on PC. This will allow you to directly keep track of the whereabouts of family members on your Windows system and you won’t have to constantly check your phone.
Life360 can also be used on a computer when your phone’s battery has completely drained and there’s no power outlet nearby. In this case, you can simply power-on your laptop, start the Life360 app and send your current whereabouts to family members.
Part 2: Is it possible to use Life360 on Windows PC?
Life360 is an extremely useful app for people who are always concerned about their closed ones. The app is basically designed with a vision to keep family members connected and safe. In addition to location sharing, the app also provides exclusive features like crash detection, place alerts, speed alerts, battery monitoring, etc.
The app also makes it easier for parents to monitor their child’s movement. Using the app, you can always know that your kids have safely reached school and back home. For any parent, knowing whether the kids are safe, is one less thing to worry about.
However, as we mentioned earlier, Life360 hasn’t been released for Windows yet. So, there’s no direct way to install and run the app on a Windows PC. While Life360 may release a dedicated Windows software in the future, as of now, you can only run it using the alternative methods.
These methods include:
 /a>
/a>Part 3: Use Life360 on Windows PC with Android emulator
The first and the most convenient way to run Life360 on computer is to use an Android Emulator. An emulator is basically a software that creates a virtual Android system on your computer. As a result, you’ll be able to run Android apps on your computer.
While there are dozens of Android emulators, Bluestacks seems to be the most popular and user-friendly option among all. Unlike other emulators, Bluestacks is easy to set up and use.
Here’s how you can run Life360 on a computer using Bluestacks Android emulator./
Step 1: Head over to Bluestacks official website and tap the download button.
Step 2: Open the installer and tap the “download” button. This will initiate the download process on your System.
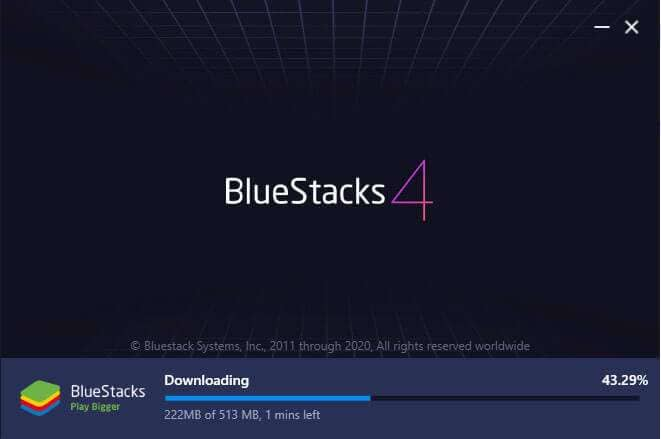
Step 3: Once the installation process completes, Bluestacks will start to boot. Keep in mind that the first boot may take some time, depending on your system configurations.

Step 4: In the home screen, tap the “Google Play Store” icon. You’ll be asked to sign-in with your Google account. Enter the right credentials and log-in to the Google Play Store.

Step 5: In the top search bar, type-in Life360 and tap the “install” button to download the app.


Step 6: Life360 is now installed on your computer. Open the app and enter your login details. You’ll now be able to run Life360 on your PC.

 EmEditor Professional (Lifetime License, non-store app)
Part 4: Use Life360 by mirroring Android to Windows PC
While running an emulator is a great way to get Life360 on PC, it has its own set of challenges. For instance, running an Android emulator is not easy when you have a low-configuration PC. Emulators like Bluestacks requires high system configuration otherwise they take forever to load.
In this situation, we have another alternative for you to run Life360 on PC. You can simply mirror your Android to your Windows system. Mirroring the Android device will allow you to see its content on the PC itself.
Here’s how you can mirror the Android device on your PC.
Step 1: Make sure that Bluetooth is activated on both devices.
Step 2: On your Windows PC, open “Settings” and select the “Systems” tab.

Step 3: Choose the “Projecting to this PC” option in the left menu-bar and make sure that “Available Everywhere” is selected.

Step 4: If you’re running Android Pie or above on your device, scroll down to open notification drawer and select “Smart View” (or “Cast” in some devices). You’ll see your PC listed here. Tap the button to start Android mirroring.

Step 5: It may take some while for the connection to establish. Once it does, you’ll be able to cast your device screen onto your computer and you’ll be able to run life360 on your system.
Keep in mind that you’ll still require your device to navigate through the content on your computer. Any action that you perform on your device will be replicated on your computer screen as well.
Final Verdict
Life360 is probably among the top family locators for Android users. Apart from its extensive range of features, the app provides a user-friendly interface, which allows it easier for even elders to use the app without any issues. Even though there isn’t a dedicated Life360 software for Windows, you can follow the above-mentioned methods to run the Life360 on PC.
You Might Also Like
Location-based apps
GPS spoof for dating apps
GPS spoof for social apps
Pokemon Go on PC
AR game tricks

Change Phone GPS Location Easily
- ● Teleport GPS location to anywhere
- ● Play AR games without moving
- ● Spoof Location on the popular Apps

All Must-Knows to Use Fake GPS GO Location Spoofer On Nubia Red Magic 9 Pro+
It is highly risky to share sensitive information like location details on social media. Most social media access the location details when you perform any sort of activity on their platform. You would have given permission while installing the app for the first time on your phone. These details interest the criminals to commit the theft act at your place when you are on a vacation.
Do you know how to avoid such a situation? It is simple, try to trick the location details using Fake GPS Go Location Spoofer.
You can also make use of this app to spoof your location while playing location related games like Pokemon. This could give a chance to explore unique and more Pokemons around the globe. Those who make use of social media and play games online should know how to spoof location using an incredible app. Just scroll down to discover the techniques.

Part 1: About Fake GPS GO Location Spoofer
The Fake GPS Go Location Spoofer is the best app to trick the location details on the online space. This app implements the strategy promptly to acquire flawless results. The basic idea behind the fake GPS concept is that a false coordinates with respect to the Nubia Red Magic 9 Pro+ device on the space recorded to the cyber grounds hiding the original location details.
The method adopted to embed this strategy varies with one app to another. The Fake GPS Go Location Spoofer handles this concept wisely and offers a simple procedure to achieve this task.
Features of Fake GPS Go Location Spoofer
- Exclusively designed for the Android Versions
- No need for Root mode
- The update version is available every now and then on the internet
- Fewer steps to complete this process
- No prior technical skills are necessary to understand the procedure
- Spoofing occurs just by a single tap on the app
- Awesome user interface
- Consistent introduction of app updates with solved bugs based on the feedback from the users
- Quick response to the user’s feedback from the team of Fake GPS Go Location Spoofer app
- Great customer service

Part 2: Fake GPS GO Location Spoofer: the For and Against voices
The FOR Voices on Fake GPS GO Location Spoofer
This app is helpful while playing games related to location. You can mock your friends and family for fun with the help of Fake GPS Go Location Spoofer app. Due to its versatile design, there are many ‘For Voices’ on the internet. The persuasive feature of this app attracts users from all age groups.
Voices of the Happy Users
- Precise location spoofing without any flaws
- Excellent tutorials to guide the novice users
- Free from unwanted advertisements
- Restores to the original location when required
- Outstanding compatibility with all versions of Android devices
- Ease Installation and setup process
- Flexible and customizable
The Against Voices on Fake GPS GO Location Spoofer
There exist disappointed users struggling to understand this app. The user’s face issues only if they were not able to follow the instructions promptly provided by the development team of Fake GPS Go Location Spoofer.
Voices of the disappointed users
- Some of the users struggle to work on this app considering it as a technical software
- Confused with the updates
- The updated versions were not appreciable
- It doesn’t work well with the Pokemon Go game
- This app download from Google Play store is not reliable

Part 3: How to use Fake GPS GO Location Spoofer on your Android
Step 1: Go to the Google Play Store and type ‘Fake GPS Go Location Spoofer’ on the search box in your Nubia Red Magic 9 Pro+ to download this app.

Step 2: Soon after the successful download tap ‘Open’ button.

Step 3: Allow the app to access the Nubia Red Magic 9 Pro+ device’s location
 OtsAV Radio Webcaster
Step 4: Accept the Advertising terms to proceed


Step 5: Next, you have to enable the ‘Mock Location’ option in the ‘Developer Option’ window. To do that you must go to ‘Settings-> Software info -> Built Number’. Tap the ‘Built Number’ few times based on the model of your Nubia Red Magic 9 Pro+ to unlock into the ‘Developer option’. In the ‘Developer Option’, choose ‘Select mock location app’.


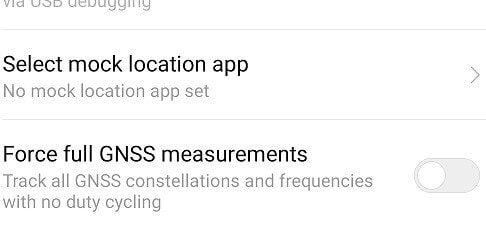
Step 6: inside the ‘Select mock location app’, you have to click the ‘FakeGPS Free’ to enable the mock location feature
.png) Kanto Player Professional
Kanto Player Professional
Step 7: Now go to the ‘Fake GPS Go Location’ app and select your favourite spot on the map. Then press the ‘Play’ button. Select ‘Without Ads’ option to implement the changes accordingly.


Step 8: Finally, you have changed the default current location in your device using the Fake GPS Go Location Spoofer app successfully.
 WinUtilities Pro
Step 9: Close this app and open the Google Map to check your current location you will be surprised to view the placeholder stays on your favourite spot thereby mocking the original location.

 Any DRM Removal for Mac: Remove DRM from Adobe, Kindle, Sony eReader, Kobo, etc, read your ebooks anywhere.
Part 4: Any other better alternative to Fake GPS GO
In this section, you will learn about the alternative tool to Fake GPS Go. The name of the alternative app is ‘Fake GPS Location’. It is a new app released this year 2019 to serve the users in a better way. You can download this software at Google play store without any issues.
Step 1: Check-in to play store and type ‘Fake GPS Location’ in the search bar. Tap the ‘Install’ button to trigger the downloading process.

Step 2: Open the app after the download process

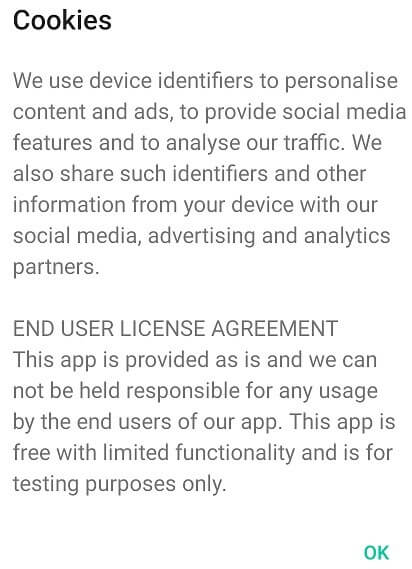
Step 3: Allow the app to access the Nubia Red Magic 9 Pro+ device location and accept the ‘Cookies’ to work on this platform
Step 4: Now, you must enable the ‘Mock Location’ option through the settings. To do so click the ‘Settings’ then ‘Additional Settings’ finally hit the ‘Developer option’. Tap ‘Select Mock Location’ and choose ‘Fake GPS Pro’ from the displayed list. Now switch on to the app to proceed further.


Step 5: To implement the fake location you must select the desired place on the map and tap the ‘Play’ button. It will lead to another screen requesting for permission.

Key features:
• Import from any devices and cams, including GoPro and drones. All formats supported. Сurrently the only free video editor that allows users to export in a new H265/HEVC codec, something essential for those working with 4K and HD.
• Everything for hassle-free basic editing: cut, crop and merge files, add titles and favorite music
• Visual effects, advanced color correction and trendy Instagram-like filters
• All multimedia processing done from one app: video editing capabilities reinforced by a video converter, a screen capture, a video capture, a disc burner and a YouTube uploader
• Non-linear editing: edit several files with simultaneously
• Easy export to social networks: special profiles for YouTube, Facebook, Vimeo, Twitter and Instagram
• High quality export – no conversion quality loss, double export speed even of HD files due to hardware acceleration
• Stabilization tool will turn shaky or jittery footage into a more stable video automatically.
• Essential toolset for professional video editing: blending modes, Mask tool, advanced multiple-color Chroma Key

Step 6: Enable the settings and grant permission to fake the location on your device


Step 7: At last, the fake location is marked on your device using this app. Your device will show up this new location irrespective of your current place.

Now you had a clear picture of the ‘Fake GPS Location’ app in a detailed manner. It is enough if you follow the steps carefully to mark the fake location in no time.
Conclusion
There are many apps related to fake GPS on the internet space and spotting the right app is quite challenging. This article has given great guidance to choose the perfect tool to meet all the requirements precisely without regrets. The procedure is very simple and you can work on it by tapping the options accordingly.
Make use of the ‘Fake GPS Go Location Spoofer’ app to protect your live location details. With the help of this app, you can surf through any social media and play online games without any fear. Conceal the location information and increase your privacy through innovative products at the Google play store.
Part 5: Fake GPS GO has no app for iPhone? What to do?
Tricking the location by Fake GPS Go location spoofer can come in handy under many situations. However, when it comes to iOS devices, the users may get annoyed as the app has no iOS version. Therefore, you should be thankful to Dr.Fone – Virtual Location (iOS) that helps you serve the purpose without any Fake GPS Go apk. The tool is designed by Wondershare and never disappoints users for faking location. Let us know how you can pretend to be somewhere in an iOS device sans Fake GPS Go.
Mode 1: Teleport Anywhere
Step 1: To work with this Fake GPS Go’s alternative, install and launch it on PC. Click “Virtual Location” tab on the main screen.
 vMix HD - Software based live production. vMix HD includes everything in vMix Basic HD plus 1000 inputs, Video List, 4 Overlay Channels, and 1 vMix Call
Step 2: Take your iOS device and establish connection between PC and device. Hit on “Get Started” button now.
Step 3: You will notice your current location on the map. If not, hit the “Center On” located at the lower right on the screen.
Step 4: Choose the third icon on the upper right part of the screen from the three given icons. This is “teleport mode”. Enter the name of the location where you need to teleport and click “Go”.
Step 5: Then entered place will be recognized by the program and you need to click “Move Here” option in the pop-up dialogue.
Step 6: The location will be changed successfully. You can now see on the map or in the location based app in iPhone, the spot will be seen as the same you selected.

 PCDJ Karaoki is the complete professional karaoke software designed for KJs and karaoke venues. Karaoki includes an advanced automatic singer rotation list with singer history, key control, news ticker, next singers screen, a song book exporter and printer, a jukebox background music player and many other features designed so you can host karaoke shows faster and easier!
Part 2: Movement Simulation Between two Places
Step 1: Launch the tool and look for the first icon at the upper right screen which is “one-stop route”. Choose the place you want to travel on the map. You will know the distance in the pop-up box.
Step 2: The slider located below the screen needs to be dragged to set the speed of travelling. You can choose cycling speed or the speed you want. Hit on “Move Here” afterwards.

Step 3: Next, key in a number that will define the number of times you want to travel the route back and forth. Hit “March” option.

Step 4: Now, the position will be seen moving as per the chosen speed on the map. And this is how you can fake the movement sans Fake GPS Go apk.


Part 3: Simulate Route Movement for Multiple Locations
Step 1: For multiple spots, you need to click the “multi-stop route” after entering map interface. This mode is the second icon on the upper right side. Now, select the multiple places one by one where you want to pass.
Step 2: The pop-up will show the distance where you need to hit the “Move Here” button. Choose the moving speed.


Step 3: Enter a digit for how many times you want to take route and click “March”. This will begin the movement simulation.

Dr.Fone - Virtual Location
1-Click Location Changer for both iOS and Android
- Teleport from one location to another across the world from the comfort of your home.
- With just a few selections on your computer, you can make members of your circle believe you’re anywhere you want.
- Stimulate and imitate movement and set the speed and stops you take along the way.
- Compatible with both iOS and Android systems.
- Work with location-based apps, like Pokemon Go , Snapchat , Instagram , Facebook , etc.
3981454 people have downloaded it
- Title: How to Change Google Play Location On Nubia Red Magic 9 Pro+ | Dr.fone
- Author: Ava
- Created at : 2024-08-01 22:37:51
- Updated at : 2024-08-02 22:37:51
- Link: https://fake-location.techidaily.com/how-to-change-google-play-location-on-nubia-red-magic-9-proplus-drfone-by-drfone-virtual-android/
- License: This work is licensed under CC BY-NC-SA 4.0.