
How to Change Google Play Location On Tecno Pop 7 Pro | Dr.fone
How to Change Google Play Location On Tecno Pop 7 Pro
Google Account has unlimited advantages as it provides quick access to multiple platforms like Google Drive, Google Calendar, and Google Play Store. By accessing these platforms, users can increase their functionality to ease their daily tasks. For example, Google Play Store offers tons of apps and tools in every category that millions of people install on their devices.
However, some featured apps on the Play Store are restricted region-wise, and some users cannot download them. This article will guide you on how to change the country in Play Store to access all the apps.
 DEX 3 RE is Easy-To-Use DJ Mixing Software for MAC and Windows Designed for Today’s Versatile DJ.
Mix from your own library of music, iTunes or use the Pulselocker subsciprtion service for in-app access to over 44 million songs. Use with over 85 supported DJ controllers or mix with a keyboard and mouse.
DEX 3 RE is everything you need without the clutter - the perfect 2-deck mixing software solution for mobile DJs or hard-core hobbiests.
PCDJ DEX 3 RE (DJ Software for Win & MAC - Product Activation For 3 Machines)
Part 1: What Should We Know Before Changing Google Account Location?
By changing the country on Google Play Store, you can install some unavailable apps in your region. You can quickly enjoy the applications and services on your phone by simply changing the country’s location. Before knowing how to change location on Google, you should know some essential aspects.
Warnings About Changing your Location
- Often, users are deprived of some services and features apps if they are not available in the newly chosen region.
- Changing the Google Play Store location is easy, but you can only change the settings once a year. This depicts that you can change the location settings of your Google Account after 365 days.
- After changing the country’s location, you won’t be able to utilize the previous Google Play balance of the old country.
- Once you have changed your country’s server location in settings, the Google Play Store takes 48 hours to change the location.
Part 2: How to Change Google Account Location?
This section will offer easy ways to change play store country and location on Google in every circumstance. By doing so, you can easily install restricted applications in your region.

How to Change Location on Google on Android
Situation 1: How to Change Country in Google Play Store on Android
Through your Tecno Pop 7 Pros, you can change the location on both Google Play Store and Google Account easily. To know more details about how to change the country in Google Play Store, read the following guidelines:
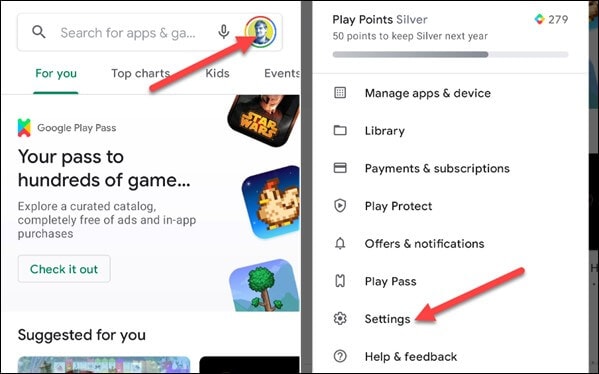
Step 1: Open your Google Play Store from your Tecno Pop 7 Pro. Navigate to the profile icon from the corner and select “Settings” from the displayed menu.
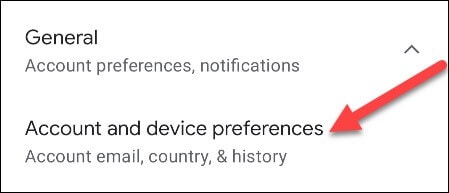
Step 2: Tap on the “General” section to locate the option of “Account and Device Preferences.” Afterward, find the “Country and Profiles” option by scrolling down. From there, you can see your current country location.

Step 3: Now click on “Switch to the Country Play Store” to change the location. For verification, click on “Continue” when a pop-up message appears on your screen asking if you want to change the location.

Step 4: Now, you will be automatically assisted in changing the payment methods of the new country. However, if you don’t come across the option to change the country, either you have already changed the country location within a year or your IP address is not synchronized with your new country.
Situation 2: How to Change Google Account Location on Android
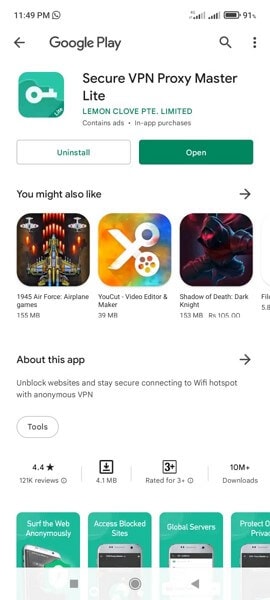
In this particular situation, you don’t have to change the Play Store country; instead, you can only change the Google location on your Tecno Pop 7 Pro. We will recommend the VPN Proxy Master Lite , which works effortlessly to change Google‘s location. This tool flawlessly hides your IP address so that you can easily use any country’s location to access all the applications and services. Moreover, it’s highly secured and well-protected so that no virus can harm your Tecno Pop 7 Pro.
To use this powerful VPN tool, we have jotted down some basic steps through which you can change the location on your phone easily:
Step 1: Start installing VPN Proxy Master Lite on your Tecno Pop 7 Pro from your Google Play Store. Once this app is successfully installed, open this app to proceed.
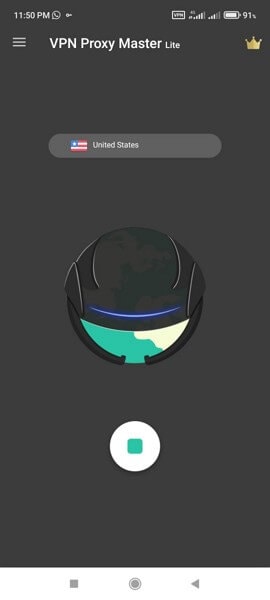
Step 2: After opening this app, tap on the country’s name list displayed above the picture of Earth. Tap on that list to view all the available countries.

Step 3: Select any country from the displayed list by tapping on it. Meanwhile, make sure that your phone is connected to a strong internet connection. This tool will automatically change your Google location by tapping on the country’s name.

How to Change Location on Computer
Situation 1: How to Change Country in Google Play Store on Computer
In this situation, we will help you change the country’s location on your Google Play Store through your computer. Just follow the below-given steps.
Step 1: Start by navigating to your PC’s browser and then open Google Play . Once done, click on the “Settings” displayed on top of your screen.
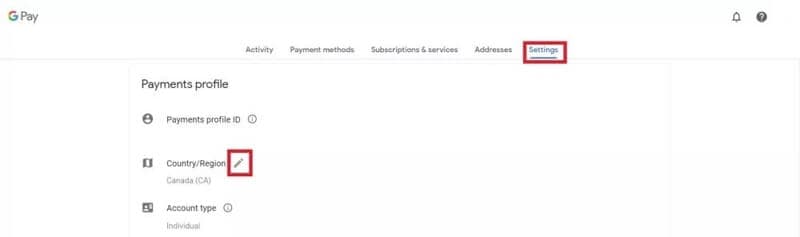
Step 2: After opening the settings menu, go to “Payments and Profile” and locate the option of “Country/Region.” Proceed by tapping the edit icon next to it.

Step 3: To connect with the new country’s location, tap on the option “Create a new profile.” Afterward, you can see the on-screen instructions on your computer, so follow them to complete the process. Once done, Google Play will change the location after 48 hours, and you can search for the applications you want to install.

Situation 2: How to Change Google Account Location on Computer
If you want to change Google location on your computer without changing country on Google Play Store, use ExpressVPN by downloading it. This tool is a well-trusted platform and offers an instant way to change Google location easily. In addition, you can rely on its platform to connect with more than 94 countries worldwide by changing the location anytime you want.
Moreover, the process is fast and fully secured to protect your computer from unwanted bugs. To change the location using ExpressVPN, the steps are:
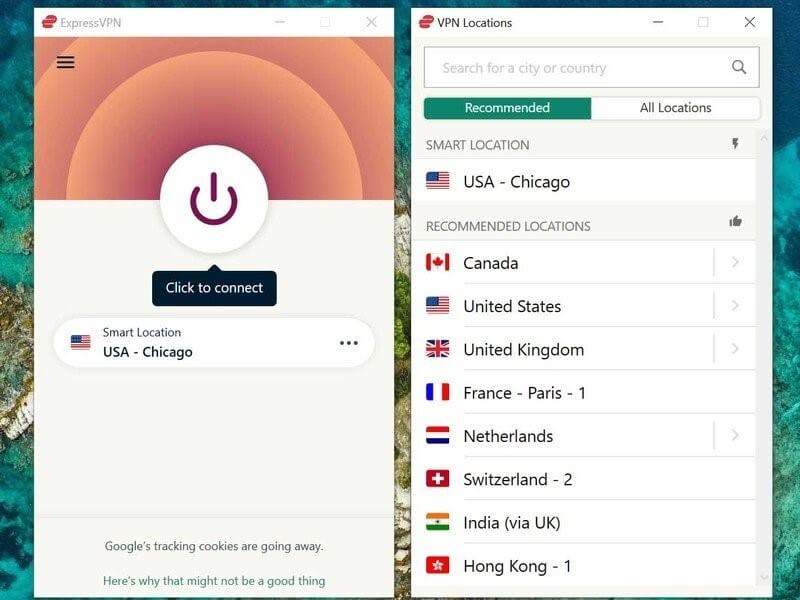
Step 1: Begin launching ExpressVPN on your computer and open its interface. Once done, turn on the VPN button and tap on the “Location Bar” to change the location.
Step 2: You can explore regions by either navigating to the “Recommended” or “All Locations” tab. Select the location you want to change with from the displayed list.
Step 3: After clicking on any country’s location, your computer’s Google Account location will be automatically changed.
Part 3: The Most Effective Way to Fake Location on iOS and Android
We have mentioned methods to change Play Store country manually and through VPN, but they still have a few limitations. Once you change the country’s location on Google Play manually, the Play Store requires 48 hours to accept this modification. Moreover, you can only change the country’s server location once a year. With VPN, many country servers are unreachable, and some servers can be reached only through a paid version. This makes the process expensive and time taking.
To avoid these hurdles and chaos, we recommend you to use Dr.Fone – Virtual Location to fake your location on both Android and iOS devices. This tool works in every situation and allows users to travel the globe through their phones free of cost. You can also travel with an exact GPS location just with a single click. Hence, this tool will work amazingly in faking your location without requiring you to change Google Play country’s location.
Dr.Fone - Virtual Location
1-Click Location Changer for both iOS and Android
- Teleport from one location to another across the world from the comfort of your home.
- Fake location on your phone with a few clicks.
- Support most mainstreaming apps and geo-based games, including Pokemon Go, Snapchat, Tinder, and so on.
- Compatible with both iOS and Android systems.
3981454 people have downloaded it
To change country Google Play using Dr.Fone - Virtual Location, here are the steps:
Step 1: Choose Virtual Location Feature
Begin with launching the tool of Dr.Fone on your computer. Open its interface and tap on the “Virtual Location” option from the home page.

Step 2: Connect your Phone
Now connect your smartphone to the phone with the help of a USB cable. Once done, click on “Get Started” to proceed further.

Step 3: Find your Current Location
After connecting your phone, you will be able to see your current location on the new window. If not, tap on the “Center On” icon displayed on the right side to find your current location.

Step 4: Enable Teleport Mode
Tap on the first icon displayed on the top right to enable the teleport mode. Now enter the location you want to navigate the search box and click on “Go” to continue.

Step 5: Change Location
A notification will pop up for confirmation once you have entered a new location. Tap on “Move here” to proceed. Once done, your new location will be set on your smartphone automatically. Now head back to Google Play Store and search for the applications you want to access.

 safe & secure
Conclusion
There are plenty of ways to execute Google One change location across various platforms to execute Google One change location. For example, people usually change Play Store country to access restricted applications in their region. This article will offer a detailed guide for changing Google location through manual and VPN means. However, to avoid any hassle, we recommend Dr.Fone - Virtual Location to change the location of your smartphone and Google Play instantly and conveniently.
Life360: Learn How Everything Works On Tecno Pop 7 Pro
Nothing is more important than your mobile device when it comes to your security, privacy, and family. Thanks to its easy-to-use features and excellent app, with Life360, your life will be as secure and private as possible.
Whether you’re looking to sync photos, videos, contacts, messages, and locations with your mobile devices and computers or simply set up your home cameras to automatically send you alerts, Life360 is designed to be the most powerful mobile phone service provider you’ve ever seen.
It’s the most secure and easiest-to-use service, but it’s not the cheapest. So, let’s know what Life360 is and how Life360 work.
Part 1: What Is Life360?
A smartphone software called Life360 tracking system enables families to communicate, track their whereabouts, and get alerts about their loved one’s safety and well-being.
When Life360 is installed on the phone, the administrator may create geo-fences specifying certain locations. For example, geo-fences might be employed to monitor family members’ arrival and departure times. In addition to that, the program provides driving analysis by means of the Life360 Driver Protect module.
Additionally, BMW has incorporated Life360 into its onboard location tracking. Accident identification and rescue operations are provided through an app that tracks authorized drivers and offers monitoring and analysis.
Both parties need to have the app installed for one to be able to monitor the activities of the other. Using the app, you can see where your phone is at any given moment. A member of your family might know exactly where you are at any given time if they have the app on their phone.
Whether you are currently using the app or not, the Life360 app tracker will always be able to pinpoint the exact location of your mobile device. In addition, you may obtain real-time location information on each other, view it on a hidden map, and even choose to get automatic notifications anytime someone enters or departs a spot, according to the Life 360 website.
Every time a family member departs or comes someplace, an alert is sent to the rest of the family. You can share your location with an adult, and they can see how fast you were driving, how long it took you to come home, and who was home or at school while you were gone.
In addition, adults and children may obtain real-time instructions from a particular family member. For example, you may touch an icon of a family member to receive instructions to that user’s location on the Life360 website.
Part 3: Is Life360 Always Accurate?
Previously, Life360 was criticized for being inaccurate, especially when locating people. However, the company has recently updated its system to ensure that the data it collects is accurate.
The Life360 app uses GPS technology to track your location. When you first install the app, you will be prompted to set up your location. This is done by entering your zip code, city, and state.
You will also be asked to select a default location. This will be used to determine your home address. Once you enter your zip code, city, and state, you will be able to view your location on a map.
Also, Life360 works best in urban areas. If you live in an area with many tall buildings, Life360 may not work as well.
Part 4: Is Life360 Safe for Your Privacy?
Life360 is a relatively new app, but it has been getting attention lately. People are wondering whether it is safe for them to use and whether or not it is worth it.
According to the Life360 website, the app is safe because it is encrypted. The encryption ensures that no one can intercept your communications.
If you are worried about privacy, you can disable the app’s location tracking feature. You can also disable the feature if you want to be notified whenever someone enters or leaves a particular area.
You can also use the app without giving anyone else access to your location. You can create a guest profile.
There are no ads or in-app purchases. You do not have to give any information to Life360. You can use the app without giving any information.
Life360 is also very easy to use. You do not need to have any special training to use the app. You simply need to sign up and download the app.
Life360 is available for free on Google Play and Apple App Store.
Part 5: Can a Location be faked on Life360?
What if You do not want your location to be tracked by someone else? One of the main reasons why people use Life360 is that it allows you to share your location with friends, family, and even strangers. However, if you do not want to be tracked by others, you need to know how to fake your location.
Unfortunately, you cannot spoof your location through Life360, so it is evident that you have to use another way to ensure that no one will know where you are. The easiest solution is an application called Dr.Fone - Virtual Location which can help you change your location in real-time.
Dr.Fone - Virtual Location is a comprehensive data management desktop software, which helps you to get all your data in one place and protect your important files from being lost. The software is easy to use and compatible with all Android and iOS devices.
You can also remotely wipe sensitive data and settings from any device at any time. With this software, you can backup your contacts, messages, photos, videos, call history, etc., to your PC or to the cloud service. All these features come as part of this.
Setting a virtual location is one of the prime role Dr.Fone plays.
Dr.Fone - Virtual Location
1-Click Location Changer for both iOS and Android
- Teleport from one location to another across the world from the comfort of your home.
- With just a few selections on your computer, you can make members of your circle believe you’re anywhere you want.
- Stimulate and imitate movement and set the speed and stops you take along the way.
- Compatible with both iOS and Android systems.
- Work with location-based apps, like Pokemon Go , Snapchat , Instagram , Facebook , etc.
3981454 people have downloaded it
Steps To Fake Your Location with Dr.Fone Virtual Location
Downloading Dr.Fone - Virtual Location (for iOS or Android) is the first thing that has to be taken. After that, run the executable file to begin using the application.
Step 1: After going through all of the available choices, choose “Virtual Location,” and then connect your iPhone or Android phone to your computer. Select “Get Started” from the drop-down menu.
For iPhone users, after the program has been linked via a USB cord, it is possible to connect wirelessly without a connection.

Step 2: You may see your current position on a map in the new window. If you are having trouble finding your current position when looking for locations on the map, you may hit the “center on” symbol that is located in the side to the right of the map to reveal your exact location.
Step 3: Tap the matching icon in the top right to enter “teleport mode.” It’s as simple as entering your destination location in the top left corner and clicking on the “go” button. Let’s look at Rome, Italy, as an illustration of this.
Step 4: It’s clear to the system that Rome is your destination. To relocate, choose “Move Here” from the menu that appears.
Step 5: Now you’re in Rome instead of wherever you were before. Your iOS or Android smartphone will always show Rome, Italy as your location, regardless of where you really are. This is the exact same location that appears in your location-based program.
 ZoneAlarm Extreme Security NextGen


Part 6: FAQs

1. What are Life360 events?
Although Life360 events are a great way to keep your loved ones informed about your whereabouts, they also provide information about your location, like the weather, time, and date. You can even set an alert when you arrive at a specific location.
For example, if you want to see who is at your house, you can set an event to notify you when someone enters or leaves your home.
2. What does protecting a drive on Life360 do?
Improve your family’s driving habits by getting a weekly picture of everyone’s driving habits. Gain a comprehensive understanding of the driving patterns of every member of the Circle.
Find out about things like your highest speed and whether or not you text while driving, among other things. Then, take a look at individual drives to find out details such as the exact route taken, the number of kilometers recorded, the peak speed, driving style, and the locations of any driving incidents.
When Circle members are on the road, whether driving, using public transportation, or traveling with companions, keep an eye on their peak speed.
 Allavsoft Batch Download Online Videos, Music Offline to MP4, MP3, MOV, etc format
3. Why does life360 show walking instead of driving?
In brief, it is because walking is less likely to be used for commuting than driving. For example, if you live in a rural area, you may not have access to public transportation, and therefore, you would have to walk to work.
4. What does it mean when life360 doesn’t update?
It means that the Tecno Pop 7 Pro device you’re using is not connected to the internet. In this case, you should check if your internet connection is working properly. If you’re sure your internet connection is working fine, try restarting your device.
5. Does Life360 work when your phone is off?
In the event that you switch off your phone, the GPS feature will also be disabled. As a result, it will not be able to determine your position when your phone is turned off.
However, Life360 will continue to provide the most recent location data uploaded to your account. So, a life360 login online is necessary.
Conclusion
Life360 is a useful application that helps you keep tabs on your loved ones. You can track location, receive notifications, and get alerts. But if you want to fake your location, Dr.Fone - Virtual Location is the most recommended product because of its unique features and easy-to-use interface.
How To Use Special Features - Virtual Location On Tecno Pop 7 Pro?
Wondershare Dr.Fone - Virtual Location comes with multiple unique features that can be used to enhance the flow of spoofing location. With all these amazing features, you can easily change your iOS location without blinking an eye. Rather than making things complicated, Dr.Fone makes it easy for you to manage operations when you perform actions like changing Android locations.

Part 1: Circle Route (For Multi-Stop Route)
The circle route feature is under the multi-stop route mode. When your starting point is close to the ending point, a pop-up asks if you want to set up a circle route. Click Yes to create a circular path on the map.

Part 2: Realistic Mode (For One-Stop Route and Multi-Stop Route)
This particular feature makes the simulation look realistic with the ability to fluctuate the speed of the simulation. If you wish to turn on realistic mode for the one-stop or multi-stop route, look for the respective checkmark option in the panel on the left.

 WinUtilities Pro
Part 3: Fluctuation Mode (For Teleport Mode)
Whenever you are teleporting your smartphone device to another location, you can try using the fluctuation mode feature offered against it. As you activate Teleport Mode from the top-right section and search for a location, you will discover the Fluctuation Mode toggle in the confirmation tab. Turn on the toggle to slightly switch the location from the selected point to show realistic motion.

 OtsAV DJ Pro
Part 4: Cooldown Timer (For Teleport Mode and Jump Teleport Mode)
While teleporting the location of your smartphone to different places for playing games like Pokemon Go, you are bound to activate a cooldown timer within your location-changing app to show realistic movement. By locating the Cooldown Timer on the right pane of icons, activate it, and this feature will automatically calculate the cooling time by measuring the distance between your destination and the starting point.

It is recommended not to start the movement until the cooldown time is completed to avoid unnecessary bans. Moreover, you can also activate the Auto jump after cooldown in the Jump teleport mode after turning on the Cooldown Timer.
This option will automatically jump you to the next destination once the timer ends. It is helpful for games like Pokemon Go, where the game servers can detect frequent jumps with no cooldown time.
Part 5: Import/Export GPX File
You can also import and export specific navigated locations from Dr.Fone in the form of GPX files. While you can export GPX files for keeping a record of your location, you can also import such files for inserting specific locations to simulate or teleport to. Find out how you can import and export GPX files with this location-changing application:
Step 1Export the GPX File
If you have defined a proper location to simulate at a particular instant using Dr.Fone - Virtual Location, you can have this location exported by clicking the Export icon on the top of the left panel. This will open a window where you can set the location for saving the GPX file.

Step 2Import a GPX File
For importing a GPX file on the platform, click the Import button on the right pane. As this opens a window, select the GPX file you wish to import to the platform.

Step 3Wait for the File to be Read
Wait for a moment until Dr.Fone - Virtual Location recognizes the specific locations within the GPX file and displays them on the map.

Part 6: Historical Records
If you want to use a similar track record on your smartphone again, you can access the historical records saved on the platform for easy access.
Step 1Open Historical Records
Click the Historical Records button on the right pane to access the entire history involving the connected smartphone and the location spoofing platform.

Step 2Access Any Location from the History
Select the Go button adjacent to any particular historical record to re-launch a similar simulation for the Tecno Pop 7 Pro device. You can also click Clear All to delete all historical records.
![]() FX PRO (Gold Robot + Silver Robot(Basic Package))
FX PRO (Gold Robot + Silver Robot(Basic Package))

Part 7: Favorite List
You can also set up favorite locations within the platform to define quick accessibility to your favorite locations. To do that, you have to follow the guidelines shown next:
Step 1Favorite Specific Locations
While setting up locations in Jump Teleport Mode, One-Stop Route, or Multi-Stop Route, you can tap on the Favorite icon adjacent to every marked location or favorite an entire route with the Favorite icon on the top of the left panel.

Step 2Access your Favorite Section
To look for your favorite locations, look for the Favorite icon on the right pane to open a list containing all locations you have marked. You can choose the Move option to automatically move into a particular location in no time.

- Title: How to Change Google Play Location On Tecno Pop 7 Pro | Dr.fone
- Author: Ava
- Created at : 2024-08-01 22:40:32
- Updated at : 2024-08-02 22:40:32
- Link: https://fake-location.techidaily.com/how-to-change-google-play-location-on-tecno-pop-7-pro-drfone-by-drfone-virtual-android/
- License: This work is licensed under CC BY-NC-SA 4.0.