
How to Change Netflix Location to Get More Country Version On Vivo Y78+ | Dr.fone
How to Change Netflix Location to Get More Country Version On Vivo Y78+
Many people nowadays idle away the hours watching films and TV shows on Netflix. Well, it’s not that hard to see why. First and foremost, Netflix is readily available and easily accessible in different parts of the world. All you have to do is set up an account and browse the selections afterward. Another thing is that Netflix offers a very large catalog of television programs to match your current mood. From romance and adventure to thrillers and documentaries, you will not run out of options. Netflix has got you covered.
At a glance, it looks like the entertainment materials that Netflix has to offer are boundless. Scrolling through its program categories feels like a never-ending loop. But in actuality, there is something important you need to know. Netflix actually provides a different set of movie selections for each region. That means there are certain TV shows and films that are not universally available worldwide. But don’t worry. There are lots of tutorials online on how to change your location on Netflix. Surely, one of them can help you gain access to geo-exclusive Netflix content that is currently unavailable in your country.
In this article, we will discuss the main reasons why some Netflix shows are not widely accessible. We will also provide some effective methods on how to change your Netflix location on mobile and other electronic devices. Continue reading below to learn more.

Part 1. Why Netflix Offers Different Shows in Every Country
Netflix is definitely one of the largest video streaming services of our time. It’s currently available in over 190 countries globally. The majority of its content is widely accessible regardless of location. You can binge-watch on them anytime and anywhere so long as their individual broadcast license remains active. But as mentioned earlier, there are some Netflix shows that are not available worldwide.
There are many potential reasons why Netflix shows vary from one region to another. One of them is cultural influence. Of course, Netflix prioritizes the screening of shows that are highly relatable for the target audience. Hence, the content available in certain locations is locally sourced or regionally concentrated. But that’s not all. There are other reasons why Netflix offers different shows in every country. Check out the list below to understand it better.
The theme of the Netflix show contradicts certain government rules or traditional beliefs

Netflix holds traditional beliefs in high regard and abides by government rules. If the show depicts sensitive topics that certain countries don’t openly discuss, its viewing is immediately restricted in the region. That’s probably the reason why a particular Netflix show is unavailable in your region. Is there a way to access it without traveling anywhere? Luckily, there is. Find a tutorial online on how to change your location on Netflix. Follow the steps accordingly until your Netflix location is modified. After that, the restricted show must be available now on your end.
There are some issues regarding copyright ownership

In simple terms, copyright ownership is enforced separately in each country. That means Netflix must secure individual licenses for every region. Sometimes, certain countries fail to acquire copyright ownership due to the cost and other factors. As a result, the content becomes unavailable in that particular location. We cannot do anything about it unless you’re willing to shell out money for the license. But if you’re really eager to get hold of the restricted Netflix show, try to modify your device’s primary location. Don’t worry. There are many tutorials online on how to change your Netflix location. Just choose one and follow the instructions indicated.
The Netflix show has varying release dates for each region

Maybe there is no complicated issue behind the geo-blocking of a particular Netflix show in your region. It’s possible that the release date is actually different in every country. If that’s the case, there is nothing to worry about. It’s just another marketing tactic to add an element of surprise for the fans. All you have to do now is sit back and wait as patiently as you can. If you’re too excited to be counting down the days, you may try to alter the location settings on your device. Find the most suitable guide on how to change your location on Netflix.
Part 2. How to Change Your Netflix Region?
If you wish to explore other Netflix collections, the best way you can try is to alter your Netflix region. Is it possible? Of course, it is. There are many tutorials that provide easy steps on how to change your Netflix region. If you successfully complete them, your Netflix location will be changed immediately as though you’ve traveled somewhere. Don’t worry. Most of them are not that complicated to implement. In actuality, it only takes a few minutes or even seconds to accomplish the entire instructions. Just make sure to choose the best guide that works perfectly with your situation. To help you out, below is the list of methods you can try.
Method 1: Activate VPN before streaming Netflix shows
Virtual Private Networks generally mask your IP address by directing your internet traffic to a server from a different location. Thus, your location settings show modified coordinates whenever you browse the internet with a VPN enabled. That also works with streaming Netflix shows that are currently restricted in your region. Do you want to try it? Here’s a short guide on how to change your location on Netflix using Virtual Private Networks.
- Step 1: First and foremost, check the current standing of your Netflix account and make sure it is active. Once confirmed, choose your preferred VPN.

- Step 2: Then, download and install your selected Virtual Private Network. Register an account afterward and subscribe to a paid plan if necessary.
- Step 3: Activate the VPN on your device. From there, choose a country where you wish to direct your internet traffic.


- Step 4: Once successfully activated, you can now access Netflix on your device and search for the restricted TV show you want to watch.
Method 2: Stream Netflix shows with a web proxy server
For the most part, a web proxy server basically works like a Virtual Private Network. It reroutes your internet traffic to a particular server from a different location. Through this tactic, Netflix fails to detect that you’re using its service from a restricted region. A web proxy server is often free of charge. Thus, it’s a great alternative to VPNs if you don’t want to spend money just to access unavailable content on your device. Do you want to try it now? Here’s how to change your Netflix location using a web proxy server.
- Step 1: Choose your preferred web proxy server and then visit its official website. Create an account if necessary.
- Step 2: After that, select a server from the available options. Make sure that the server you’re going to choose is not geologically blocklisted on Netflix.
 WonderFox DVD Ripper Pro
- Step 3: Enter the official web address of Netflix into the URL bar and then proceed immediately.
- Step 4: Wait while the web proxy server is loading up your request. After a few minutes, the Netflix dashboard must be displayed on your computer screen. From there, you can now browse its catalog and binge-watch the content currently restricted in your region. That’s exactly how to change your location on Netflix with a web proxy server.

Method 3: Stream Netflix shows from the Tor browser
Tor browser is primarily used for ultra-private internet browsing. Your online activities on this platform are encrypted and directed to about three various servers located worldwide. Although you cannot actually change your location settings, your actual IP address will be masked and routed somewhere else. This way, you get a higher chance of accessing restricted Netflix shows from the comfort of your own home. Do you want to try it now? Here’s the guide on how to change your Netflix region using the Tor browser.
- Step 1: Download Tor browser from its official website. After that, install it on your computer.
- Step 2: Launch the Tor browser on your desktop and hit Connect. Make sure that Tor has been successfully configured on your device. Once confirmed, visit the official website of Netflix.
 OtsAV Radio Webcaster
- Step 3: Browse through the wide content selections on Netflix dashboard and find the restricted content you want to watch.
Part 3. Things to Remember When Modifying Location Settings For Netflix Streaming
The tutorials above on how to change your location on Netflix are undeniably helpful for many people. The three of them are effective in this regard, depending on your situation. However, don’t forget that engaging in this kind of modification entails some risk. That’s why you should be careful and vigilant when you decide to implement the methods above. To understand it better, check out the list below.
 SwifDoo PDF 2-Year Plan
- Avoid using VPNs or web proxy servers with unverified origin. You never know. Instead of providing solutions, these illegitimate tools might cause serious problems on your end. It’s better to pay for a subscription if it’s going to help you secure your usage.
- According to some users, Tor browsers run too slow. If you’re not patient enough, you might struggle to stream Netflix shows on this platform. That’s why you only resort to this option if all available alternatives have been exhausted.
- Take note that Virtual Private Networks sometimes downgrade the network bandwidth. As a result, internet speed gets affected, and data transmission slacks off than usual. If you cannot stand this kind of scenario, it’s best to tick off the use of VPN from your list of options.
- It rarely happens, but there is a possibility that data breaches might occur. That’s why you should first check the security protocols that VPNs and web proxy servers implement. Make sure that their data protection is powerful enough to keep your personal information safe and private.
Part 4. How to Change Your Netflix Location on Mobile Devices
The first three tutorials above on how to change your location on Netflix work pretty well on personal computers. Do they work too on mobile devices? Well, you can try and see what’s going to happen. However, a positive result is not a hundred percent guaranteed. Is there any other way? Fortunately, there is. Wondershare Dr.Fone can absolutely help you with that. It offers a potent Virtual Location feature capable of simulating GPS movements and modifying your location settings in a snap/ Don’t sweat it. It’s very easy to get started. Check out the tutorial below on how to change your location on Netflix using Wondershare Dr.Fone.
- Step 1: Download Wondershare Dr.Fone for free from its official website. Right after, install it on your computer.
- Step 2: Launch the newly installed software on your desktop. Once it fully loads up, connect your smartphone using a data cable. Follow the on-screen instructions carefully and execute each step properly to ensure the connection between the two devices is stable enough to handle the succeeding procedures.
- Step 3: Access the left-side panel afterward and then click Toolbox. On the main dashboard, click Virtual Location. Is it your first time using this feature? If so, let Wondershare Dr.Fone download additional resources. Don’t worry. It will only take a few minutes to complete.
- Step 4: Once the downloading process has concluded, Wondershare Dr.Fone - Virtual Location will immediately open on a separate window. From there, hover over to the top-right menu bar and then click Teleport Mode. It is the first icon in the row.


- Step 5: After that, find the search at the top-left corner of your screen and type in your desired location. Choose one from the suggested results. Then, click the Enter icon to proceed.

- Step 6: The essential details referring to your chosen location will be displayed on your computer screen, along with a map marker. Read the information very well and make sure that it is exactly the place you’re looking for. Once confirmed, click Move Here.

- Step 7: The location settings on your mobile devices will be immediately changed to your chosen coordinates. Verify that the changes have already been applied by simply checking out your Maps mobile app. It must not show your real current location.

- Step 8: Open the Netflix application on your smartphone and then browse through its catalog. Find the restricted content you want to watch and try to stream it on your device. To restore your original location settings, simply close the Wondershare Dr.Fone on your computer and then restart your device.
Conclusion
Netflix is definitely at the forefront of modern entertainment. It is the go-to app of many people whenever they are bored and want to binge-watch TV shows. However, it is sometimes infuriating if the movie you want to stream is restricted in your location. If you’re experiencing anything similar, you can refer to the discussions above. The provided tutorials on how to change your location on Netflix can surely help you in this regard. For mobile devices, follow the guide on how to change your Netflix location using Wondershare Dr.Fone. It has a powerful Virtual Location feature capable of modifying your whereabouts and simulating GPS movements.

How to Share Location in Messenger On Vivo Y78+?
We usually host a gathering once in a while and invite our friends to come over. Most of us are already used to organizing such activities because we’ve been doing that for a long time now. However, we cannot deny that it’s much easier nowadays than years ago. Why so? Simply because the communication channels available today at our disposal are more digital and more capable. For instance, Facebook Messenger now allows users to share their whereabouts in a snap of a finger. Yes. That feature is called Live Location.
The Live Location feature on Messenger works beyond sending the address or coordinates of your exact location. It basically visualizes your whereabouts by means of an interactive map and updates the details from time to time. That means the receiver can view not only your position but also your movements. Is that helpful? Absolutely yes. It’s indeed a game-changer in today’s already convenient world. Is it highly recommended? With proper handling and adequate caution, Messenger’s Live Location can definitely do more good than harm to the users.
In this article, we will delve into the highlights and benefits of Facebook Messenger’s location-sharing features. We will also provide some tutorials on how to share Live Location on Messenger. Continue reading below to learn more.
Part 1. Everything You Should Know About Messenger’s Live Location
Facebook is well aware that sharing location details is essential to its users. That’s why developers have come up with a brilliant idea and rolled out Live Location on Messenger. It basically works like other location-sharing features. However, Live Location provides more precise and thorough location information. It’s in map form, where you can view the exact location and track the movements of the sender. You’ll continue to see updates for as long as the sharing is not halted on the other end. To navigate it properly, try to read tutorials on how to share Live Location on Messenger.

What if you wish to send a particular address from another location? There is no problem with that. Messenger allows users to search for a specific place, trace it on the map, and share the details. The receiver can view it in map form and get directions if necessary. See? It’s very easy and convenient. No need to type in long addresses just to share a particular location with your friend. You just have to find it precisely on the map and send the information afterward.
Convenience is just one thing. Messenger’s location-sharing feature has a lot more to offer to users. One of which is the accuracy of the shared location information. Since the details are automatically generated through GPS, you can be sure that it is correct and definite. If you go out and track it down the neighborhood, you can certainly find the location in no time. Just make sure that the location services on your smartphone are activated so you can view your progress in real time. Also, stay vigilant while you’re out and keep yourself safe from any harm. Remember that safety remains a priority and comes above convenience.
How to Grant Facebook Messenger the Permission to Access Your Location?
Facebook Messenger’s location-sharing feature will not work without the necessary access. That’s why you should first configure the permission settings on your mobile device to avoid unwanted disruptions. Don’t worry. It’s indeed a piece of cake. Check out the tutorial provided below.
- 1: Go to Settings.
- Step 2: Click Apps.

- Step 3: Find and click Messenger.

- Step 4: Click Permissions.

- Step 5: Click Location.
 The BootIt Collection covers multi-booting, partitioning, and disk imaging on traditional PC’s using the standard BIOS and newer PC’s using UEFI. The collection includes BootIt Bare Metal (BIBM) for standard BIOS systems and BootIt UEFI (BIU) for UEFI system.
- Step 6: Select Allow Only While Using the App. If you’re quite conservative regarding this matter, click Ask Every Time instead. After that, Facebook Messenger will have access to your location information.


Part 2. How to Share My Location on Messenger?
How do I share my location on Messenger? As mentioned earlier, it’s very easy to use Facebook Messenger for location sharing. All it takes is just a few clicks on the platform. No need to manually type in the address or sketch the landmarks. Messenger does the rest of the work for you. In actuality, there are three ways to share your location on Messenger. Any of them can be of great help to you, depending on your current situation. Do you want to try them now? Check out the tutorials below.
Method 1: Share location on Facebook Messenger via Live Location
How to share my location on Messenger? Well, the first option you can try is through Live Location. It works best if you wish to tell somebody where exactly you are and give updates from time to time. Don’t worry. Although it looks complicated at a glance, in reality, it’s actually not rocket science. It only takes a few seconds to complete. Below is a tutorial on how to share Live Location on Messenger in easy steps.
- Step 1: Open the Facebook Messenger application on your mobile device.
- Step 2: Browse through your conversation feed and find the contact with whom you wish to share your Live Location. Click on it.
- Step 3: Click the More (+) icon at the bottom-left corner of the screen.

- Step 4: Right after, click Location.

- Step 5: Click Start Sharing Live Location. Immediately, your current location details will be available and forwarded to the intended receiver. Live Location lasts for 60 minutes at maximum. If you wish to terminate it, simply click Stop Sharing Live Location.

Method 2: Share location on Facebook Messenger via Pinned Location
Let’s say there is a specific place you want to visit with your friend. Is there a way to share the address of the venue without you being there at the moment? Fortunately, it is possible. Apart from sharing your current location in real-time via Live Location, you can also send pinned locations on Messenger. You just need to search for it and then redirect the details to your friend. Yes. It’s just as simple as that. Do you want to try it on your smartphone? If so, follow the guide below.
- Step 1: Launch the Facebook Messenger application on your mobile device.
- Step 2: Scroll through your conversations and find the receiver from the list. Click on it.
- Step 3: On the text field, click the More (+) icon at the bottom-left corner.
- Step 4: Then, click Location.
- Step 5: Locate the search bar above the interactive map and type in the location you want to share.

- Step 6: Choose one from the suggested results and then click on it. The details will then be forwarded immediately to the intended receiver.
Method 3: Share location on Facebook Messenger via Google Maps location
How do I share my location in Messenger if I cannot find it on the map provided? Yes. That happens sometimes. There are certain places that are untraceable on the messaging platform. As a result, it doesn’t appear on the map when you try to search for it. But don’t sweat it. If you experience the same issue, you can instead use Google Maps to share location details. How to do it? Check out the tutorial provided below.
- Step 1: Launch the Google Maps application on your mobile device.
- Step 2: Click on the Search bar at the top and then type in the location.


- Step 3: Choose one from the suggestions and then tap on it. Make sure that it is exactly what you’re looking for.

- Step 4: Access the menu bar below the map and then click Share.
 Glarysoft File Recovery Pro Annually - Helps to recover your lost file/data, even permanently deleted data.
- Step 5: From there, click Chats or the Facebook Messenger logo.
- Step 6: Find the receiver from the provided list and then click the Send button next to its name.

NOTE: Of course, you can only send pinned locations via Google Maps. The Facebook Messenger’s Live Location is available within the platform only.
BONUS TIP: Protect Your Privacy With Wondershare Dr.Fone
There’s no denying that the location-sharing feature of Facebook Messenger is useful to many of us. It always comes in very handy whenever we need to meet people somewhere or invite them to our places. However, we should not become too complacent and let our guard down. Sharing sensitive information like whereabouts always comes with risk, regardless of the platform and the intention. Therefore, make it a habit to protect your privacy at all costs. In this regard, Wondershare Dr.Fone has something special to offer. Its Virtual Location feature, capable of modifying and simulating your location records, can be of great help for you. Don’t worry. It’s very easy to use. Here’s a short guide for you.
- Step 1: Download Wondershare Dr.Fone from its official website. Right after, install it on your computer.
- Step 2: Launch the newly installed software on your desktop. Once it fully loads up, connect your smartphone using a data cable. Follow the on-screen instructions and perform the steps accordingly to ensure the connection between the two devices is stable enough to handle the succeeding operations.
- Step 3: Navigate to the left-side panel and then click Toolbox. On the main dashboard, click Virtual Location. Is it your first time using this feature? If so, allow Wondershare Dr.Fone to download additional resources. Don’t sweat it. It will only take a few minutes to complete.
- Step 4: Once the downloading process has concluded, Wondershare Dr.Fone - Virtual Location will automatically open on a separate window. From there, go to the top-right menu bar and then click Teleport Mode. It is the first icon that appears in the row.
- Step 5: Head over to the top-left corner and enter your desired location into the search bar. Choose one from the suggested results. After that, click the Enter icon.
- Step 6: The details regarding your chosen location will be displayed on the computer screen. Review the information and make sure that it is the specific location you’re looking for. Once confirmed, click Move Here to proceed.
- Step 7: Immediately, the location settings on your smartphone will be changed according to the inputs you have provided to Wondershare Dr.Fone. You can verify it by checking the current location registered on your Maps app. After confirming that your mobile device is now showing a different location, you can now start browsing without worrying about your location’s privacy.
NOTE: Resort to Wondershare Dr.Fone - Virtual Location if your internet browsing does not require you to provide your real address. If you wish to restore your original location settings, simply close the Wondershare Dr.Fone application and restart your smartphone.
Conclusion
Gone are the days when you had to write invitation cards manually and deliver them one by one. Nowadays, all you need to do is go online and use Messenger’s location-sharing feature. Have you already tried it? If not, you should take it into consideration and use it on your next agenda. Refer to the tutorial above on how to share Live Location on Messenger. It can certainly help you get started. How do I share my location on Messenger without physically being there? That’s simple. Use Messenger or Google Maps’s pinned location. Furthermore, download Wondershare Dr.Fone on your computer. Its Virtual Location feature, capable of modifying your location settings, can provide protection for your privacy. Just connect your Vivo Y78+ to the computer and set it up from there.
How to use Snapchat Location Spoofer to Protect Your Privacy On Vivo Y78+?
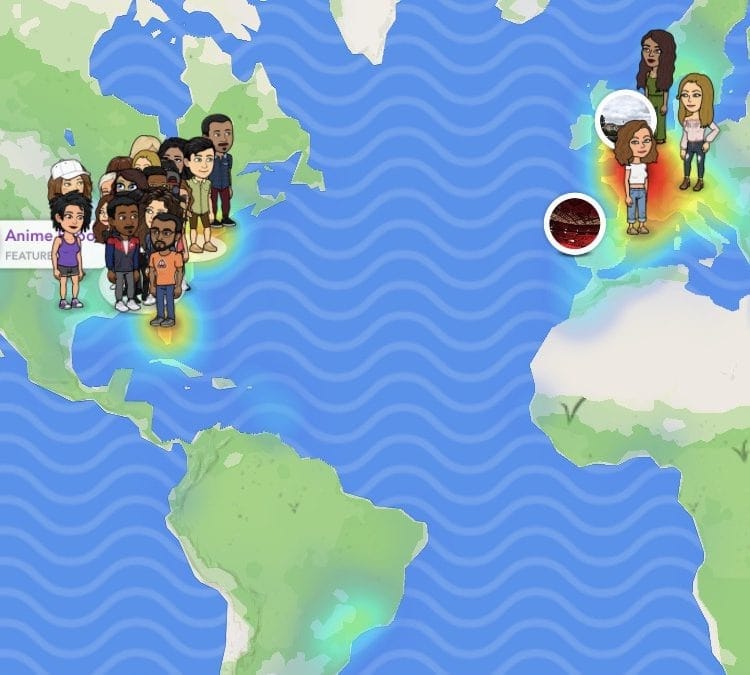
People are very happy about Snapchat’s new Snap map feature. It lets you update your location on a map, so that you can know who else (in your friends circle) is in the same concert or attending the same seminar. Whenever you add a post to your stories, your bitmoji appears on the geo-tagged location on the map.
This feature was good news for people who were wondering how to share location on snapchat with their friends. But there is more to this than your eyes are seeing. Even when you don’t upload any posts to the stories, snapchat is still revealing your location to all your friends, whether you want it or not. Everytime you open the app, your location is being compromised. You just need to agree to share your location once, and Snapchat takes it as an invite to share your location every single time you send a snap or simply open the app to look at others’ snaps.
This is very dangerous when you have unknown people on your snap friends list. You must have accidentally accepted requests from people who have similar names to your friends? You don’t really know the identity of the person unless they snap their faces to you. In the worst case scenario, you can also have an obsessed stalker who was just waiting for this chance to track you down. The possibilities are endless. So, how to hide your snapchat location from the others on the internet? Our guide will teach you exactly that!

Part 1: Can we Hide Location on Snapchat?
The first thing that comes to our mind whenever we think about fake gps location snapchat is a VPN. But keeping these virtual network apps and spoofing apps aside, is it possible to hide our location by taking advantage of the existing settings on the app?
Yes, Absolutely!
There are a few tricks that you can use to hide your location from your friends or anyone who you have on your Snap List.
Ghost Mode: The word ‘Ghost’ was never this sweet. The snapchat fake location saves a lot of trouble. However, if there is no location at all, that is a huge advantage too! You can literally disappear off of the map when you activate the Ghost mode on Snapchat. Instead of a snapchat spoof, you are completely removing your traces from the Snapmap. This is how you enable this very useful setting -
Step 1: If you are someone who maintains the snap streak regularly, then it is no problem for you to track down the camera screen. Open the camera screen on your phone.
 LYRX is an easy-to-use karaoke software with the professional features karaoke hosts need to perform with precision. LYRX is karaoke show hosting software that supports all standard karaoke file types as well as HD video formats, and it’s truly fun to use.
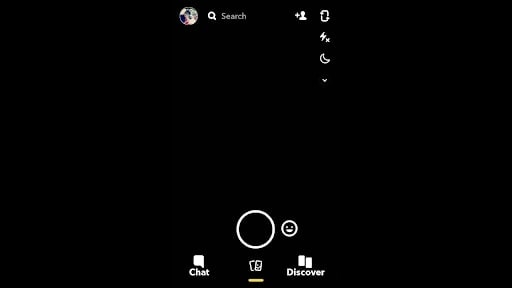
Step 2: On the top-left corner, you will find your bitmoji that will lead you to your Snap profile. Click on your bitmoji.
![]()
Step 3: The profile page will appear. Scroll to the bottom and you will find the Snapmap option there. Right below it will be a small arrow pointing to the right. Instead of clicking on the map, tap on thi arrow.
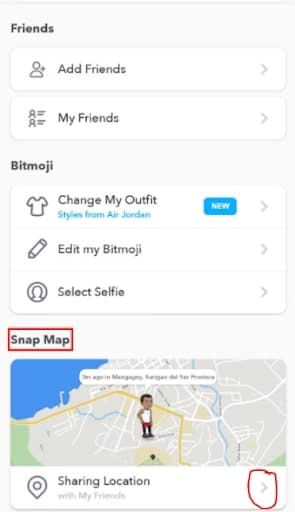
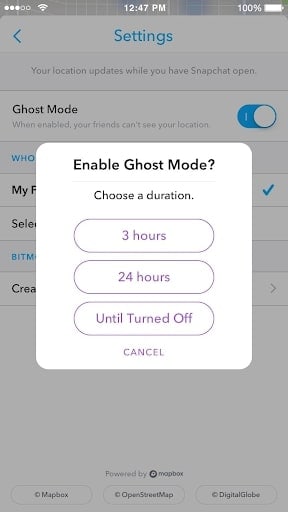
Step 4: The Map and ‘My Location’ settings will open. There you will find the Ghost Mode. Enable the setting and you will see a dialogue box asking you to choose the duration of the Ghost Mode. Depending on what you want, choose your location.
If you still don’t trust this Ghost mode, the next trick will be very useful for you. Not just Snapchat, any app won’t be able to track down your exact location when you follow it.
Turn Off GPS Permissions on your phone
If you completely turn off the GPS Permissions on your phone, then no app can access your location even if you are connected to the internet. This might hinder the performance of a few apps but that is the risk that you must take to safeguard your privacy. The procedure to Turn off the GPS will differ from Android to iPhone. We have listed the most easy ways to turn off the location services on your phones.
Android
The easiest method is to go with the Notification tray that is present on top of the Android device. That is, when you look at your Android screen, you will see the notification tray on the top.
Step 1: Swipe down the notification tray and you will find several options. One of them is the ‘Location’ icon.
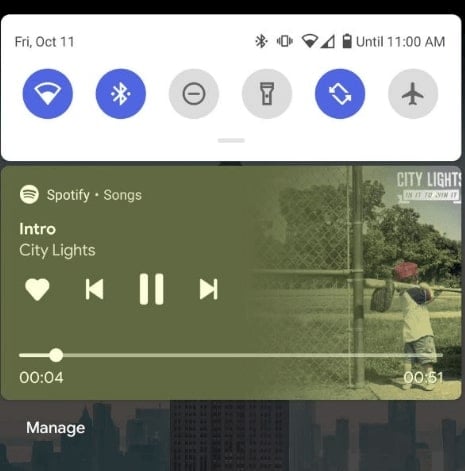
Step 2: The ‘Location’ icon is shaped like a geo-coordinate pin and remains in grey color when switched off and Blue color when turned on. Tap on the icon to on/off.
.png) Kanto Player Professional
Kanto Player Professional
iPhone
To turn off the Location on your iPhone device,
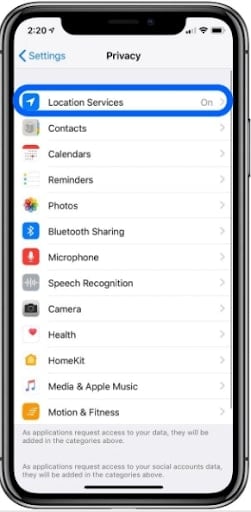
Step 1: Go to the ‘Settings’ option from your iPhone device’s Menu.
 vMix Pro - Software based live production. vMix Pro includes everything in vMix 4K plus 8 channels of Replay and 8 vMix Call
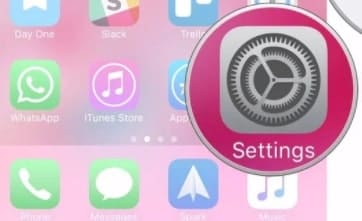
Step 2: Search for the ‘Privacy’ option and tap on it.

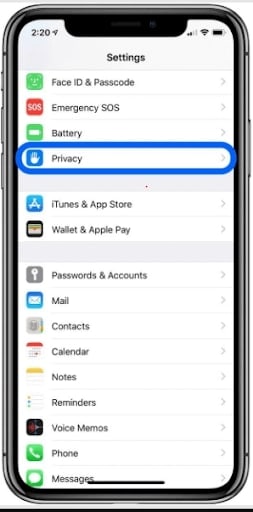
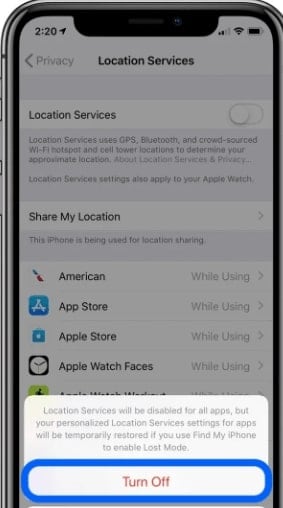
Step 3: In the next page that appears, you will find the ‘Location Services’. If we are not wrong, it is usually the first option on the page that opens up.
Step 4: Shift the toggle and turn off the Location Services. If you want, you can also disable location services individually for Snapchat only.
These are the simple ways in which you can prevent snapchat from spying on your location. You must be knowing how to send location on snapchat through chats - even this won’t be possible once you completely turn off the GPS of your devices.
Part 2: How to Spoof Location on Snapchat
If you are wondering how to fake location on snapchat, then the Snapchat location spoofer is one of the best options. You won’t find a specific software designed exclusively for Snapchat but Wondershare’s Dr. Fone Virtual Location spoofer will help you hide your real location on social media apps. This is how you use the application.
Dr. Fone - Virtual Location (iOS)
Step 1: Download the Dr.Fone Virtual Location Spoofer on your PC and launch it. You will find several options on the page. Go for ‘Virtual Location’.
 KoolReport Pro is an advanced solution for creating data reports and dashboards in PHP. Equipped with all extended packages , KoolReport Pro is able to connect to various datasources, perform advanced data analysis, construct stunning charts and graphs and export your beautiful work to PDF, Excel, JPG or other formats. Plus, it includes powerful built-in reports such as pivot report and drill-down report which will save your time in building ones.
 It will help you to write dynamic data reports easily, to construct intuitive dashboards or to build a whole business intelligence cockpit.
KoolReport Pro package goes with Full Source Code, Royal Free, ONE (1) Year Priority Support, ONE (1) Year Free Upgrade and 30-Days Money Back Guarantee.
Developer License allows Single Developer to create Unlimited Reports, deploy on Unlimited Servers and able deliver the work to Unlimited Clients.
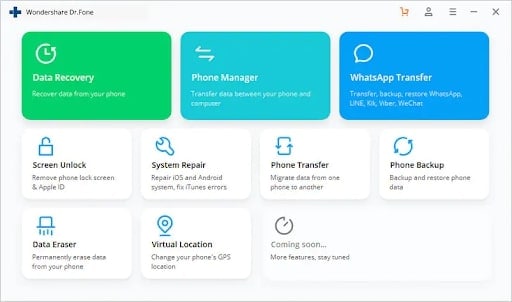
Step 2: Now connect Your Vivo Y78+ to your PC and go with the ‘Get Started’ option.

Step 3: The world map with your current location will show up on the page. The ‘Teleport mode’ is the third icon on the top-right corner of the page. Click on it and enter your new location in the search box.

Step 4: Once you’ve decided with your final virtual location to fake gps for snapchat, then click on ‘Move Here’. New location will update in your phone and Snapchat will detect it too.
One of the advantages of using a location spoofer is that - your new location will reflect in all social media applications. Even your regular apps will detect the change and note it. So, it becomes hard to know if the change is fake or real.
VPN Service - NordVPN
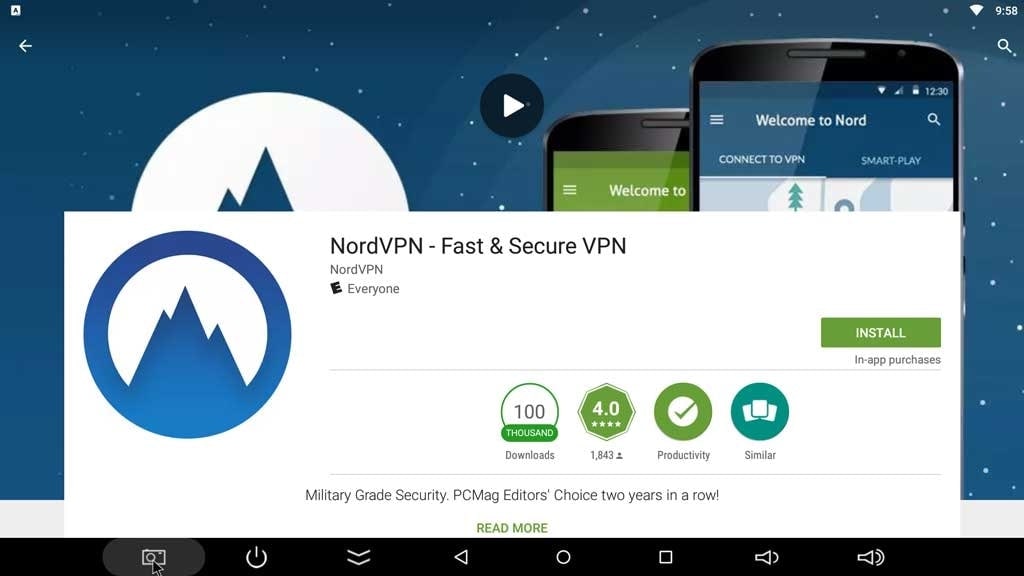
The Virtual private Network services hide your IP, mask your identity and since you will be changing your server, they spoof location on snapchat too. NordVPN is one of the most hailed VPNs and this is how you use it -
Step 1: Download NordVPN either from Google or App store.
Step 2: You need to sign up and the app quickly connects you to a nearby server. This is the Quick connect option.
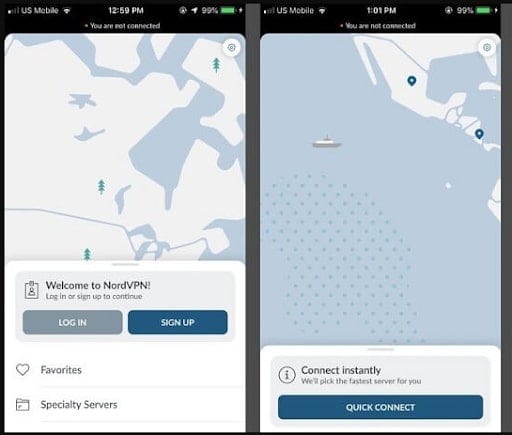
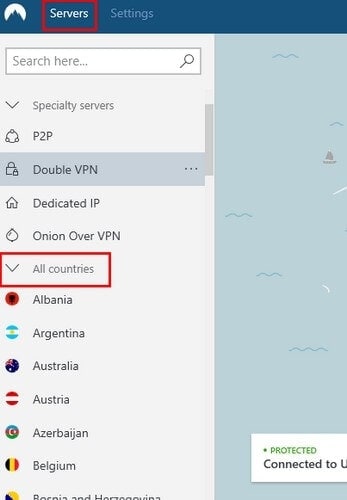
Step 3: However, you can change your location too. Go to the ‘More options’ and then choose Servers. Under this, go for All Countries to view the choices you have. Choose one and that server will be activated.
So, the location of this new server will reflect on your snapchat snapmap too.
Part 3: Frequently Asked Questions
Q1. Can you get someone’s Location from Snapchat?
A - Yes, people can easily know your location through Snapchat. The new Snapmap feature makes it all the more easy. The snapmap shows your bitmoji’s location anywhere in the world, as long as your phone’s GPS is ON and you have the snapchat app open. So, people can zoom in and know your exact coordinates and even your house-no and residential details.
Q2. Is Snapchat Location ever wrong?
A - Snapchat tries to provide the accurate location most of the time. It uses your geo-coordinates that it detects when you Switch ON the GPS on your phone. It tracks the location in which your snap is taken and if you are on snapmap and sharing your location, it can provide the exact details of the place you are in. However, there is no authentic report that says that Snapchat shows 100% accurate location or if it can go wrong sometimes.
Q3. How do you tell if someone is hiding their location from you on snapchat?
A - They will disappear off of the world map. Literally! So, whenever someone is hiding their location from you, it means they’ve either activated the Ghost Mode or they turned off the Location services of their phone. As a result, you will not find their bitmoji on the snapmap even if they are actively using the app. But if they’ve employed a Location spoofer, it is hard to say if the location is real or not.
Part 4: Conclusion
Now that you have learnt how to fake location on snapchat map, understand that these methods have their own hierarchy of success. While the location spoofer stands at the top-spot, using a VPN is the next best thing. If you want to rely on in-built features, know that they aren’t always successful. Make the right choice and keep your location a secret for your own privacy.
- Title: How to Change Netflix Location to Get More Country Version On Vivo Y78+ | Dr.fone
- Author: Ava
- Created at : 2024-08-01 22:49:46
- Updated at : 2024-08-02 22:49:46
- Link: https://fake-location.techidaily.com/how-to-change-netflix-location-to-get-more-country-version-on-vivo-y78plus-drfone-by-drfone-virtual-android/
- License: This work is licensed under CC BY-NC-SA 4.0.