
How to Find iSpoofer Pro Activation Key On Nokia C300? | Dr.fone
How to Find iSpoofer Pro Activation Key On Nokia C300?
There are specific situations where it is necessary to fake your GPS location. By spoofing locations, you can teleport to anywhere in the world, hide your true location to prevent others from tracking you, have access to content that is restricted in your current location, and so on. Spoofing locations is also conducive in location-based games such as Pokémon GO.
There are specific applications that allow you to spoof the location of your device. However, there are no such apps for iPhones as Apple does not allow GPS spoofing apps in the App store. To change the location of your iPhone, you can connect it to your PC and use a spoofing application there to change its location. We are going to talk about iSpoofer, a professional location spoofing application; 3 ways to get the iSpoofer Pro Plan License Key for free; Wondershare Dr.Fone - Virtual Location (iOS), a better alternative to iSpoofer; and the steps to spoof your iPhone GPS location using Wondershare Dr.Fone - Virtual Location (iOS).
 PDF application, powered by AI-based OCR, for unified workflows with both digital and scanned documents.
 Part 1: Ways to Get the iSpoofer Pro Plane License Key Free 2022
iSpoofer is a professional GPS simulation desktop application that can be used to spoof the GPS location of an iOS device. It runs on Windows and Mac computers. To change the GPS location of your iOS device, you have to install and run this application on your PC, connect your iOS device to your PC, and then spoof its location by using the application on your PC.
iSpoofer has a free version and 2 subscription plans - Pro plan and Volume plan. For unlimited spoofing, you can use the Pro plan of iSpoofer, which is available at $4.95 per month. With this plan, you can change the location of up to 3 iOS devices at once. To activate iSpoofer Pro on your PC, you will have to enter a license key sent to you via email after you pay for its subscription. However, there are a few tricks with which you can get this license key without subscribing and activate iSpoofer Pro and use it for free. Below, we have mentioned 3 ways to get a free iSpoofer Pro Plan License Key.
- Check on Community Days: The game Pokémon GO sometimes offers free iSpoofer Pro PlanLicense Keys on Community Days. Community Day is a worldwide special event in Pokémon GO that occurs every month for a few hours. Various kinds of special bonuses and rewards are offered on Community Days. Among these offers, a free iSpoofer Pro Plan License Key might be available on a particular Community Day. Make assured you do not miss this offer because the key will be available only for a few hours before it gets expired.

- Check out websites: Certain websites throughout the internet occasionally offer free iSpoofer Pro Plan License Keys. Try to check them out from time to time, and someday you might be lucky to get a free iSpoofer Pro Plan License Key. One of such websites is http://www.spoofer.pro/.


- Subscribe to YouTube channels: Another way to get a free iSpoofer Pro PlanLicense Key is to subscribe to YouTube channels that offer giveaways of these license keys. There are specific YouTube channels that offer free iSpoofer Pro Plan License Keys to their lucky subscribers. Make sure you subscribe to such channels and keep checking their videos, especially around giveaway times, to see if you are the lucky subscriber to win the giveaway.

Part 2: The safer way to Spoof on iPhone
A much better and safer way to spoof your iPhone location is to do it using Wondershare Dr.Fone - Virtual Location (iOS). It is a desktop application that can be used to instantly fake the GPS location of your iOS device with just a click of your mouse. It is compatible with both Windows and Mac computers. You can use this fantastic application to safely change your GPS location on several applications, including WhatsApp, Snapchat, Tinder, and Pokémon GO. It allows you to change the location of up to 5 iOS devices at once.
Key features:
- It comes with an integrated joystick feature for controlling GPS movement.
- GPS movement can also be controlled with a keyboard.
- Offers 3 modes - teleport your location, simulate movement between two spots, and simulate movement along a specified route.
- Offers; both automatic and manual GPS movements.
- Compatible with Windows XP and above, and Mac OS X 10.13 and above.
- Requires a minimum RAM of 256 MB and a minimum free hard disk space of 200 MB.
Steps to spoof your iPhone location using Wondershare Dr.Fone - Virtual Location (iOS):
- Download and install Wondershare Dr.Fone - Virtual Location (iOS) on your Windows or Mac PC. Launch the application.
- Once the application is launched, a window will appear with a variety of options. Click “Virtual Location” from those options.

- Connect your iPhone to your PC. via USB cord. Once your device is connected successfully, click on the “Get Started” button.

- A new window will appear where the actual GPS location of your iPhone will be shown. If it is not accurately displayed, click on the “Center On” icon in the lower right part of the window to show the accurate location.

- Click on the “teleport mode” icon in the upper-right part of the window (the 3rd one from the right). This will activate “teleport mode”.
- In the search bar in the upper left part of the window, enter the name of the desired location where you wish to teleport. Then click “Go”.

- A popup box will appear. Click “Move Here”.

- With that, the GPS location of your iPhone has been successfully changed and fixed. You can check it by clicking on the “Center On” icon or checking your iPhone’s location. Also, the location of the location-based app; you are currently using on your iPhone has been successfully changed too.


Conclusion
So, that was all about the article. We have discussed 3 simple tricks to get a free iSpoofer Pro Plan License Key. Then, compared with iSpoofer Pro which allows you to change the location of up to 3 iOS devices at once, Wondershare Dr.Fone - Virtual Location (iOS) allows you to change the location up to 5 iOS devices at once. Compared with iSpoofer Pro, it is safer and easier to use and comes with more features.
 vMix Basic HD - Software based live production. vMix Basic HD includes 4 inputs, 3 cameras, streaming, recording, playlist.
A Detailed Guide on Faking Your Location in Mozilla Firefox On Nokia C300
Mozilla Firefox is one of the most famous browsers known for its security. Like other browsers, it also tracks your location and shares it with websites. Although Firefox asks for your permission before sharing your location, it can still be a privacy concern for many people. For many reasons, disabling your location is disadvantageous, so Firefox spoof location can resolve your concerns.
It is not hard to change or spoof your location in Mozilla Firefox. Stick with this article to learn different ways to fake a location in Firefox on devices.


Part 1: Preparations Before Spoofing Your Location in Firefox
Before starting with Firefox location spoof, you must be aware of how the platform and websites determine your location. There are many ways a browser can detect your location. It includes services like IP addresses, GPS tracking, Wi-Fi, and Bluetooth. The main tool browsers and websites use to determine your location is HTML5 Geolocation API.
1. Basic Understanding of the HTML5 Geolocation API
Basically, a browser API called HTML5 Geolocation API is used by websites and browsers to detect a user’s location using longitude and latitude coordinates. It is strictly based on user permissions for detecting location. That means you will receive a permission prompt whenever a website or browser uses it to detect your location. If you refuse the permission, they can’t use this API for location determination.
2. How Does HTML5 Geolocation Work?
HTML5 Geolocation determines your location using the longitude and latitude coordinates with the help of GPS. If your device doesn’t have GPS tracking, it uses Wi-Fi and cell tower signals to detect the Nokia C300 device’s location. The location detected by HTML5 Geolocation is highly accurate with accuracy up to street level. Due to its high precision in locating users, it can create privacy issues for users.
Part 2: How to Fake Your Location in Mozilla Firefox on Computers
Many ways are available for you to fake or disable your desktop location in Mozilla Firefox to address your privacy concerns. You can either disable or change the location in the browser or use a third-party app or extension. Below, we have explained the three most common ways to fake or disable your location in Firefox.
Method 1: Disable Geolocation in Firefox
If you want to stop websites from accessing your location from Mozilla Firefox, you can disable the geolocation feature using Firefox Settings. The process to disable your location in Mozilla Firefox is covered using these steps:
Step 1: Open Mozilla Firefox on your computer to disable its location. Click the “Three Vertical Bars” icon to select “Settings.” Now, tap “Privacy & Security” from the left sidebar and navigate to “Permissions.”

Step 2: Click “Settings” in front of “Location” to manage the location settings. It will open a window with a list of all the websites that can access your location. Depending on your needs, you can choose between “Remove Web Site” or “Remove All Web Sites” to remove their location access.

Step 3: If you want to block the websites from accessing your location indefinitely, you can select the “Block new requests asking to access your location” option. Once selected, click “Save Changes” to disable your geolocation on Firefox.

 Forex Robotron Basic Package
Method 2: Manually Change Your Firefox Location
Disabling your location on Mozilla Firefox can stop websites from accessing your location. It also means websites with location-based services will no longer work. That’s why it is better to spoof the location on Firefox rather than disabling it. Firefox allows you to manually change your location using its advanced settings. The steps required for this process are given below:
Step 1: Once Mozilla Firefox is open, type “about:config” and press Enter. You will see a warning screen as you modify advanced settings. You have to click on the “Accept the Risk and Continue” button to proceed further.

Step 2: First search for “Geo.enabled,” and when it appears, toggle its value from “True” to “False” to disable geolocation. To spoof your location, search for “geo.provider.network.url” and press the “Pen” icon to edit it.

Step 3: You can enter your desired location using its latitude and longitude coordinates. The format to enter your location coordinates should be:
“data:application/json,{“location”: {“lat”: LATITUDE VALUE, “lng”: LONGITUDE VALUE}, “accuracy”: 27000.0}.”
Once done, your geolocation will be changed to your desired location.

Method 3: Use The Location Guard Firefox Extension
Another way you can protect your location from websites is to use the “Location Guard “ add-on in Mozilla Firefox. It is generally recognized as an extension, also available in the Add-Ons Store of Firefox. The steps to add “Location Guard” and use it to alter your location are following:
Step 1: Click on the “Three Vertical Bars” icon from the top left corner of your Firefox and select “Add-ons and themes.” Tap “Extensions” from the left sidebar and search for “Location Guard” in the Add-Ons Store. Once located, click “Add to Firefox” to add it to your browser.
 SwifDoo PDF Perpetual (1 PC) Free upgrade. No monthly fees ever.

Step 2: You can choose between two options to protect your location’s privacy. Using the “Privacy Levels” option, you can select a privacy level and location range to add noise when a website tries to locate you. It stops websites from detecting your accurate location, though they can still locate the general area.

Step 3: Using its “Fixed Location” feature from the left sidebar, you can change your location. Here, select any location from the map by placing the “Marker” on it to change your browser’s location.

Part 3: How to Fake Your Location in Mozilla Firefox on Phones
It is not only on computers where you can use Firefox fake location but also on smartphones. You can easily disable or change your Firefox location on your iOS or Android device. Three different methods to disable or change the location in Mozilla Firefox are summarized below:
Method 1: Disable Geolocation Sharing on the Firefox Browser
If you use the Firefox browser on your phone, it allows you to disable your location using a couple of simple steps. Disabling location services for the Firefox browser differs on Android and iOS devices. A detailed step-by-step process for disabling location is given below for both platforms:
On Android
Step 1: Open the Firefox browser on your phone and press the “Three Dots” icon from the bottom right corner. Select “Settings” from the menu and navigate to the “Privacy and Security” section.
Step 2: Now, tap “Site Permissions” and select “Location.” In the “Location” option, select “Blocked” to disable the location access on the Firefox browser.

On iPhone
Step 1: On your iPhone, open “Settings” and scroll down to “Firefox.” After locating the app, select it and press “Location” on the next screen.


Step 2: In the “Location” menu, you can select “Never” to completely disable the location access for the Firefox browser. To only stop Firefox from detecting your accurate location, turn off the toggle of the “Precise Location” option.
 OtsAV Radio Webcaster
Method 2: Spoof Your Location in Firefox Using Dr.Fone - Virtual Location
Nowadays, many websites work with the help of location-based services. Disabling geolocation from the Firefox browser means they won’t work. It means you need a tool that can change your Firefox location without affecting your favorite platforms.
Wondershare Dr.Fone - Virtual Location provides you with an excellent way to do Firefox location spoofing. You will not have to worry about websites or apps detecting your location as fake when using this tool.
Dr.Fone - Virtual Location
1-Click Location Changer for both iOS and Android
- Teleport from one location to another across the world from the comfort of your home.
- With just a few selections on your computer, you can make members of your circle believe you’re anywhere you want.
- Stimulate and imitate movement and set the speed and stops you take along the way.
- Compatible with both iOS and Android systems.
- Work with location-based apps, like Pokemon Go , Snapchat , Instagram , Facebook , etc.
3981454 people have downloaded it
Main Features of Dr.Fone - Virtual Location
- Dr.Fone - Virtual Location allows you to play location-based games. It includes games like Pokémon Go, Minecraft Earth, and Jurassic World Alive, all from the comfort of your bed.
- If you use a dating app like Tinder or Bumble, you can increase your likes and matches using this tool.
- You can bypass the geo-restriction of apps and enjoy their content with the tool’s help.
Steps Required for Spoofing Location in Firefox via Dr.Fone - Virtual Location
Using Dr.Fone- Virtual Location to spoof your location in Mozilla Firefox is simple and quick. You will need to install Dr.Fone on your computer and follow these steps for location spoofing:
Step 1: Install Dr.Fone on Your System
Download and install Dr.Fone on your computer and connect your phone to it. Access Dr.Fone, select “Virtual Location,” and click “Get Started” on the next screen to begin the process.
Step 2: Activate the Teleport Mode on Dr.Fone
After clicking “Get Started, “ a map will open where you must select your original location. It can be done using the “Center On” icon from the right sidebar. To choose your fake location, you will need to activate “Teleport Mode” from the top right corner.
Step 3: Spoof Your Location in Firefox
Enter your desired fake location in the provided space and press “Go” once the mode is activated. It will take you to the entered location, where you need to select “Move Here” to complete the process. You can confirm the location spoof by opening any location-based app on your phone.

Method 3: Change Your Location in Firefox Using ExpressVPN
Browsers like Mozilla Firefox tracks your location by using your IP address. You can use a VPN to spoof your IP location to protect your actual location from websites. ExpressVPN is a VPN that is available for both Android and iOS devices. You can use these steps to change your location using ExpressVPN:
Step 1: Install ExpressVPN on your phone and create an account for it. If you are already a user of ExpressVPN, then log in with your account.
Step 2: Select your desired fake location from the “Smart Location” tab after logging in. Once a location is selected, press “Connect” to change to the desired fake location.

Conclusion
In today’s digital world, you have to compromise your privacy to some extent. However, it doesn’t mean that you should not try to use tools available to you to protect your privacy to the limit. Dr.Fone - Virtual Location solves your concerns regarding location sharing with ease. With this tool, you can fake location in Firefox and still enjoy all the features and services offered by location-based websites and apps.
Prevent Cross-Site Tracking on Nokia C300 and Browser
Have you ever wondered why you get the advertisements of the websites you visited a few minutes ago on your social media sites? Here comes to Cross-Site Tracking, also termed CST, and it is a process where third-party cookies and sites track your browser history.
![]()
The CST process is like invading your privacy by collecting your browser history and personal information. So, to prevent these services, there are several ways by which you can cross-site tracking on your system as well as Nokia C300 phone browsers. Keep reading to learn how to stop cross-site tracking on both Nokia C300 and browser.
Part 1: Why Do We Need to Stop Cross-site Tracking?
Cross-site Tracking is all about collecting your browsing data and other information for advertising purposes. Though the process can prove convenient for many as it provides additional information about the products and services you have searched for and offers tailor-made content, it is intrusive and about breaching your privacy.
Cross-site tracking collects information about your browsing history. The third-party cookies also monitor the content type you have visited and your personal information, which is risky.
Besides invading privacy, the CST also poses several other issues. Based on your browsing history, additional content you have not asked for is loaded on your visited sites, slows down the page loading process, and puts an extra burden on your battery. Moreover, too much-unwanted content can interfere with the basic information you are looking for.
So, it is always better to prevent cross-site tracking for all the above and more reasons.
Further reading: A detailed guide on faking location in Mozilla Firefox . Don’t worry about your location privacy anymore!
 PDF application, powered by AI-based OCR, for unified workflows with both digital and scanned documents.
 Part 2: Can Private Browsing be traced?
Yes, private browsing can be traced. When you work in private browsing mode, the web browser does not save the browsing history, which means that anyone who uses your system will not check your online activities. But websites and cookies can track your browsing history as well as other information.
Part 3: How to Disable Cross-website Tracking on Safari for iOS Devices?
Safari is the most commonly used platform by iOS users. So, to prevent CST for Safari on your iOS devices and Mac systems, below is a complete guide.
Deactivate Safari cross-website tracking for iPhone & iPad
Safari cross-site tracking can be prevented using the below steps on your iPhone and iPad.
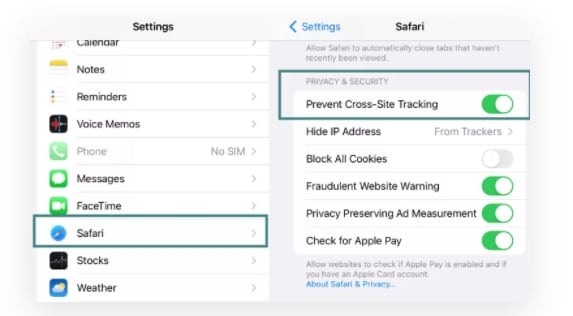- Step 1. Launch the Settings app on your iOS device.
- Step 2. Find the Safari option by scrolling down the menu.
- Step 3. Move the slider to turn on “Prevent Cross-Site Tracking” under the PRIVACY & SECURITY option.
Deactivate Safari cross-website tracking for Mac
Use the steps below to turn off cross-site tracking on Safari on your Mac systems.
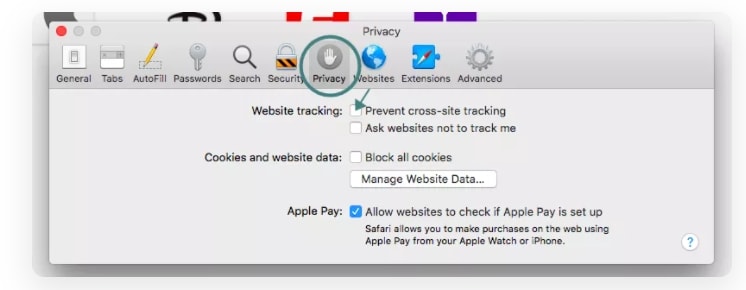
- Step 1. On your Mac system, open the Safari app.
- Step 2. Move to Safari > Preferences > Privacy
- Step 3. Enable the “Prevent cross tracking” option by clicking on the box next to it.
Part 4: How to Disable Cross-site Tracking on Google Chrome
Chrome is used widely on Windows systems and Android devices, and to prevent the CST from your browser, a detailed guide is given below.
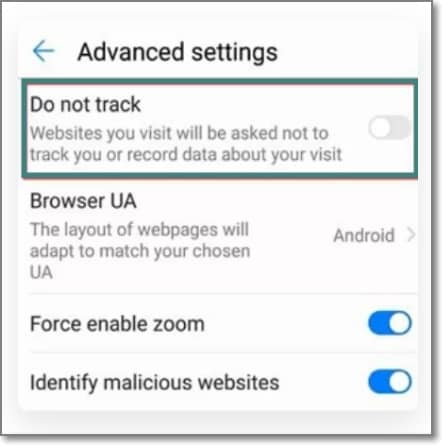
Enable “Do Not Track” on Google Chrome for Android
- Step 1. On your Nokia C300, open the Chrome app.
- Step 2. At the right side of the address bar, click on the More option and choose Settings.
- Step 3. Choose the Privacy option from the Advanced tab.
- Step 4. Click on the “Do Not Track” option to turn on the feature.
Enable “Do Not Track” on Google Chrome for Computer
- Step 1. Launch Chrome on your system, and from the menu at the upper-right corner, click on the Settings option.
- Step 2. From the “Privacy and Security” tab, choose the “Cookies and other site data” option.
- Step 3. Tap and enable the slider next to “Send a “Do not track” request with your browsing traffic.”
 vMix 4K - Software based live production. vMix 4K includes everything in vMix HD plus 4K support, PTZ control, External/Fullscreen output, 4 Virtual Outputs, 1 Replay, 4 vMix Call, and 2 Recorders.
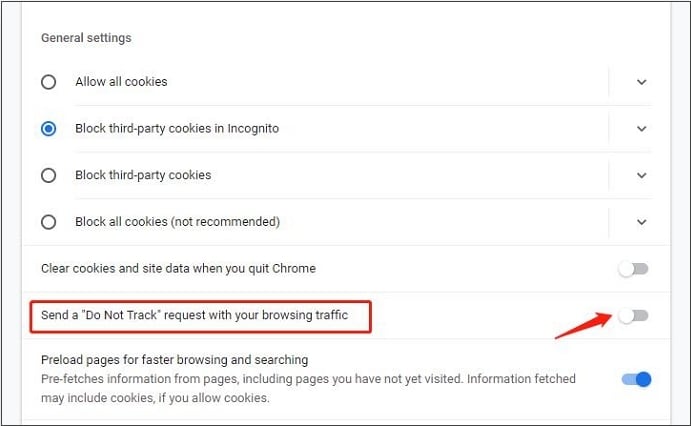
Part 5: Recommended Solution: Fake a Location to Stop Cross-Site Location Tracking Using Dr. Fone
What if you let the sites and cookies track your phone location without worrying about your privacy? Yes, it can be done by spoofing your location. So, if you set a fake location while browsing the internet, you will not have to worry about cross-site tracking, as anyways, the sites and cookies will get misled browsing information that cannot harm you in any manner.
Setting a fake location on your iOS devices, a professional tool is needed, for we recommend Wondershare Dr.Fone - Virtual Location as the best tool. Using this Android and iOS-based software, you can set any fake GPS location on your device. The tool is simple to use and does not require any mastery of technical know-how.
Key features
- Simple tool to teleport to any GPS location in a single click.
- Allows simulating GPS movement along the route.
- All popular models of Android and iOS devices are compatible.
- Compatible with all location-based apps on your phone.
- Compatible with Windows and Mac systems.
Here is a video tutorial for you to take an overview of how to use Dr.Fone - Virtual Location to fake location on your Android and iOS devices.

 safe & secure
Steps to set fake location on your Android and iOS devices using DrFone-Virtual Location
Step 1. Download, install and launch the software on your Windows or Mac systems. On the main software interface, choose the Virtual Location option.
Step 2. Connect your iPhone or Android device to your system using a USB cable and then tap on the Get Started option on your software interface.
Step 3. A new window on the software interface will open, showing your connected phone’s real and actual location. If the detected location is incorrect, click on the “Center On” icon to display the right device location.
Step 4. Next, you need to activate the “teleport mode” and click o the 3rd icon at the upper-right corner.
Step 5. Next, you have to enter now the fake location to which you wish to teleport to at the upper-left corner. Click on Go.

Step 6. Finally, tap on the Move Here button and the new fake location for your connected Android or iOS device at the pop-up box.

Key features:
• Import from any devices and cams, including GoPro and drones. All formats supported. Сurrently the only free video editor that allows users to export in a new H265/HEVC codec, something essential for those working with 4K and HD.
• Everything for hassle-free basic editing: cut, crop and merge files, add titles and favorite music
• Visual effects, advanced color correction and trendy Instagram-like filters
• All multimedia processing done from one app: video editing capabilities reinforced by a video converter, a screen capture, a video capture, a disc burner and a YouTube uploader
• Non-linear editing: edit several files with simultaneously
• Easy export to social networks: special profiles for YouTube, Facebook, Vimeo, Twitter and Instagram
• High quality export – no conversion quality loss, double export speed even of HD files due to hardware acceleration
• Stabilization tool will turn shaky or jittery footage into a more stable video automatically.
• Essential toolset for professional video editing: blending modes, Mask tool, advanced multiple-color Chroma Key
Check the new location of your phone from the app.

Wrap it up
Preventing Cross-site tracking can be done on different browsers and devices using the guides listed in the above parts of the article. Settings a fake location for your device using Dr. Fone-Virtual Location is another interesting way to prevent tracking your browsing history by spoofing the sites and cookies. Setting a fake place will not only avoid monitoring your browsing history but will also work with all location-based apps on your phone.
safe & secure
- Title: How to Find iSpoofer Pro Activation Key On Nokia C300? | Dr.fone
- Author: Ava
- Created at : 2024-08-01 23:09:21
- Updated at : 2024-08-02 23:09:21
- Link: https://fake-location.techidaily.com/how-to-find-ispoofer-pro-activation-key-on-nokia-c300-drfone-by-drfone-virtual-android/
- License: This work is licensed under CC BY-NC-SA 4.0.