
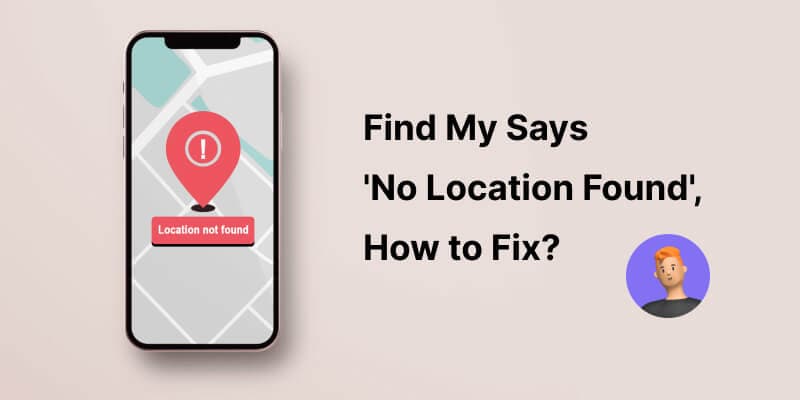
How to Fix Itel P40 Find My Friends No Location Found? | Dr.fone
How to Fix Itel P40 Find My Friends No Location Found?

In this time of modern technology, it is hard to be away from your phone or even leave it at home. When any task that we plan to do, usually already have an application released for the sole purpose of doing that task and needing to do it on your phone. When we message our friends, have a video call with our family, or just simply order food to eat at home, you can do all of them on the Itel P40 device in your palm.
Another advantage of having our phones with us all the time is that you can also see the current location of either your friend or family. For Apple phone users, they have an app that is called “Find My Friends” that will show you the locations of the people that you are tracking. But what if you cannot find the location of the friend? We will find out the causes as to why no location can be found and how you can fix this in just a few simple steps.

Part 1: Why does an Itel P40 say “no location found”?
When you are searching for your friend’s current location and it shows that “no location found”, there could be numerous reasons as to why that is happening. We have listed down the possible reasons why there is no location found.
Option #1: Your friend has not signed in to the “Find My Friends” application. Make sure that they are registered in the application before tracking their location.
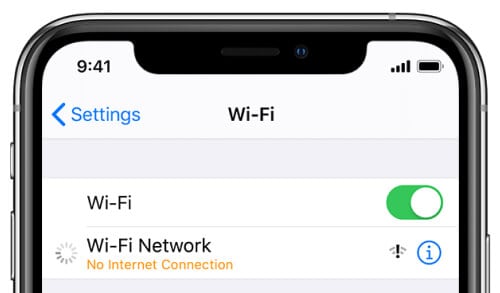
Option #2: The other person’s mobile is not connected to the internet or their phone is off. This could also be another common reason why you cannot see their location.
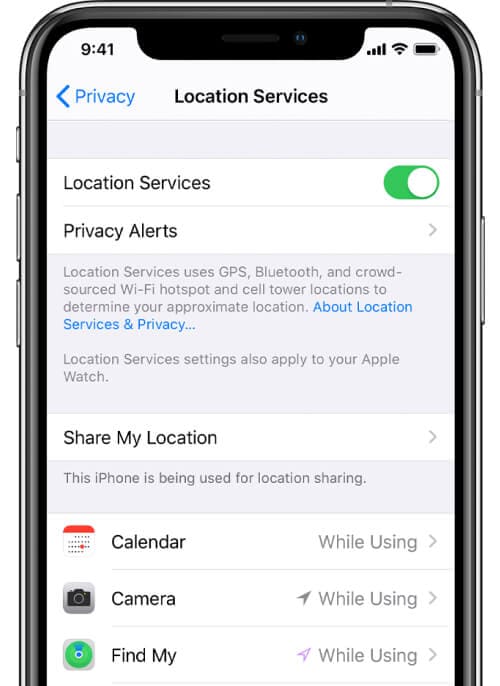
Option #3: Make sure that their “Location Services” is turned on. Some users would turn this feature off which hinders the application from checking their current location.
Option #4: The other user must have set up the wrong date and time. If the date and time do not correspond to the global time, then it will cause problems and difficulty with tracking that user.
Option #5: The application might not have been enabled under “Location Services”. Make sure that the application has the permission to track your current location and you can do this by following the steps below.
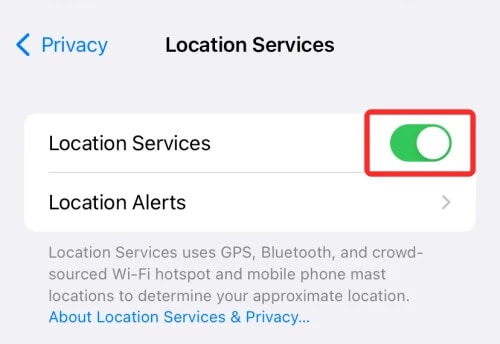
- Step 1: Go to “Settings” and then “Privacy”.
- Step 2: You can then go to “Location Services” and make sure that the application “Find My Friends” is enabled to track your location.
Part 2: Tips To Fix “No Location Found” Available
If you encounter an issue that says “No Location Found”, there are numerous ways you can fix the “No Location Found” message on “Find My Friends” and we will share them with you.
Option #1: Adjust your phone’s date and time. You can reset your time by following the steps.

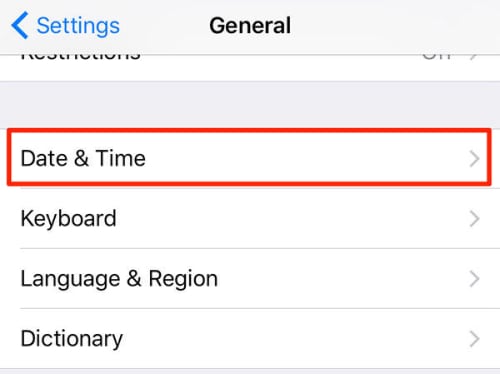
- Step 1: Go to “Settings” and choose “General”.
- Step 2: Then click on “Date & Time” and you can manually or automatically set the time.
Option #2: Make sure that you or the other user is connected to the internet. Double-check if your phone is connected to the internet.

Option #3: Turn off and turn on your “Location Services”. Usually, this simple troubleshooting can fix this issue, you can try this out and check if you can see their location now. They can turn it on by following the steps below.
- Step 1: Go to “Settings” and choose “Privacy”.
- Step 2: After, you can look for “Location Services” and enable it.
Option #4: Enable “Location Services” for the “Find My Friends” application. There could be instances where your “Location Services” is not enabled for the application.

Part 3: How to Share Your Location with Find My Friends App?
If you want to share your location in the “Find My Friends” application, you can do that by following the steps below.
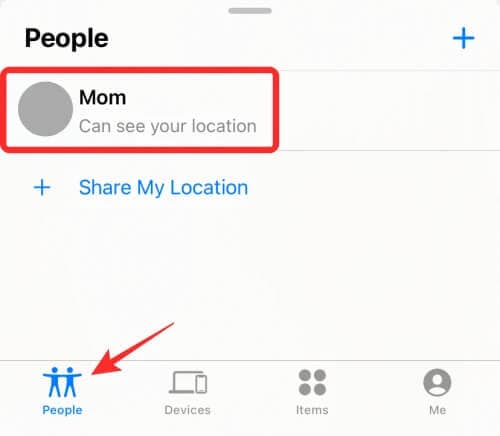
- Step 1: Open the “Find My Friends” application and select “People”.
- Step 2: Then you can tap on “Share My Location” and from there, you can type the phone number of the person you want to share your location too. You can also specify the amount of time you will share your location.
Part 4: How to Share a Fake Location to Others in Find App?
Sometimes we want our location to be kept secret and send a fake one to our friends and family. You can do that in our app, “Dr. Fone - Virtual Location “ which allows you to share a fake location with your friends.
Dr.Fone - Virtual Location
1-Click Location Changer for both iOS and Android
- Teleport from one location to another across the world from the comfort of your home.
- With just a few selections on your computer, you can make members of your circle believe you’re anywhere you want.
- Stimulate and imitate movement and set the speed and stops you take along the way.
- Compatible with both iOS and Android systems.
- Work with location-based apps, like Pokemon Go , Snapchat , Instagram , Facebook , etc.
3981454 people have downloaded it
You can use this application by following the steps below.
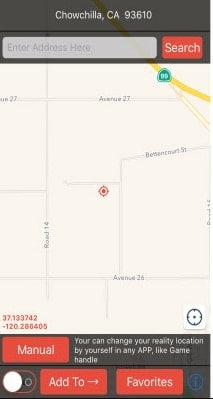
Step 1: Download the “Dr. Fone - Virtual Location” software on your laptop. Open and choose “Virtual Location”.

Step 2: You can then connect your phone to your computer and click on “Get Started”.

Step 3: You will then be redirected to your current location on the new page.
 Nero Burning ROM:
The ultimate burning program for all your needs!

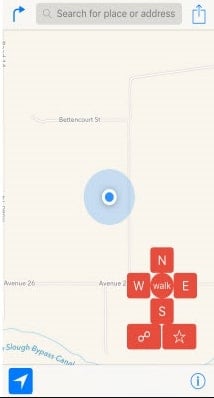
Step 4: If you want to change your location, you will need to turn on the “Teleportation” mode by clicking on the first icon, typing the location you want, and then clicking on the “Go” icon.

Step 5: Click on “Move Here” and your current location will show up as the location that you typed on Your Itel P40.

Conclusion
We hope the tips we shared helped fix the “No Location Found” issue on your phone. Sometimes basic troubleshooting such as restarting your phone or turning off and on your GPS. You can also use our tip to use a fake location that you can send to your friends if you want to play a prank on them.
Methods to Change GPS Location On Itel P40

The Internet is a vast space and you have a plethora of content on different websites and platforms. You can call it a two-way - give and take relationship when it comes to the dynamics of data exchange between the world wide web and the users.
When you visit websites, they use cookies to track your activities. When you visit a restaurant, the phone detects and saves the GPS in the memory. You click a picture in the Maldives, your phone seeks out geographic points to prepare the right time and date stamps.
You need your GPS to download and use certain apps. Similarly, your GPS might be the reason you are unable to play some games or use some applications. Change GPS Location Itel P40 and this won’t be a problem for you.
But if you are wondering how can I change my location on my iPhone? These 5 methods will help you get fruitful results.
Part 1: Change GPS Location on Itel P40 using a Professional PC Program
The PC Programs are entirely Software based and do a tremendous job to spoof Itel P40 iOS 16 Location . You don’t have to buy any new equipment and you will be operating using your computer.
You can get this done within minutes if you have the right program with you. One of the best options in the market is Wondershare’s Dr.Fone. This is how you use Dr. Fone Virtual Location spoofer for GPS Spoofing iPhone.
Dr.Fone - Virtual Location
1-Click Location Changer for both iOS and Android
- Teleport from one location to another across the world from the comfort of your home.
- With just a few selections on your computer, you can make members of your circle believe you’re anywhere you want.
- Stimulate and imitate movement and set the speed and stops you take along the way.
- Compatible with both iOS and Android systems.
- Work with location-based apps, like Pokemon Go , Snapchat , Instagram , Facebook , etc.
3981454 people have downloaded it
Step 1: Go to the official website of Dr.Fone - Virtual Location (iOS) . This is easily available when you google it or you can also follow this link here. Then you can download the executive file, install and then launch the application. Once the home page opens, you will find several options - Opt for ‘Virtual Location’. It is usually at the bottom of the page.
Step 2: Now take your Itel P40 device and connect it to the computer that has Dr. Fone. Then click on ‘Get Started’.
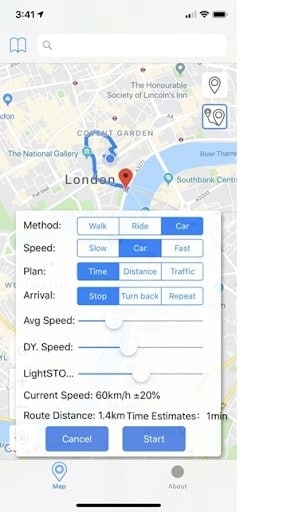
Step 3: Now, the world map will display on the screen and you can clearly see the coordinates and directions as well. On the top right corner, the third icon is called the ‘Teleport Mode’. Click on that and enter the name of the place in the search box. You can even pinpoint it, if you are sure about the place.
Step 4: If you are completely sure that you got the address right, click on the ‘Move Here’ option. It moves your Pin from your present location to your new virtual location.

If you are looking for a way to change Itel P40 Location without Jailbreak, then this is one of the safest options for you. Also, you have other additional features like Phone Transfer, and Whatsapp Transfer along with Location spoofing. The application will never go to waste, won’t occupy much of your computer/PC/Laptop’s space and you can get the fake location iOS within minutes.
Part 2: Change GPS Location on Itel P40 using External Device
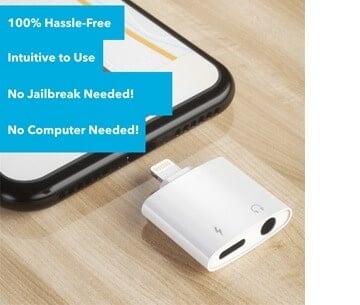
You can achieve the iOS Spoof Location using External devices as well. These devices do not cause any inconvenience to you. They are meant to be small, fit into the lightning port of your iPhone, and act as an external source that will spoof the Itel P40 location and the same will reflect in every app that uses or detects your iPhone’s geographic location.
The best external device to change phone location Itel P40 is Double Location Dongle. This simple device can be utilized by following the steps below -
Step 1: The Double Location Dongle is a very small, white rectangle that connects to your iPhone’s port. But along with it, you also have to install the Companion app for location spoofing. Once you have both of them ready, connect the Itel P40 device to your iPhone.

Note: The Companion App is not available on the App store. You have to download it from Double Location’s official website.
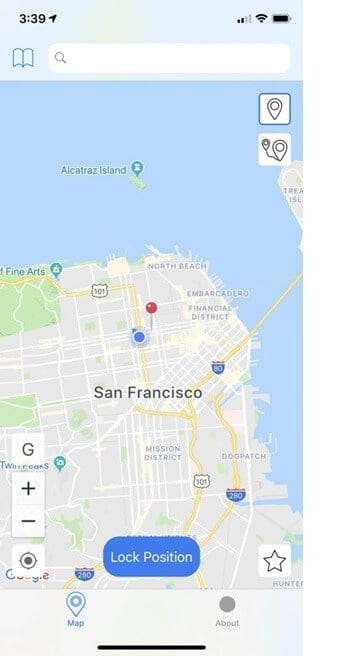
Step 2: The next step is to open the Double Location iOS companion app and then settle on the Map Tab.

Step 3: Unlike what we had seen in the Dr. Fone step, we cannot enter the location into any search box. You should move the pin to the location that you want to virtually shift to. Double Location provides some very good options that will help you during gaming. You can change all the appropriate settings and proceed.
Step 4: On the bottom of the screen, Go for the lock position option. Once you do that, there will be a virtual shift in your geographic position and all your apps will register your new coordinates.
Part 3: Change GPS Location on Itel P40 using XCode
You can change the geolocation Itel P40 by using your coding expertise as well. That is why XCode exists. This Computer Program lets you change your Location in Itel P40 by giving some GIT Commands to the PC while your Itel P40 stays connected to it. By following these steps, you can understand how to do it. But if you’ve never had a liking for programming and coding languages, then you should probably skip this -
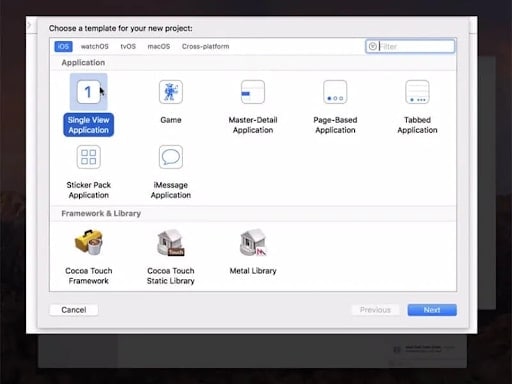
Step 1: Download and install XCode from the AppStore, directly to your Mac device. Launch the application.

Step 2: Once you see the XCode window open, Go for the ‘Single View Application’ to start a new Project and go on by clicking on ‘Next’. You can set up a name and details for this particular project.
Step 3: A screen display will appear asking you about your identity. This is where the minimal coding part starts. You need to enter some GIT Commands to continue with the project.
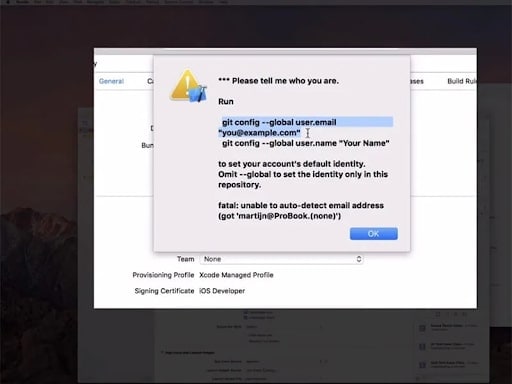
Step 4: Launch and run the terminal on your Mac device and enter these commands - git config –global user.email “[email protected]“ and git config –global user. name “your name”.You need to add your own details in the quoted space and continue to verify your identity.
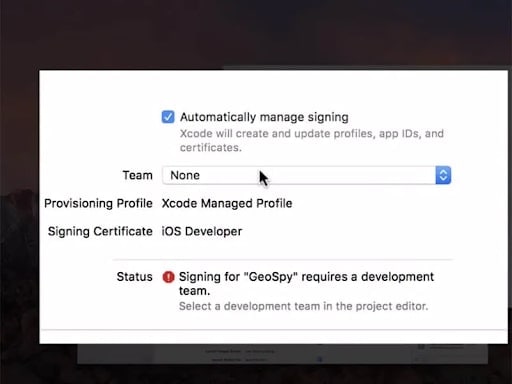
Step 5: Once you enter the commands, go to the next step and establish the Development Team. Then you can proceed to connect your Itel P40 device to your Mac device. Use the normal cable to do that.

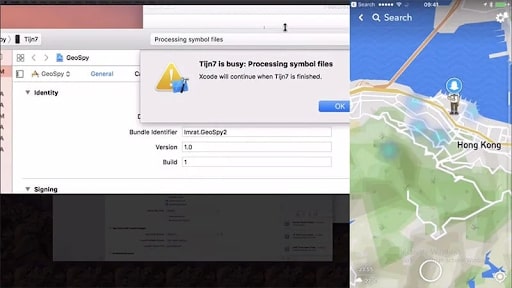
Step 6: To allow the program to process the Symbol Files, you will have to choose the model of your device. Go to the ‘Build Device’ option and continue as per the prompts. However, make sure that you keep your Itel P40 unlocked for quick detection by the computer software.
 Lyric Video Creator Professional Version
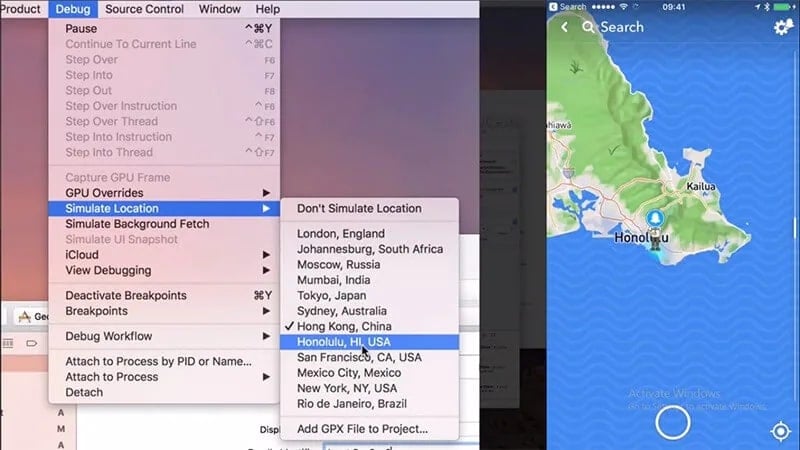
Step 7: Once that is done, you can come back to the actual location spoofing part. Go to the debug Menu > Simulation Location and specify the exact location that you want to virtually shift to. Once you are okay with it, the same will reflect on your Itel P40 as well.
 Power Tools add-on for Google Sheets, 12-month subscription
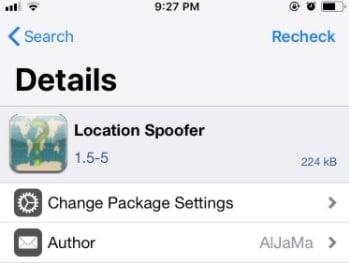
Part 4: Change GPS location on Itel P40 using Cydia Location Faker App
Cydia is also based on software applications and changes location in seconds, However, you need to note that you have to jailbreak your phone. If you don’t know how to do it or do not want to take the risk, Cydia’s LocationFaker app may not be the right fit for you. But if you are a jailbreak expert, this is a very comfortable GPS Changer for iPhone.
Step 1: Download the Cyndia LocationFaker app from the official website. LocationFaker8 is available for the iOS 8.0 model.

Step 2: After launching the app, enter the virtual location into the search box.
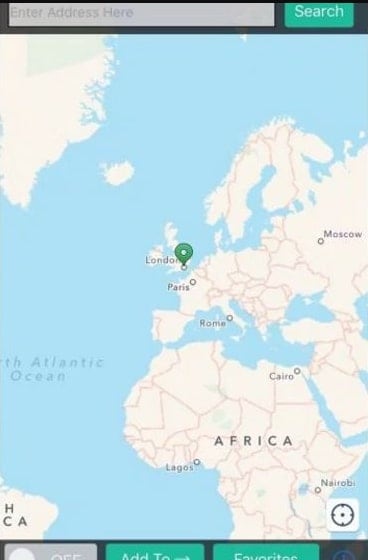
Step 3: If you are done with choosing the new location, shift the toggle from ‘OFF’ to ‘ON’ at the bottom of the page.
 Video Converter Factory Pro
Step 4: Now we can decide which apps can access our new virtual location. At the bottom of the page, you will find an ‘i’ icon. Go click on it and choose the ‘White List’ option. This one will then take you to the app list and you can decide which of them will have access to the phone’s location.
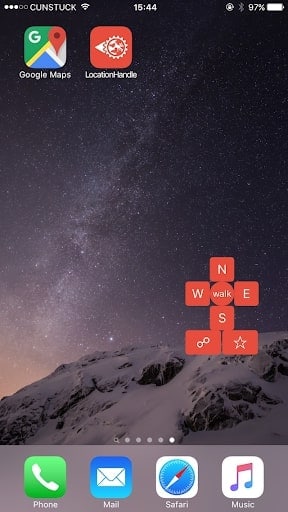
Part 5: Change GPS Location on Itel P40 using Location Handle
Location Handle is another useful application that you can use to change your location by a few meters or simply go with an automated movement system that changes your location gradually as if you are moving from one place to another. This is how you use it -
Step 1: Download the Location Handle app from the website or App store
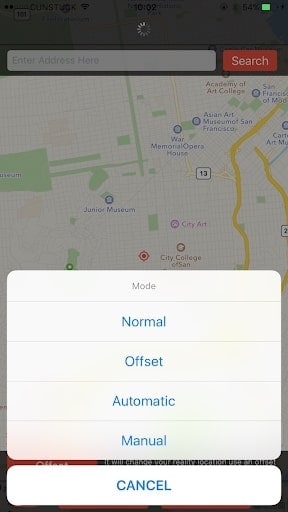
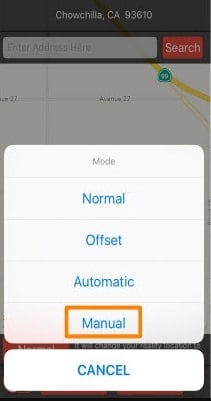
Step 2: There are four different types - Normal Mode - teleport to a new location; Offset Mode - Move a few feet away from the present location ; Automatic Mode - Slowly change your location from one point to another, as if walking ; Manual Mode - Change your location using a joystick.

Step 3: Consider the Manual mode, because we want to change location to a far-off place and not necessarily for gaming.
Step 4: Once the Manual mode is activated, the map will be displayed and you can change the pin location. You can enter the location name in the search box.
Step 5: The Joystick will appear on the page and you can use it to shift your location to wherever you want. Once you fix on the location, proceed and the new location will be updated.
Conclusion
We hope you are no longer wondering How to change Location services on Itel P40. These 6 methods are very effective and you can always opt for the one that is most comfortable for you. If you want a hassle-free PC program, we have that narrowed down for you. If you are a coding enthusiast, then we’ve listed a method that best fits you. Whatever the reason, with an iOS Fake GPS, life becomes much easier and sometimes even safe on the internet. You can explore beyond the boundaries without moving from your couch!
Thinking About Changing Your Netflix Region Without a VPN On Itel P40?
Netflix is easily one of the most popular streaming apps available today. It offers a huge library of movies, TV shows, documentaries, and more. However, the content you want to watch on Netflix depends on the country where you live.
The traditional method of circumventing region-locked content on Netflix is simply utilizing a VPN. You can also change Netflix country restrictions without it, but it will require a bit of work. If you’re interested to know how to change the Netflix region without a VPN, follow our quick article below to learn more.

Part 1: Netflix and Geo-Restrictions
Netflix offers subscribers a wide range of content, but their library varies per region due to licensing and copyright agreements. The service price sometimes costs less in other countries, which is why using VPNs to save money on subscriptions are highly popular.
Using VPNs and other methods to change your region is not illegal, but it violates Netflix’s Terms of Use. If you’re caught using VPNs or other means to bypass their geo-restrictions, Netflix can suspend or terminate your account. This is why you should always take caution when navigating the streaming giant’s Terms of Use.
Part 2: Will Netflix Ban My Account If I Use a VPN?
If you’re wondering if Netflix bans accounts that use VPN, the answer is “No, they don’t”. On the other hand, Netflix will block access to content if it detects that you’re connected to VPN. If this happens, simply turn off your VPN or try connecting to different servers on your VPN and retry.
Part 3: Can You Change Your Netflix Region Without a VPN?
There are multiple ways to change your location on Netflix without a VPN, whether you’re on your computer, iPhone, or Android. You can use a smart DNS service, a Proxy Server, or a Tor browser to connect to a country you want to access. Follow our guide below to change country on Netflix now without a VPN.
 vMix HD - Software based live production. vMix HD includes everything in vMix Basic HD plus 1000 inputs, Video List, 4 Overlay Channels, and 1 vMix Call
Method 1: Using a Smart DNS
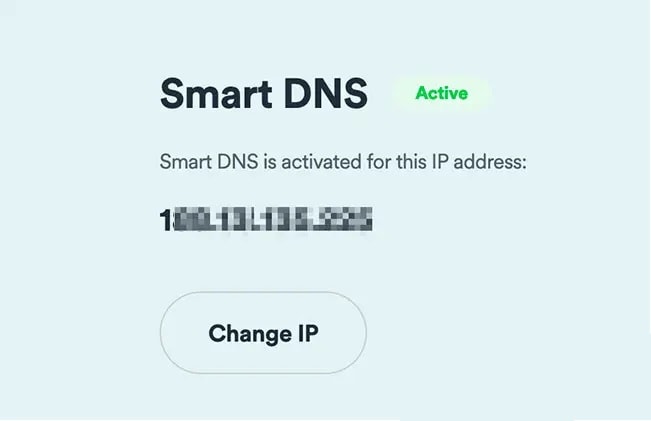
Utilizing Smart DNS to change country on Netflix without VPN actually works in the same way. This is because Smart DNS re-routes your connection through a server in a different country. Keep in mind that Smart DNS is still a service and will require a subscription from a Smart DNS provider.
Step 1: Find and select a DNS Server address from different online DNS providers. In this example, you’ll see using SurfShark .
Step 2: Register your IP address on your selected provider and obtain the appropriate DNS Server Address on your account.
Step 3: Open Networking settings on your computer, iPhone, PlayStation, or Xbox and find DNS Settings (the image below is an example for the Windows system).
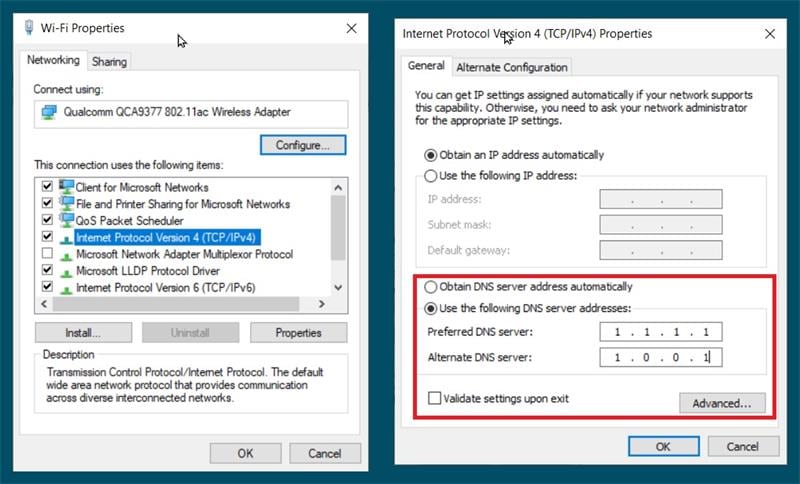
Step 4: Input your DNS Server address. Click Ok once done and restart your computer. The DNS address should activate once you reconnect to the internet.
Pros
- DNS servers are faster than a usual internet connection, so you can enjoy streaming at high connection speeds.
- DNS Servers don’t encrypt your traffic or hide your IP address.
Cons
- DNS doesn’t carry your information, as the server side will only see the IP address where the query came from, which hackers can manipulate.
 Project Manager - Asset Browser for 3Ds Max
Method 2: Using a Proxy Server
Proxy Servers work the same as VPNs as it routes traffic to a third-party server. However, like DNS, Proxy Servers don’t encrypt data but can mask your IP address. Here are the steps to watch NetFlix with a Proxy Server.
Step 1: Search for Proxy Settings on your computer.
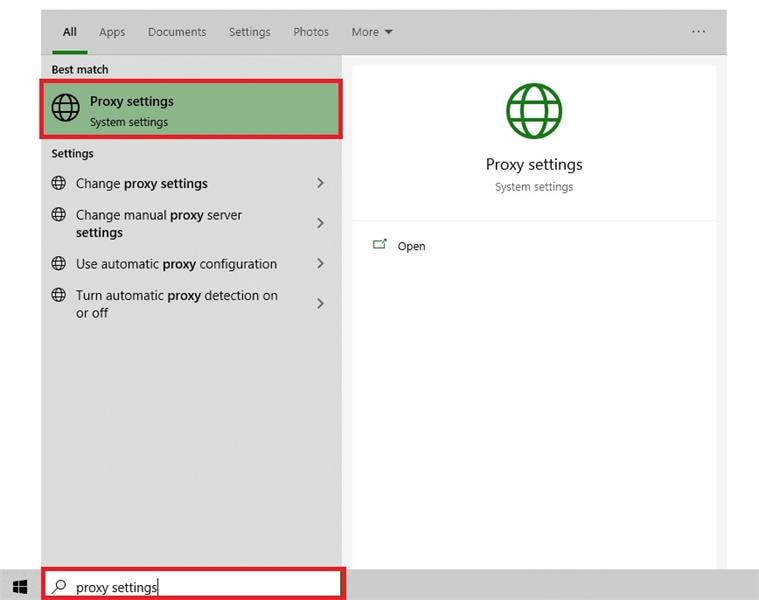
Step 2: Choose between Automatic or Manual proxy setup.
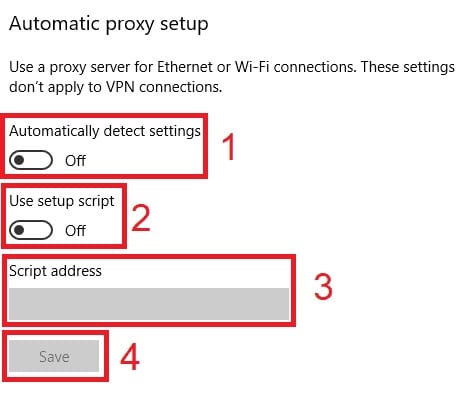
Step 3A: For Automatic proxy setup, turn on Automatically detect settings and Use setup script. Afterward, enter the Script address and click Save.
Step 3B: For Manual proxy setup, click Use a proxy server. Input Address and Port numbers. Click Save afterward.

Note
To change Proxy on mobile phones, change your phone’s proxy settings. Your Netflix app will automatically copy your phone’s proxy settings if done correctly.
Pros
- Proxy Servers mask your IP address retaining anonymity.
- Proxies improve web browsing performance, especially when downloading large files.
Cons
- Proxy Servers don’t encrypt data.
Method 3: Using a Tor Browser
For the unfamiliar, Tor is an open-source network that encrypts your connection while stopping trackers from following your activity. Here are the steps to start using Tor Browser to watch Netflix without a VPN.
Step 1: Download and install Tor Browser.

Step 2: Launch Tor Browser and click Connect.
Step 3: Go to Netflix.com and log in to your account.
Note
Tor Browser is available across all major platforms, including Windows, macOS, Linux, and Android.
Pros
- Tor is completely free to use.
- Your browsing history automatically gets deleted.
Cons
- You can’t control the region you have access to, so your Netflix content is not guaranteed to have what you’re looking for.
Conclusion
Changing your Netflix region with or without a VPN certainly has its perks. This is because you can watch your favorite series unavailable to your country to maximize your streaming access. Choosing a country with a lower subscription price also saves you money.
While it’s not illegal to change your Netflix region, it does violate the streaming giant’s Terms of Use. You should always research and know the pros and cons when circumventing Netflix’s terms so your account doesn’t get suspended or terminated.
Dr.Fone - Virtual Location
1-Click Location Changer for both iOS and Android
- Teleport from one location to another across the world from the comfort of your home.
- With just a few selections on your computer, you can make members of your circle believe you’re anywhere you want.
- Stimulate and imitate movement and set the speed and stops you take along the way.
- Compatible with both iOS and Android systems.
- Work with location-based apps, like Pokemon Go , Snapchat , Instagram , Facebook , etc.
3981454 people have downloaded it
- Title: How to Fix Itel P40 Find My Friends No Location Found? | Dr.fone
- Author: Ava
- Created at : 2024-08-01 23:16:14
- Updated at : 2024-08-02 23:16:14
- Link: https://fake-location.techidaily.com/how-to-fix-itel-p40-find-my-friends-no-location-found-drfone-by-drfone-virtual-android/
- License: This work is licensed under CC BY-NC-SA 4.0.