
How to Fix Life360 Shows Wrong Location On Realme 12 Pro+ 5G? | Dr.fone
How to Fix Life360 Shows Wrong Location On Realme 12 Pro+ 5G?
Life360, the app for family and friends, allows you to see where your loved ones are when you open the app. The app shows the current location of your contacts and will tell you the last time they were seen and if they are in an emergency.
However, there’s a good chance that you’ve seen this message multiple times: “Your phone is missing from Life360. Please contact your cellular carrier and try again”. This message indicates that your phone is not connected to the internet.
As a result, your contacts, photos, and messages are not showing. Life360 may be using cellular data instead of Wi-Fi, but it’s not certain. To avoid this, let us read what we should know.
Part 1: Why is Life360 Location Wrong?
Interference From Nearby Devices/Networks
In some cases, Life360 may not be able to determine the location of your device because it is being interfered with by other nearby devices or networks. For example, if you have an iPhone or iPad, it may be using the same cell tower as your Realme 12 Pro+ 5G.
The Life360 app has to use the closest available cell tower to determine your location. So if another device uses the closest tower, Life360 will use that instead.

Poor Signal
A poor signal in a particular region, particularly if you’re commuting, is the most common cause of Life360’s incorrect location. When your phone is in a poor signal area, the app will use the internet instead of cellular data to determine the location of your contacts.
Therefore, it is important to keep an eye on the network lines to determine whether or not this is indeed the source of the problem that prevents your Life360 from being found.
To get more information about how often does life360 update location, read about the Life360: Learn How Everything Works!
Part 2: How to Fix Life360 Shows Wrong Location Issue?
There are several ways to fix the Life360app problems that life360 not updating its location. Let’s check them out one by one.
Method 1: Review the Internet settings
The weak internet access contributes to the location display’s unreliability in life 360. If you notice that life360 is displaying the wrong location, you should examine your Internet connection settings to prevent life360 from displaying an inaccurate location.
Switch off the option that saves power and then turn on the wireless Internet connection.
You may turn off your smartphone’s power-saving mode by heading to the status bar and selecting the appropriate option.


Please note that this is just for Android users. Also, do not forget to consider that your Android smartphone’s settings may vary from those listed below.
The “switch off low power mode” option may be found in the “Settings”> “Battery” menu on an iOS device.
Android users should also follow this procedure if life360 displays an incorrect location. For battery conservation, numerous programs are disabled when the low power state is engaged.
 Glary Utilities PRO - Premium all-in-one utility to clean, speed up, maintain and protect your PC
Method 2: Double-check Your Current Location in the Settings
If life360 shows the incorrect location, the smartphone’s location services significantly come into play. The location settings must be activated to prevent the life360 location issue, and the current program must be updated accordingly.
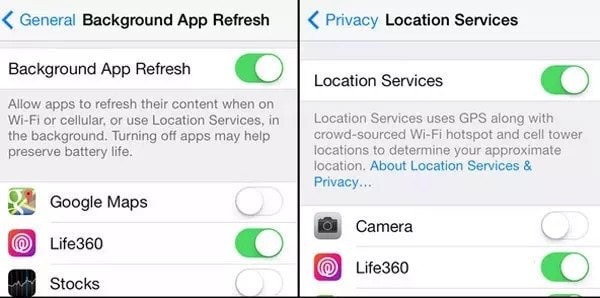
Scrolling horizontally on the status bar on an Android device is all that is required for consumers to visit the website. Of course, you can also run the software in the background, which may be accomplished in a variety of straightforward but distinct ways based on the Realme 12 Pro+ 5G device’s model.

You may access the Background App Refresh function by going to the settings menu on your iOS device and selecting “Settings,” followed by “General,” and then selecting “Background App Refresh.” Next, launch the location services function by navigating to “Settings”> “Privacy”> “location services” and selecting “Location Services” from the drop-down menu.
After that, touch on the symbol that represents Life360, as shown below; this will take you to a screen where you may change “Allow Location Access” to “Always” and “Enable Precise Location.”
Method 3: Connecting One Device at a Time
Only one device may be used to sign in to the Life 360 app at a time. To prevent the life360 false location problem, log out of all other devices and use just one. When many devices are logged into Life 360 simultaneously, the user’s location might be incorrectly determined.
If you want reliable results, you must be logged in from the same device. If you use numerous devices simultaneously to log in to Life360, it will report incorrect location errors for each one. Therefore, it is possible to get inaccurate data. Use a single device to log into life360 to prevent the issue of a wrong location showing up.
Part 3: How to Keep Your Location on Life360 in One Place?
Two of the most important and easy ways to keep your location on life360 in one place are:
1. Stopping both Wi-Fi and Cellular Data Transmissions
If you disconnect from the internet, Life360 will no longer work, and your last known position will be shown.
Because all other applications are disconnected, this solution has a significant drawback: it prevents alerts, instant messengers, and other applications from working properly. In addition to the fact that you’re unable to use the internet, people in your circle will notice something wrong. In addition, it may not be adequate to fake your location.

Those with an iPhone have the advantage of being able to disable the usage of cellular data directly inside the application’s settings. However, those with an Android device will need to resort to other approaches.
iPhone users may access the Cellular setting by going to the Settings app and tapping on it. This will switch off the cellular data for the Life360 app. Turn off Life360 by swiping the switch to the off position mentioned above. Life360 will not be able to provide an accurate location report for you so long as there is no Wi-Fi access.
Advantages:
- You can use only one device to connect to the internet.
- No need to manually switch between apps.
- You can easily manage all your data.
Disadvantages:
- You cannot use other devices at the same time.
- If you lose the connection, you need to reconnect.
2. Faking Your Location
It seems like everyone has their own way to try and fiddle with their location in real life. Some may use satellite images or even old maps and coordinates, while others will buy old phones and ship them to a random location. Whatever your method is, it’s probably not the best one out there.
However, a fast but secure option is the use of Dr.Fone - Virtual Location , which is the best virtual location application right now. You canuse it to change your location to any place on earth.
One of Wondershare’s most popular products, Dr. Fone, is a data management and recovery tool. It is compatible with both iOS and Android smartphones, and it comes packaged with a wide variety of control toolkits.
When it comes to faking a location on iOS devices, Dr. Fone- Virtual Location (iOS) is one of the most effective solutions currently available on the market. It is possible to use it to teleport the iOS device to any location in the globe with just one click, and all you have to do is input the address of the place to which you wish to be moved.
Simulating GPS movement from one place to another or along a predetermined course is also possible by simply picking locations on a map that you want to go through.
Using Dr. Fone-Virtual Location iOS, you can customize your route by selecting how many times you want to go through it and how fast you want to relocate it.
To free yourself from any hassle, consider using a third-party tool instead, such as Dr.Fone, which will make the entire process super easy and accurate.
 TubeDigger - online video downloader from mostly any site

Advantages:
- The application is easy to install and use.
- It doesn’t require you to go through a lot of settings.
Disadvantages:
- • It is not a mobile application.
Dr.Fone - Virtual Location
1-Click Location Changer for both iOS and Android
- Teleport from one location to another across the world from the comfort of your home.
- With just a few selections on your computer, you can make members of your circle believe you’re anywhere you want.
- Stimulate and imitate movement and set the speed and stops you take along the way.
- Compatible with both iOS and Android systems.
- Work with location-based apps, like Pokemon Go , Snapchat , Instagram , Facebook , etc.
3981454 people have downloaded it
Conclusion
Life360 has released a major update for Android and iPhone users, fixing the shows being sent to the wrong location. This has caused many problems for many users and is a rather annoying problem to fix. However, you can get help from Dr.Fone - Virtual Location (iOS/Android) application which is an absolute fix to all of your problems.
Ultimate Guide to Free PPTP VPN For Beginners On Realme 12 Pro+ 5G
PPTP, which stands for Point to Point Tunneling Protocol is one of the oldest and most trusted ways of implementing a VPN. It was developed by Microsoft and uses a GRE tunnel with a TCP control channel to bypass various geo-based restrictions. Since free PPTP VPN has been around for years now and is pretty easy to setup, it is quite popular as well. Read on and learn the basics of PPTP VPN free with a free PPTP VPN list as well.
 OtsAV Radio Webcaster
Part 1: What is PPTP VPN?
The free VPN PPTP was earlier introduced by Windows, but was later adopted by all the other platforms like Linux, macOS, iOS, Android, etc. Even though the layer of encryption in free PPTP VPN is not as secure as other protocols, it makes it pretty fast. Due to this, the PPTP VPN is widely used to bypass location-based restrictions.
- The free VPN PPTP supplies data into packets and send them through a tunnel to attain a secure communication.
- Data is encrypted and its authenticity is kept intact. Due to this, the free PPTP VPN is extensively used in public networks as well.
- It supports the 128-bit Point to Point encryption.
- It is quite easy to setup PPTP free VPN (only the server address, username, and password are needed).
- Even though PPTP is secure and pretty fast, it is not as safe as other protocols (that support 256-bit encryption). It is believed that the government is now able to crack it.
- The tunneling is of two types in PPTP – Voluntary and Compulsory. Voluntary tunneling is initiated from the client’s end while compulsory tunneling is initiated from the server’s end. Compulsory tunneling should be supported by the router.

By attaining a free VPN PPTP server, you can easily connect to it. For instance, if you wish to connect to Singapore, you would need free PPTP VPN Singapore host IP. We have provided a free PPTP VPN list in the next section.
Part 2: Free PPTP VPN Server List
To make things easier for you to connect to a free PPTP VPN server, we have come up with a working and free PPTP VPN list right here. This includes free PPTP VPN Singapore, Canada, UK, USA, and other countries.
| Server | Username | Password | Country | |
| 1. | us1.vpnbook.com | vpnbook | 88wxtet | USA |
| 2. | us2.vpnbook.com | vpnbook | 88wxtet | USA |
| 3. | ca1.vpnbook.com | vpnbook | 88wxtet | Canada |
| 4. | de233.vpnbook.com | vpnbook | 88wxtet | Germany |
| 5. | fr1.vpnbook.com | vpnbook | 88wxtet | France |
| 6. | it.vpnjantit.com | vpnjantit.com | i0ryj | Italy |
| 7. | sg1.vpnjantit.com | vpnjantit.com | i0ryj | Singapore |
| 8. | sg2.vpnjantit.com | vpnjantit.com | i0ryj | Singapore |
| 9. | sg3.vpnjantit.com | vpnjantit.com | i0ryj | Singapore |
| 10. | usa1.vpnjantit.com | vpnjantit.com | i0ryj | USA |
| 11. | gr.vpnjantit.com | vpnjantit.com | i0ryj | Germany |
| 12. | uk.realfreevpn.com | realfreevpn | 25570 | UK |
| 13. | de.realfreevpn.com | realfreevpn | 93937 | Germany |
| 14. | fr.realfreevpn.com | realfreevpn | 76216 | France |
| 15. | us1.superfreevpn.com | free | 1596 | USA (Miami) |
| 16. | us2.superfreevpn.com | free | 2737 | USA (Chicago) |
| 17. | uk.superfreevpn.com | free | 7833 | UK (London) |
| 18. | ca.superfreevpn.com | free | 1251 | Canada (Montreal) |
| 19. | nl.superfreevpn.com | free | 2988 | Netherlands (Brabant) |
| 20. | us.websitevpn.com | websitevpn.com | freevpn | USA |
| 21. | uk.websitevpn.com | websitevpn.com | freevpn | UK |
| 22. | ca.justfreevpn.com | justfreevpn | Canada Free VPN Account | Canada |
| 23. | uspptp.hotfreevpn.com | free | 1234 | USA |
| 24. | 51.15.151.165 | pptp | ykDJYnCIirN | France |
| 25. | 128.199.221.154 | contassh | abcd1234 | Singapore |
| 26. | 128.199.96.14 | contassh | abcd1234 | Singapore |
| 27. | 188.166.6.170 | contassh | abcd1234 | Netherlands |
| 28. | 188.166.155.99 | contassh | abcd1234 | Netherlands |
| 29. | 138.68.140.197 | contassh | abcd1234 | UK |
| 30. | 138.68.64.68 | contassh | abcd1234 | UK |
| 31. | 159.203.111.101 | contassh | abcd1234 | USA |
| 32. | 139.59.244.147 | sshagan | abcd1234 | Singapore |
| 33. | 139.59.237.15 | sshagan | abcd1234 | Singapore |
| 34. | 128.199.214.71 | sshagan | abcd1234 | Singapore |
| 35. | 178.62.38.164 | sshagan | abcd1234 | UK |
| 36. | 46.101.79.161 | sshagan | abcd1234 | UK |
| 37. | 192.241.184.169 | sshagan | abcd1234 | USA |
| 38. | 192.241.179.120 | sshagan | abcd1234 | USA |
| 39. | 162.243.33.71 | sshagan | abcd1234 | USA |
| 40. | 162.243.15.104 | sshagan | abcd1234 | USA |
Part 3: How to Setup Free PPTP VPN on Your Computer?
After getting to know about so many free PPTP VPN Singapore, USA, Canada, UK, and other countries, you can easily learn how to set up a PPTP VPN free. The process is quite simple and can be implemented in all the leading versions of Windows (and other operating systems). Though, there could be a slight change in the overall interface of the OS you are using. To set up free VPN PPT, follow these steps:
1. To start with, launch Control Panel and go to the Network and Sharing Center.
2. From here, you need to select the “Set up a new connection or network” option to start the process.

3. This will launch a new wizard that can be used to setup a PPTP VPN free. Out of all the provided options, select the “Connect to a workplace” option.

4. On the next window, you would be given an option to either dial directly or use a VPN. Click on the “Use my Internet Connection (VPN)” option to continue.

5. Great! Now, you need to provide information related to the host and server. You can refer the free PPTP VPN list we have provided in the previous section and pick the server (and hostname) of your choice.
6. As you would proceed to the next window, you need to provide the username and password of the PPTP VPN free you are using. The same can be obtained from our free PPTP VPN list.
7. In the end, just click on the “Create” button to use your VPN. It will be listed under the available networks.
8. Sometimes, we have to change Network Settings to make it work. To do this, just select the VPN you have created and visit its Properties.

9. Go to the Security tab and make sure the type of VPN is listed as PPTP (Point to Point Tunneling Protocol). Also, the data encryption option should be “Optional Encryption (Connect even if no encryption)” and the option for “Challenge Handshake Authentication Protocol (CHAP)” should be selected for “Allow these protocols”.

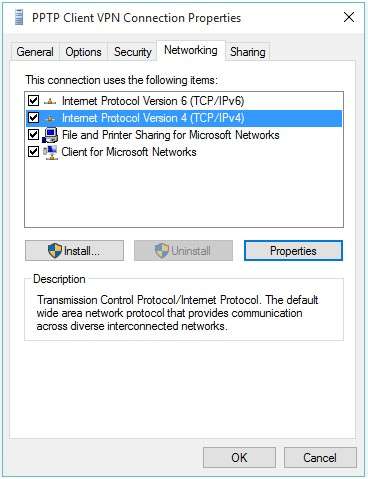
10. Furthermore, you can go to the General tab to make sure the server is specified correctly.
11. Once it is done, you can save these changes and exit the interface. Now, go to the list of available networks and connect to the free PPTP VPN you have created.

That’s it! By following these steps, you would be able to create a free PPTP VPN Singapore, USA, UK, Canada, Germany, or any other location. Simply give this tutorial a try and pick the preferred option from our free PPTP VPN list. If you also have a suggestion for a free VPN PPTP that you want to add to your list, then let us know about it in the comments below.
Part 4: An Easier Alternative to Setup VPN
You may find that there is a steep learning curve ahead to master PPTP VPN setup. In addition, the ways to set up PPTP VPN are quite different for various devices and PCs.
Is there an easier alternative to setup VPN?
Yes. There are quite a few easy-to-use VPN services available in the market, among which, NordVPN is one considered reliable by many users.
Some of its advantages are as follows:
- Supports VPN access on PCs and phones (even browser plugins available).
- Intuitive interface and easy operations.
- Offers 24/7 customer service.
- As low as about 3 USD per month.

Dr.Fone - Virtual Location
1-Click Location Changer for both iOS and Android
- Teleport from one location to another across the world from the comfort of your home.
- With just a few selections on your computer, you can make members of your circle believe you’re anywhere you want.
- Stimulate and imitate movement and set the speed and stops you take along the way.
- Compatible with both iOS and Android systems.
- Work with location-based apps, like Pokemon Go , Snapchat , Instagram , Facebook , etc.
3981454 people have downloaded it
How to Change Netflix Location to Get More Country Version On Realme 12 Pro+ 5G
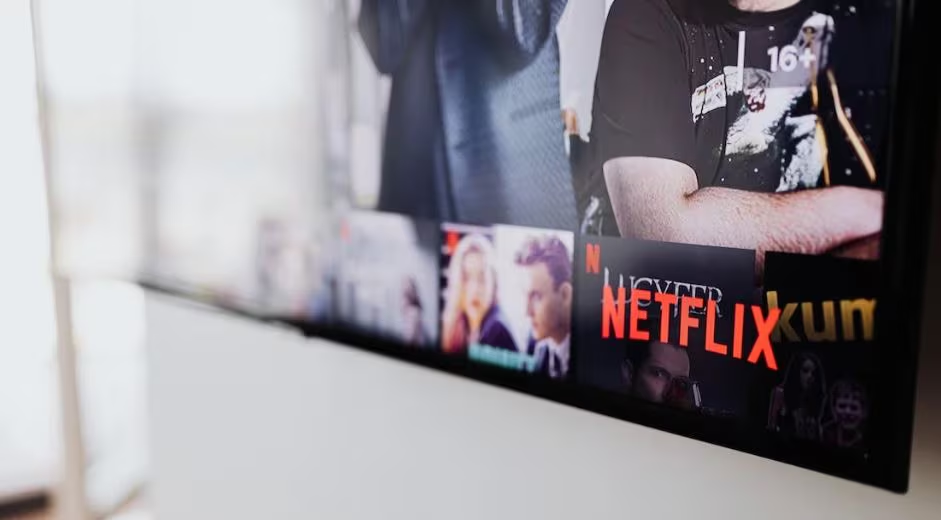
Many people nowadays idle away the hours watching films and TV shows on Netflix. Well, it’s not that hard to see why. First and foremost, Netflix is readily available and easily accessible in different parts of the world. All you have to do is set up an account and browse the selections afterward. Another thing is that Netflix offers a very large catalog of television programs to match your current mood. From romance and adventure to thrillers and documentaries, you will not run out of options. Netflix has got you covered.
At a glance, it looks like the entertainment materials that Netflix has to offer are boundless. Scrolling through its program categories feels like a never-ending loop. But in actuality, there is something important you need to know. Netflix actually provides a different set of movie selections for each region. That means there are certain TV shows and films that are not universally available worldwide. But don’t worry. There are lots of tutorials online on how to change your location on Netflix. Surely, one of them can help you gain access to geo-exclusive Netflix content that is currently unavailable in your country.
In this article, we will discuss the main reasons why some Netflix shows are not widely accessible. We will also provide some effective methods on how to change your Netflix location on mobile and other electronic devices. Continue reading below to learn more.
Part 1. Why Netflix Offers Different Shows in Every Country
Netflix is definitely one of the largest video streaming services of our time. It’s currently available in over 190 countries globally. The majority of its content is widely accessible regardless of location. You can binge-watch on them anytime and anywhere so long as their individual broadcast license remains active. But as mentioned earlier, there are some Netflix shows that are not available worldwide.
There are many potential reasons why Netflix shows vary from one region to another. One of them is cultural influence. Of course, Netflix prioritizes the screening of shows that are highly relatable for the target audience. Hence, the content available in certain locations is locally sourced or regionally concentrated. But that’s not all. There are other reasons why Netflix offers different shows in every country. Check out the list below to understand it better.

The theme of the Netflix show contradicts certain government rules or traditional beliefs
 PearlMountain Image Converter
Netflix holds traditional beliefs in high regard and abides by government rules. If the show depicts sensitive topics that certain countries don’t openly discuss, its viewing is immediately restricted in the region. That’s probably the reason why a particular Netflix show is unavailable in your region. Is there a way to access it without traveling anywhere? Luckily, there is. Find a tutorial online on how to change your location on Netflix. Follow the steps accordingly until your Netflix location is modified. After that, the restricted show must be available now on your end.
There are some issues regarding copyright ownership

In simple terms, copyright ownership is enforced separately in each country. That means Netflix must secure individual licenses for every region. Sometimes, certain countries fail to acquire copyright ownership due to the cost and other factors. As a result, the content becomes unavailable in that particular location. We cannot do anything about it unless you’re willing to shell out money for the license. But if you’re really eager to get hold of the restricted Netflix show, try to modify your device’s primary location. Don’t worry. There are many tutorials online on how to change your Netflix location. Just choose one and follow the instructions indicated.
The Netflix show has varying release dates for each region

Maybe there is no complicated issue behind the geo-blocking of a particular Netflix show in your region. It’s possible that the release date is actually different in every country. If that’s the case, there is nothing to worry about. It’s just another marketing tactic to add an element of surprise for the fans. All you have to do now is sit back and wait as patiently as you can. If you’re too excited to be counting down the days, you may try to alter the location settings on your device. Find the most suitable guide on how to change your location on Netflix.
Part 2. How to Change Your Netflix Region?
If you wish to explore other Netflix collections, the best way you can try is to alter your Netflix region. Is it possible? Of course, it is. There are many tutorials that provide easy steps on how to change your Netflix region. If you successfully complete them, your Netflix location will be changed immediately as though you’ve traveled somewhere. Don’t worry. Most of them are not that complicated to implement. In actuality, it only takes a few minutes or even seconds to accomplish the entire instructions. Just make sure to choose the best guide that works perfectly with your situation. To help you out, below is the list of methods you can try.

Method 1: Activate VPN before streaming Netflix shows
Virtual Private Networks generally mask your IP address by directing your internet traffic to a server from a different location. Thus, your location settings show modified coordinates whenever you browse the internet with a VPN enabled. That also works with streaming Netflix shows that are currently restricted in your region. Do you want to try it? Here’s a short guide on how to change your location on Netflix using Virtual Private Networks.
- Step 1: First and foremost, check the current standing of your Netflix account and make sure it is active. Once confirmed, choose your preferred VPN.

- Step 2: Then, download and install your selected Virtual Private Network. Register an account afterward and subscribe to a paid plan if necessary.
- Step 3: Activate the VPN on your device. From there, choose a country where you wish to direct your internet traffic.

- Step 4: Once successfully activated, you can now access Netflix on your device and search for the restricted TV show you want to watch.
Method 2: Stream Netflix shows with a web proxy server
For the most part, a web proxy server basically works like a Virtual Private Network. It reroutes your internet traffic to a particular server from a different location. Through this tactic, Netflix fails to detect that you’re using its service from a restricted region. A web proxy server is often free of charge. Thus, it’s a great alternative to VPNs if you don’t want to spend money just to access unavailable content on your device. Do you want to try it now? Here’s how to change your Netflix location using a web proxy server.
- Step 1: Choose your preferred web proxy server and then visit its official website. Create an account if necessary.
- Step 2: After that, select a server from the available options. Make sure that the server you’re going to choose is not geologically blocklisted on Netflix.


- Step 3: Enter the official web address of Netflix into the URL bar and then proceed immediately.
- Step 4: Wait while the web proxy server is loading up your request. After a few minutes, the Netflix dashboard must be displayed on your computer screen. From there, you can now browse its catalog and binge-watch the content currently restricted in your region. That’s exactly how to change your location on Netflix with a web proxy server.

Method 3: Stream Netflix shows from the Tor browser
Tor browser is primarily used for ultra-private internet browsing. Your online activities on this platform are encrypted and directed to about three various servers located worldwide. Although you cannot actually change your location settings, your actual IP address will be masked and routed somewhere else. This way, you get a higher chance of accessing restricted Netflix shows from the comfort of your own home. Do you want to try it now? Here’s the guide on how to change your Netflix region using the Tor browser.
- Step 1: Download Tor browser from its official website. After that, install it on your computer.
- Step 2: Launch the Tor browser on your desktop and hit Connect. Make sure that Tor has been successfully configured on your device. Once confirmed, visit the official website of Netflix.

- Step 3: Browse through the wide content selections on Netflix dashboard and find the restricted content you want to watch.
Part 3. Things to Remember When Modifying Location Settings For Netflix Streaming
The tutorials above on how to change your location on Netflix are undeniably helpful for many people. The three of them are effective in this regard, depending on your situation. However, don’t forget that engaging in this kind of modification entails some risk. That’s why you should be careful and vigilant when you decide to implement the methods above. To understand it better, check out the list below.
 Allavsoft Batch Download Online Videos, Music Offline to MP4, MP3, MOV, etc format
- Avoid using VPNs or web proxy servers with unverified origin. You never know. Instead of providing solutions, these illegitimate tools might cause serious problems on your end. It’s better to pay for a subscription if it’s going to help you secure your usage.
- According to some users, Tor browsers run too slow. If you’re not patient enough, you might struggle to stream Netflix shows on this platform. That’s why you only resort to this option if all available alternatives have been exhausted.
- Take note that Virtual Private Networks sometimes downgrade the network bandwidth. As a result, internet speed gets affected, and data transmission slacks off than usual. If you cannot stand this kind of scenario, it’s best to tick off the use of VPN from your list of options.
- It rarely happens, but there is a possibility that data breaches might occur. That’s why you should first check the security protocols that VPNs and web proxy servers implement. Make sure that their data protection is powerful enough to keep your personal information safe and private.
Part 4. How to Change Your Netflix Location on Mobile Devices
The first three tutorials above on how to change your location on Netflix work pretty well on personal computers. Do they work too on mobile devices? Well, you can try and see what’s going to happen. However, a positive result is not a hundred percent guaranteed. Is there any other way? Fortunately, there is. Wondershare Dr.Fone can absolutely help you with that. It offers a potent Virtual Location feature capable of simulating GPS movements and modifying your location settings in a snap/ Don’t sweat it. It’s very easy to get started. Check out the tutorial below on how to change your location on Netflix using Wondershare Dr.Fone.
- Step 1: Download Wondershare Dr.Fone for free from its official website. Right after, install it on your computer.
- Step 2: Launch the newly installed software on your desktop. Once it fully loads up, connect your smartphone using a data cable. Follow the on-screen instructions carefully and execute each step properly to ensure the connection between the two devices is stable enough to handle the succeeding procedures.
- Step 3: Access the left-side panel afterward and then click Toolbox. On the main dashboard, click Virtual Location. Is it your first time using this feature? If so, let Wondershare Dr.Fone download additional resources. Don’t worry. It will only take a few minutes to complete.
- Step 4: Once the downloading process has concluded, Wondershare Dr.Fone - Virtual Location will immediately open on a separate window. From there, hover over to the top-right menu bar and then click Teleport Mode. It is the first icon in the row.

- Step 5: After that, find the search at the top-left corner of your screen and type in your desired location. Choose one from the suggested results. Then, click the Enter icon to proceed.

- Step 6: The essential details referring to your chosen location will be displayed on your computer screen, along with a map marker. Read the information very well and make sure that it is exactly the place you’re looking for. Once confirmed, click Move Here.
- Step 7: The location settings on your mobile devices will be immediately changed to your chosen coordinates. Verify that the changes have already been applied by simply checking out your Maps mobile app. It must not show your real current location.
 vMix Basic HD - Software based live production. vMix Basic HD includes 4 inputs, 3 cameras, streaming, recording, playlist.
- Step 8: Open the Netflix application on your smartphone and then browse through its catalog. Find the restricted content you want to watch and try to stream it on your device. To restore your original location settings, simply close the Wondershare Dr.Fone on your computer and then restart your device.
Conclusion
Netflix is definitely at the forefront of modern entertainment. It is the go-to app of many people whenever they are bored and want to binge-watch TV shows. However, it is sometimes infuriating if the movie you want to stream is restricted in your location. If you’re experiencing anything similar, you can refer to the discussions above. The provided tutorials on how to change your location on Netflix can surely help you in this regard. For mobile devices, follow the guide on how to change your Netflix location using Wondershare Dr.Fone. It has a powerful Virtual Location feature capable of modifying your whereabouts and simulating GPS movements.
- Title: How to Fix Life360 Shows Wrong Location On Realme 12 Pro+ 5G? | Dr.fone
- Author: Ava
- Created at : 2024-08-01 23:21:19
- Updated at : 2024-08-02 23:21:19
- Link: https://fake-location.techidaily.com/how-to-fix-life360-shows-wrong-location-on-realme-12-proplus-5g-drfone-by-drfone-virtual-android/
- License: This work is licensed under CC BY-NC-SA 4.0.