
How to Fix Life360 Shows Wrong Location On Vivo Y56 5G? | Dr.fone
How to Fix Life360 Shows Wrong Location On Vivo Y56 5G?
Life360, the app for family and friends, allows you to see where your loved ones are when you open the app. The app shows the current location of your contacts and will tell you the last time they were seen and if they are in an emergency.
However, there’s a good chance that you’ve seen this message multiple times: “Your phone is missing from Life360. Please contact your cellular carrier and try again”. This message indicates that your phone is not connected to the internet.
As a result, your contacts, photos, and messages are not showing. Life360 may be using cellular data instead of Wi-Fi, but it’s not certain. To avoid this, let us read what we should know.

Part 1: Why is Life360 Location Wrong?

Interference From Nearby Devices/Networks
In some cases, Life360 may not be able to determine the location of your device because it is being interfered with by other nearby devices or networks. For example, if you have an iPhone or iPad, it may be using the same cell tower as your Vivo Y56 5G.
The Life360 app has to use the closest available cell tower to determine your location. So if another device uses the closest tower, Life360 will use that instead.

Poor Signal
A poor signal in a particular region, particularly if you’re commuting, is the most common cause of Life360’s incorrect location. When your phone is in a poor signal area, the app will use the internet instead of cellular data to determine the location of your contacts.
Therefore, it is important to keep an eye on the network lines to determine whether or not this is indeed the source of the problem that prevents your Life360 from being found.
To get more information about how often does life360 update location, read about the Life360: Learn How Everything Works!

Key features:
• Import from any devices and cams, including GoPro and drones. All formats supported. Сurrently the only free video editor that allows users to export in a new H265/HEVC codec, something essential for those working with 4K and HD.
• Everything for hassle-free basic editing: cut, crop and merge files, add titles and favorite music
• Visual effects, advanced color correction and trendy Instagram-like filters
• All multimedia processing done from one app: video editing capabilities reinforced by a video converter, a screen capture, a video capture, a disc burner and a YouTube uploader
• Non-linear editing: edit several files with simultaneously
• Easy export to social networks: special profiles for YouTube, Facebook, Vimeo, Twitter and Instagram
• High quality export – no conversion quality loss, double export speed even of HD files due to hardware acceleration
• Stabilization tool will turn shaky or jittery footage into a more stable video automatically.
• Essential toolset for professional video editing: blending modes, Mask tool, advanced multiple-color Chroma Key
Part 2: How to Fix Life360 Shows Wrong Location Issue?
There are several ways to fix the Life360app problems that life360 not updating its location. Let’s check them out one by one.

Method 1: Review the Internet settings
The weak internet access contributes to the location display’s unreliability in life 360. If you notice that life360 is displaying the wrong location, you should examine your Internet connection settings to prevent life360 from displaying an inaccurate location.
Switch off the option that saves power and then turn on the wireless Internet connection.
You may turn off your smartphone’s power-saving mode by heading to the status bar and selecting the appropriate option.

Please note that this is just for Android users. Also, do not forget to consider that your Android smartphone’s settings may vary from those listed below.
The “switch off low power mode” option may be found in the “Settings”> “Battery” menu on an iOS device.
Android users should also follow this procedure if life360 displays an incorrect location. For battery conservation, numerous programs are disabled when the low power state is engaged.
Method 2: Double-check Your Current Location in the Settings
If life360 shows the incorrect location, the smartphone’s location services significantly come into play. The location settings must be activated to prevent the life360 location issue, and the current program must be updated accordingly.
Scrolling horizontally on the status bar on an Android device is all that is required for consumers to visit the website. Of course, you can also run the software in the background, which may be accomplished in a variety of straightforward but distinct ways based on the Vivo Y56 5G device’s model.

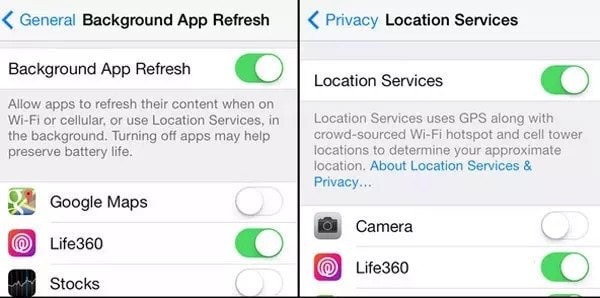
You may access the Background App Refresh function by going to the settings menu on your iOS device and selecting “Settings,” followed by “General,” and then selecting “Background App Refresh.” Next, launch the location services function by navigating to “Settings”> “Privacy”> “location services” and selecting “Location Services” from the drop-down menu.
After that, touch on the symbol that represents Life360, as shown below; this will take you to a screen where you may change “Allow Location Access” to “Always” and “Enable Precise Location.”
Method 3: Connecting One Device at a Time
Only one device may be used to sign in to the Life 360 app at a time. To prevent the life360 false location problem, log out of all other devices and use just one. When many devices are logged into Life 360 simultaneously, the user’s location might be incorrectly determined.
If you want reliable results, you must be logged in from the same device. If you use numerous devices simultaneously to log in to Life360, it will report incorrect location errors for each one. Therefore, it is possible to get inaccurate data. Use a single device to log into life360 to prevent the issue of a wrong location showing up.
Part 3: How to Keep Your Location on Life360 in One Place?
Two of the most important and easy ways to keep your location on life360 in one place are:

1. Stopping both Wi-Fi and Cellular Data Transmissions
If you disconnect from the internet, Life360 will no longer work, and your last known position will be shown.
Because all other applications are disconnected, this solution has a significant drawback: it prevents alerts, instant messengers, and other applications from working properly. In addition to the fact that you’re unable to use the internet, people in your circle will notice something wrong. In addition, it may not be adequate to fake your location.

Those with an iPhone have the advantage of being able to disable the usage of cellular data directly inside the application’s settings. However, those with an Android device will need to resort to other approaches.
iPhone users may access the Cellular setting by going to the Settings app and tapping on it. This will switch off the cellular data for the Life360 app. Turn off Life360 by swiping the switch to the off position mentioned above. Life360 will not be able to provide an accurate location report for you so long as there is no Wi-Fi access.
Advantages:
- You can use only one device to connect to the internet.
- No need to manually switch between apps.
- You can easily manage all your data.
Disadvantages:
- You cannot use other devices at the same time.
- If you lose the connection, you need to reconnect.
2. Faking Your Location
It seems like everyone has their own way to try and fiddle with their location in real life. Some may use satellite images or even old maps and coordinates, while others will buy old phones and ship them to a random location. Whatever your method is, it’s probably not the best one out there.
However, a fast but secure option is the use of Dr.Fone - Virtual Location , which is the best virtual location application right now. You canuse it to change your location to any place on earth.
One of Wondershare’s most popular products, Dr. Fone, is a data management and recovery tool. It is compatible with both iOS and Android smartphones, and it comes packaged with a wide variety of control toolkits.
When it comes to faking a location on iOS devices, Dr. Fone- Virtual Location (iOS) is one of the most effective solutions currently available on the market. It is possible to use it to teleport the iOS device to any location in the globe with just one click, and all you have to do is input the address of the place to which you wish to be moved.
Simulating GPS movement from one place to another or along a predetermined course is also possible by simply picking locations on a map that you want to go through.
Using Dr. Fone-Virtual Location iOS, you can customize your route by selecting how many times you want to go through it and how fast you want to relocate it.
To free yourself from any hassle, consider using a third-party tool instead, such as Dr.Fone, which will make the entire process super easy and accurate.

Advantages:
- The application is easy to install and use.
- It doesn’t require you to go through a lot of settings.
Disadvantages:
- • It is not a mobile application.
Dr.Fone - Virtual Location
1-Click Location Changer for both iOS and Android
- Teleport from one location to another across the world from the comfort of your home.
- With just a few selections on your computer, you can make members of your circle believe you’re anywhere you want.
- Stimulate and imitate movement and set the speed and stops you take along the way.
- Compatible with both iOS and Android systems.
- Work with location-based apps, like Pokemon Go , Snapchat , Instagram , Facebook , etc.
3981454 people have downloaded it
Conclusion
Life360 has released a major update for Android and iPhone users, fixing the shows being sent to the wrong location. This has caused many problems for many users and is a rather annoying problem to fix. However, you can get help from Dr.Fone - Virtual Location (iOS/Android) application which is an absolute fix to all of your problems.
 TubeDigger - online video downloader from mostly any site
Ultimate Guide to Free PPTP VPN For Beginners On Vivo Y56 5G
PPTP, which stands for Point to Point Tunneling Protocol is one of the oldest and most trusted ways of implementing a VPN. It was developed by Microsoft and uses a GRE tunnel with a TCP control channel to bypass various geo-based restrictions. Since free PPTP VPN has been around for years now and is pretty easy to setup, it is quite popular as well. Read on and learn the basics of PPTP VPN free with a free PPTP VPN list as well.
Part 1: What is PPTP VPN?
The free VPN PPTP was earlier introduced by Windows, but was later adopted by all the other platforms like Linux, macOS, iOS, Android, etc. Even though the layer of encryption in free PPTP VPN is not as secure as other protocols, it makes it pretty fast. Due to this, the PPTP VPN is widely used to bypass location-based restrictions.
- The free VPN PPTP supplies data into packets and send them through a tunnel to attain a secure communication.
- Data is encrypted and its authenticity is kept intact. Due to this, the free PPTP VPN is extensively used in public networks as well.
- It supports the 128-bit Point to Point encryption.
- It is quite easy to setup PPTP free VPN (only the server address, username, and password are needed).
- Even though PPTP is secure and pretty fast, it is not as safe as other protocols (that support 256-bit encryption). It is believed that the government is now able to crack it.
- The tunneling is of two types in PPTP – Voluntary and Compulsory. Voluntary tunneling is initiated from the client’s end while compulsory tunneling is initiated from the server’s end. Compulsory tunneling should be supported by the router.
 HD Video Converter Factory Pro

By attaining a free VPN PPTP server, you can easily connect to it. For instance, if you wish to connect to Singapore, you would need free PPTP VPN Singapore host IP. We have provided a free PPTP VPN list in the next section.
Part 2: Free PPTP VPN Server List
To make things easier for you to connect to a free PPTP VPN server, we have come up with a working and free PPTP VPN list right here. This includes free PPTP VPN Singapore, Canada, UK, USA, and other countries.
| Server | Username | Password | Country | |
| 1. | us1.vpnbook.com | vpnbook | 88wxtet | USA |
| 2. | us2.vpnbook.com | vpnbook | 88wxtet | USA |
| 3. | ca1.vpnbook.com | vpnbook | 88wxtet | Canada |
| 4. | de233.vpnbook.com | vpnbook | 88wxtet | Germany |
| 5. | fr1.vpnbook.com | vpnbook | 88wxtet | France |
| 6. | it.vpnjantit.com | vpnjantit.com | i0ryj | Italy |
| 7. | sg1.vpnjantit.com | vpnjantit.com | i0ryj | Singapore |
| 8. | sg2.vpnjantit.com | vpnjantit.com | i0ryj | Singapore |
| 9. | sg3.vpnjantit.com | vpnjantit.com | i0ryj | Singapore |
| 10. | usa1.vpnjantit.com | vpnjantit.com | i0ryj | USA |
| 11. | gr.vpnjantit.com | vpnjantit.com | i0ryj | Germany |
| 12. | uk.realfreevpn.com | realfreevpn | 25570 | UK |
| 13. | de.realfreevpn.com | realfreevpn | 93937 | Germany |
| 14. | fr.realfreevpn.com | realfreevpn | 76216 | France |
| 15. | us1.superfreevpn.com | free | 1596 | USA (Miami) |
| 16. | us2.superfreevpn.com | free | 2737 | USA (Chicago) |
| 17. | uk.superfreevpn.com | free | 7833 | UK (London) |
| 18. | ca.superfreevpn.com | free | 1251 | Canada (Montreal) |
| 19. | nl.superfreevpn.com | free | 2988 | Netherlands (Brabant) |
| 20. | us.websitevpn.com | websitevpn.com | freevpn | USA |
| 21. | uk.websitevpn.com | websitevpn.com | freevpn | UK |
| 22. | ca.justfreevpn.com | justfreevpn | Canada Free VPN Account | Canada |
| 23. | uspptp.hotfreevpn.com | free | 1234 | USA |
| 24. | 51.15.151.165 | pptp | ykDJYnCIirN | France |
| 25. | 128.199.221.154 | contassh | abcd1234 | Singapore |
| 26. | 128.199.96.14 | contassh | abcd1234 | Singapore |
| 27. | 188.166.6.170 | contassh | abcd1234 | Netherlands |
| 28. | 188.166.155.99 | contassh | abcd1234 | Netherlands |
| 29. | 138.68.140.197 | contassh | abcd1234 | UK |
| 30. | 138.68.64.68 | contassh | abcd1234 | UK |
| 31. | 159.203.111.101 | contassh | abcd1234 | USA |
| 32. | 139.59.244.147 | sshagan | abcd1234 | Singapore |
| 33. | 139.59.237.15 | sshagan | abcd1234 | Singapore |
| 34. | 128.199.214.71 | sshagan | abcd1234 | Singapore |
| 35. | 178.62.38.164 | sshagan | abcd1234 | UK |
| 36. | 46.101.79.161 | sshagan | abcd1234 | UK |
| 37. | 192.241.184.169 | sshagan | abcd1234 | USA |
| 38. | 192.241.179.120 | sshagan | abcd1234 | USA |
| 39. | 162.243.33.71 | sshagan | abcd1234 | USA |
| 40. | 162.243.15.104 | sshagan | abcd1234 | USA |
Part 3: How to Setup Free PPTP VPN on Your Computer?
After getting to know about so many free PPTP VPN Singapore, USA, Canada, UK, and other countries, you can easily learn how to set up a PPTP VPN free. The process is quite simple and can be implemented in all the leading versions of Windows (and other operating systems). Though, there could be a slight change in the overall interface of the OS you are using. To set up free VPN PPT, follow these steps:
1. To start with, launch Control Panel and go to the Network and Sharing Center.
2. From here, you need to select the “Set up a new connection or network” option to start the process.

3. This will launch a new wizard that can be used to setup a PPTP VPN free. Out of all the provided options, select the “Connect to a workplace” option.

4. On the next window, you would be given an option to either dial directly or use a VPN. Click on the “Use my Internet Connection (VPN)” option to continue.

5. Great! Now, you need to provide information related to the host and server. You can refer the free PPTP VPN list we have provided in the previous section and pick the server (and hostname) of your choice.
6. As you would proceed to the next window, you need to provide the username and password of the PPTP VPN free you are using. The same can be obtained from our free PPTP VPN list.
7. In the end, just click on the “Create” button to use your VPN. It will be listed under the available networks.
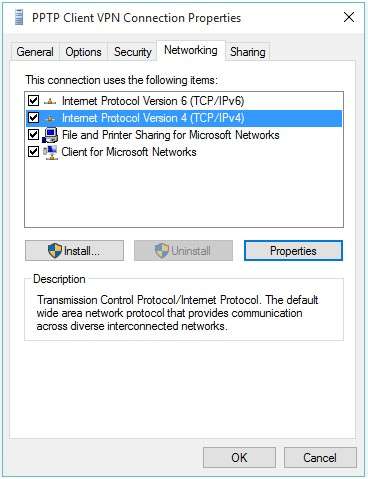
8. Sometimes, we have to change Network Settings to make it work. To do this, just select the VPN you have created and visit its Properties.

9. Go to the Security tab and make sure the type of VPN is listed as PPTP (Point to Point Tunneling Protocol). Also, the data encryption option should be “Optional Encryption (Connect even if no encryption)” and the option for “Challenge Handshake Authentication Protocol (CHAP)” should be selected for “Allow these protocols”.
10. Furthermore, you can go to the General tab to make sure the server is specified correctly.
11. Once it is done, you can save these changes and exit the interface. Now, go to the list of available networks and connect to the free PPTP VPN you have created.

That’s it! By following these steps, you would be able to create a free PPTP VPN Singapore, USA, UK, Canada, Germany, or any other location. Simply give this tutorial a try and pick the preferred option from our free PPTP VPN list. If you also have a suggestion for a free VPN PPTP that you want to add to your list, then let us know about it in the comments below.
Part 4: An Easier Alternative to Setup VPN
You may find that there is a steep learning curve ahead to master PPTP VPN setup. In addition, the ways to set up PPTP VPN are quite different for various devices and PCs.
Is there an easier alternative to setup VPN?
Yes. There are quite a few easy-to-use VPN services available in the market, among which, NordVPN is one considered reliable by many users.
Some of its advantages are as follows:
- Supports VPN access on PCs and phones (even browser plugins available).
- Intuitive interface and easy operations.
- Offers 24/7 customer service.
- As low as about 3 USD per month.
 Any DRM Removal for Mac: Remove DRM from Adobe, Kindle, Sony eReader, Kobo, etc, read your ebooks anywhere.
Dr.Fone - Virtual Location
1-Click Location Changer for both iOS and Android
- Teleport from one location to another across the world from the comfort of your home.
- With just a few selections on your computer, you can make members of your circle believe you’re anywhere you want.
- Stimulate and imitate movement and set the speed and stops you take along the way.
- Compatible with both iOS and Android systems.
- Work with location-based apps, like Pokemon Go , Snapchat , Instagram , Facebook , etc.
3981454 people have downloaded it
 OtsAV TV Webcaster
How to Use Life360 on Windows PC For Vivo Y56 5G?
Life360 is an online platform that utilizes geo-location services to help users share their real-time location with friends and family. The app allows people to create a family group and stay connected to each other through features like chatting, sharing location, sending safety alerts, etc.
As of now, you cannot run Life360 on computer as it is only available for Android and iOS. Why? Because as opposed to a PC, one can easily carry their device everywhere! It means whether your kid is stuck in traffic and needs your help or your parents have lost their way back home, Life360 will instantly send you an alert on your device.
However, that doesn’t mean you cannot use Life360 on a PC. While it may seem a bit odd, there are a couple of methods that’ll allow you to get the Life360 app for Windows. In today’s guide, we are going to share some of these methods that’ll help you run the Life360 app on Windows.
So, without wasting another second, let’s dive straight into the guide.
Part 1: Why people seek to use Life360 on PC?
First things first; why would anyone want to use a family locator app like Life360 on their PC? Well, the truth is everyone has their own reason to get Life360 for PC. For instance, let’s say you are in the middle of an important project and don’t want to be bothered by alerts on your smartphone. However, you still don’t want to compromise with the safety of your family members.
In this situation, you can simply run the Life360 app on PC. This will allow you to directly keep track of the whereabouts of family members on your Windows system and you won’t have to constantly check your phone.
Life360 can also be used on a computer when your phone’s battery has completely drained and there’s no power outlet nearby. In this case, you can simply power-on your laptop, start the Life360 app and send your current whereabouts to family members.
Part 2: Is it possible to use Life360 on Windows PC?
Life360 is an extremely useful app for people who are always concerned about their closed ones. The app is basically designed with a vision to keep family members connected and safe. In addition to location sharing, the app also provides exclusive features like crash detection, place alerts, speed alerts, battery monitoring, etc.
The app also makes it easier for parents to monitor their child’s movement. Using the app, you can always know that your kids have safely reached school and back home. For any parent, knowing whether the kids are safe, is one less thing to worry about.
However, as we mentioned earlier, Life360 hasn’t been released for Windows yet. So, there’s no direct way to install and run the app on a Windows PC. While Life360 may release a dedicated Windows software in the future, as of now, you can only run it using the alternative methods.
These methods include:
Part 3: Use Life360 on Windows PC with Android emulator
The first and the most convenient way to run Life360 on computer is to use an Android Emulator. An emulator is basically a software that creates a virtual Android system on your computer. As a result, you’ll be able to run Android apps on your computer.
While there are dozens of Android emulators, Bluestacks seems to be the most popular and user-friendly option among all. Unlike other emulators, Bluestacks is easy to set up and use.
Here’s how you can run Life360 on a computer using Bluestacks Android emulator./
Step 1: Head over to Bluestacks official website and tap the download button.
Step 2: Open the installer and tap the “download” button. This will initiate the download process on your System.
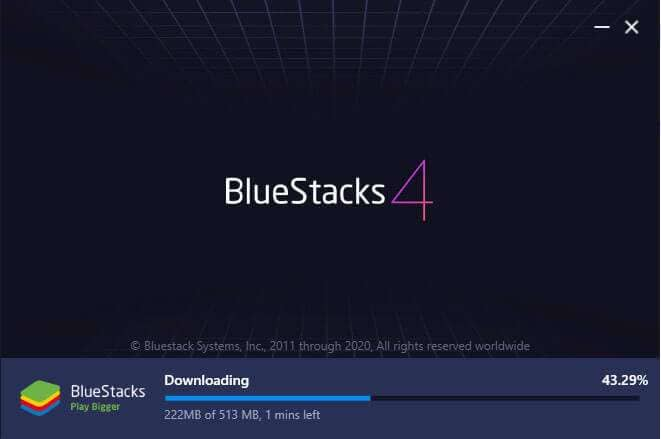
Step 3: Once the installation process completes, Bluestacks will start to boot. Keep in mind that the first boot may take some time, depending on your system configurations.

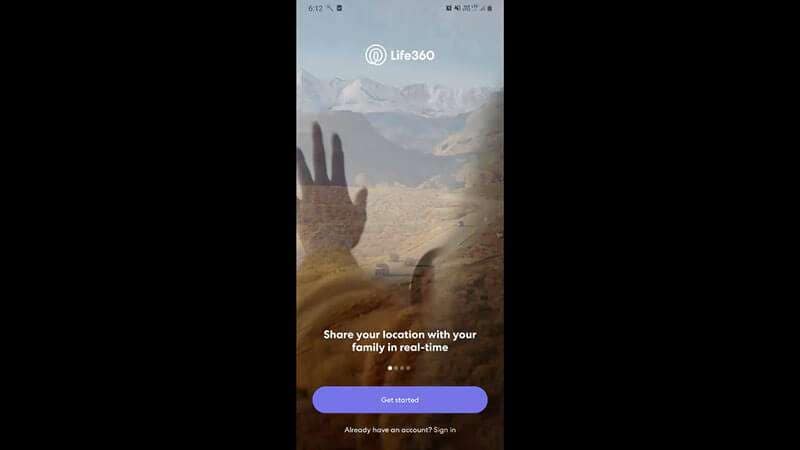
Step 4: In the home screen, tap the “Google Play Store” icon. You’ll be asked to sign-in with your Google account. Enter the right credentials and log-in to the Google Play Store.

Step 5: In the top search bar, type-in Life360 and tap the “install” button to download the app.
 OtsAV DJ Pro
Step 6: Life360 is now installed on your computer. Open the app and enter your login details. You’ll now be able to run Life360 on your PC.

 Jet Profiler for MySQL, Enterprise Version: Jet Profiler for MySQL is real-time query performance and diagnostics tool for the MySQL database server. Its detailed query information, graphical interface and ease of use makes this a great tool for finding performance bottlenecks in your MySQL databases.
 Part 4: Use Life360 by mirroring Android to Windows PC
While running an emulator is a great way to get Life360 on PC, it has its own set of challenges. For instance, running an Android emulator is not easy when you have a low-configuration PC. Emulators like Bluestacks requires high system configuration otherwise they take forever to load.
In this situation, we have another alternative for you to run Life360 on PC. You can simply mirror your Android to your Windows system. Mirroring the Android device will allow you to see its content on the PC itself.
Here’s how you can mirror the Android device on your PC.
Step 1: Make sure that Bluetooth is activated on both devices.
Step 2: On your Windows PC, open “Settings” and select the “Systems” tab.


Step 3: Choose the “Projecting to this PC” option in the left menu-bar and make sure that “Available Everywhere” is selected.

Step 4: If you’re running Android Pie or above on your device, scroll down to open notification drawer and select “Smart View” (or “Cast” in some devices). You’ll see your PC listed here. Tap the button to start Android mirroring.

Step 5: It may take some while for the connection to establish. Once it does, you’ll be able to cast your device screen onto your computer and you’ll be able to run life360 on your system.
Keep in mind that you’ll still require your device to navigate through the content on your computer. Any action that you perform on your device will be replicated on your computer screen as well.
Final Verdict
Life360 is probably among the top family locators for Android users. Apart from its extensive range of features, the app provides a user-friendly interface, which allows it easier for even elders to use the app without any issues. Even though there isn’t a dedicated Life360 software for Windows, you can follow the above-mentioned methods to run the Life360 on PC.
You Might Also Like
Location-based apps
GPS spoof for dating apps
GPS spoof for social apps
Pokemon Go on PC
AR game tricks

Change Phone GPS Location Easily
- ● Teleport GPS location to anywhere
- ● Play AR games without moving
- ● Spoof Location on the popular Apps
- Title: How to Fix Life360 Shows Wrong Location On Vivo Y56 5G? | Dr.fone
- Author: Ava
- Created at : 2024-08-01 23:23:44
- Updated at : 2024-08-02 23:23:44
- Link: https://fake-location.techidaily.com/how-to-fix-life360-shows-wrong-location-on-vivo-y56-5g-drfone-by-drfone-virtual-android/
- License: This work is licensed under CC BY-NC-SA 4.0.