
How to Share Location in Messenger On Realme C51? | Dr.fone
How to Share Location in Messenger On Realme C51?
We usually host a gathering once in a while and invite our friends to come over. Most of us are already used to organizing such activities because we’ve been doing that for a long time now. However, we cannot deny that it’s much easier nowadays than years ago. Why so? Simply because the communication channels available today at our disposal are more digital and more capable. For instance, Facebook Messenger now allows users to share their whereabouts in a snap of a finger. Yes. That feature is called Live Location.
The Live Location feature on Messenger works beyond sending the address or coordinates of your exact location. It basically visualizes your whereabouts by means of an interactive map and updates the details from time to time. That means the receiver can view not only your position but also your movements. Is that helpful? Absolutely yes. It’s indeed a game-changer in today’s already convenient world. Is it highly recommended? With proper handling and adequate caution, Messenger’s Live Location can definitely do more good than harm to the users.
In this article, we will delve into the highlights and benefits of Facebook Messenger’s location-sharing features. We will also provide some tutorials on how to share Live Location on Messenger. Continue reading below to learn more.

Part 1. Everything You Should Know About Messenger’s Live Location
Facebook is well aware that sharing location details is essential to its users. That’s why developers have come up with a brilliant idea and rolled out Live Location on Messenger. It basically works like other location-sharing features. However, Live Location provides more precise and thorough location information. It’s in map form, where you can view the exact location and track the movements of the sender. You’ll continue to see updates for as long as the sharing is not halted on the other end. To navigate it properly, try to read tutorials on how to share Live Location on Messenger.

What if you wish to send a particular address from another location? There is no problem with that. Messenger allows users to search for a specific place, trace it on the map, and share the details. The receiver can view it in map form and get directions if necessary. See? It’s very easy and convenient. No need to type in long addresses just to share a particular location with your friend. You just have to find it precisely on the map and send the information afterward.
Convenience is just one thing. Messenger’s location-sharing feature has a lot more to offer to users. One of which is the accuracy of the shared location information. Since the details are automatically generated through GPS, you can be sure that it is correct and definite. If you go out and track it down the neighborhood, you can certainly find the location in no time. Just make sure that the location services on your smartphone are activated so you can view your progress in real time. Also, stay vigilant while you’re out and keep yourself safe from any harm. Remember that safety remains a priority and comes above convenience.
How to Grant Facebook Messenger the Permission to Access Your Location?
Facebook Messenger’s location-sharing feature will not work without the necessary access. That’s why you should first configure the permission settings on your mobile device to avoid unwanted disruptions. Don’t worry. It’s indeed a piece of cake. Check out the tutorial provided below.
- 1: Go to Settings.
- Step 2: Click Apps.

- Step 3: Find and click Messenger.

- Step 4: Click Permissions.


- Step 5: Click Location.

- Step 6: Select Allow Only While Using the App. If you’re quite conservative regarding this matter, click Ask Every Time instead. After that, Facebook Messenger will have access to your location information.

 Easy GIF Animator is a powerful animated GIF editor and the top tool for creating animated pictures, banners, buttons and GIF videos. You get extensive animation editing features, animation effects, unmatched image quality and optimization for the web. No other GIF animation software matches our features and ease of use, that’s why Easy GIF Animator is so popular.
Part 2. How to Share My Location on Messenger?
How do I share my location on Messenger? As mentioned earlier, it’s very easy to use Facebook Messenger for location sharing. All it takes is just a few clicks on the platform. No need to manually type in the address or sketch the landmarks. Messenger does the rest of the work for you. In actuality, there are three ways to share your location on Messenger. Any of them can be of great help to you, depending on your current situation. Do you want to try them now? Check out the tutorials below.
Method 1: Share location on Facebook Messenger via Live Location
How to share my location on Messenger? Well, the first option you can try is through Live Location. It works best if you wish to tell somebody where exactly you are and give updates from time to time. Don’t worry. Although it looks complicated at a glance, in reality, it’s actually not rocket science. It only takes a few seconds to complete. Below is a tutorial on how to share Live Location on Messenger in easy steps.
- Step 1: Open the Facebook Messenger application on your mobile device.
- Step 2: Browse through your conversation feed and find the contact with whom you wish to share your Live Location. Click on it.
- Step 3: Click the More (+) icon at the bottom-left corner of the screen.

- Step 4: Right after, click Location.

- Step 5: Click Start Sharing Live Location. Immediately, your current location details will be available and forwarded to the intended receiver. Live Location lasts for 60 minutes at maximum. If you wish to terminate it, simply click Stop Sharing Live Location.

Method 2: Share location on Facebook Messenger via Pinned Location
Let’s say there is a specific place you want to visit with your friend. Is there a way to share the address of the venue without you being there at the moment? Fortunately, it is possible. Apart from sharing your current location in real-time via Live Location, you can also send pinned locations on Messenger. You just need to search for it and then redirect the details to your friend. Yes. It’s just as simple as that. Do you want to try it on your smartphone? If so, follow the guide below.
- Step 1: Launch the Facebook Messenger application on your mobile device.
- Step 2: Scroll through your conversations and find the receiver from the list. Click on it.
- Step 3: On the text field, click the More (+) icon at the bottom-left corner.
- Step 4: Then, click Location.
- Step 5: Locate the search bar above the interactive map and type in the location you want to share.

- Step 6: Choose one from the suggested results and then click on it. The details will then be forwarded immediately to the intended receiver.

Method 3: Share location on Facebook Messenger via Google Maps location
How do I share my location in Messenger if I cannot find it on the map provided? Yes. That happens sometimes. There are certain places that are untraceable on the messaging platform. As a result, it doesn’t appear on the map when you try to search for it. But don’t sweat it. If you experience the same issue, you can instead use Google Maps to share location details. How to do it? Check out the tutorial provided below.
- Step 1: Launch the Google Maps application on your mobile device.
- Step 2: Click on the Search bar at the top and then type in the location.


- Step 3: Choose one from the suggestions and then tap on it. Make sure that it is exactly what you’re looking for.

- Step 4: Access the menu bar below the map and then click Share.

- Step 5: From there, click Chats or the Facebook Messenger logo.
- Step 6: Find the receiver from the provided list and then click the Send button next to its name.

NOTE: Of course, you can only send pinned locations via Google Maps. The Facebook Messenger’s Live Location is available within the platform only.
BONUS TIP: Protect Your Privacy With Wondershare Dr.Fone
There’s no denying that the location-sharing feature of Facebook Messenger is useful to many of us. It always comes in very handy whenever we need to meet people somewhere or invite them to our places. However, we should not become too complacent and let our guard down. Sharing sensitive information like whereabouts always comes with risk, regardless of the platform and the intention. Therefore, make it a habit to protect your privacy at all costs. In this regard, Wondershare Dr.Fone has something special to offer. Its Virtual Location feature, capable of modifying and simulating your location records, can be of great help for you. Don’t worry. It’s very easy to use. Here’s a short guide for you.
- Step 1: Download Wondershare Dr.Fone from its official website. Right after, install it on your computer.
- Step 2: Launch the newly installed software on your desktop. Once it fully loads up, connect your smartphone using a data cable. Follow the on-screen instructions and perform the steps accordingly to ensure the connection between the two devices is stable enough to handle the succeeding operations.
- Step 3: Navigate to the left-side panel and then click Toolbox. On the main dashboard, click Virtual Location. Is it your first time using this feature? If so, allow Wondershare Dr.Fone to download additional resources. Don’t sweat it. It will only take a few minutes to complete.
- Step 4: Once the downloading process has concluded, Wondershare Dr.Fone - Virtual Location will automatically open on a separate window. From there, go to the top-right menu bar and then click Teleport Mode. It is the first icon that appears in the row.
 DEX 3 RE is Easy-To-Use DJ Mixing Software for MAC and Windows Designed for Today’s Versatile DJ.
Mix from your own library of music, iTunes or use the Pulselocker subsciprtion service for in-app access to over 44 million songs. Use with over 85 supported DJ controllers or mix with a keyboard and mouse.
DEX 3 RE is everything you need without the clutter - the perfect 2-deck mixing software solution for mobile DJs or hard-core hobbiests.
PCDJ DEX 3 RE (DJ Software for Win & MAC - Product Activation For 3 Machines)

- Step 5: Head over to the top-left corner and enter your desired location into the search bar. Choose one from the suggested results. After that, click the Enter icon.

- Step 6: The details regarding your chosen location will be displayed on the computer screen. Review the information and make sure that it is the specific location you’re looking for. Once confirmed, click Move Here to proceed.

- Step 7: Immediately, the location settings on your smartphone will be changed according to the inputs you have provided to Wondershare Dr.Fone. You can verify it by checking the current location registered on your Maps app. After confirming that your mobile device is now showing a different location, you can now start browsing without worrying about your location’s privacy.

NOTE: Resort to Wondershare Dr.Fone - Virtual Location if your internet browsing does not require you to provide your real address. If you wish to restore your original location settings, simply close the Wondershare Dr.Fone application and restart your smartphone.
Conclusion
Gone are the days when you had to write invitation cards manually and deliver them one by one. Nowadays, all you need to do is go online and use Messenger’s location-sharing feature. Have you already tried it? If not, you should take it into consideration and use it on your next agenda. Refer to the tutorial above on how to share Live Location on Messenger. It can certainly help you get started. How do I share my location on Messenger without physically being there? That’s simple. Use Messenger or Google Maps’s pinned location. Furthermore, download Wondershare Dr.Fone on your computer. Its Virtual Location feature, capable of modifying your location settings, can provide protection for your privacy. Just connect your Realme C51 to the computer and set it up from there.
All Must-Knows to Use Fake GPS GO Location Spoofer On Realme C51
It is highly risky to share sensitive information like location details on social media. Most social media access the location details when you perform any sort of activity on their platform. You would have given permission while installing the app for the first time on your phone. These details interest the criminals to commit the theft act at your place when you are on a vacation.
Do you know how to avoid such a situation? It is simple, try to trick the location details using Fake GPS Go Location Spoofer.
You can also make use of this app to spoof your location while playing location related games like Pokemon. This could give a chance to explore unique and more Pokemons around the globe. Those who make use of social media and play games online should know how to spoof location using an incredible app. Just scroll down to discover the techniques.


Part 1: About Fake GPS GO Location Spoofer
The Fake GPS Go Location Spoofer is the best app to trick the location details on the online space. This app implements the strategy promptly to acquire flawless results. The basic idea behind the fake GPS concept is that a false coordinates with respect to the Realme C51 device on the space recorded to the cyber grounds hiding the original location details.
The method adopted to embed this strategy varies with one app to another. The Fake GPS Go Location Spoofer handles this concept wisely and offers a simple procedure to achieve this task.
Features of Fake GPS Go Location Spoofer
- Exclusively designed for the Android Versions
- No need for Root mode
- The update version is available every now and then on the internet
- Fewer steps to complete this process
- No prior technical skills are necessary to understand the procedure
- Spoofing occurs just by a single tap on the app
- Awesome user interface
- Consistent introduction of app updates with solved bugs based on the feedback from the users
- Quick response to the user’s feedback from the team of Fake GPS Go Location Spoofer app
- Great customer service

Part 2: Fake GPS GO Location Spoofer: the For and Against voices
The FOR Voices on Fake GPS GO Location Spoofer
This app is helpful while playing games related to location. You can mock your friends and family for fun with the help of Fake GPS Go Location Spoofer app. Due to its versatile design, there are many ‘For Voices’ on the internet. The persuasive feature of this app attracts users from all age groups.
Voices of the Happy Users
- Precise location spoofing without any flaws
- Excellent tutorials to guide the novice users
- Free from unwanted advertisements
- Restores to the original location when required
- Outstanding compatibility with all versions of Android devices
- Ease Installation and setup process
- Flexible and customizable
The Against Voices on Fake GPS GO Location Spoofer
There exist disappointed users struggling to understand this app. The user’s face issues only if they were not able to follow the instructions promptly provided by the development team of Fake GPS Go Location Spoofer.
Voices of the disappointed users
- Some of the users struggle to work on this app considering it as a technical software
- Confused with the updates
- The updated versions were not appreciable
- It doesn’t work well with the Pokemon Go game
- This app download from Google Play store is not reliable


Part 3: How to use Fake GPS GO Location Spoofer on your Android
Step 1: Go to the Google Play Store and type ‘Fake GPS Go Location Spoofer’ on the search box in your Realme C51 to download this app.

Step 2: Soon after the successful download tap ‘Open’ button.
Step 3: Allow the app to access the Realme C51 device’s location

Step 4: Accept the Advertising terms to proceed

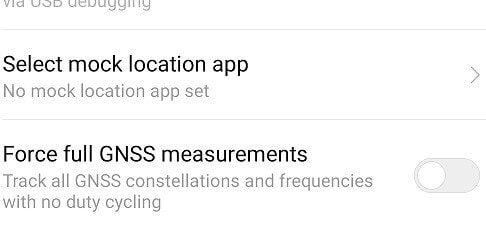
Step 5: Next, you have to enable the ‘Mock Location’ option in the ‘Developer Option’ window. To do that you must go to ‘Settings-> Software info -> Built Number’. Tap the ‘Built Number’ few times based on the model of your Realme C51 to unlock into the ‘Developer option’. In the ‘Developer Option’, choose ‘Select mock location app’.
 OtsAV DJ Pro
Step 6: inside the ‘Select mock location app’, you have to click the ‘FakeGPS Free’ to enable the mock location feature

Step 7: Now go to the ‘Fake GPS Go Location’ app and select your favourite spot on the map. Then press the ‘Play’ button. Select ‘Without Ads’ option to implement the changes accordingly.


Step 8: Finally, you have changed the default current location in your device using the Fake GPS Go Location Spoofer app successfully.


Step 9: Close this app and open the Google Map to check your current location you will be surprised to view the placeholder stays on your favourite spot thereby mocking the original location.

Part 4: Any other better alternative to Fake GPS GO
In this section, you will learn about the alternative tool to Fake GPS Go. The name of the alternative app is ‘Fake GPS Location’. It is a new app released this year 2019 to serve the users in a better way. You can download this software at Google play store without any issues.
Step 1: Check-in to play store and type ‘Fake GPS Location’ in the search bar. Tap the ‘Install’ button to trigger the downloading process.

Step 2: Open the app after the download process
 SwifDoo PDF 2-Year Plan
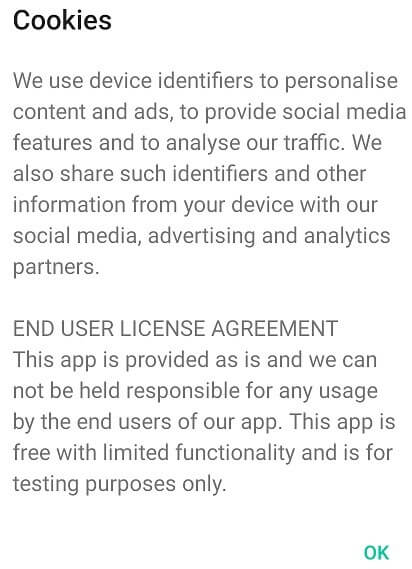
Step 3: Allow the app to access the Realme C51 device location and accept the ‘Cookies’ to work on this platform
Step 4: Now, you must enable the ‘Mock Location’ option through the settings. To do so click the ‘Settings’ then ‘Additional Settings’ finally hit the ‘Developer option’. Tap ‘Select Mock Location’ and choose ‘Fake GPS Pro’ from the displayed list. Now switch on to the app to proceed further.


Step 5: To implement the fake location you must select the desired place on the map and tap the ‘Play’ button. It will lead to another screen requesting for permission.

Step 6: Enable the settings and grant permission to fake the location on your device

Step 7: At last, the fake location is marked on your device using this app. Your device will show up this new location irrespective of your current place.

Now you had a clear picture of the ‘Fake GPS Location’ app in a detailed manner. It is enough if you follow the steps carefully to mark the fake location in no time.
 Allavsoft Batch Download Online Videos, Music Offline to MP4, MP3, MOV, etc format
Conclusion
There are many apps related to fake GPS on the internet space and spotting the right app is quite challenging. This article has given great guidance to choose the perfect tool to meet all the requirements precisely without regrets. The procedure is very simple and you can work on it by tapping the options accordingly.
Make use of the ‘Fake GPS Go Location Spoofer’ app to protect your live location details. With the help of this app, you can surf through any social media and play online games without any fear. Conceal the location information and increase your privacy through innovative products at the Google play store.
Part 5: Fake GPS GO has no app for iPhone? What to do?
Tricking the location by Fake GPS Go location spoofer can come in handy under many situations. However, when it comes to iOS devices, the users may get annoyed as the app has no iOS version. Therefore, you should be thankful to Dr.Fone – Virtual Location (iOS) that helps you serve the purpose without any Fake GPS Go apk. The tool is designed by Wondershare and never disappoints users for faking location. Let us know how you can pretend to be somewhere in an iOS device sans Fake GPS Go.
Mode 1: Teleport Anywhere
Step 1: To work with this Fake GPS Go’s alternative, install and launch it on PC. Click “Virtual Location” tab on the main screen.

Step 2: Take your iOS device and establish connection between PC and device. Hit on “Get Started” button now.

Step 3: You will notice your current location on the map. If not, hit the “Center On” located at the lower right on the screen.
 Any DRM Removal for Win:Remove DRM from Adobe, Kindle, Sony eReader, Kobo, etc, read your ebooks anywhere.
Step 4: Choose the third icon on the upper right part of the screen from the three given icons. This is “teleport mode”. Enter the name of the location where you need to teleport and click “Go”.

Step 5: Then entered place will be recognized by the program and you need to click “Move Here” option in the pop-up dialogue.
Step 6: The location will be changed successfully. You can now see on the map or in the location based app in iPhone, the spot will be seen as the same you selected.
Part 2: Movement Simulation Between two Places
Step 1: Launch the tool and look for the first icon at the upper right screen which is “one-stop route”. Choose the place you want to travel on the map. You will know the distance in the pop-up box.
Step 2: The slider located below the screen needs to be dragged to set the speed of travelling. You can choose cycling speed or the speed you want. Hit on “Move Here” afterwards.

Step 3: Next, key in a number that will define the number of times you want to travel the route back and forth. Hit “March” option.

Step 4: Now, the position will be seen moving as per the chosen speed on the map. And this is how you can fake the movement sans Fake GPS Go apk.

Part 3: Simulate Route Movement for Multiple Locations
Step 1: For multiple spots, you need to click the “multi-stop route” after entering map interface. This mode is the second icon on the upper right side. Now, select the multiple places one by one where you want to pass.
Step 2: The pop-up will show the distance where you need to hit the “Move Here” button. Choose the moving speed.

Step 3: Enter a digit for how many times you want to take route and click “March”. This will begin the movement simulation.


Dr.Fone - Virtual Location
1-Click Location Changer for both iOS and Android
- Teleport from one location to another across the world from the comfort of your home.
- With just a few selections on your computer, you can make members of your circle believe you’re anywhere you want.
- Stimulate and imitate movement and set the speed and stops you take along the way.
- Compatible with both iOS and Android systems.
- Work with location-based apps, like Pokemon Go , Snapchat , Instagram , Facebook , etc.
3981454 people have downloaded it
How to Change Spotify Location After Moving to Another Country On Realme C51
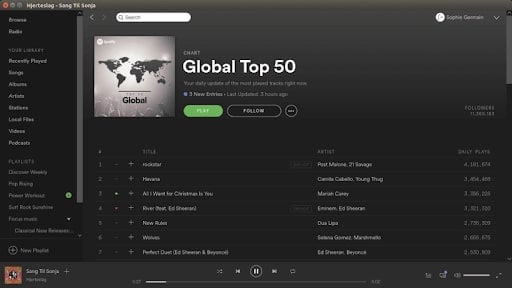
Spotify is one of the best apps to access quality music and podcasts. Be it in your car while you commute from the workplace to home or simply when you are home with your latte, the music is made for every mood. Spotify is easy to use, you can make your own playlist and you have access to a lot of musical content.

But this depends on the country you are staying in. And if you’ve recently shifted your base, it can be tricky to change spotify region. But if you opt for the manual methods, it is a breeze to update location spotify. We will teach you how that is done effectively using different resources available to you.
## **Part 1: Reasons for changing Location on Spotify**But why to Change Location Spotify in the first place? Is it important to change your location if you are changing countries? Will that affect the music on the streaming app? Yes! It certainly will. Before we discuss the different ways to change country on spotify, let us understand why we should do it at all.
Region specific Content
Everything is not available everywhere. If you are looking for a specific motivational podcast that is a hit in the US, it might not be available in your region. You like that new Arabic song, maybe it won’t stream in your Australian lanes. The content can be restricted to a specific region and if you don’t stay there, it is far away from your reach. You have to rely on Spotify Change Location to access that musical content.
Playlists and Recommendations
Spotify uses your coordinates to provide the right music content for you. There are people who jump up and down and say that the app suggests songs that are their absolute favorite! As if it has read their minds. This is possible because Spotify identifies the most played songs in the region, detects the language and delivers these suggestions to you.
So, the content that you receive depends on the place that you are staying in.
Payment Plans
The Spotify premium account provides more benefits than the normal free version that people use. But what many of us are not aware of is that the premium version’s cost differs from place to place. If you can manage a spotify location update, you can save yourself some bucks.
Spotify Unavailable


Spotify did gain a lot of popularity in a very short period of time. People are making money, uploading their own content and even exploring newer genres of music. However, Spotify is not available world-wide. Currently, it is only accessible from 65 countries. If you hail from a region where Spotify hasn’t launched yet, you need to update spotify location to a place where it is fully functional.
Part 2: How To Edit Your Country on Spotify?
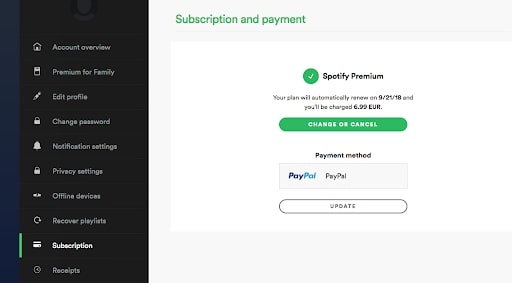
You can change region spotify manually by directly tweaking a few settings in the Account Overview section. If you are using a Free Spotify account, then you will have to manually change your location. But a person who has a Premium Spotify account can access all the content from all those countries where spotify is legally available. Here’s how you can change the location using the Spotify settings -
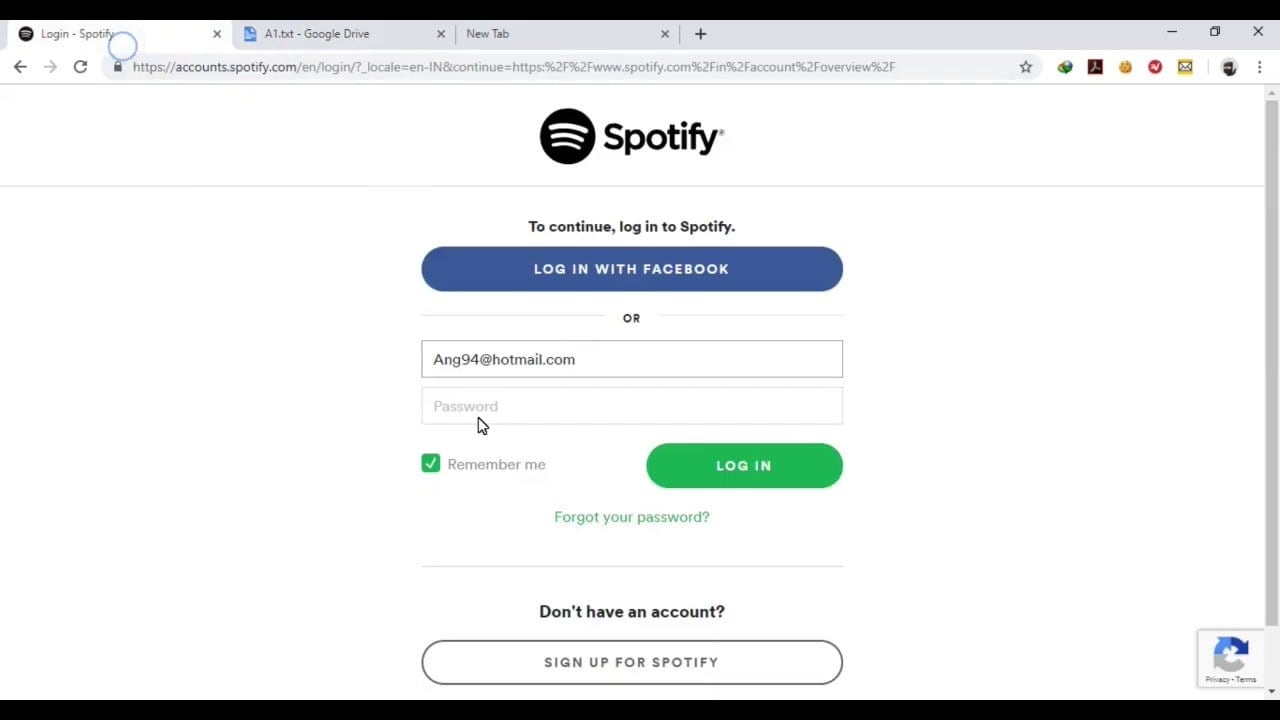
Step 1: Go to the Spotify Homepage on your desktop and Log into your account. This is how you do it if you happen to have a free account. Premium accounts don’t need it. After you Log in, go to the ‘Accounts’ section.
Step 2: From the sidebar, go to the ‘Account Overview’ option. When you click on it, you will find the ‘Edit Profile’ option on the screen. Go for it.
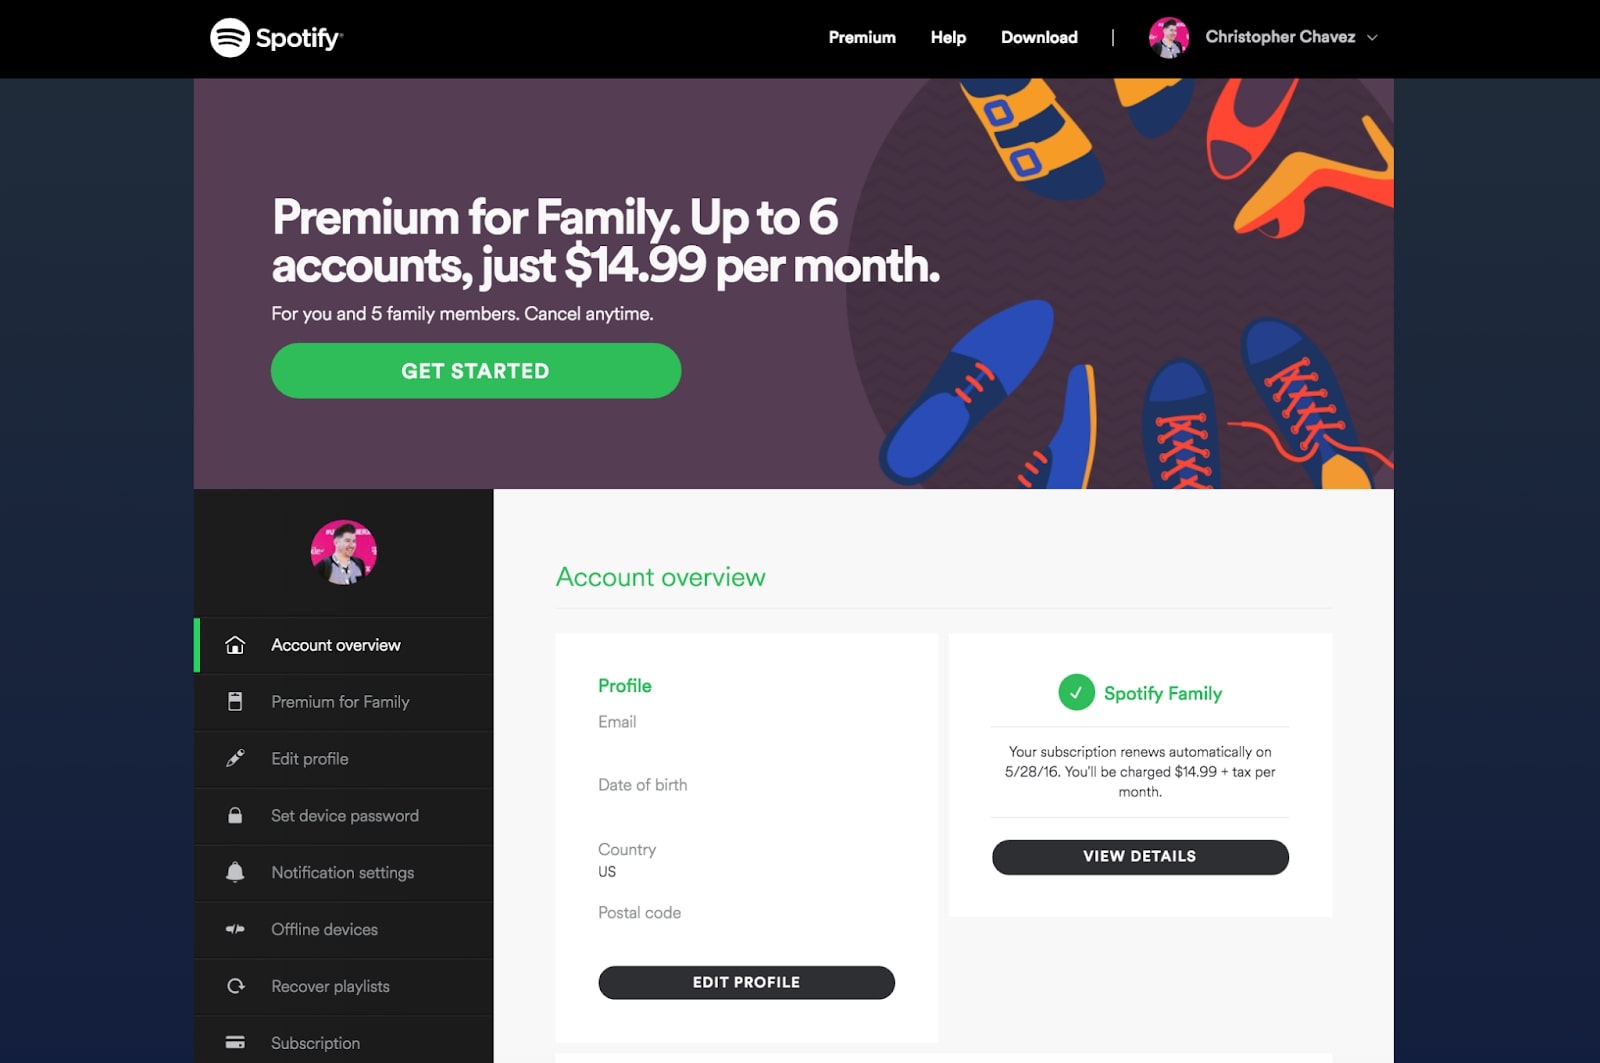
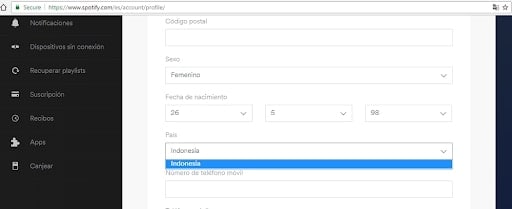
Step 3: Once you click on theEdit Profile option, there will be several categories that display your personal information. If you scroll down, you will find the ‘Country’ Option. Select the country of your choice there.

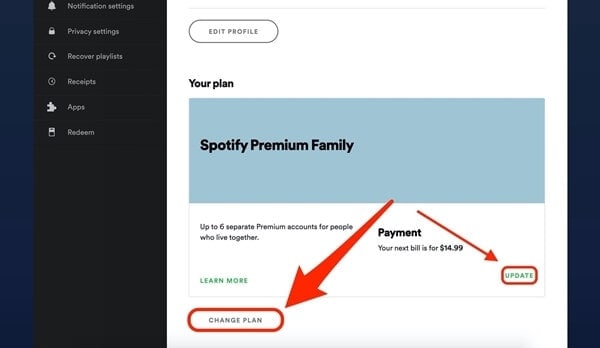
If you are a Spotify Free user, then you will have to go by the above mentioned method. But if you are a Spotify premium user, you don’t need to change location to access content. However, you can change it to update the Payment plans.
Step 4 (Premium): In the same Account Overview option, you can either ‘Update’ your new location and spotify works accordingly. Otherwise, you can completely Change your Plan as well.
Part 3: How to Use Apps to Fake Spotify Location?
Now you know that by Spotify Change Country, you can get more benefits and you can enjoy podcasts, music and other audio content that is otherwise unavailable in your region. So, it is understandable that you’d want to deliberately fake spotify location. This is possible when you use some of the best Location Spoofer softwares available on the internet. Our best suggestion would be Wondershare’s Dr.Fone. It is easy to use and your location will be changed within a few minutes in minimal steps.
Step 1: You need to download the executive file of the WondershareDr. Fone’s Virtual Location Spoofer. The android and even Windows compatible files are available on the website. Choose appropriately and download - and launch them.
Step 2: Once you launch the application, the homepage will open and several options will display on the screen. Choose the Virtual Location option that is usually at the end of the page.

Step 3: To Change Location on Spotify Mobile, connect your Realme C51 to your computer - both Android and iPhones can detect the virtual location change. Then click on Get Started.
Step 4: A map will appear on the screen. You can change the pi to a new location or you can enter the new location into the search box displayed on top of the page. You can do this by going to the ‘Teleport Mode’ on the top right corner of the page.
Step 5: Once you are sure about the new virtual location, click on ‘Move Here’ option.
The New Location will now display on your iPhone/Android Device’s GPS system too. And Spotify will reflect it too. So, when you decide to change location on spotify using this method, the new location will reflect in all your apps. So, it’s hard to figure out that you’ve deliberately changed the location.
Part 4: How to Use a VPN to change Spotify Location?
A Virtual Private Network App is also very useful for the Spotify change Region. But you need to keep two important points in mind - The Trial Versions do not provide complete protection and the features aren’t satisfactory. If you go for free VPNs available on the internet, you cannot be 100% sure that your data is safe. So, we have narrowed down the safest option for you. We suggest that you use Nord VPN if you cannot get your hands on a Location Spoofer.
Location Spoofers are much safer because they don’t maintain Log data like the VPNs. But if you have no other option left for Spotify update Location, then you can rely on NordVPN.
Step 1: Go to the AppStore or Google Play Store and choose NordVPN from the different VPN options available.
 PearlMountain Image Converter
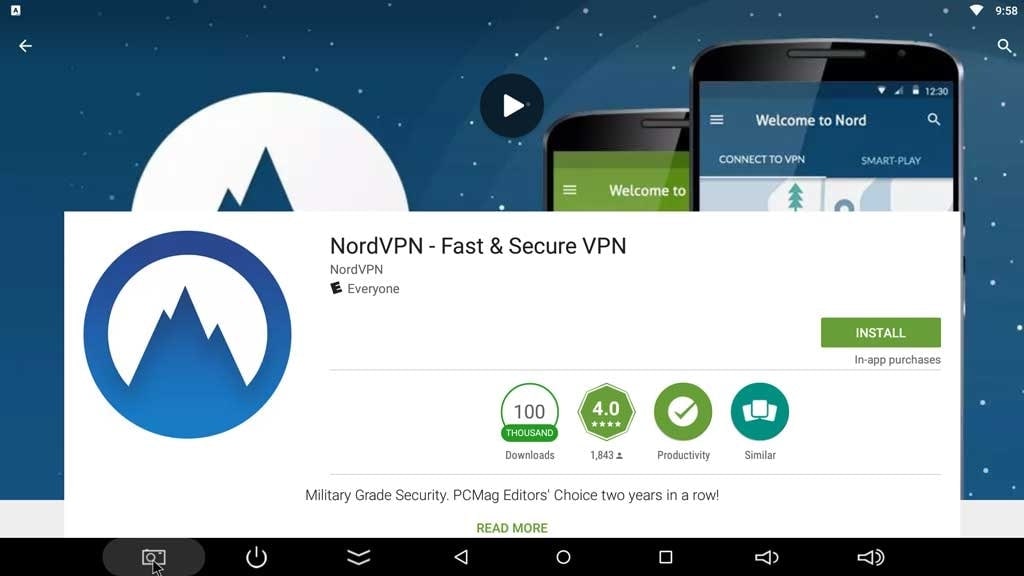
Step 2: Sign Up and create your account on the app. The main use of a VPN is to mask your IP and give you a new server for internet surfing. So, once you log in, NordVPN will find the closest server for you.
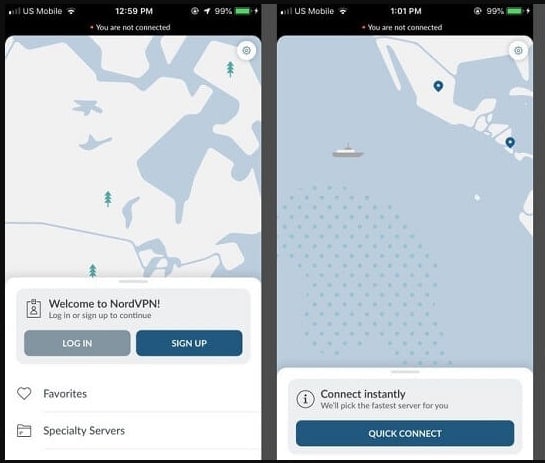
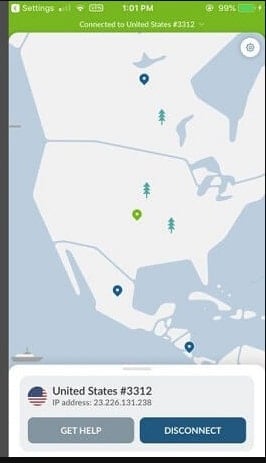
The automatic connect was made to United States - the closest server
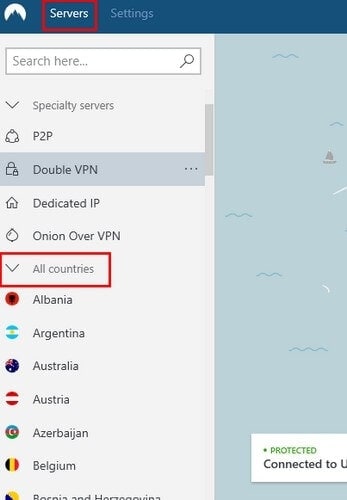
Step 3: In case you want to change to a specific country, You can go to ‘More Options’ and then choose Servers. Then go to All Countries and choose the country of your choice. Once you launch Spotify, the same will reflect there too.
The VPN works for all kinds of mobiles and it is very convenient to use. This is a good way to mask your IP address completely, so that no one can track your location change activity either. You can change servers several times a day to access content from across the world.
Conclusion
If you know the right way to do it, changing Spotify Location After Moving to Another Country is no big deal. You have several tools that will assist you in the job. Unless you are faking your location, you can change location directly from Spotify Account Overview too. But if you want to Change Location in Spotify for more benefits, then you can use the tools we have mentioned to get the job done. You can cut down the premium payment prices, listen to exotic music from across the world and also stay up to date with the podcast releases too.
- Title: How to Share Location in Messenger On Realme C51? | Dr.fone
- Author: Ava
- Created at : 2024-08-01 23:42:38
- Updated at : 2024-08-02 23:42:38
- Link: https://fake-location.techidaily.com/how-to-share-location-in-messenger-on-realme-c51-drfone-by-drfone-virtual-android/
- License: This work is licensed under CC BY-NC-SA 4.0.