
How To Simulate GPS Movement With Location Spoofer On OnePlus 12R? | Dr.fone
How To Simulate GPS Movement With Location Spoofer On OnePlus 12R?
When you are playing location-based games like Pokemon Go, you might need to simulate GPS movement to catch more Pokemon. To do this, you can use the GPS movement feature of Wondershare Dr.Fone - Virtual Location . This feature allows you to simulate GPS movement between two or multiple spots on the map. Here’s how you can do it:
Part 1: Simulate Movement Along a Route (One-Stop Route)
You can set up a one-stop route when mocking locations fake with Dr.Fone - Virtual Location. This particular feature helps users to set up looping or round trips within a specific location. To perform the steps for simulating movement, look ahead for a better understanding:
Step 1Access One-Stop Route Function
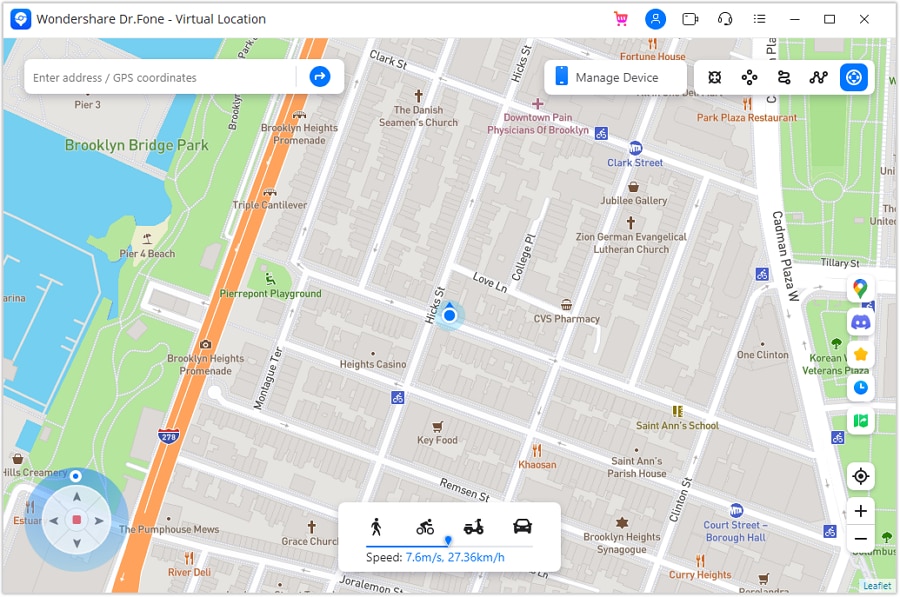
Once you launch Wondershare Dr.Fone - Virtual Location and connect your smartphone successfully, proceed to select the One-Stop Route function from the top-right section. The function is represented by the third icon from the left in the section. While you have already teleported to another location or are using your current location, you can tap anywhere on the map to set your destination location.

Step 2Define Simulation Parameters
Enter a number to define how many times you want to go back and forth, and select whether you want a Round trip or a Loop trip. Drag the slider on the speed option to set how fast you want to walk. Proceed to click Move Here on the bottom to start the movement simulation.

Step 3Start Simulation Movement
The respective simulation starts, and you can see your position is moving on the map with the speed you set. If you wish to hold the simulation, click Pause or tap Clear to revert to your original state.

Part 2: Simulate Movement Along a Route (Multi-Stop Route)
You can try the multi-stop mode if you want to pass by multiple places along a route on the map. Learn how it is done when you are trying to **spoof location on Android/**iOS:
Step 1Start Multi-Stop Route and Set Parameters
Activate the Multi-Stop Route mode from the top-right section next to the One-Stop Route mode. After activating the mode, set multiple spots on the map by clicking your required place. Define the number of trips and speed. Click Start Moving to initiate the process.
Note: Select the spots along a specific road to prevent the game developer from thinking you are cheating.

Step 2View Multi-Stop Route Movement
As the simulation starts, click Pause at any instance where you want to stop the simulation. You can also Clear all settings if required.

Part 3: Use Joystick for More Flexible GPS Control (Joystick Movement)
Dr.Fone has integrated the joystick feature into the Virtual Location program to spare 90% of the labor for GPS control. You can always find the joystick on the lower left part in teleport mode. And you can also click the joystick button in the upper right (the 5th one) to use the joystick feature.
The joystick, like one-stop route or multi-stop route modes, aims to facilitate GPS movement on the map. But what’s better? The joystick lets you move on the map by changing directions in real time. Here are the two main scenes where you will definitely love the joystick.
- Automatic GPS movement: Click the Start button in the middle, and the automatic movement starts. Then just change the directions as you like by 1) clicking the left or right arrows, 2) dragging the spot around the circle, 3) pressing keys A and D on the keyboard, or 4) pressing keys Left and Right on the keyboard.
- Manual GPS movement: Move forward by constantly clicking the Up arrow in the program and long-pressing the key W or Up on the keyboard. Reverse by constantly clicking the Down arrow, or long-pressing the key S or Down on the keyboard. You can also tweak the directions using the four ways above before moving forward or reverse.
How to Find iSpoofer Pro Activation Key On OnePlus 12R?
There are specific situations where it is necessary to fake your GPS location. By spoofing locations, you can teleport to anywhere in the world, hide your true location to prevent others from tracking you, have access to content that is restricted in your current location, and so on. Spoofing locations is also conducive in location-based games such as Pokémon GO.
There are specific applications that allow you to spoof the location of your device. However, there are no such apps for iPhones as Apple does not allow GPS spoofing apps in the App store. To change the location of your iPhone, you can connect it to your PC and use a spoofing application there to change its location. We are going to talk about iSpoofer, a professional location spoofing application; 3 ways to get the iSpoofer Pro Plan License Key for free; Wondershare Dr.Fone - Virtual Location (iOS), a better alternative to iSpoofer; and the steps to spoof your iPhone GPS location using Wondershare Dr.Fone - Virtual Location (iOS).
Part 1: Ways to Get the iSpoofer Pro Plane License Key Free 2022
iSpoofer is a professional GPS simulation desktop application that can be used to spoof the GPS location of an iOS device. It runs on Windows and Mac computers. To change the GPS location of your iOS device, you have to install and run this application on your PC, connect your iOS device to your PC, and then spoof its location by using the application on your PC.
iSpoofer has a free version and 2 subscription plans - Pro plan and Volume plan. For unlimited spoofing, you can use the Pro plan of iSpoofer, which is available at $4.95 per month. With this plan, you can change the location of up to 3 iOS devices at once. To activate iSpoofer Pro on your PC, you will have to enter a license key sent to you via email after you pay for its subscription. However, there are a few tricks with which you can get this license key without subscribing and activate iSpoofer Pro and use it for free. Below, we have mentioned 3 ways to get a free iSpoofer Pro Plan License Key.
- Check on Community Days: The game Pokémon GO sometimes offers free iSpoofer Pro PlanLicense Keys on Community Days. Community Day is a worldwide special event in Pokémon GO that occurs every month for a few hours. Various kinds of special bonuses and rewards are offered on Community Days. Among these offers, a free iSpoofer Pro Plan License Key might be available on a particular Community Day. Make assured you do not miss this offer because the key will be available only for a few hours before it gets expired.

- Check out websites: Certain websites throughout the internet occasionally offer free iSpoofer Pro Plan License Keys. Try to check them out from time to time, and someday you might be lucky to get a free iSpoofer Pro Plan License Key. One of such websites is http://www.spoofer.pro/.

- Subscribe to YouTube channels: Another way to get a free iSpoofer Pro PlanLicense Key is to subscribe to YouTube channels that offer giveaways of these license keys. There are specific YouTube channels that offer free iSpoofer Pro Plan License Keys to their lucky subscribers. Make sure you subscribe to such channels and keep checking their videos, especially around giveaway times, to see if you are the lucky subscriber to win the giveaway.

Part 2: The safer way to Spoof on iPhone
A much better and safer way to spoof your iPhone location is to do it using Wondershare Dr.Fone - Virtual Location (iOS). It is a desktop application that can be used to instantly fake the GPS location of your iOS device with just a click of your mouse. It is compatible with both Windows and Mac computers. You can use this fantastic application to safely change your GPS location on several applications, including WhatsApp, Snapchat, Tinder, and Pokémon GO. It allows you to change the location of up to 5 iOS devices at once.
Key features:
- It comes with an integrated joystick feature for controlling GPS movement.
- GPS movement can also be controlled with a keyboard.
- Offers 3 modes - teleport your location, simulate movement between two spots, and simulate movement along a specified route.
- Offers; both automatic and manual GPS movements.
- Compatible with Windows XP and above, and Mac OS X 10.13 and above.
- Requires a minimum RAM of 256 MB and a minimum free hard disk space of 200 MB.
Steps to spoof your iPhone location using Wondershare Dr.Fone - Virtual Location (iOS):
- Download and install Wondershare Dr.Fone - Virtual Location (iOS) on your Windows or Mac PC. Launch the application.
- Once the application is launched, a window will appear with a variety of options. Click “Virtual Location” from those options.

- Connect your iPhone to your PC. via USB cord. Once your device is connected successfully, click on the “Get Started” button.

- A new window will appear where the actual GPS location of your iPhone will be shown. If it is not accurately displayed, click on the “Center On” icon in the lower right part of the window to show the accurate location.

- Click on the “teleport mode” icon in the upper-right part of the window (the 3rd one from the right). This will activate “teleport mode”.
- In the search bar in the upper left part of the window, enter the name of the desired location where you wish to teleport. Then click “Go”.

- A popup box will appear. Click “Move Here”.

- With that, the GPS location of your iPhone has been successfully changed and fixed. You can check it by clicking on the “Center On” icon or checking your iPhone’s location. Also, the location of the location-based app; you are currently using on your iPhone has been successfully changed too.

Conclusion
So, that was all about the article. We have discussed 3 simple tricks to get a free iSpoofer Pro Plan License Key. Then, compared with iSpoofer Pro which allows you to change the location of up to 3 iOS devices at once, Wondershare Dr.Fone - Virtual Location (iOS) allows you to change the location up to 5 iOS devices at once. Compared with iSpoofer Pro, it is safer and easier to use and comes with more features.
How To Use Special Features - Virtual Location On OnePlus 12R?
Wondershare Dr.Fone - Virtual Location comes with multiple unique features that can be used to enhance the flow of spoofing location. With all these amazing features, you can easily change your iOS location without blinking an eye. Rather than making things complicated, Dr.Fone makes it easy for you to manage operations when you perform actions like changing Android locations.
Part 1: Circle Route (For Multi-Stop Route)
The circle route feature is under the multi-stop route mode. When your starting point is close to the ending point, a pop-up asks if you want to set up a circle route. Click Yes to create a circular path on the map.

Part 2: Realistic Mode (For One-Stop Route and Multi-Stop Route)
This particular feature makes the simulation look realistic with the ability to fluctuate the speed of the simulation. If you wish to turn on realistic mode for the one-stop or multi-stop route, look for the respective checkmark option in the panel on the left.

Part 3: Fluctuation Mode (For Teleport Mode)
Whenever you are teleporting your smartphone device to another location, you can try using the fluctuation mode feature offered against it. As you activate Teleport Mode from the top-right section and search for a location, you will discover the Fluctuation Mode toggle in the confirmation tab. Turn on the toggle to slightly switch the location from the selected point to show realistic motion.

Part 4: Cooldown Timer (For Teleport Mode and Jump Teleport Mode)
While teleporting the location of your smartphone to different places for playing games like Pokemon Go, you are bound to activate a cooldown timer within your location-changing app to show realistic movement. By locating the Cooldown Timer on the right pane of icons, activate it, and this feature will automatically calculate the cooling time by measuring the distance between your destination and the starting point.

It is recommended not to start the movement until the cooldown time is completed to avoid unnecessary bans. Moreover, you can also activate the Auto jump after cooldown in the Jump teleport mode after turning on the Cooldown Timer.
This option will automatically jump you to the next destination once the timer ends. It is helpful for games like Pokemon Go, where the game servers can detect frequent jumps with no cooldown time.
Part 5: Import/Export GPX File
You can also import and export specific navigated locations from Dr.Fone in the form of GPX files. While you can export GPX files for keeping a record of your location, you can also import such files for inserting specific locations to simulate or teleport to. Find out how you can import and export GPX files with this location-changing application:
Step 1Export the GPX File
If you have defined a proper location to simulate at a particular instant using Dr.Fone - Virtual Location, you can have this location exported by clicking the Export icon on the top of the left panel. This will open a window where you can set the location for saving the GPX file.

Step 2Import a GPX File
For importing a GPX file on the platform, click the Import button on the right pane. As this opens a window, select the GPX file you wish to import to the platform.

Step 3Wait for the File to be Read
Wait for a moment until Dr.Fone - Virtual Location recognizes the specific locations within the GPX file and displays them on the map.

Part 6: Historical Records
If you want to use a similar track record on your smartphone again, you can access the historical records saved on the platform for easy access.
Step 1Open Historical Records
Click the Historical Records button on the right pane to access the entire history involving the connected smartphone and the location spoofing platform.

Step 2Access Any Location from the History
Select the Go button adjacent to any particular historical record to re-launch a similar simulation for the OnePlus 12R device. You can also click Clear All to delete all historical records.

Part 7: Favorite List
You can also set up favorite locations within the platform to define quick accessibility to your favorite locations. To do that, you have to follow the guidelines shown next:
Step 1Favorite Specific Locations
While setting up locations in Jump Teleport Mode, One-Stop Route, or Multi-Stop Route, you can tap on the Favorite icon adjacent to every marked location or favorite an entire route with the Favorite icon on the top of the left panel.

Step 2Access your Favorite Section
To look for your favorite locations, look for the Favorite icon on the right pane to open a list containing all locations you have marked. You can choose the Move option to automatically move into a particular location in no time.

Also read:
- [Updated] In 2024, Quick Guide Initiating & Managing Android Zoom Calls
- 2024 Approved Extensive Look at DJI's Inspire 1 Drone
- A Closer Look at the Metaverse 6 Deep-Dive Examples Reviewed
- How Can I Use a Fake GPS Without Mock Location On Apple iPhone 12? | Dr.fone
- How to Change your Oppo Find X7 Location on Twitter | Dr.fone
- How To Fake GPS On Apple iPhone 14 For Mobile Legends? | Dr.fone
- In 2024, Solved How To Transfer From Apple iPhone 14 Pro Max to iPhone 15 | Dr.fone
- Prevent Cross-Site Tracking on Lava Blaze Pro 5G and Browser | Dr.fone
- Transforming iMovie Projects Into YouTube Shows
- WD My Cloud 儲存空間驗收技術解析 - 四大復原模式
- Which is the Best Fake GPS Joystick App On Itel P40? | Dr.fone
- Title: How To Simulate GPS Movement With Location Spoofer On OnePlus 12R? | Dr.fone
- Author: Ava
- Created at : 2025-02-17 16:29:57
- Updated at : 2025-02-18 17:03:19
- Link: https://fake-location.techidaily.com/how-to-simulate-gps-movement-with-location-spoofer-on-oneplus-12r-drfone-by-drfone-virtual-android/
- License: This work is licensed under CC BY-NC-SA 4.0.