
How To Simulate GPS Movement With Location Spoofer On Vivo Y28 5G? | Dr.fone
How To Simulate GPS Movement With Location Spoofer On Vivo Y28 5G?
When you are playing location-based games like Pokemon Go, you might need to simulate GPS movement to catch more Pokemon. To do this, you can use the GPS movement feature of Wondershare Dr.Fone - Virtual Location . This feature allows you to simulate GPS movement between two or multiple spots on the map. Here’s how you can do it:
Part 1: Simulate Movement Along a Route (One-Stop Route)
You can set up a one-stop route when mocking locations fake with Dr.Fone - Virtual Location. This particular feature helps users to set up looping or round trips within a specific location. To perform the steps for simulating movement, look ahead for a better understanding:
Step 1Access One-Stop Route Function
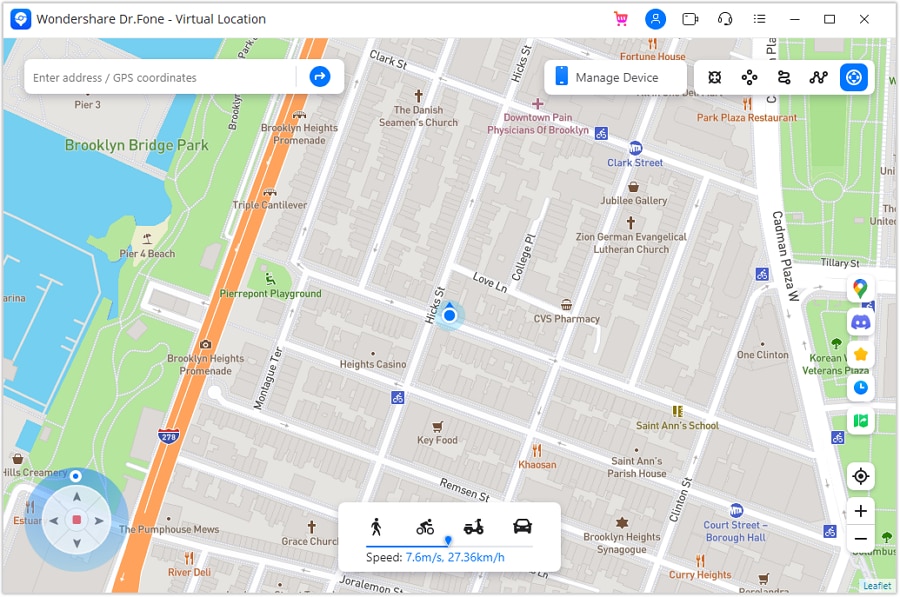
Once you launch Wondershare Dr.Fone - Virtual Location and connect your smartphone successfully, proceed to select the One-Stop Route function from the top-right section. The function is represented by the third icon from the left in the section. While you have already teleported to another location or are using your current location, you can tap anywhere on the map to set your destination location.

Step 2Define Simulation Parameters
Enter a number to define how many times you want to go back and forth, and select whether you want a Round trip or a Loop trip. Drag the slider on the speed option to set how fast you want to walk. Proceed to click Move Here on the bottom to start the movement simulation.

Step 3Start Simulation Movement
The respective simulation starts, and you can see your position is moving on the map with the speed you set. If you wish to hold the simulation, click Pause or tap Clear to revert to your original state.

Part 2: Simulate Movement Along a Route (Multi-Stop Route)
You can try the multi-stop mode if you want to pass by multiple places along a route on the map. Learn how it is done when you are trying to **spoof location on Android/**iOS:
Step 1Start Multi-Stop Route and Set Parameters
Activate the Multi-Stop Route mode from the top-right section next to the One-Stop Route mode. After activating the mode, set multiple spots on the map by clicking your required place. Define the number of trips and speed. Click Start Moving to initiate the process.
Note: Select the spots along a specific road to prevent the game developer from thinking you are cheating.

Step 2View Multi-Stop Route Movement
As the simulation starts, click Pause at any instance where you want to stop the simulation. You can also Clear all settings if required.

Part 3: Use Joystick for More Flexible GPS Control (Joystick Movement)
Dr.Fone has integrated the joystick feature into the Virtual Location program to spare 90% of the labor for GPS control. You can always find the joystick on the lower left part in teleport mode. And you can also click the joystick button in the upper right (the 5th one) to use the joystick feature.
The joystick, like one-stop route or multi-stop route modes, aims to facilitate GPS movement on the map. But what’s better? The joystick lets you move on the map by changing directions in real time. Here are the two main scenes where you will definitely love the joystick.
- Automatic GPS movement: Click the Start button in the middle, and the automatic movement starts. Then just change the directions as you like by 1) clicking the left or right arrows, 2) dragging the spot around the circle, 3) pressing keys A and D on the keyboard, or 4) pressing keys Left and Right on the keyboard.
- Manual GPS movement: Move forward by constantly clicking the Up arrow in the program and long-pressing the key W or Up on the keyboard. Reverse by constantly clicking the Down arrow, or long-pressing the key S or Down on the keyboard. You can also tweak the directions using the four ways above before moving forward or reverse.
How to Fix Vivo Y28 5G Find My Friends No Location Found?

In this time of modern technology, it is hard to be away from your phone or even leave it at home. When any task that we plan to do, usually already have an application released for the sole purpose of doing that task and needing to do it on your phone. When we message our friends, have a video call with our family, or just simply order food to eat at home, you can do all of them on the Vivo Y28 5G device in your palm.
Another advantage of having our phones with us all the time is that you can also see the current location of either your friend or family. For Apple phone users, they have an app that is called “Find My Friends” that will show you the locations of the people that you are tracking. But what if you cannot find the location of the friend? We will find out the causes as to why no location can be found and how you can fix this in just a few simple steps.
Part 1: Why does an Vivo Y28 5G say “no location found”?
When you are searching for your friend’s current location and it shows that “no location found”, there could be numerous reasons as to why that is happening. We have listed down the possible reasons why there is no location found.
Option #1: Your friend has not signed in to the “Find My Friends” application. Make sure that they are registered in the application before tracking their location.
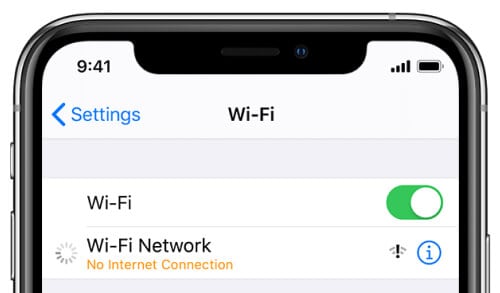
Option #2: The other person’s mobile is not connected to the internet or their phone is off. This could also be another common reason why you cannot see their location.
Option #3: Make sure that their “Location Services” is turned on. Some users would turn this feature off which hinders the application from checking their current location.
Option #4: The other user must have set up the wrong date and time. If the date and time do not correspond to the global time, then it will cause problems and difficulty with tracking that user.
Option #5: The application might not have been enabled under “Location Services”. Make sure that the application has the permission to track your current location and you can do this by following the steps below.
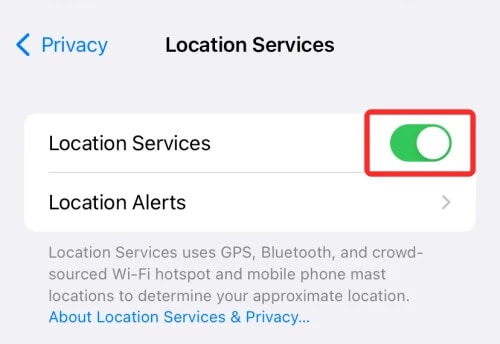
- Step 1: Go to “Settings” and then “Privacy”.
- Step 2: You can then go to “Location Services” and make sure that the application “Find My Friends” is enabled to track your location.
Part 2: Tips To Fix “No Location Found” Available
If you encounter an issue that says “No Location Found”, there are numerous ways you can fix the “No Location Found” message on “Find My Friends” and we will share them with you.
Option #1: Adjust your phone’s date and time. You can reset your time by following the steps.
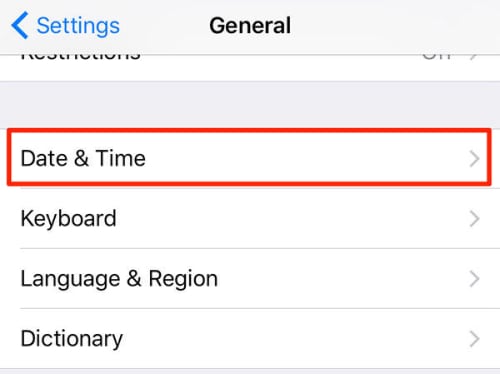
- Step 1: Go to “Settings” and choose “General”.
- Step 2: Then click on “Date & Time” and you can manually or automatically set the time.
Option #2: Make sure that you or the other user is connected to the internet. Double-check if your phone is connected to the internet.
Option #3: Turn off and turn on your “Location Services”. Usually, this simple troubleshooting can fix this issue, you can try this out and check if you can see their location now. They can turn it on by following the steps below.
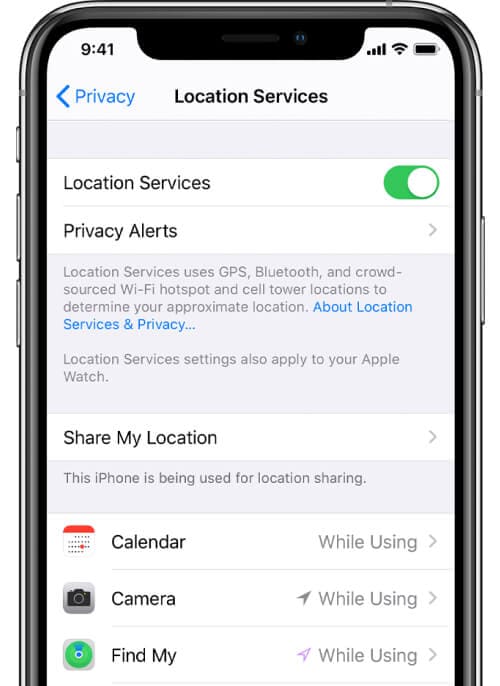
- Step 1: Go to “Settings” and choose “Privacy”.
- Step 2: After, you can look for “Location Services” and enable it.
Option #4: Enable “Location Services” for the “Find My Friends” application. There could be instances where your “Location Services” is not enabled for the application.
Part 3: How to Share Your Location with Find My Friends App?
If you want to share your location in the “Find My Friends” application, you can do that by following the steps below.
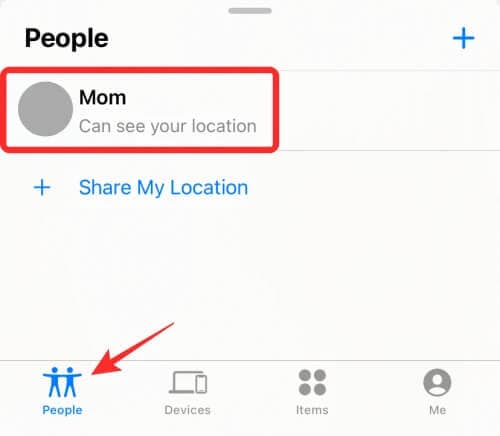
- Step 1: Open the “Find My Friends” application and select “People”.
- Step 2: Then you can tap on “Share My Location” and from there, you can type the phone number of the person you want to share your location too. You can also specify the amount of time you will share your location.
Part 4: How to Share a Fake Location to Others in Find App?
Sometimes we want our location to be kept secret and send a fake one to our friends and family. You can do that in our app, “Dr. Fone - Virtual Location “ which allows you to share a fake location with your friends.
Dr.Fone - Virtual Location
1-Click Location Changer for both iOS and Android
- Teleport from one location to another across the world from the comfort of your home.
- With just a few selections on your computer, you can make members of your circle believe you’re anywhere you want.
- Stimulate and imitate movement and set the speed and stops you take along the way.
- Compatible with both iOS and Android systems.
- Work with location-based apps, like Pokemon Go , Snapchat , Instagram , Facebook , etc.
3981454 people have downloaded it
You can use this application by following the steps below.
Step 1: Download the “Dr. Fone - Virtual Location” software on your laptop. Open and choose “Virtual Location”.

Step 2: You can then connect your phone to your computer and click on “Get Started”.

Step 3: You will then be redirected to your current location on the new page.

Step 4: If you want to change your location, you will need to turn on the “Teleportation” mode by clicking on the first icon, typing the location you want, and then clicking on the “Go” icon.

Step 5: Click on “Move Here” and your current location will show up as the location that you typed on Your Vivo Y28 5G.

Conclusion
We hope the tips we shared helped fix the “No Location Found” issue on your phone. Sometimes basic troubleshooting such as restarting your phone or turning off and on your GPS. You can also use our tip to use a fake location that you can send to your friends if you want to play a prank on them.
Ultimate Guide to Free PPTP VPN For Beginners On Vivo Y28 5G
PPTP, which stands for Point to Point Tunneling Protocol is one of the oldest and most trusted ways of implementing a VPN. It was developed by Microsoft and uses a GRE tunnel with a TCP control channel to bypass various geo-based restrictions. Since free PPTP VPN has been around for years now and is pretty easy to setup, it is quite popular as well. Read on and learn the basics of PPTP VPN free with a free PPTP VPN list as well.
Part 1: What is PPTP VPN?
The free VPN PPTP was earlier introduced by Windows, but was later adopted by all the other platforms like Linux, macOS, iOS, Android, etc. Even though the layer of encryption in free PPTP VPN is not as secure as other protocols, it makes it pretty fast. Due to this, the PPTP VPN is widely used to bypass location-based restrictions.
- The free VPN PPTP supplies data into packets and send them through a tunnel to attain a secure communication.
- Data is encrypted and its authenticity is kept intact. Due to this, the free PPTP VPN is extensively used in public networks as well.
- It supports the 128-bit Point to Point encryption.
- It is quite easy to setup PPTP free VPN (only the server address, username, and password are needed).
- Even though PPTP is secure and pretty fast, it is not as safe as other protocols (that support 256-bit encryption). It is believed that the government is now able to crack it.
- The tunneling is of two types in PPTP – Voluntary and Compulsory. Voluntary tunneling is initiated from the client’s end while compulsory tunneling is initiated from the server’s end. Compulsory tunneling should be supported by the router.

By attaining a free VPN PPTP server, you can easily connect to it. For instance, if you wish to connect to Singapore, you would need free PPTP VPN Singapore host IP. We have provided a free PPTP VPN list in the next section.
Part 2: Free PPTP VPN Server List
To make things easier for you to connect to a free PPTP VPN server, we have come up with a working and free PPTP VPN list right here. This includes free PPTP VPN Singapore, Canada, UK, USA, and other countries.
| Server | Username | Password | Country | |
| 1. | us1.vpnbook.com | vpnbook | 88wxtet | USA |
| 2. | us2.vpnbook.com | vpnbook | 88wxtet | USA |
| 3. | ca1.vpnbook.com | vpnbook | 88wxtet | Canada |
| 4. | de233.vpnbook.com | vpnbook | 88wxtet | Germany |
| 5. | fr1.vpnbook.com | vpnbook | 88wxtet | France |
| 6. | it.vpnjantit.com | vpnjantit.com | i0ryj | Italy |
| 7. | sg1.vpnjantit.com | vpnjantit.com | i0ryj | Singapore |
| 8. | sg2.vpnjantit.com | vpnjantit.com | i0ryj | Singapore |
| 9. | sg3.vpnjantit.com | vpnjantit.com | i0ryj | Singapore |
| 10. | usa1.vpnjantit.com | vpnjantit.com | i0ryj | USA |
| 11. | gr.vpnjantit.com | vpnjantit.com | i0ryj | Germany |
| 12. | uk.realfreevpn.com | realfreevpn | 25570 | UK |
| 13. | de.realfreevpn.com | realfreevpn | 93937 | Germany |
| 14. | fr.realfreevpn.com | realfreevpn | 76216 | France |
| 15. | us1.superfreevpn.com | free | 1596 | USA (Miami) |
| 16. | us2.superfreevpn.com | free | 2737 | USA (Chicago) |
| 17. | uk.superfreevpn.com | free | 7833 | UK (London) |
| 18. | ca.superfreevpn.com | free | 1251 | Canada (Montreal) |
| 19. | nl.superfreevpn.com | free | 2988 | Netherlands (Brabant) |
| 20. | us.websitevpn.com | websitevpn.com | freevpn | USA |
| 21. | uk.websitevpn.com | websitevpn.com | freevpn | UK |
| 22. | ca.justfreevpn.com | justfreevpn | Canada Free VPN Account | Canada |
| 23. | uspptp.hotfreevpn.com | free | 1234 | USA |
| 24. | 51.15.151.165 | pptp | ykDJYnCIirN | France |
| 25. | 128.199.221.154 | contassh | abcd1234 | Singapore |
| 26. | 128.199.96.14 | contassh | abcd1234 | Singapore |
| 27. | 188.166.6.170 | contassh | abcd1234 | Netherlands |
| 28. | 188.166.155.99 | contassh | abcd1234 | Netherlands |
| 29. | 138.68.140.197 | contassh | abcd1234 | UK |
| 30. | 138.68.64.68 | contassh | abcd1234 | UK |
| 31. | 159.203.111.101 | contassh | abcd1234 | USA |
| 32. | 139.59.244.147 | sshagan | abcd1234 | Singapore |
| 33. | 139.59.237.15 | sshagan | abcd1234 | Singapore |
| 34. | 128.199.214.71 | sshagan | abcd1234 | Singapore |
| 35. | 178.62.38.164 | sshagan | abcd1234 | UK |
| 36. | 46.101.79.161 | sshagan | abcd1234 | UK |
| 37. | 192.241.184.169 | sshagan | abcd1234 | USA |
| 38. | 192.241.179.120 | sshagan | abcd1234 | USA |
| 39. | 162.243.33.71 | sshagan | abcd1234 | USA |
| 40. | 162.243.15.104 | sshagan | abcd1234 | USA |
Part 3: How to Setup Free PPTP VPN on Your Computer?
After getting to know about so many free PPTP VPN Singapore, USA, Canada, UK, and other countries, you can easily learn how to set up a PPTP VPN free. The process is quite simple and can be implemented in all the leading versions of Windows (and other operating systems). Though, there could be a slight change in the overall interface of the OS you are using. To set up free VPN PPT, follow these steps:
1. To start with, launch Control Panel and go to the Network and Sharing Center.
2. From here, you need to select the “Set up a new connection or network” option to start the process.

3. This will launch a new wizard that can be used to setup a PPTP VPN free. Out of all the provided options, select the “Connect to a workplace” option.

4. On the next window, you would be given an option to either dial directly or use a VPN. Click on the “Use my Internet Connection (VPN)” option to continue.

5. Great! Now, you need to provide information related to the host and server. You can refer the free PPTP VPN list we have provided in the previous section and pick the server (and hostname) of your choice.
6. As you would proceed to the next window, you need to provide the username and password of the PPTP VPN free you are using. The same can be obtained from our free PPTP VPN list.
7. In the end, just click on the “Create” button to use your VPN. It will be listed under the available networks.
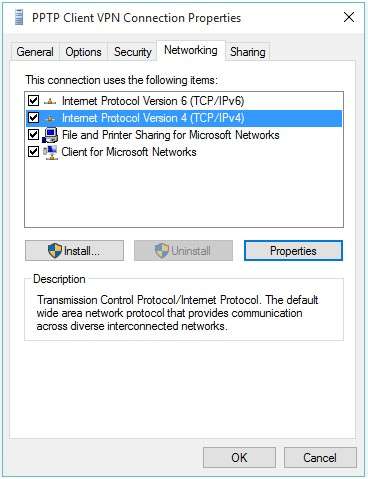
8. Sometimes, we have to change Network Settings to make it work. To do this, just select the VPN you have created and visit its Properties.

9. Go to the Security tab and make sure the type of VPN is listed as PPTP (Point to Point Tunneling Protocol). Also, the data encryption option should be “Optional Encryption (Connect even if no encryption)” and the option for “Challenge Handshake Authentication Protocol (CHAP)” should be selected for “Allow these protocols”.
10. Furthermore, you can go to the General tab to make sure the server is specified correctly.
11. Once it is done, you can save these changes and exit the interface. Now, go to the list of available networks and connect to the free PPTP VPN you have created.

That’s it! By following these steps, you would be able to create a free PPTP VPN Singapore, USA, UK, Canada, Germany, or any other location. Simply give this tutorial a try and pick the preferred option from our free PPTP VPN list. If you also have a suggestion for a free VPN PPTP that you want to add to your list, then let us know about it in the comments below.
Part 4: An Easier Alternative to Setup VPN
You may find that there is a steep learning curve ahead to master PPTP VPN setup. In addition, the ways to set up PPTP VPN are quite different for various devices and PCs.
Is there an easier alternative to setup VPN?
Yes. There are quite a few easy-to-use VPN services available in the market, among which, NordVPN is one considered reliable by many users.
Some of its advantages are as follows:
- Supports VPN access on PCs and phones (even browser plugins available).
- Intuitive interface and easy operations.
- Offers 24/7 customer service.
- As low as about 3 USD per month.
Dr.Fone - Virtual Location
1-Click Location Changer for both iOS and Android
- Teleport from one location to another across the world from the comfort of your home.
- With just a few selections on your computer, you can make members of your circle believe you’re anywhere you want.
- Stimulate and imitate movement and set the speed and stops you take along the way.
- Compatible with both iOS and Android systems.
- Work with location-based apps, like Pokemon Go , Snapchat , Instagram , Facebook , etc.
3981454 people have downloaded it
Also read:
- [Updated] In 2024, Complete Studio Exploration In-Depth XVideoExamine
- Apply These Techniques to Improve How to Detect Fake GPS Location On Honor X50 | Dr.fone
- Complete Tutorial to Use GPS Joystick to Fake GPS Location On Apple iPhone XR | Dr.fone
- Fresh Download: Updated Intel AX200 Wi-Fi Adapter Software Compatible with Windows 11 & 10
- How to Change Google Play Location On Honor 90 GT | Dr.fone
- How to Share Location in Messenger On Samsung Galaxy M14 4G? | Dr.fone
- How to Share/Fake Location on WhatsApp for Nubia Red Magic 9 Pro+ | Dr.fone
- Quick Fixes for Privacy Concerns in PiscArt Images
- Supercharge Your PC's Graphics Potential: Installing the Sapphire Pulse Radeon RX 6900 XT for Pro Gamers
- Title: How To Simulate GPS Movement With Location Spoofer On Vivo Y28 5G? | Dr.fone
- Author: Ava
- Created at : 2025-02-15 16:10:18
- Updated at : 2025-02-18 18:32:53
- Link: https://fake-location.techidaily.com/how-to-simulate-gps-movement-with-location-spoofer-on-vivo-y28-5g-drfone-by-drfone-virtual-android/
- License: This work is licensed under CC BY-NC-SA 4.0.