
How To Teleport Your GPS Location On OnePlus 12R? | Dr.fone
How To Teleport Your GPS Location On OnePlus 12R?
While playing games like Pokemon Go, you are in desperate need of finding more Pokémon. If so, changing your location is a necessity that needs to be figured out. For that, teleporting the GPS location of the OnePlus 12R device is the optimal solution. To carry this out, Wondershare Dr.Fone - Virtual Location provides a perfect system for fake locations.
Part 1: Teleport to Anywhere in the World (Teleport Mode)
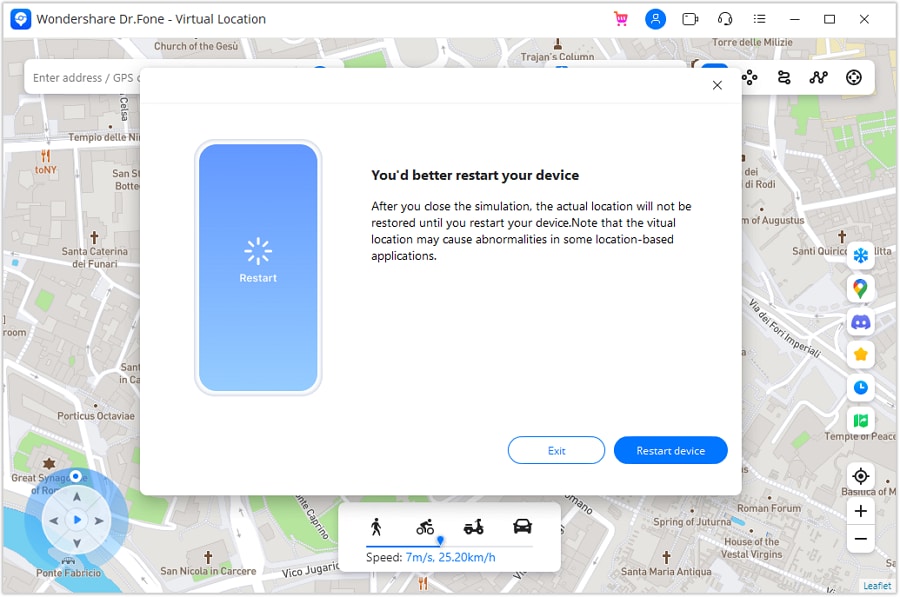
Note: Once you teleport or move to a virtual place, you can restore to the actual location by restarting the OnePlus 12R device. You will see a prompt that reminds you to restart your device to restore the location of the connected device when you close the Virtual Location. Click Restart Device and close the program.
* Dr.Fone Mac version still has the old interface, but it does not affect the use of Dr.Fone function, we will update it as soon as possible.
The Teleport Mode offered in Virtual Location is a great way to change the location of iOS/Android devices. If you wish to show a different location to someone else, the best way is to use this mode on Virtual Location. This can be done by following the steps described below:
Step 1Activate Teleport Mode
Once you have connected your smartphone, continue to select the Teleport Mode option from the top-right section. The particular icon is represented by the first icon from the left in that section.

Step 2Add Location To Teleport
After activating Teleport Mode, click the search bar on the top-left to type in the location where you want to shift. After adding the location, hit Enter to proceed.

Note: If you can’t find your current location when searching spots on the map, you can click the Current Virtual Location icon on the right sidebar to show your current virtual location.
Step 3Confirm the Location For Teleporting
You will be directed to the particular, and the map will display it for confirmation. If you are willing to teleport to this specific location, click Move Here.

Step 4Location Successfully Changed On Computer
The location of the smartphone will be instantly changed to the selected location and will be displayed on the map.

Step 5Location Changed On the Smartphone
Open your smartphone and access its maps application. Look into the current location of the OnePlus 12R device and verify it to be the same as the changed location on the computer.

Part 2: Instantaneous Movement Between Multiple Points (Jump Teleport Mode)
Wondershare Dr.Fone - Virtual Location also allows the movement of the smartphone device between multiple places with the Jump Teleport Mode. If you want to make your location spoofing look realistic, the steps below will be beneficial:
Step 1Activate Jump Teleport Mode
You will have to first access the Jump Teleport Mode option from the second icon from the left in the top-right section. This can be done after teleporting the location of the smartphone device.
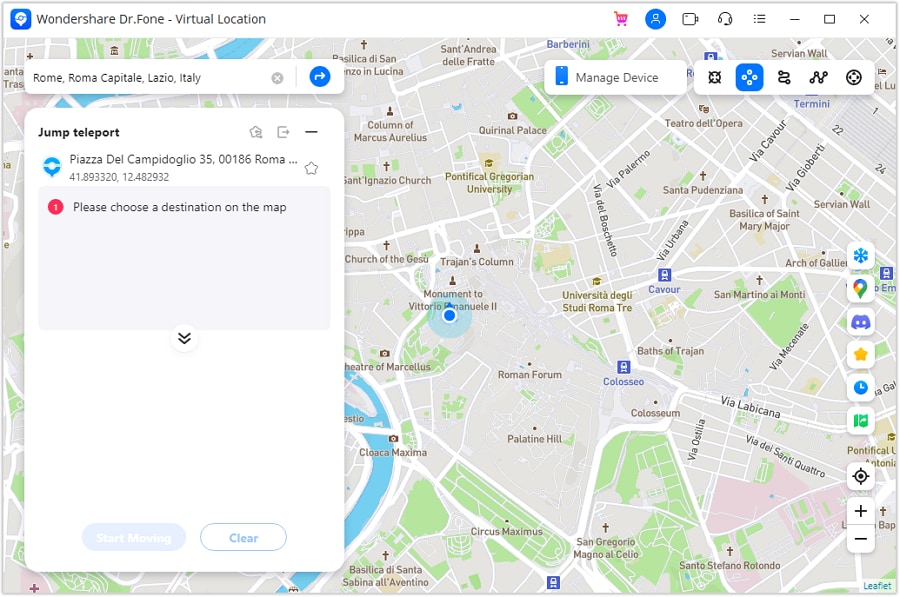
Step 2Set Spots to Jump Teleport
Continue to select the spots you want to pass one by one on the map by simply tapping on them with your mouse. After selecting multiple spots, click the Start Moving button at the bottom of the left panel to start the movement.

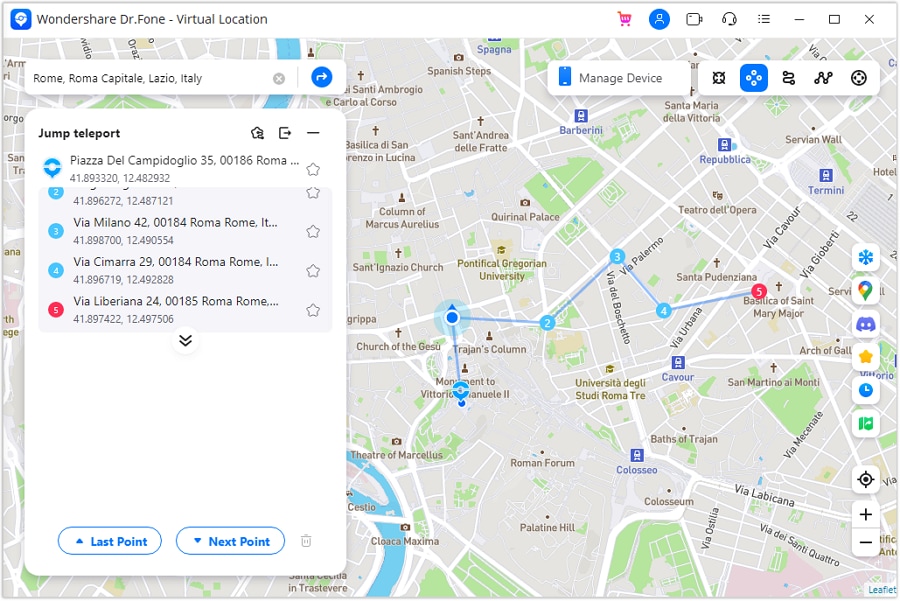
Step 3Change Location Between Set Spots
As prescribed, you can propagate amongst the set spots with the Jump Teleport Mode. Use the Next Point and Last Point buttons to shift your location.
3 Ways to Change Location on Facebook Marketplace for OnePlus 12R
Facebook Marketplace is a hub designed within Facebook that enables Facebook users to buy and sell stuff online. This marketplace has optimized the chances of buying and selling legit stuff, including household appliances, clothes, and electronic devices. You must enter the pictures of that product and write a good description.
All the potential buyers from the nearest locations will access it. Moreover, you can look up stuff on the marketplace and order your favorite product with just simple clicks. It is also possible if you want to change the location of marketplace listings to attract buyers and sellers of your nearby areas.
The following discussed points in the article will teach you how to change location on the Facebook marketplace:
Part 1: How to Change Location on the Facebook Marketplace on iOS and Android Devices
The Facebook Marketplace is a feature that finishes the gap between social media and digital marketplaces. With this helpful feature, you can now buy and sell items on your Facebook account to other Facebook users. In addition, you can filter the listings and see the buyers from a specific location by changing to a location.
Here, we will teach you the steps involved in changing the FB Marketplace location on your Android and iOS devices:
Step 1: The first step requires you to open the Facebook app on your OnePlus 12R or iPhone. Login to your Facebook account to initiate the procedure.

Step 2: If you have an Android device, you will see a hamburger icon situated at the top-right corner. You have to click on it to access the Facebook menu. Or, if you have an iPhone, click on the three dots on the bottom side of the application.
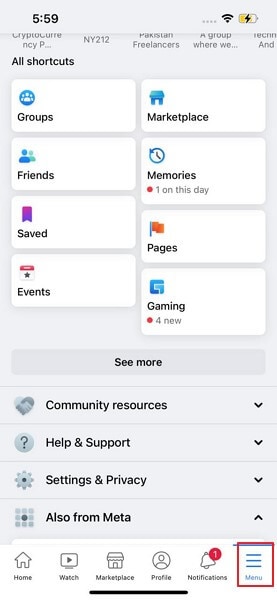
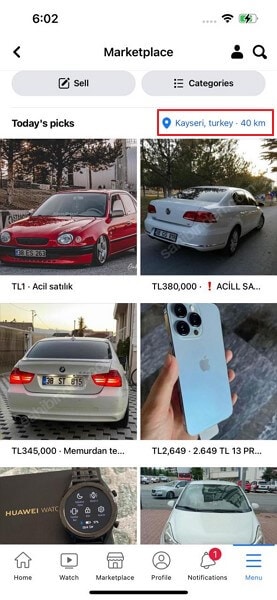
Step 3; After doing the prior step, you will now access the “Facebook Marketplace” feature. Your current location will be written in blue on the upper-right side of the existing Marketplace listings. You should click it to change your Marketplace location.

Step 4: Use the “Search Bar’ at the top of the screen to search and select the new location. After entering the target place, tap on the “Apply” button. You can also adjust the distance slider below “Custom radius” to change the location.

Step 5: Now, the Facebook Marketplace will refresh. You will now be able to see new listings for the selected location.
Part 2: How to Change Facebook Marketplace Location on Facebook Website
If you are using Facebook from a browser, it is also achievable to change the location and control the listings yourself. To perform this process on a browser, follow the given steps and achieve the Facebook marketplace change location:
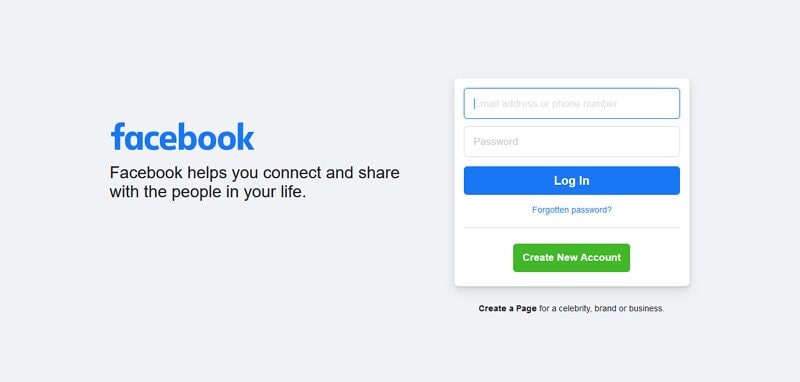
Step 1: Access Facebook through the browser of your choice and sign in to your Facebook account.
Step 2: There will be a “Marketplace” icon; click on it. Now, the current location will be displayed on the screen. You have to tap on your current location to fake the location of your marketplace.

Step 3: Enter the desired location and hit the “Apply” button. The listing search radius can also be changed with the help of the dropdown button.


Step 4: Facebook marketplace will be refreshed, and your new listings for the selected location will be visible.

Part 3: Facebook Marketplace Location Won’t Change? One-Click to Solve It
Dr.Fone – Virtual Location is an application that allows users to change their device location virtually. You can quickly teleport the GPS location to places of your choice. It is now super-easy and secure to virtually change your current location, bypass all the restrictions, and filter the listings on your Facebook marketplace.
What Makes Dr.Fone – Virtual Location the Best Solution?
The application holds a wide range of uses and characteristics, so it is considered the best way to change location. The following key points are mentioned why it is the best location changing solution available:
Dr.Fone - Virtual Location
1-Click Location Changer for both iOS and Android
- Teleport from one place to another across the world from the comfort of your home.
- With just a few selections on your computer, you can change the location on your Facebook marketplace.
- Stimulate and imitate movement and set the speed and stops you take along the way.
- Compatible with both iOS and Android systems.
- Work with location-based apps, like Pokemon Go , Snapchat , Instagram , Facebook , etc.
3981454 people have downloaded it
Simple Steps to Fake your Location on Facebook Marketplace
The following step guide will assist you in changing the location of the marketplace listing to get targeted buyers or sellers for the Facebook marketplace:
Step 1: Install the Program
The first step requires downloading Dr.Fone- Virtual Location (iOS/Android). Now, install it and launch the software on your PC.
Step 2: Connect your Phone
Click on “Virtual Location” from the available options and connect your phone to the computer with a USB cable. IPhone users, once connected, can link the software with Wi-Fi without any USB cable. Now, press the “Get Started” button.

Step 3: Provide your Desired Location
Now, activate the “Teleport Mode” by clicking the first icon on the upper-right side. Next, enter the target place you want to teleport to and click on the “Go” button.
Step 4: Change your Location
Now, click on “Move Here” in the popup box, and your location will be changed. Your Android or iOS device location will be shifted to the added location now. Then, you can open Facebook and see the buyers and sellers of the given location in the Marketplace.
Part 4: FAQs about Facebook Marketplace
- What are the extra services for me after changing my location on Facebook Marketplace?
There are no extra services given on the Facebook Marketplace after changing the location. You will be able to access the audience of the selected location.
- Is it secure if I give my address on the Facebook marketplace?
You must not offer your full name and your contact details. Meet in a safe and public place such as a park, restaurant, shopping mall, or police station. However, you still should not give your details to the buyer.
- Why is my Facebook marketplace displaying the wrong address?
You might have used a VPN service in the past, which affected your actual address on the Facebook Marketplace. Don’t worry, as you can change the current location with a mere click.
- How to change the Facebook marketplace plan?
There is no plan required to use the Facebook Marketplace. This feature is entirely free for all Facebook users.
- How to maximize sales on the Facebook marketplace?
There are various methods to attract more buyers to you. First, try to optimize the Facebook listing by adding more keywords in the description and title. Also, write a longer description and explain more details about the item. You can also hire a photographer who will take good pictures of your product.
Conclusion
The article concludes with how to change location on the Facebook Marketplace to perceive buyers and sellers of your nearby areas. This way, you will be able to meet the buyer or seller yourself and discuss the product peacefully. With Dr.Fone - Virtual Location , you can change the location of the marketplace listing and teleport to a place you want to sell/buy in.
 safe & secure
Prevent Cross-Site Tracking on OnePlus 12R and Browser
Have you ever wondered why you get the advertisements of the websites you visited a few minutes ago on your social media sites? Here comes to Cross-Site Tracking, also termed CST, and it is a process where third-party cookies and sites track your browser history.
![]()
The CST process is like invading your privacy by collecting your browser history and personal information. So, to prevent these services, there are several ways by which you can cross-site tracking on your system as well as OnePlus 12R phone browsers. Keep reading to learn how to stop cross-site tracking on both OnePlus 12R and browser.
Part 1: Why Do We Need to Stop Cross-site Tracking?
Cross-site Tracking is all about collecting your browsing data and other information for advertising purposes. Though the process can prove convenient for many as it provides additional information about the products and services you have searched for and offers tailor-made content, it is intrusive and about breaching your privacy.
Cross-site tracking collects information about your browsing history. The third-party cookies also monitor the content type you have visited and your personal information, which is risky.
Besides invading privacy, the CST also poses several other issues. Based on your browsing history, additional content you have not asked for is loaded on your visited sites, slows down the page loading process, and puts an extra burden on your battery. Moreover, too much-unwanted content can interfere with the basic information you are looking for.
So, it is always better to prevent cross-site tracking for all the above and more reasons.
Further reading: A detailed guide on faking location in Mozilla Firefox . Don’t worry about your location privacy anymore!
Part 2: Can Private Browsing be traced?
Yes, private browsing can be traced. When you work in private browsing mode, the web browser does not save the browsing history, which means that anyone who uses your system will not check your online activities. But websites and cookies can track your browsing history as well as other information.
Part 3: How to Disable Cross-website Tracking on Safari for iOS Devices?
Safari is the most commonly used platform by iOS users. So, to prevent CST for Safari on your iOS devices and Mac systems, below is a complete guide.
Deactivate Safari cross-website tracking for iPhone & iPad
Safari cross-site tracking can be prevented using the below steps on your iPhone and iPad.
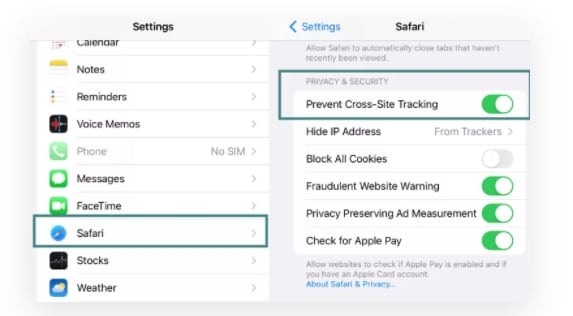
- Step 1. Launch the Settings app on your iOS device.
- Step 2. Find the Safari option by scrolling down the menu.
- Step 3. Move the slider to turn on “Prevent Cross-Site Tracking” under the PRIVACY & SECURITY option.
Deactivate Safari cross-website tracking for Mac
Use the steps below to turn off cross-site tracking on Safari on your Mac systems.
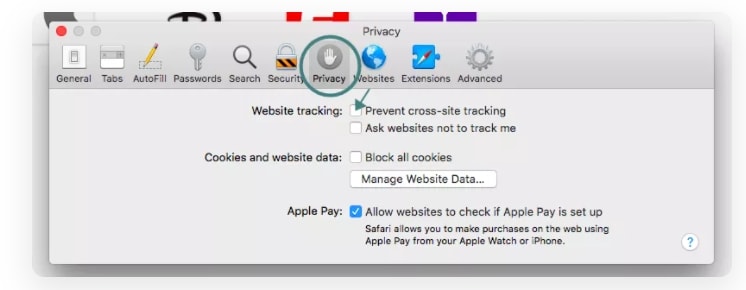
- Step 1. On your Mac system, open the Safari app.
- Step 2. Move to Safari > Preferences > Privacy
- Step 3. Enable the “Prevent cross tracking” option by clicking on the box next to it.
Part 4: How to Disable Cross-site Tracking on Google Chrome
Chrome is used widely on Windows systems and Android devices, and to prevent the CST from your browser, a detailed guide is given below.
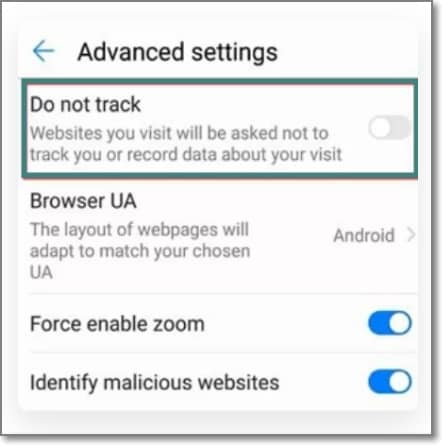
Enable “Do Not Track” on Google Chrome for Android
- Step 1. On your OnePlus 12R, open the Chrome app.
- Step 2. At the right side of the address bar, click on the More option and choose Settings.
- Step 3. Choose the Privacy option from the Advanced tab.
- Step 4. Click on the “Do Not Track” option to turn on the feature.
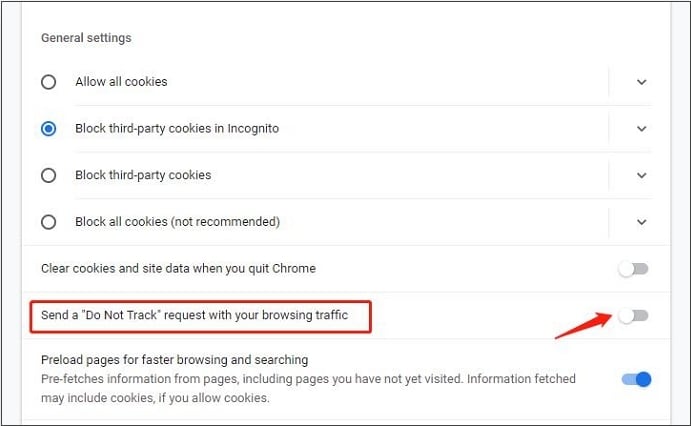
Enable “Do Not Track” on Google Chrome for Computer
- Step 1. Launch Chrome on your system, and from the menu at the upper-right corner, click on the Settings option.
- Step 2. From the “Privacy and Security” tab, choose the “Cookies and other site data” option.
- Step 3. Tap and enable the slider next to “Send a “Do not track” request with your browsing traffic.”
Part 5: Recommended Solution: Fake a Location to Stop Cross-Site Location Tracking Using Dr. Fone
What if you let the sites and cookies track your phone location without worrying about your privacy? Yes, it can be done by spoofing your location. So, if you set a fake location while browsing the internet, you will not have to worry about cross-site tracking, as anyways, the sites and cookies will get misled browsing information that cannot harm you in any manner.
Setting a fake location on your iOS devices, a professional tool is needed, for we recommend Wondershare Dr.Fone - Virtual Location as the best tool. Using this Android and iOS-based software, you can set any fake GPS location on your device. The tool is simple to use and does not require any mastery of technical know-how.
Key features
- Simple tool to teleport to any GPS location in a single click.
- Allows simulating GPS movement along the route.
- All popular models of Android and iOS devices are compatible.
- Compatible with all location-based apps on your phone.
- Compatible with Windows and Mac systems.
Here is a video tutorial for you to take an overview of how to use Dr.Fone - Virtual Location to fake location on your Android and iOS devices.
 safe & secure
Steps to set fake location on your Android and iOS devices using DrFone-Virtual Location
Step 1. Download, install and launch the software on your Windows or Mac systems. On the main software interface, choose the Virtual Location option.
Step 2. Connect your iPhone or Android device to your system using a USB cable and then tap on the Get Started option on your software interface.

Step 3. A new window on the software interface will open, showing your connected phone’s real and actual location. If the detected location is incorrect, click on the “Center On” icon to display the right device location.
Step 4. Next, you need to activate the “teleport mode” and click o the 3rd icon at the upper-right corner.
Step 5. Next, you have to enter now the fake location to which you wish to teleport to at the upper-left corner. Click on Go.
Step 6. Finally, tap on the Move Here button and the new fake location for your connected Android or iOS device at the pop-up box.
Check the new location of your phone from the app.
Wrap it up
Preventing Cross-site tracking can be done on different browsers and devices using the guides listed in the above parts of the article. Settings a fake location for your device using Dr. Fone-Virtual Location is another interesting way to prevent tracking your browsing history by spoofing the sites and cookies. Setting a fake place will not only avoid monitoring your browsing history but will also work with all location-based apps on your phone.
safe & secure
Also read:
- [New] The Pro's Guide to Documenting Your Online Facebook Interactions for 2024
- [Updated] 2024 Approved Decoding YouTube's Thumbnail Impact on Traffic
- [Updated] Optimizing Vimeo Playback Speed
- [Updated] The Evolution of Video From Full-Length to YT Shorts
- 「新型ウィルス感染対策:家で楽しむ Nintendo Switch ゲームのチョイス!」
- Advancements in Digital Health Through Innovations Like ChatGPT: Transforming Patient Experience
- Can Life360 Track Or See Text Messages? What Can You Do with Life360 On OnePlus 11R? | Dr.fone
- How to Change Netflix Location to Get More Country Version On Poco F5 5G | Dr.fone
- How to Fix My Nokia C02 Location Is Wrong | Dr.fone
- How to Simulate GPS Movement in AR games On Motorola Moto G84 5G? | Dr.fone
- Methods to Change GPS Location On Poco X5 | Dr.fone
- Thinking About Changing Your Netflix Region Without a VPN On OnePlus 12? | Dr.fone
- Top 7 AI-Powered Presentation Assistants
- Title: How To Teleport Your GPS Location On OnePlus 12R? | Dr.fone
- Author: Ava
- Created at : 2024-10-27 09:02:42
- Updated at : 2024-11-03 06:44:36
- Link: https://fake-location.techidaily.com/how-to-teleport-your-gps-location-on-oneplus-12r-drfone-by-drfone-virtual-android/
- License: This work is licensed under CC BY-NC-SA 4.0.