
How To Use Special Features - Virtual Location On Vivo S17e? | Dr.fone
How To Use Special Features - Virtual Location On Vivo S17e?
Wondershare Dr.Fone - Virtual Location comes with multiple unique features that can be used to enhance the flow of spoofing location. With all these amazing features, you can easily change your iOS location without blinking an eye. Rather than making things complicated, Dr.Fone makes it easy for you to manage operations when you perform actions like changing Android locations.
Part 1: Circle Route (For Multi-Stop Route)
The circle route feature is under the multi-stop route mode. When your starting point is close to the ending point, a pop-up asks if you want to set up a circle route. Click Yes to create a circular path on the map.

Part 2: Realistic Mode (For One-Stop Route and Multi-Stop Route)
This particular feature makes the simulation look realistic with the ability to fluctuate the speed of the simulation. If you wish to turn on realistic mode for the one-stop or multi-stop route, look for the respective checkmark option in the panel on the left.

Part 3: Fluctuation Mode (For Teleport Mode)
Whenever you are teleporting your smartphone device to another location, you can try using the fluctuation mode feature offered against it. As you activate Teleport Mode from the top-right section and search for a location, you will discover the Fluctuation Mode toggle in the confirmation tab. Turn on the toggle to slightly switch the location from the selected point to show realistic motion.

Part 4: Cooldown Timer (For Teleport Mode and Jump Teleport Mode)
While teleporting the location of your smartphone to different places for playing games like Pokemon Go, you are bound to activate a cooldown timer within your location-changing app to show realistic movement. By locating the Cooldown Timer on the right pane of icons, activate it, and this feature will automatically calculate the cooling time by measuring the distance between your destination and the starting point.


It is recommended not to start the movement until the cooldown time is completed to avoid unnecessary bans. Moreover, you can also activate the Auto jump after cooldown in the Jump teleport mode after turning on the Cooldown Timer.
This option will automatically jump you to the next destination once the timer ends. It is helpful for games like Pokemon Go, where the game servers can detect frequent jumps with no cooldown time.
Part 5: Import/Export GPX File
You can also import and export specific navigated locations from Dr.Fone in the form of GPX files. While you can export GPX files for keeping a record of your location, you can also import such files for inserting specific locations to simulate or teleport to. Find out how you can import and export GPX files with this location-changing application:
Step 1Export the GPX File
If you have defined a proper location to simulate at a particular instant using Dr.Fone - Virtual Location, you can have this location exported by clicking the Export icon on the top of the left panel. This will open a window where you can set the location for saving the GPX file.

Step 2Import a GPX File
For importing a GPX file on the platform, click the Import button on the right pane. As this opens a window, select the GPX file you wish to import to the platform.

Step 3Wait for the File to be Read
Wait for a moment until Dr.Fone - Virtual Location recognizes the specific locations within the GPX file and displays them on the map.

Part 6: Historical Records
If you want to use a similar track record on your smartphone again, you can access the historical records saved on the platform for easy access.
Step 1Open Historical Records
Click the Historical Records button on the right pane to access the entire history involving the connected smartphone and the location spoofing platform.

Step 2Access Any Location from the History
Select the Go button adjacent to any particular historical record to re-launch a similar simulation for the Vivo S17e device. You can also click Clear All to delete all historical records.

Part 7: Favorite List
You can also set up favorite locations within the platform to define quick accessibility to your favorite locations. To do that, you have to follow the guidelines shown next:
Step 1Favorite Specific Locations
While setting up locations in Jump Teleport Mode, One-Stop Route, or Multi-Stop Route, you can tap on the Favorite icon adjacent to every marked location or favorite an entire route with the Favorite icon on the top of the left panel.

Step 2Access your Favorite Section
To look for your favorite locations, look for the Favorite icon on the right pane to open a list containing all locations you have marked. You can choose the Move option to automatically move into a particular location in no time.

How To Teleport Your GPS Location On Vivo S17e?
While playing games like Pokemon Go, you are in desperate need of finding more Pokémon. If so, changing your location is a necessity that needs to be figured out. For that, teleporting the GPS location of the Vivo S17e device is the optimal solution. To carry this out, Wondershare Dr.Fone - Virtual Location provides a perfect system for fake locations.
Part 1: Teleport to Anywhere in the World (Teleport Mode)
Note: Once you teleport or move to a virtual place, you can restore to the actual location by restarting the Vivo S17e device. You will see a prompt that reminds you to restart your device to restore the location of the connected device when you close the Virtual Location. Click Restart Device and close the program.
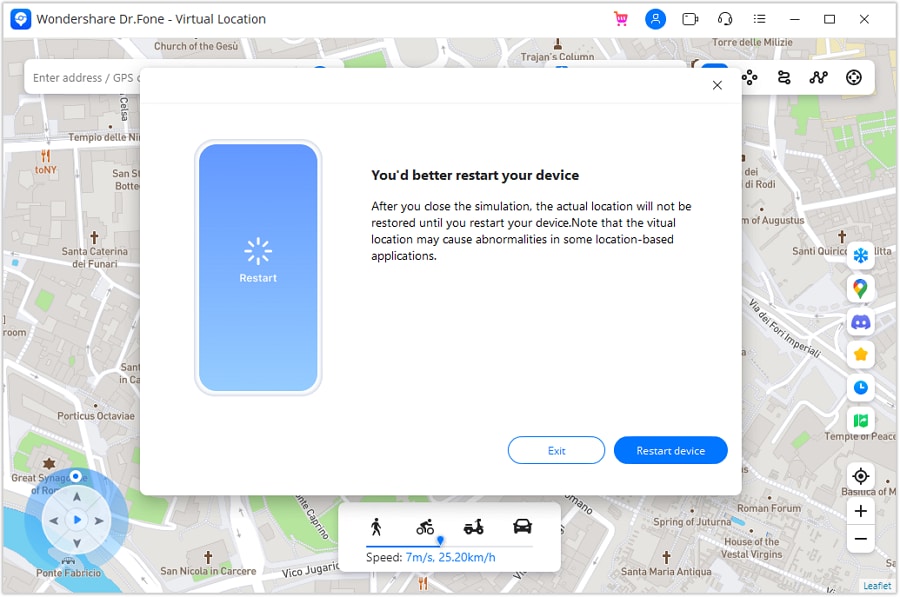
* Dr.Fone Mac version still has the old interface, but it does not affect the use of Dr.Fone function, we will update it as soon as possible.
The Teleport Mode offered in Virtual Location is a great way to change the location of iOS/Android devices. If you wish to show a different location to someone else, the best way is to use this mode on Virtual Location. This can be done by following the steps described below:
Step 1Activate Teleport Mode
Once you have connected your smartphone, continue to select the Teleport Mode option from the top-right section. The particular icon is represented by the first icon from the left in that section.

Step 2Add Location To Teleport
After activating Teleport Mode, click the search bar on the top-left to type in the location where you want to shift. After adding the location, hit Enter to proceed.

Note: If you can’t find your current location when searching spots on the map, you can click the Current Virtual Location icon on the right sidebar to show your current virtual location.
Step 3Confirm the Location For Teleporting
You will be directed to the particular, and the map will display it for confirmation. If you are willing to teleport to this specific location, click Move Here.

Step 4Location Successfully Changed On Computer
The location of the smartphone will be instantly changed to the selected location and will be displayed on the map.

Step 5Location Changed On the Smartphone
Open your smartphone and access its maps application. Look into the current location of the Vivo S17e device and verify it to be the same as the changed location on the computer.

Part 2: Instantaneous Movement Between Multiple Points (Jump Teleport Mode)
Wondershare Dr.Fone - Virtual Location also allows the movement of the smartphone device between multiple places with the Jump Teleport Mode. If you want to make your location spoofing look realistic, the steps below will be beneficial:
Step 1Activate Jump Teleport Mode
You will have to first access the Jump Teleport Mode option from the second icon from the left in the top-right section. This can be done after teleporting the location of the smartphone device.
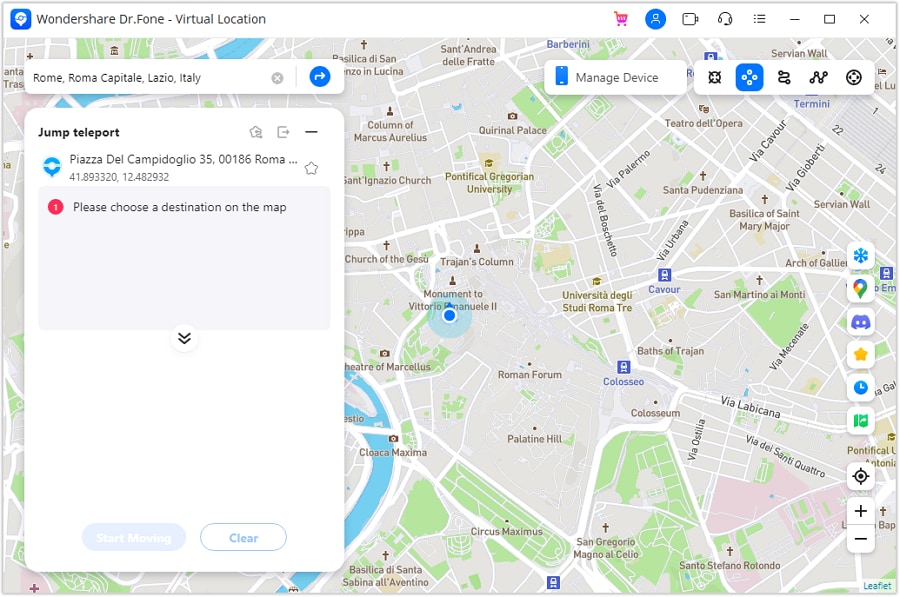
Step 2Set Spots to Jump Teleport
Continue to select the spots you want to pass one by one on the map by simply tapping on them with your mouse. After selecting multiple spots, click the Start Moving button at the bottom of the left panel to start the movement.

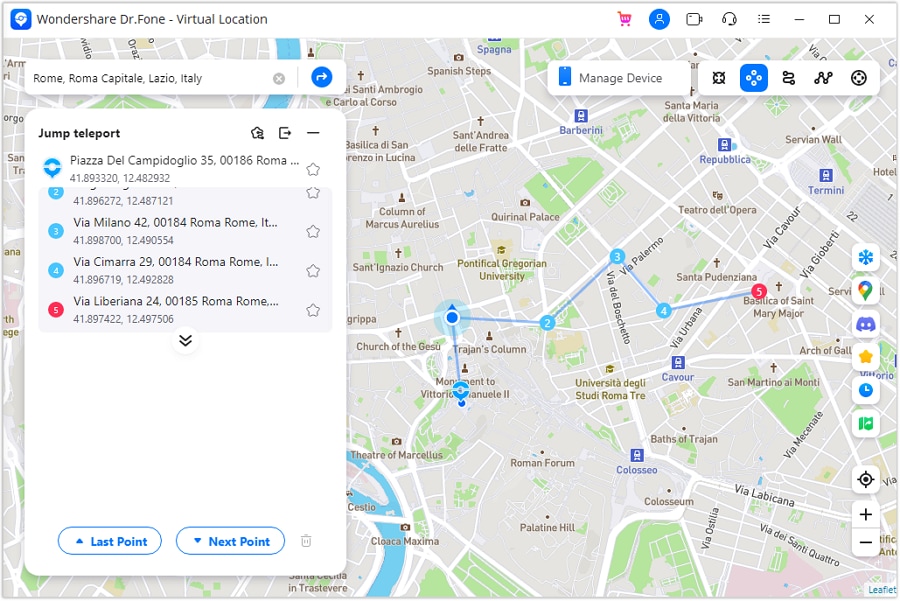
Step 3Change Location Between Set Spots
As prescribed, you can propagate amongst the set spots with the Jump Teleport Mode. Use the Next Point and Last Point buttons to shift your location.
4 Methods to Turn off Life 360 On Vivo S17e without Anyone Knowing
Life 360 has made tracking our friends and loved ones so easy. It is an excellent choice for staying updated about family when you have security concerns. Despite this, it can be intrusive when you need your privacy. If you’re a group member and wonder how to turn off Life360 without parents knowing on iPhone and Android devices, you’re in luck. This article will provide you with a complete guide on how to turn off Life 360 without anyone knowing.
Part 1: What is Life 360?
Many applications are available today to help family and friends track each other for various purposes. One such app is Life360, and it has been successful since its launch. This tracking app makes it easy to trace the location of your loved ones or anyone you want to track. But, first, you need to create a circle of friends on a map.
Life360 works by sharing your GPS location on the map, allowing the members of your circle to view it. As long as your GPS location is turned on, those in your circle will always have access to your exact location. Life360 developers are continually releasing new features to improve their tracking function.

Some of the available Life360 features include notifying you when a member of your circle moves to a new point and it will send a help alert when there’s an emergency. In addition, the app automatically contacts the emergency contacts you added when you do this. However, this doesn’t change that it can get intrusive when you need some privacy. That’s why the next section covers how to turn Life360 off.

Part 2: How to Turn off Life360 without Knowing
There are times when you want to turn Life360 off without it showing so that people don’t know your present location. But, if you have no idea how to go about it, you’re in luck. This section covers the best methods to stop sharing your location with friends and family on Life360.
1. Turn Off Your Circle’s Location on Life360
There is the possibility of limiting the details about your location to others in your circle. One way to turn Life360 without anyone knowing is by choosing a circle and disconnecting from them. The steps below break down the entire process.
- First, launch Life360 on your device and navigate to ‘settings.’ You can find it at the bottom right corner of the screen.
- Next, choose a circle you want to stop sharing your location with at the top of the page.

- Tap on ‘location sharing’ and click on the slider next to it to disable location sharing.

- Now you can recheck the map, and it will show ‘location sharing paused.

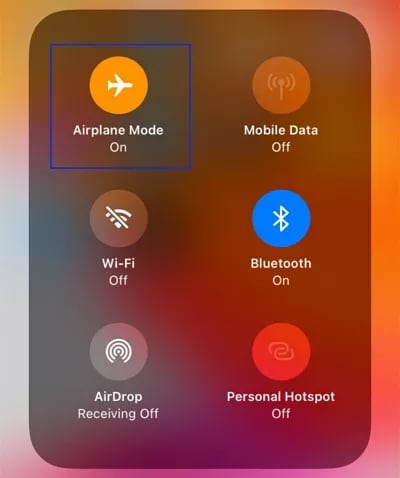
2. Turn off Your Vivo S17e’s Airplane Mode
Another option you have to stop sharing location on Life360 is by switching on Airplane mode. You can do this on your Android and iOS devices. Once you enable Airplane mode, you’ll see a white flag on your last saved location.
For your iOS devices: open ‘control center’ and tap on the ‘airplane mode’ button. Alternatively, you can go to settings and tap on ‘airplane mode’ to switch it on.
For Android owners wondering how to turn location off on life360 through Airplane mode, swipe down from the top of your screen and select the ‘Airplane mode’ icon. You can also turn it on by visiting ‘settings’ and selecting ‘network & internet’ from the option displayed. Finally, find the airplane mode and switch it on.

These steps will help you turn off location sharing on Life360. However, the downside of using Airplane mode is that it prevents you from accessing the internet. In addition, with the Airplane mode turned on, you can’t make or receive phone calls, either. Therefore, we don’t recommend this as your top choice when learning to turn off Life 360.
3. Disable GPS Service on Your Device
Another top method of turning off Life360 is disabling the GPS service on your device. It is an effective option, and you can carry it out on your iOS and Android devices. Below, we’ll break down the steps of doing this on your Android and iOS devices.
For iOS
iOS users can easily turn off GPS services by following the steps we’ll be providing below.
- First, open Settings on your smartphone.
- Next, locate the ‘personal’ category and tap on ‘location services’ from the options displayed.
- Next, disable GPS location services

For Android
You’re not left out of this option; below are the steps to disable GPS service on your Vivo S17es.
- Firstly, visit ‘settings’ on your device.
- On the menu, scroll to ‘privacy’ and tap on it.
- It will open a new page. Select ‘location’ from the options provided.
- If you want to disable GPS services on your Vivo S17e, turn off location tracking for apps.

Part 3: Best Ways to Fake Location on Life360 without Anyone Knowing-Virtual location [iOS/Android Supported]
Although Life360 can be helpful in emergencies or security issues, it can also prove quite problematic. If you want some privacy or don’t trust members of your circle, you might want to learn how to turn off Life 360. The problem with turning off the Life360 location is that members of your circle might notice, which would inevitably cause some conflict.
Fortunately, you have another effective option, and that is by faking your GPS location using a location spoofer. You can display the location you want while keeping your true location safe on Life360. Dr. Fone –Virtual location is an excellent tool for faking your location.
Dr.Fone - Virtual Location
1-Click Location Changer for both iOS and Android
- Teleport from one location to another across the world from the comfort of your home.
- With just a few selections on your computer, you can make members of your circle believe you’re anywhere you want.
- Stimulate and imitate movement and set the speed and stops you take along the way.
- Compatible with both iOS and Android systems.
- Work with location-based apps, like Pokemon Go , Snapchat , Instagram , Facebook , etc.
3981454 people have downloaded it
Steps to Fake Location Using Dr. Fone – Virtual Location
Below, we’ve broken down the process for you; keep reading to learn how to fake location using Dr. Fone – Virtual Location.
1. Firstly, you have to download Dr. Fone – Virtual Location on your PC. After downloading and installing, launch the app to get started.
2. Select ‘virtual location’ from the options displayed on the main menu.

3. Next, connect your iPhone or Android device to your PC and click ‘get started.’

4. Next, you have to turn on the ‘teleport mode’ by clicking its icon at the upper right corner of the screen.
5. Now, enter the location you want to teleport to on the upper left side of the screen and then click the ‘go’ icon.
6. Click ‘move here’ in the popup box to change your location to this new place.
Automatically, your location will change to the chosen place on the map and your mobile device.
Part 4: FAQ About Turn off Location on Life360
1. Are there any risks to turning off GPS location?
Yes, there are some dangers associated with turning off location on Life360. No one knows where you are anymore, which could be dangerous in the case of an emergency.
2. Can Life360 track my location when I switch My Vivo S17e off?
When your phone is off, your GPS location is automatically disabled. Therefore Life360 won’t be able to track your location; it will only display your last logged location.
3. Does Life360 tell my circle when I turn off the location?
Yes, it does. It will send a ‘location sharing paused’ notification to all your group members. Additionally, if you log out from Life360, it will notify your circle immediately.
Conclusion
Life360 is a useful app for professional and personal circles. However, it can be intrusive on our privacy sometimes. Most times, the youths want to learn how to turn off Life360 without their parents knowing on iPhone and Android devices. This article provides you with different methods you can achieve this. If you want to learn how to turn off life 360 without showing up, the best option is to fake your location. We hope the guide above helps you utilize Dr.Fone - Virtual Location without any issues.
Also read:
- 2024 Approved Dive Into Color Management with AE LUTs
- Android Safe Mode - How to Turn off Safe Mode on Poco C55? | Dr.fone
- Convertitori Gratuiti Online per Convertire M2P a Formato MPEG Con Movavi - Fai Il Passo Alla Gatta!
- Following the Reel Adventures of Indiana Jones: A Guide to View Them Properly
- How to Simulate GPS Movement in AR games On Tecno Phantom V Fold? | Dr.fone
- How To Simulate GPS Movement With Location Spoofer On Motorola Moto G Stylus (2023)? | Dr.fone
- In 2024, 11 Best Location Changers for Motorola Edge+ (2023) | Dr.fone
- In 2024, 11 Best Location Changers for Samsung Galaxy F04 | Dr.fone
- In 2024, A Detailed Guide on Faking Your Location in Mozilla Firefox On Xiaomi Civi 3 | Dr.fone
- In 2024, A Detailed VPNa Fake GPS Location Free Review On Realme C51 | Dr.fone
- The Future Is Now Examining HP Envy 27'S Innovations for 2024
- Unexpected Black Screen Blues? Here's How To Get Your Computer Showing Again!
- Unlocking NVIDIA's Screen Recorder Potential
- Unsupported Screen Input Issue Resolved: Monitor Fix Guide
- What is Geo-Blocking and How to Bypass it On Tecno Pop 8? | Dr.fone
- Title: How To Use Special Features - Virtual Location On Vivo S17e? | Dr.fone
- Author: Ava
- Created at : 2024-10-21 18:27:32
- Updated at : 2024-10-28 19:53:38
- Link: https://fake-location.techidaily.com/how-to-use-special-features-virtual-location-on-vivo-s17e-drfone-by-drfone-virtual-android/
- License: This work is licensed under CC BY-NC-SA 4.0.