
How To Use Special Features - Virtual Location On Vivo Y100i Power 5G? | Dr.fone
How To Use Special Features - Virtual Location On Vivo Y100i Power 5G?
Wondershare Dr.Fone - Virtual Location comes with multiple unique features that can be used to enhance the flow of spoofing location. With all these amazing features, you can easily change your iOS location without blinking an eye. Rather than making things complicated, Dr.Fone makes it easy for you to manage operations when you perform actions like changing Android locations.
Part 1: Circle Route (For Multi-Stop Route)
The circle route feature is under the multi-stop route mode. When your starting point is close to the ending point, a pop-up asks if you want to set up a circle route. Click Yes to create a circular path on the map.

Part 2: Realistic Mode (For One-Stop Route and Multi-Stop Route)
This particular feature makes the simulation look realistic with the ability to fluctuate the speed of the simulation. If you wish to turn on realistic mode for the one-stop or multi-stop route, look for the respective checkmark option in the panel on the left.


Part 3: Fluctuation Mode (For Teleport Mode)
Whenever you are teleporting your smartphone device to another location, you can try using the fluctuation mode feature offered against it. As you activate Teleport Mode from the top-right section and search for a location, you will discover the Fluctuation Mode toggle in the confirmation tab. Turn on the toggle to slightly switch the location from the selected point to show realistic motion.

Part 4: Cooldown Timer (For Teleport Mode and Jump Teleport Mode)
While teleporting the location of your smartphone to different places for playing games like Pokemon Go, you are bound to activate a cooldown timer within your location-changing app to show realistic movement. By locating the Cooldown Timer on the right pane of icons, activate it, and this feature will automatically calculate the cooling time by measuring the distance between your destination and the starting point.

It is recommended not to start the movement until the cooldown time is completed to avoid unnecessary bans. Moreover, you can also activate the Auto jump after cooldown in the Jump teleport mode after turning on the Cooldown Timer.
This option will automatically jump you to the next destination once the timer ends. It is helpful for games like Pokemon Go, where the game servers can detect frequent jumps with no cooldown time.
Part 5: Import/Export GPX File
You can also import and export specific navigated locations from Dr.Fone in the form of GPX files. While you can export GPX files for keeping a record of your location, you can also import such files for inserting specific locations to simulate or teleport to. Find out how you can import and export GPX files with this location-changing application:
Step 1Export the GPX File
If you have defined a proper location to simulate at a particular instant using Dr.Fone - Virtual Location, you can have this location exported by clicking the Export icon on the top of the left panel. This will open a window where you can set the location for saving the GPX file.

Step 2Import a GPX File
For importing a GPX file on the platform, click the Import button on the right pane. As this opens a window, select the GPX file you wish to import to the platform.

Step 3Wait for the File to be Read
Wait for a moment until Dr.Fone - Virtual Location recognizes the specific locations within the GPX file and displays them on the map.

Part 6: Historical Records
If you want to use a similar track record on your smartphone again, you can access the historical records saved on the platform for easy access.
Step 1Open Historical Records
Click the Historical Records button on the right pane to access the entire history involving the connected smartphone and the location spoofing platform.

Step 2Access Any Location from the History
Select the Go button adjacent to any particular historical record to re-launch a similar simulation for the Vivo Y100i Power 5G device. You can also click Clear All to delete all historical records.

Part 7: Favorite List
You can also set up favorite locations within the platform to define quick accessibility to your favorite locations. To do that, you have to follow the guidelines shown next:
Step 1Favorite Specific Locations
While setting up locations in Jump Teleport Mode, One-Stop Route, or Multi-Stop Route, you can tap on the Favorite icon adjacent to every marked location or favorite an entire route with the Favorite icon on the top of the left panel.

Step 2Access your Favorite Section
To look for your favorite locations, look for the Favorite icon on the right pane to open a list containing all locations you have marked. You can choose the Move option to automatically move into a particular location in no time.

How to Fix Life360 Shows Wrong Location On Vivo Y100i Power 5G?
Life360, the app for family and friends, allows you to see where your loved ones are when you open the app. The app shows the current location of your contacts and will tell you the last time they were seen and if they are in an emergency.
However, there’s a good chance that you’ve seen this message multiple times: “Your phone is missing from Life360. Please contact your cellular carrier and try again”. This message indicates that your phone is not connected to the internet.
As a result, your contacts, photos, and messages are not showing. Life360 may be using cellular data instead of Wi-Fi, but it’s not certain. To avoid this, let us read what we should know.
Part 1: Why is Life360 Location Wrong?
Interference From Nearby Devices/Networks
In some cases, Life360 may not be able to determine the location of your device because it is being interfered with by other nearby devices or networks. For example, if you have an iPhone or iPad, it may be using the same cell tower as your Vivo Y100i Power 5G.
The Life360 app has to use the closest available cell tower to determine your location. So if another device uses the closest tower, Life360 will use that instead.
Poor Signal
A poor signal in a particular region, particularly if you’re commuting, is the most common cause of Life360’s incorrect location. When your phone is in a poor signal area, the app will use the internet instead of cellular data to determine the location of your contacts.
Therefore, it is important to keep an eye on the network lines to determine whether or not this is indeed the source of the problem that prevents your Life360 from being found.
To get more information about how often does life360 update location, read about the Life360: Learn How Everything Works!
Part 2: How to Fix Life360 Shows Wrong Location Issue?
There are several ways to fix the Life360app problems that life360 not updating its location. Let’s check them out one by one.
Method 1: Review the Internet settings
The weak internet access contributes to the location display’s unreliability in life 360. If you notice that life360 is displaying the wrong location, you should examine your Internet connection settings to prevent life360 from displaying an inaccurate location.
Switch off the option that saves power and then turn on the wireless Internet connection.
You may turn off your smartphone’s power-saving mode by heading to the status bar and selecting the appropriate option.

Please note that this is just for Android users. Also, do not forget to consider that your Android smartphone’s settings may vary from those listed below.
The “switch off low power mode” option may be found in the “Settings”> “Battery” menu on an iOS device.
Android users should also follow this procedure if life360 displays an incorrect location. For battery conservation, numerous programs are disabled when the low power state is engaged.
Method 2: Double-check Your Current Location in the Settings
If life360 shows the incorrect location, the smartphone’s location services significantly come into play. The location settings must be activated to prevent the life360 location issue, and the current program must be updated accordingly.
Scrolling horizontally on the status bar on an Android device is all that is required for consumers to visit the website. Of course, you can also run the software in the background, which may be accomplished in a variety of straightforward but distinct ways based on the Vivo Y100i Power 5G device’s model.

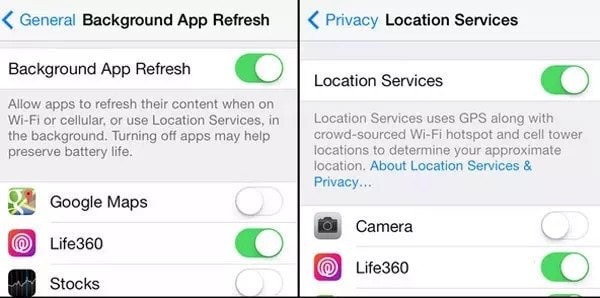
You may access the Background App Refresh function by going to the settings menu on your iOS device and selecting “Settings,” followed by “General,” and then selecting “Background App Refresh.” Next, launch the location services function by navigating to “Settings”> “Privacy”> “location services” and selecting “Location Services” from the drop-down menu.
After that, touch on the symbol that represents Life360, as shown below; this will take you to a screen where you may change “Allow Location Access” to “Always” and “Enable Precise Location.”
Method 3: Connecting One Device at a Time
Only one device may be used to sign in to the Life 360 app at a time. To prevent the life360 false location problem, log out of all other devices and use just one. When many devices are logged into Life 360 simultaneously, the user’s location might be incorrectly determined.
If you want reliable results, you must be logged in from the same device. If you use numerous devices simultaneously to log in to Life360, it will report incorrect location errors for each one. Therefore, it is possible to get inaccurate data. Use a single device to log into life360 to prevent the issue of a wrong location showing up.
Part 3: How to Keep Your Location on Life360 in One Place?
Two of the most important and easy ways to keep your location on life360 in one place are:
1. Stopping both Wi-Fi and Cellular Data Transmissions
If you disconnect from the internet, Life360 will no longer work, and your last known position will be shown.
Because all other applications are disconnected, this solution has a significant drawback: it prevents alerts, instant messengers, and other applications from working properly. In addition to the fact that you’re unable to use the internet, people in your circle will notice something wrong. In addition, it may not be adequate to fake your location.

Those with an iPhone have the advantage of being able to disable the usage of cellular data directly inside the application’s settings. However, those with an Android device will need to resort to other approaches.
iPhone users may access the Cellular setting by going to the Settings app and tapping on it. This will switch off the cellular data for the Life360 app. Turn off Life360 by swiping the switch to the off position mentioned above. Life360 will not be able to provide an accurate location report for you so long as there is no Wi-Fi access.
Advantages:
- You can use only one device to connect to the internet.
- No need to manually switch between apps.
- You can easily manage all your data.
Disadvantages:
- You cannot use other devices at the same time.
- If you lose the connection, you need to reconnect.
2. Faking Your Location
It seems like everyone has their own way to try and fiddle with their location in real life. Some may use satellite images or even old maps and coordinates, while others will buy old phones and ship them to a random location. Whatever your method is, it’s probably not the best one out there.
However, a fast but secure option is the use of Dr.Fone - Virtual Location , which is the best virtual location application right now. You canuse it to change your location to any place on earth.
One of Wondershare’s most popular products, Dr. Fone, is a data management and recovery tool. It is compatible with both iOS and Android smartphones, and it comes packaged with a wide variety of control toolkits.
When it comes to faking a location on iOS devices, Dr. Fone- Virtual Location (iOS) is one of the most effective solutions currently available on the market. It is possible to use it to teleport the iOS device to any location in the globe with just one click, and all you have to do is input the address of the place to which you wish to be moved.
Simulating GPS movement from one place to another or along a predetermined course is also possible by simply picking locations on a map that you want to go through.
Using Dr. Fone-Virtual Location iOS, you can customize your route by selecting how many times you want to go through it and how fast you want to relocate it.
To free yourself from any hassle, consider using a third-party tool instead, such as Dr.Fone, which will make the entire process super easy and accurate.

Advantages:
- The application is easy to install and use.
- It doesn’t require you to go through a lot of settings.
Disadvantages:
- • It is not a mobile application.
Dr.Fone - Virtual Location
1-Click Location Changer for both iOS and Android
- Teleport from one location to another across the world from the comfort of your home.
- With just a few selections on your computer, you can make members of your circle believe you’re anywhere you want.
- Stimulate and imitate movement and set the speed and stops you take along the way.
- Compatible with both iOS and Android systems.
- Work with location-based apps, like Pokemon Go , Snapchat , Instagram , Facebook , etc.
3981454 people have downloaded it
Conclusion
Life360 has released a major update for Android and iPhone users, fixing the shows being sent to the wrong location. This has caused many problems for many users and is a rather annoying problem to fix. However, you can get help from Dr.Fone - Virtual Location (iOS/Android) application which is an absolute fix to all of your problems.
Complete Tutorial to Use GPS Joystick to Fake GPS Location On Vivo Y100i Power 5G
The web world offers many apps, including Google, Facebook, Uber, etc. that provide location-based services. This means such apps will need your location to work. However, there are some rare occasions when users don’t find this service welcoming and thus, they wish to fake GPS location.
One of the instances comprises a well-known location-based game – Pokemon Go, where users might want to mislead the app and make the phone not understand where they exactly are. There might be other cases as well. No matter what reason you want this to be done, we are here to introduce you GPS joystick app that helps you for the same. Here we go!
Part 1: Fake GPS Location - GPS JoyStick the App
GPS joystick is an app that helps the users to fake GPS with the help of an overlay joystick control. It is easy to use and works instantly when you wish to modify the GPS location. Providing a unique “Joystick” option, this app can be considered a useful fake GPS joystick apk. On a plus, the app has the best algorithm so that it can offer realistic GPS values.
Features:
- Able to make modifications in the location wherever you point the joystick.
- You can choose the current location with the help of a map or joystick.
- You can also get the GPX files imported and exported to favorites, routes, or custom markers.
- It offers a good amount of setting options to provide complete user customization.
- You can manage the settings regarding size, type, and opacity for the joystick.
- With the help of this fake GPS joystick apk, you can get an opportunity to show the distance and cool-down time information.
- There is also a hide option available to help you decide whether you want to hide or show the joystick on your screen.
- Moreover, you get 3 customizable speeds for the joystick.
Disadvantages:
- It requires a hell lot of steps that are confusing and tough to perform.
- Users have reported that the app only works for a few minutes after the first time of installation. Afterward, the app function to fake GPS location dies and is then good for nothing.
- You need to be tech-savvy to fake GPS location with a GPS joystick.
- Fake GPS joystick for Pokemon Go cannot perform well for it as reported by the users. Also, it drives the same result for other popular location-based apps or games.
Part 2: How to set up GPS JoyStick
Though, it is quite difficult to get through the process of setting up the GPS joystick apk to a fake GPS location. Remember, we’ve always got your back. Therefore, we would like to bring you up with a detailed streak of steps (if followed properly) to install and set up the fake GPS joystick apk easily.
Basically, the tutorial is categorized into 3 different streaks depending upon the different Android OS security patches and OS version. Therefore, before we begin with steps, let’s understand what you need to do to find your Android OS version or the Security Patch. Depending on the Security Patches or Android OS version, follow the tutorials mentioned below with falls compatible for your device.
- Take your Vivo Y100i Power 5G handy and launch the “Settings”.
- Now, scroll down to the “About phone” option at the bottom and then hit on it.
- Lastly, look for the “Android version” entry and “Android security patch level” entry from the information displayed over your screen.
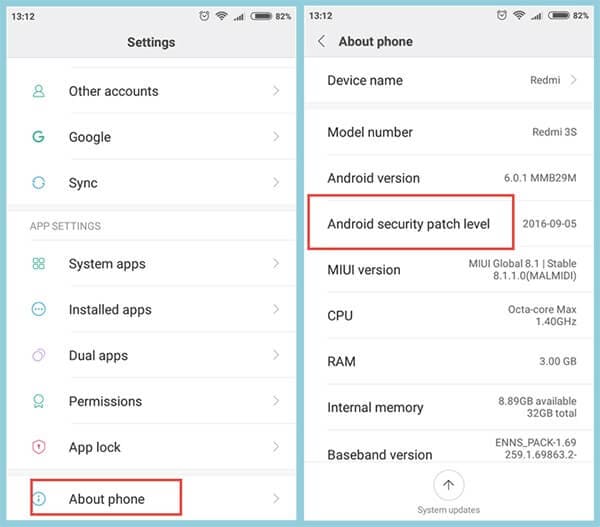
Note: Remember the date mentioned besides the “Android security patch level” is when it was first released. Please do not take it otherwise, that it is the date when you might have installed Google’s security patch.
2.1 For Android 6.0 and Above (New Security Patch) - AFTER March 5, 2017
If you own an Android device that runs on the Android OS version 6.0 or higher updated to “New Security Patch” released “AFTER March 5, 2017”. You need to follow the steps mentioned below.
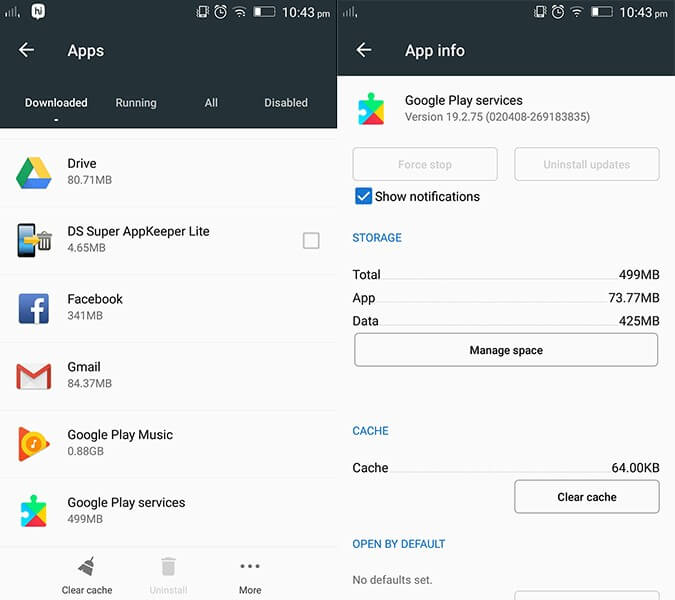
First, you need to make sure that the Google Play Services app installed over your Vivo Y100i Power 5G is running on version 12.6.85 or lower. If that’s the case, you no longer require performing the lengthy steps below. Instead, directly skip stepping number 7 below.
Note: To verify the Play Services version, launch “Settings” followed by selecting “Apps/Applications”. Scroll down to “Google Play Services” and hit on it. You will then see the app version at the top of the screen.

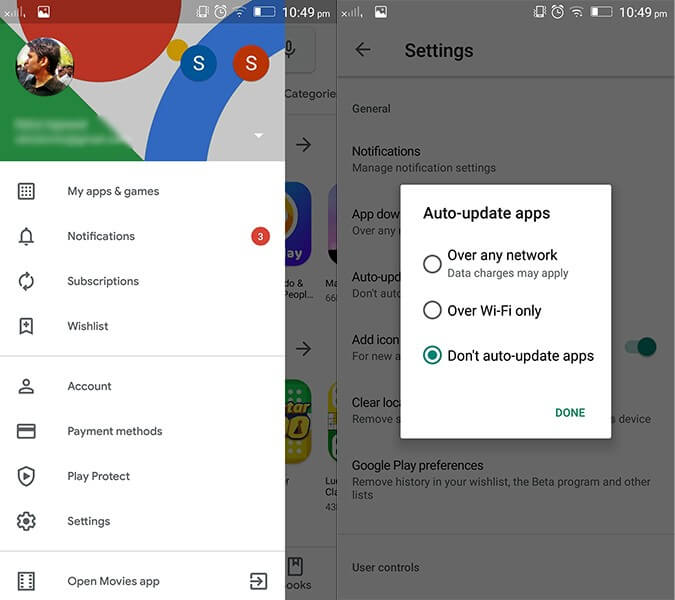
But if that’s not the case, you’re required to disable the Play Store’s auto-updates. For this, launch the Play Store and hit the “3 horizontal bars” at the top. Then, tap on “Settings” option from the appearing left panel followed by Auto-update apps available under “General” settings. Lastly, hit on the “Do not auto-update apps” option.
Next, get hold of Google Play Services (an older version) from the link here: https://www.apkmirror.com/apk/google-inc/google-play-services/google-play-services-12-6-85-release/
Note: Ensure to download the Google Play Services apk file that is closest to your Android version. But, remember not to install it now.
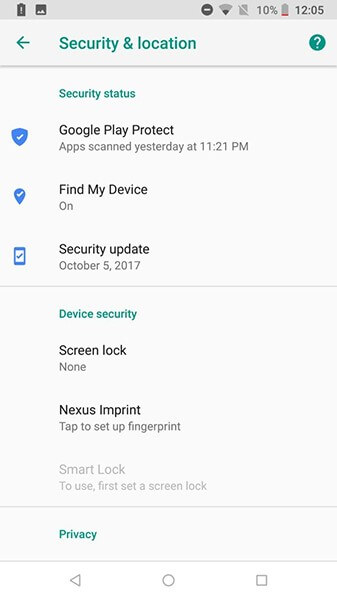
Once done, if “Find My Device” is enabled over your device, you need to get it disabled too. To do this, get into “Settings” followed by “Security & Location”. Now, hit on “Find my device” and toggle it off.
Likewise, disable “Google Play” and uninstall all its updates as well. To remove updates, get into “Settings” followed by “Apps/Applications”. Scroll down to “Google Play Services” and hit on “Uninstall updates”.
Note: If you’re unable to get this done, then you may need to disable the Android device manager in the first place. For this, get to “Settings” > “Security” > “Device Administrators” > disable “Android Device Manager first”.
Now is the time when you should install the Google Play Services apk (downloaded in step 3 above). Reboot your device afterwards.
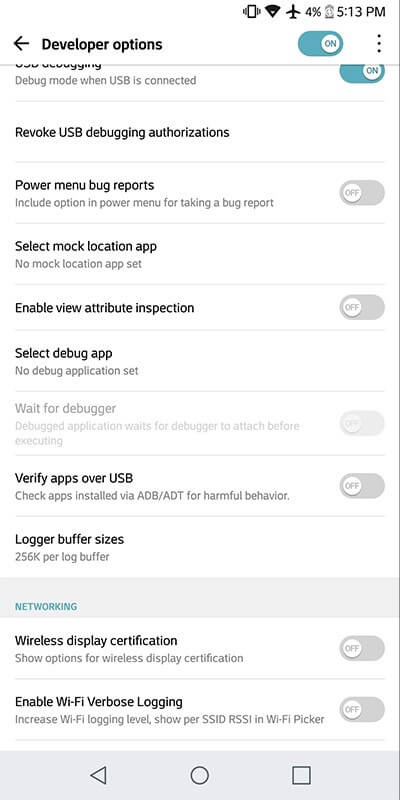
Subsequently, you need to again get into the “Settings” and then opt for “Developer Options”. Now, hit on “Select mock location app” and opt for “GPS JoyStick” here.
Lastly, launch the “GPS JoyStick app” and navigate to “Settings” followed by toggling on the “Enable Suspended Mocking” switch.

2.2 For Android 6.0 and Above (Old Security Patch) - BEFORE March 5, 2017
That was a detailed tutorial about the Android security patch level released “AFTER March 5, 2017”. But if your Android security patch level is before March 5, 2017, what would you have to do? Well, worry not, here is exactly what steps you need to follow to make use of the GPS joystick app to fake GPS location.
First, you need to navigate to the “Settings”. Then, opt for “Developer Options” and hit on “Select mock location app” followed by selecting the “GPS JoyStick” app here.

Lastly, launch the “GPS JoyStick app” to fake GPS location and navigate to “Settings”. Thereafter, toggle on the “Indirect Mocking” switch, and you’re done.

2.3 For Android 4 or 5
For the users of Android OS version 4 or Android OS version 5, there’s not much you need to do. Here is the exact method that you need to get through.
Get the “GPS JoyStick apk” installed over your device and then proceed to “Developer Options” available under the “Settings” menu. Then, hit on the “Select mock location app”.

Now, “GPS JoyStick app” to fake GPS location and get started with the FGL pro joystick control.
You will then have the FGL pro joystick control is visible on your Android screen. Thereafter, head back to the “Developer Options” and get the “Mock Locations” disabled.
Lastly, launch the “Pokemon GO” and you’re all set to fake GPS go with a joystick.
Part 3: How to bypass the blacklist of games like Pokemon GO
There are chances when you get caught by Pokemon Go for spoofing GPS location and get blocked/blacklisted for making use of fake GPS location apk. Here’s a workaround for bypassing the blacklist of games like Pokemon Go.
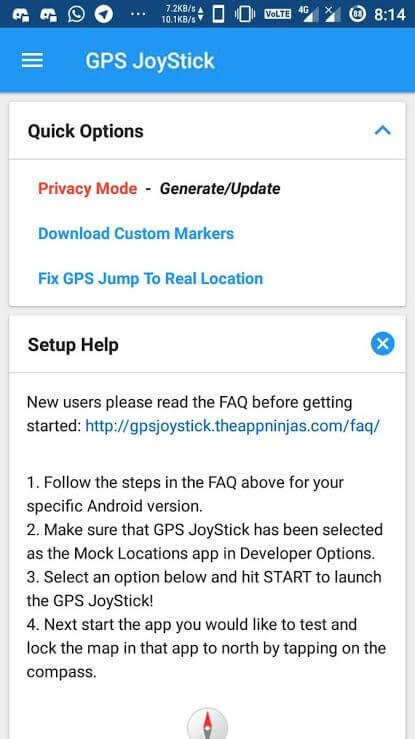
Download and then install the most recent version of GPS JoyStick apk. Now, launch it, and then hit on the “Privacy Mode” link available under the “Quick Options” section on the home screen. This will generate a unique copy of the app specifically for you.
Next, you need the generated app installed and get through with the setup process with the streak of steps listed below.
Now, you need to uninstall the original fake GPS joystick for Pokemon Go. Also, ensure that to uninstall every other spoofing/fake GPS apps that can potentially be on the Pokemon GO blacklist.
Thereafter, make use of the specifically generated GPS joystick on Pokemon Go to bypass the blacklist warning!
Lastly, utilize the “Update” button after hitting on the “Privacy Mode” link under the “Quick Options”. Then, navigate to the previously generated app from the appearing pop up. This will generate the update for it, and you’re all done.

Part 4: How to Use GPS Joystick to Fake Location on iPhone
When you fake GPS Joystick location, you can double the joy in playing location-based games like Pokemon go, Ingress, Zombies, Run, Geocaching, etc. All these games make use of the phone location, and it will be quite interesting if you move on with exciting places worldwide.
Do you want to fake GPS Joystick on iPhone?
Are you tired of searching for an effective GPS Joystick to fake location on the iPhone?
You would have ended up with a conclusion that there are no reliable and effective apps to fake location on the iPhone.
Dr. Fone’s specialist team presents Dr.Fone - Virtual Location for the gaming lovers to fake GPS Joystick on iPhone. You can now move the joystick to the desired location in no time using Dr.Fone.
Stepwise procedure to fake GPS with a joystick on iPhone
Step 1: Launch the app
After a successful download, install the app through the guiding wizard. Click the Dr.Fone app icon to explore its features. Using a USB cable, attach your iPhone with your PC.

Step 2: Set a virtual location
On the first screen of Dr.Fone app, choose the ‘Virtual Location’ option.

Step 3: Modify the location address
Tap ‘Get Started’ option then add a new address in the ‘Teleport’ mode. To choose ‘Teleport’ mode, you have to select the first icon at the top-right screen. Next, enter the address at the top left side of the window. You can enter any address around the globe to fake GPS joystick location.

Step 4: Changed Location in the app
Now the Dr.Fone app displays your desired address as your current location. You can verify it by spotting the location on the map view.

Step 5: Location on iPhone
Next, you must check your default current location in map view on iPhone, and you will witness the modified location in pace with your desired address.

Step 6: Play Pokemon Go without moving
Now use the “one-stop route” or “multi-stop route” to simulate the real-world movement without moving. Just play Pokemon go to explore new Pokemons on different locations and gain more points through an effective fake GPS joystick location app Dr.Fone.
Also read:
- [New] Best Ways to Record Video Without Sound for 2024
- [New] Essential URLs for Accessing Copyright-Free Gaming Scores for 2024
- [New] Unlock Clarity in Photos Leading 10 Online Edits at a Glance
- [Updated] Masterful Podcast Descriptions Strategies and Case Studies
- How to Change Google Play Location On Asus ROG Phone 7 Ultimate | Dr.fone
- How to Change Netflix Location to Get More Country Version On Realme Narzo N53 | Dr.fone
- How to Share Location in Messenger On Motorola Moto G14? | Dr.fone
- How To Stop Mass Effect Legendary Edition From Stopping Unexpectedly - Tips for Xbox & Computer Players
- How To Use Special Features - Virtual Location On Motorola Edge 40 Pro? | Dr.fone
- In 2024, 9 Best Free Android Monitoring Apps to Monitor Phone Remotely For your Realme GT 5 | Dr.fone
- In 2024, Can Life360 Track Or See Text Messages? What Can You Do with Life360 On ZTE Nubia Z60 Ultra? | Dr.fone
- In 2024, Refurbished Apple iPhone 12 Everything You Need to Know | Dr.fone
- Slash Prices for Top-of-the-Line Game Monitors in Time for Samsung's Epic Gaming Festival Sale!
- Will the iPogo Get You Banned and How to Solve It On Xiaomi Redmi 13C | Dr.fone
- Title: How To Use Special Features - Virtual Location On Vivo Y100i Power 5G? | Dr.fone
- Author: Ava
- Created at : 2024-10-27 16:18:28
- Updated at : 2024-10-28 19:28:28
- Link: https://fake-location.techidaily.com/how-to-use-special-features-virtual-location-on-vivo-y100i-power-5g-drfone-by-drfone-virtual-android/
- License: This work is licensed under CC BY-NC-SA 4.0.