
In 2024, 3 Ways to Change Location on Facebook Marketplace for Oppo Find N3 | Dr.fone
3 Ways to Change Location on Facebook Marketplace for Oppo Find N3
Facebook Marketplace is a hub designed within Facebook that enables Facebook users to buy and sell stuff online. This marketplace has optimized the chances of buying and selling legit stuff, including household appliances, clothes, and electronic devices. You must enter the pictures of that product and write a good description.
All the potential buyers from the nearest locations will access it. Moreover, you can look up stuff on the marketplace and order your favorite product with just simple clicks. It is also possible if you want to change the location of marketplace listings to attract buyers and sellers of your nearby areas.
The following discussed points in the article will teach you how to change location on the Facebook marketplace:
Part 1: How to Change Location on the Facebook Marketplace on iOS and Android Devices
The Facebook Marketplace is a feature that finishes the gap between social media and digital marketplaces. With this helpful feature, you can now buy and sell items on your Facebook account to other Facebook users. In addition, you can filter the listings and see the buyers from a specific location by changing to a location.
Here, we will teach you the steps involved in changing the FB Marketplace location on your Android and iOS devices:
Step 1: The first step requires you to open the Facebook app on your Oppo Find N3 or iPhone. Login to your Facebook account to initiate the procedure.

Step 2: If you have an Android device, you will see a hamburger icon situated at the top-right corner. You have to click on it to access the Facebook menu. Or, if you have an iPhone, click on the three dots on the bottom side of the application.
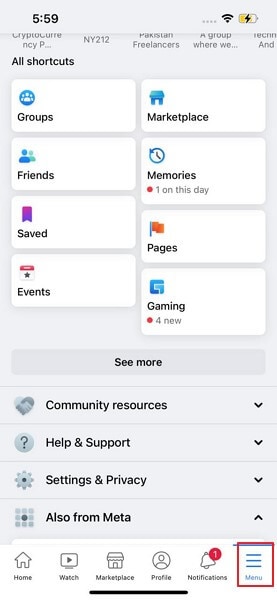
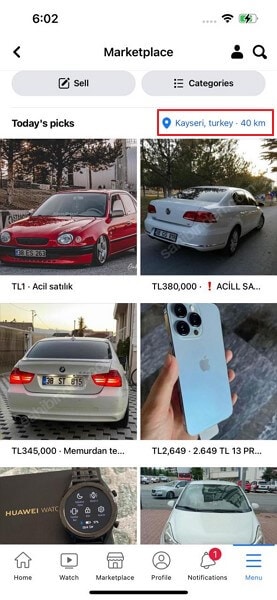
Step 3; After doing the prior step, you will now access the “Facebook Marketplace” feature. Your current location will be written in blue on the upper-right side of the existing Marketplace listings. You should click it to change your Marketplace location.

Step 4: Use the “Search Bar’ at the top of the screen to search and select the new location. After entering the target place, tap on the “Apply” button. You can also adjust the distance slider below “Custom radius” to change the location.

Step 5: Now, the Facebook Marketplace will refresh. You will now be able to see new listings for the selected location.
Part 2: How to Change Facebook Marketplace Location on Facebook Website
If you are using Facebook from a browser, it is also achievable to change the location and control the listings yourself. To perform this process on a browser, follow the given steps and achieve the Facebook marketplace change location:
Step 1: Access Facebook through the browser of your choice and sign in to your Facebook account.
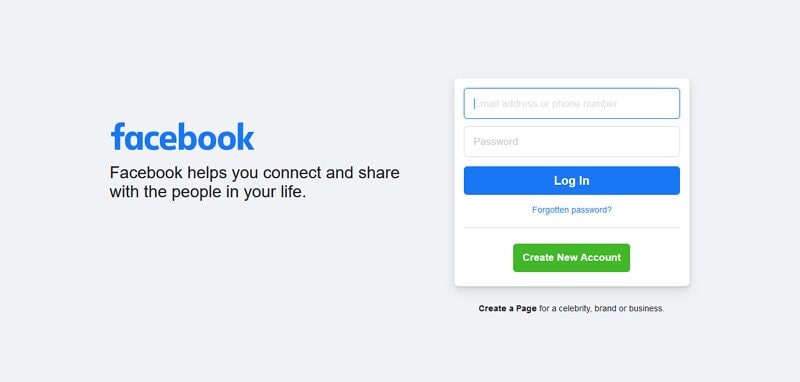
Step 2: There will be a “Marketplace” icon; click on it. Now, the current location will be displayed on the screen. You have to tap on your current location to fake the location of your marketplace.

Step 3: Enter the desired location and hit the “Apply” button. The listing search radius can also be changed with the help of the dropdown button.

Step 4: Facebook marketplace will be refreshed, and your new listings for the selected location will be visible.

Part 3: Facebook Marketplace Location Won’t Change? One-Click to Solve It
Dr.Fone – Virtual Location is an application that allows users to change their device location virtually. You can quickly teleport the GPS location to places of your choice. It is now super-easy and secure to virtually change your current location, bypass all the restrictions, and filter the listings on your Facebook marketplace.
What Makes Dr.Fone – Virtual Location the Best Solution?
The application holds a wide range of uses and characteristics, so it is considered the best way to change location. The following key points are mentioned why it is the best location changing solution available:
Dr.Fone - Virtual Location
1-Click Location Changer for both iOS and Android
- Teleport from one place to another across the world from the comfort of your home.
- With just a few selections on your computer, you can change the location on your Facebook marketplace.
- Stimulate and imitate movement and set the speed and stops you take along the way.
- Compatible with both iOS and Android systems.
- Work with location-based apps, like Pokemon Go , Snapchat , Instagram , Facebook , etc.
3981454 people have downloaded it
Simple Steps to Fake your Location on Facebook Marketplace
The following step guide will assist you in changing the location of the marketplace listing to get targeted buyers or sellers for the Facebook marketplace:
Step 1: Install the Program
The first step requires downloading Dr.Fone- Virtual Location (iOS/Android). Now, install it and launch the software on your PC.
Step 2: Connect your Phone
Click on “Virtual Location” from the available options and connect your phone to the computer with a USB cable. IPhone users, once connected, can link the software with Wi-Fi without any USB cable. Now, press the “Get Started” button.

Step 3: Provide your Desired Location
Now, activate the “Teleport Mode” by clicking the first icon on the upper-right side. Next, enter the target place you want to teleport to and click on the “Go” button.

Step 4: Change your Location
Now, click on “Move Here” in the popup box, and your location will be changed. Your Android or iOS device location will be shifted to the added location now. Then, you can open Facebook and see the buyers and sellers of the given location in the Marketplace.

Part 4: FAQs about Facebook Marketplace
- What are the extra services for me after changing my location on Facebook Marketplace?
There are no extra services given on the Facebook Marketplace after changing the location. You will be able to access the audience of the selected location.
- Is it secure if I give my address on the Facebook marketplace?
You must not offer your full name and your contact details. Meet in a safe and public place such as a park, restaurant, shopping mall, or police station. However, you still should not give your details to the buyer.
- Why is my Facebook marketplace displaying the wrong address?
You might have used a VPN service in the past, which affected your actual address on the Facebook Marketplace. Don’t worry, as you can change the current location with a mere click.
- How to change the Facebook marketplace plan?
There is no plan required to use the Facebook Marketplace. This feature is entirely free for all Facebook users.
- How to maximize sales on the Facebook marketplace?
There are various methods to attract more buyers to you. First, try to optimize the Facebook listing by adding more keywords in the description and title. Also, write a longer description and explain more details about the item. You can also hire a photographer who will take good pictures of your product.
Conclusion
The article concludes with how to change location on the Facebook Marketplace to perceive buyers and sellers of your nearby areas. This way, you will be able to meet the buyer or seller yourself and discuss the product peacefully. With Dr.Fone - Virtual Location , you can change the location of the marketplace listing and teleport to a place you want to sell/buy in.
 safe & secure

8 Solutions to Fix ‘Find My Friends Location Not Available’ On Oppo Find N3
There is no doubt that Find My Friends is an excellent application for location tracking. It allows users to track the location of their friends and family members through a variety of devices. So, when Find My Friends says the location is not available, it can be a frustrating situation. But don’t stress over this because we are here to assist you in Find My Friends not working. Go through this guide, and you’ll know what to do to take care of the problem.

Part 1: What Does “Location Not Available” Mean on Find My Friends?
When the “Location Not Available” message appears on Find My Friends, it means that you have disabled location sharing or have turned off your device’s location services. This message can also appear if your device is in an area with poor network coverage or if your device is turned off. In some cases, the message can indicate that you have logged out of your iCloud account or that there is an issue with the iCloud server.
Does “Location Not Available” mean that there is something wrong with Oppo Find N3 ?
Not! This message does not necessarily mean that you have blocked yourself or there is something wrong with your device. If you frequently see the “Location Not Available” message, you may need to check your own device’s settings or contact your friends to confirm their location-sharing preferences.
How to distinguish “No Location Found” and “Location Not Available”?
“No Location Found” means that the Find My app is unable to locate the Oppo Find N3 device being tracked. This can happen for a variety of reasons, such as if the Oppo Find N3 device is turned off, not connected to the internet, or if location services are disabled.
“Location Not Available” means that the Oppo Find N3 device is not currently sharing its location with the Find My app. This can happen if the Oppo Find N3 device is in Airplane mode or if the user has turned off location sharing for the Find My app. It can also happen if there is a temporary issue with the iCloud servers.
In summary, “No Location Found” means the app could not locate the Oppo Find N3 device, while “Location Not Available” means that the Oppo Find N3 device is not currently sharing its location.
Part 2: Possible Reasons For Find My Friends Location Oppo Find N3 Not Available
Why does Find My Friends say location not available? Before we get to the solutions, let’s explore the possible reasons behind this problem. It is apparent that when the location is not found on Find My Friends, there is an underlying problem. Here are the possible reasons that could cause this error:
- Your friend’s device has an inaccurate date
- The other device isn’t connected to a network, or it’s off
- Hide My Location feature is active on your friend’s phone
- The Location Services are also turned off on the friend’s device
- Your friend hasn’t signed in to the service
- The location of your friend is in a country or region where Apple doesn’t provide this feature
All these reasons can be the ones causing trouble on your Oppo Find N3 and Android phones. Hence, you will have to look for some conventional methods to fix the unavailable location error.
Part 3: 8 Tips To Make “Find My Friends Location” Available
When the Find My Friends app location is not available, here are some more tips that can help get rid of this issue.
Tip 1: Check if Find My Friends is Supported in Region/Country
The foremost thing you should do when the Find My Friends location is not available is to check the region/country’s location. Apple Inc still hasn’t provided the Find My Friends feature in all countries and regions due to local laws and technical issues. So, the most plausible reason for the app not working properly is solely because it is not available in that particular country/region.
Tip 2: Quit and enable GPS or Location Services again
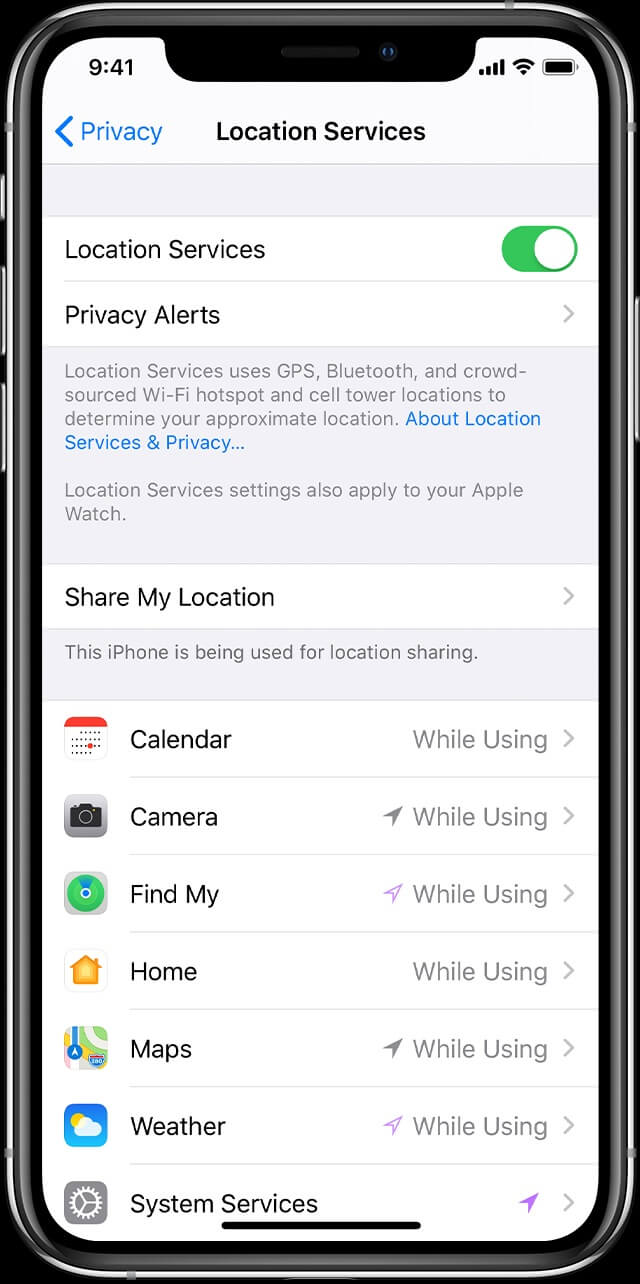
After verifying that the feature is available in your region, enable the GPS & Location Services. In case you’ve already enabled the feature, turn it off, quit the app, and again enable the service. It might fix the location not found on the Find My Friends issue you’ve been facing. Just open Settings > Privacy & Security > Location Services and toggle the bar to turn the feature on or off.
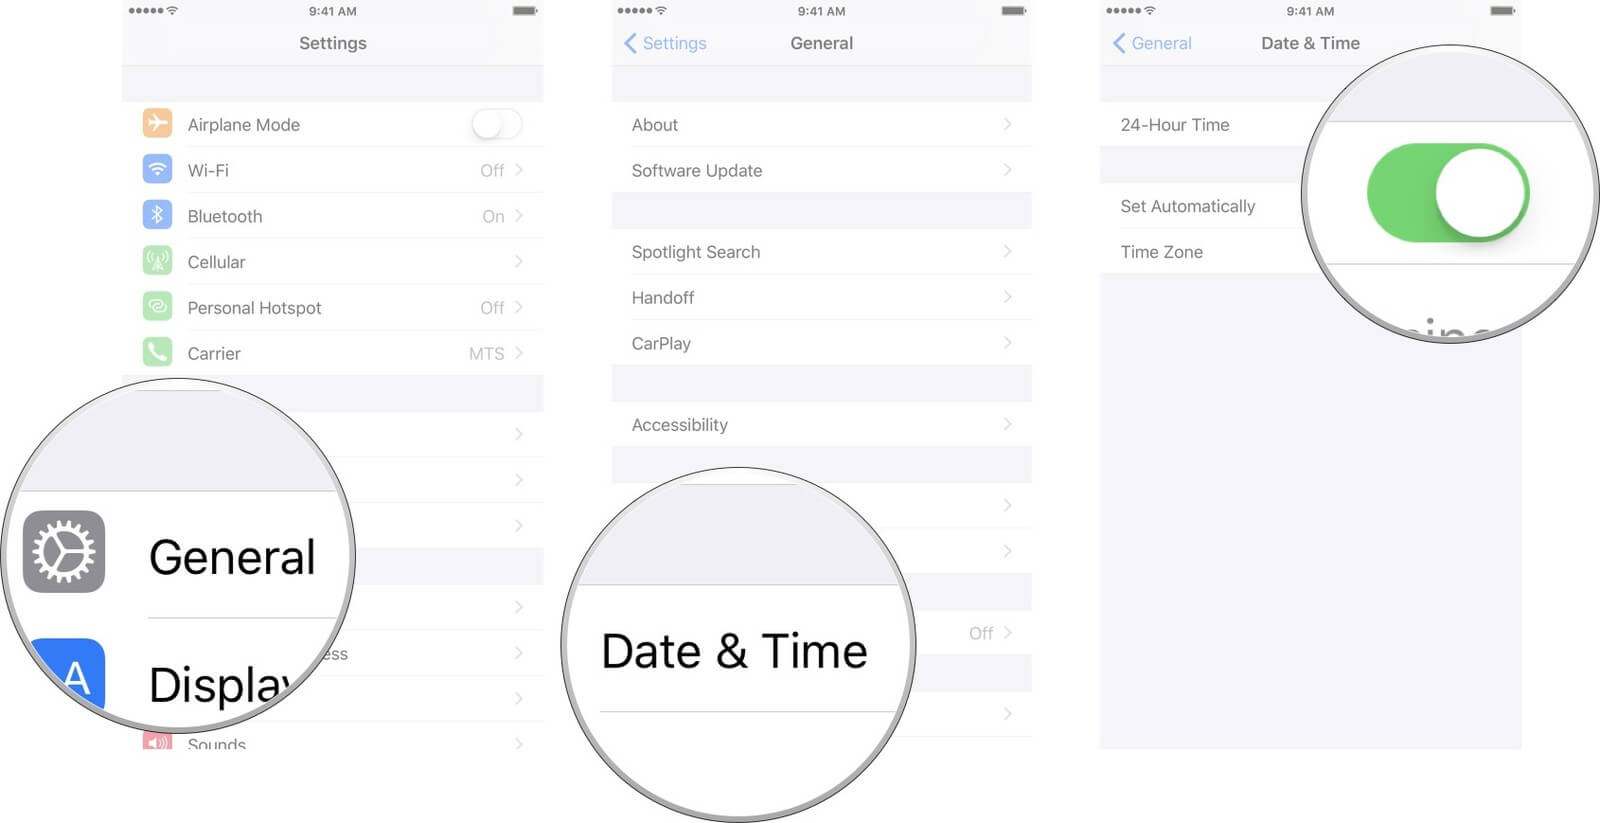
Tip 3: Adjust Oppo Find N3 Date and Time
As we stated in the possible reasons, incorrect dates and times also result in this problem. If you have manually set the date and time, change the settings and set it to “Set Automatically” in General Settings. Hopefully, this will resolve the problem when the Find My Friends location is not available.
Tip 4: Check the Internet
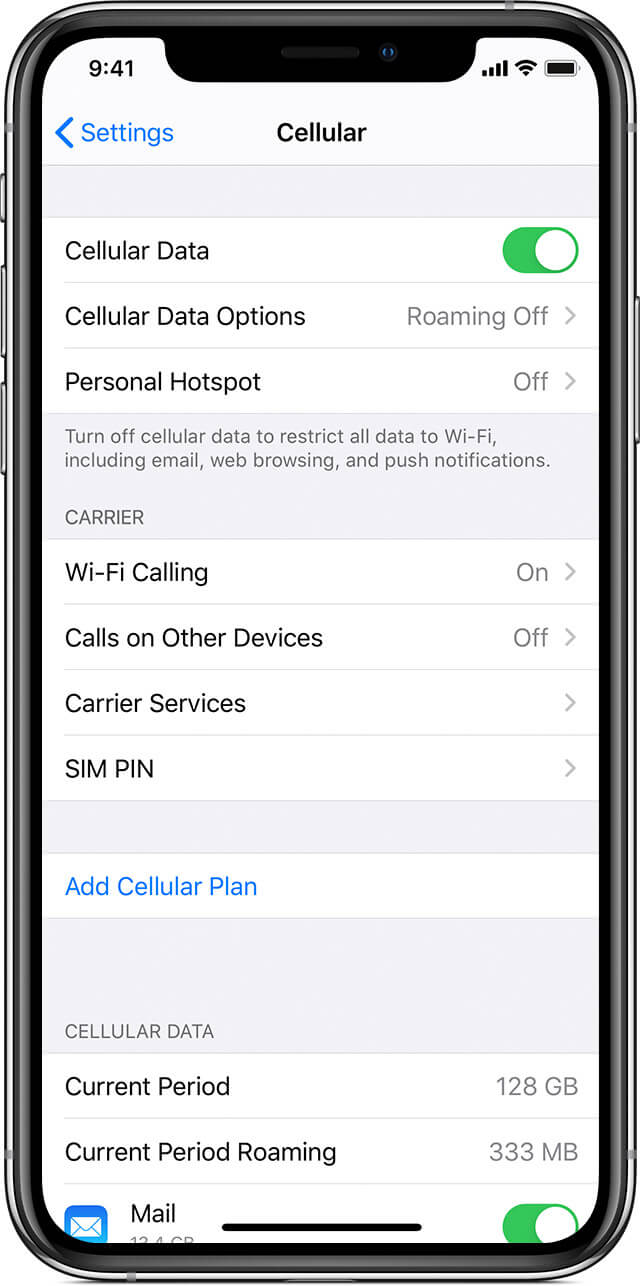
Before you conclude that there is something wrong with the Find My Friends app, check your internet connection. There is a chance that location is not available on the Oppo Find N3 because your device doesn’t have internet access. Try opening Settings > Mobile Data/Wi-Fi and turning it on and off. Alongside, make sure that you have signal strength, whether you are connecting to cellular data or a Wi-Fi network.
Tip 5: Enable Share My Location
Another tip to try out when your friend’s location is not available is to make certain that you’ve enabled Share My Location feature. To do this, follow the steps given below:
Step 1: For Oppo Find N3 users: get to the “Settings” app and go to “Privacy & Security”. You will find the “Location Services” feature, click on it, and see the “Share My Location” feature.

Toggle on the option to enable it. Once the feature is enabled, your friends will see your location, and you can see theirs.
For Android users, go to “Settings” > “Additional settings” > “Privacy” > “Location”, and choose the location mode to enable it.
Tip 6: Restart the Oppo Find N3 or Android Phones
The next tip to use when Find My Friends says location not available is restarting your phone. For most devices, the method is common. But for Oppo Find N3 X and 11, the steps are slightly different. For other Oppo Find N3 models, press the Power button and wait until the slider appears. For Oppo Find N3 X and 11/12/13/14, you’ll have to hold the Volume button and the Power button together to make the slider appear on the screen.

Drag the Power slider to the right side and wait for the Oppo Find N3 device to shut down. Wait for a minute before you restart the Oppo Find N3 device, and hopefully, the feature will start working again as usual.
Tip 7: Check That Your Friend Has Signed into Find My Friends
Another tip that can help you resolve to Find My Friends location not available is checking that your friend has signed into the app. It is apparent that if your friend hasn’t logged into the feature, you won’t access his/her location.
Open the Find Friends app, log into it, and enable the location-sharing feature.
Tip 8: Quit Find My Friends App and Open It Again
Last but not least valuable tip to use when the Find Friends location is not available is to quit the app. There is a possibility that you’ve faced the problem only because of a momentary issue or some random glitch. Make sure that you also clear the cache memory before opening the app again. It might fix the problem entirely.
Extension: Can I send the fake location by Find Friends to others?
With Dr. Fone - Virtual Location software, you will be able to share a fake or any location you want with your friends and family. Alongside this, Dr. Fone will also pace up your movement to ensure that your friends and family members won’t find out that you share fake locations with them. The video below teaches you how to teleport your Oppo Find N3 GPS location, and more tips and tricks can be found in the Wondershare Video Community .
Here is a video for you to learn how to fix Oppo Find N3 Find My Friends location not available:
To use Dr.Fone - Virtual Location, here are the steps you need to follow:
Step 1: Download the virtual location app for both iOS and Android and install it on your system carefully. Then, launch the app and select the “Virtual Location” option from the toolkit.
Step 2: The next step is to set up the phone’s connection. Connect your Oppo Find N3 and click on the “Get Started” button. Now, detect your current virtual location by clicking on the “Current Virtual Location” icon.

Step 3: Now go to the search box and type the location you want to switch to. Once the location gets detected, click on the “Move Here” option, and the location of your Oppo Find N3 or Android phone will change to the one you specified.
As you can see, when you have Dr.Fone - Virtual Location software, you can share any location with just one click. And it would seem that your Find My Friends app is working fine.
FAQs You May Want to Know about Oppo Find N3 Location
1. Is there a way to check if someone has stopped sharing their location with you on their Oppo Find N3 ?
If someone stops sharing their location with you on their Oppo Find N3 , you will see “Location Not Available” next to their name in the Find My app or Messages app. You can check the status of location sharing by tapping their name in the Find My app.
2. Can I track a stolen Oppo Find N3 if it is turned off?
You may still be able to track a stolen Oppo Find N3 if it is turned off using the Find My app or iCloud website. However, this depends on several factors, such as whether the Oppo Find N3 device is connected to a Wi-Fi or cellular network, and whether the person who stole the Oppo Find N3 device has turned off location services.
3. Can I track someone else’s Oppo Find N3 location without their permission?
No, you cannot track someone else’s Oppo Find N3 location without their permission. The Find My app only allows you to track the location of devices that are signed in with your Apple ID, and you need the other person’s permission to share their location with you.
4. Can I prevent someone from tracking my location?
Yes, you can take steps to prevent someone from tracking your phone’s location. Here are some measures you can consider:
- Turn off location services or GPS.
- Adjust app permissions.
- Use airplane mode.
- Use a VPN or professional location changer tool like Dr.Fone - Virtual Location to change your phone location .
- Check for spyware.
- Turn off Wi-Fi and Bluetooth.
- Review privacy settings.
- Be cautious with social media.
- Use encrypted messaging.
- Avoid public Wi-Fi.
- Clear location history.
Taking these precautions can help safeguard your phone’s location and enhance your privacy. It’s important to stay vigilant and be aware of the privacy settings and permissions on your device.
Dr.Fone - Virtual Location
1-Click Location Changer for both iOS and Android
- Teleport from one location to another across the world from the comfort of your home.
- With just a few selections on your computer, you can make members of your circle believe you’re anywhere you want.
- Stimulate and imitate movement and set the speed and stops you take along the way.
- Compatible with both iOS and Android systems.
- Work with location-based apps, like Pokemon Go , Snapchat , Instagram , Facebook , etc.
3981454 people have downloaded it
Conclusion
Hopefully, now you know “why is find my friends not working” and several ways to fix the Find Friends location not available. In this guide, we learned all these tips to make it easy for Oppo Find N3 users to rectify the issues with the Find Friends app. Check all the tips carefully and implement them whenever you face issues like this.
All Must-Knows to Use Fake GPS GO Location Spoofer On Oppo Find N3
It is highly risky to share sensitive information like location details on social media. Most social media access the location details when you perform any sort of activity on their platform. You would have given permission while installing the app for the first time on your phone. These details interest the criminals to commit the theft act at your place when you are on a vacation.
Do you know how to avoid such a situation? It is simple, try to trick the location details using Fake GPS Go Location Spoofer.
You can also make use of this app to spoof your location while playing location related games like Pokemon. This could give a chance to explore unique and more Pokemons around the globe. Those who make use of social media and play games online should know how to spoof location using an incredible app. Just scroll down to discover the techniques.

Part 1: About Fake GPS GO Location Spoofer
The Fake GPS Go Location Spoofer is the best app to trick the location details on the online space. This app implements the strategy promptly to acquire flawless results. The basic idea behind the fake GPS concept is that a false coordinates with respect to the Oppo Find N3 device on the space recorded to the cyber grounds hiding the original location details.
The method adopted to embed this strategy varies with one app to another. The Fake GPS Go Location Spoofer handles this concept wisely and offers a simple procedure to achieve this task.
Features of Fake GPS Go Location Spoofer
- Exclusively designed for the Android Versions
- No need for Root mode
- The update version is available every now and then on the internet
- Fewer steps to complete this process
- No prior technical skills are necessary to understand the procedure
- Spoofing occurs just by a single tap on the app
- Awesome user interface
- Consistent introduction of app updates with solved bugs based on the feedback from the users
- Quick response to the user’s feedback from the team of Fake GPS Go Location Spoofer app
- Great customer service

Part 2: Fake GPS GO Location Spoofer: the For and Against voices
The FOR Voices on Fake GPS GO Location Spoofer
This app is helpful while playing games related to location. You can mock your friends and family for fun with the help of Fake GPS Go Location Spoofer app. Due to its versatile design, there are many ‘For Voices’ on the internet. The persuasive feature of this app attracts users from all age groups.
Voices of the Happy Users
- Precise location spoofing without any flaws
- Excellent tutorials to guide the novice users
- Free from unwanted advertisements
- Restores to the original location when required
- Outstanding compatibility with all versions of Android devices
- Ease Installation and setup process
- Flexible and customizable
The Against Voices on Fake GPS GO Location Spoofer
There exist disappointed users struggling to understand this app. The user’s face issues only if they were not able to follow the instructions promptly provided by the development team of Fake GPS Go Location Spoofer.
Voices of the disappointed users
- Some of the users struggle to work on this app considering it as a technical software
- Confused with the updates
- The updated versions were not appreciable
- It doesn’t work well with the Pokemon Go game
- This app download from Google Play store is not reliable

Part 3: How to use Fake GPS GO Location Spoofer on your Android
Step 1: Go to the Google Play Store and type ‘Fake GPS Go Location Spoofer’ on the search box in your Oppo Find N3 to download this app.

Step 2: Soon after the successful download tap ‘Open’ button.
Step 3: Allow the app to access the Oppo Find N3 device’s location

Step 4: Accept the Advertising terms to proceed

Step 5: Next, you have to enable the ‘Mock Location’ option in the ‘Developer Option’ window. To do that you must go to ‘Settings-> Software info -> Built Number’. Tap the ‘Built Number’ few times based on the model of your Oppo Find N3 to unlock into the ‘Developer option’. In the ‘Developer Option’, choose ‘Select mock location app’.

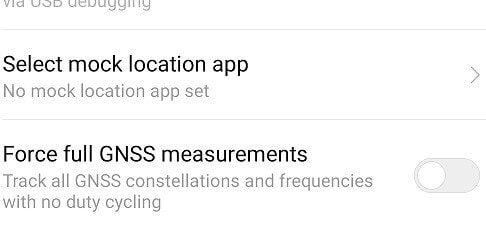
Step 6: inside the ‘Select mock location app’, you have to click the ‘FakeGPS Free’ to enable the mock location feature

Step 7: Now go to the ‘Fake GPS Go Location’ app and select your favourite spot on the map. Then press the ‘Play’ button. Select ‘Without Ads’ option to implement the changes accordingly.


Step 8: Finally, you have changed the default current location in your device using the Fake GPS Go Location Spoofer app successfully.

Step 9: Close this app and open the Google Map to check your current location you will be surprised to view the placeholder stays on your favourite spot thereby mocking the original location.

Part 4: Any other better alternative to Fake GPS GO
In this section, you will learn about the alternative tool to Fake GPS Go. The name of the alternative app is ‘Fake GPS Location’. It is a new app released this year 2019 to serve the users in a better way. You can download this software at Google play store without any issues.
Step 1: Check-in to play store and type ‘Fake GPS Location’ in the search bar. Tap the ‘Install’ button to trigger the downloading process.

Step 2: Open the app after the download process

Step 3: Allow the app to access the Oppo Find N3 device location and accept the ‘Cookies’ to work on this platform
Step 4: Now, you must enable the ‘Mock Location’ option through the settings. To do so click the ‘Settings’ then ‘Additional Settings’ finally hit the ‘Developer option’. Tap ‘Select Mock Location’ and choose ‘Fake GPS Pro’ from the displayed list. Now switch on to the app to proceed further.


Step 5: To implement the fake location you must select the desired place on the map and tap the ‘Play’ button. It will lead to another screen requesting for permission.

Step 6: Enable the settings and grant permission to fake the location on your device

Step 7: At last, the fake location is marked on your device using this app. Your device will show up this new location irrespective of your current place.

Now you had a clear picture of the ‘Fake GPS Location’ app in a detailed manner. It is enough if you follow the steps carefully to mark the fake location in no time.
Conclusion
There are many apps related to fake GPS on the internet space and spotting the right app is quite challenging. This article has given great guidance to choose the perfect tool to meet all the requirements precisely without regrets. The procedure is very simple and you can work on it by tapping the options accordingly.
Make use of the ‘Fake GPS Go Location Spoofer’ app to protect your live location details. With the help of this app, you can surf through any social media and play online games without any fear. Conceal the location information and increase your privacy through innovative products at the Google play store.
Part 5: Fake GPS GO has no app for iPhone? What to do?
Tricking the location by Fake GPS Go location spoofer can come in handy under many situations. However, when it comes to iOS devices, the users may get annoyed as the app has no iOS version. Therefore, you should be thankful to Dr.Fone – Virtual Location (iOS) that helps you serve the purpose without any Fake GPS Go apk. The tool is designed by Wondershare and never disappoints users for faking location. Let us know how you can pretend to be somewhere in an iOS device sans Fake GPS Go.
Mode 1: Teleport Anywhere
Step 1: To work with this Fake GPS Go’s alternative, install and launch it on PC. Click “Virtual Location” tab on the main screen.
Step 2: Take your iOS device and establish connection between PC and device. Hit on “Get Started” button now.

Step 3: You will notice your current location on the map. If not, hit the “Center On” located at the lower right on the screen.
Step 4: Choose the third icon on the upper right part of the screen from the three given icons. This is “teleport mode”. Enter the name of the location where you need to teleport and click “Go”.
Step 5: Then entered place will be recognized by the program and you need to click “Move Here” option in the pop-up dialogue.
Step 6: The location will be changed successfully. You can now see on the map or in the location based app in iPhone, the spot will be seen as the same you selected.

Part 2: Movement Simulation Between two Places
Step 1: Launch the tool and look for the first icon at the upper right screen which is “one-stop route”. Choose the place you want to travel on the map. You will know the distance in the pop-up box.
Step 2: The slider located below the screen needs to be dragged to set the speed of travelling. You can choose cycling speed or the speed you want. Hit on “Move Here” afterwards.

Step 3: Next, key in a number that will define the number of times you want to travel the route back and forth. Hit “March” option.

Step 4: Now, the position will be seen moving as per the chosen speed on the map. And this is how you can fake the movement sans Fake GPS Go apk.

Part 3: Simulate Route Movement for Multiple Locations
Step 1: For multiple spots, you need to click the “multi-stop route” after entering map interface. This mode is the second icon on the upper right side. Now, select the multiple places one by one where you want to pass.
Step 2: The pop-up will show the distance where you need to hit the “Move Here” button. Choose the moving speed.

Step 3: Enter a digit for how many times you want to take route and click “March”. This will begin the movement simulation.

Dr.Fone - Virtual Location
1-Click Location Changer for both iOS and Android
- Teleport from one location to another across the world from the comfort of your home.
- With just a few selections on your computer, you can make members of your circle believe you’re anywhere you want.
- Stimulate and imitate movement and set the speed and stops you take along the way.
- Compatible with both iOS and Android systems.
- Work with location-based apps, like Pokemon Go , Snapchat , Instagram , Facebook , etc.
3981454 people have downloaded it
Also read:
- [New] Crafting a Revenue-Driven Approach to YouTube Content Creation for 2024
- [Updated] 2024 Approved A Step-by-Step Guide to Amplify Your Content Through Spotlighting
- [Updated] Security First Legitimate TikTok Fan Buys
- [Updated] Unlocking the Potential of Aiseesoft for Video Documentation
- 2024 Approved Budget-Friendly 4K Imaging Sources
- How to Unlock Tecno Phantom V Fold Phone Password Without Factory Reset?
- How To Use Special Features - Virtual Location On Samsung Galaxy M54 5G? | Dr.fone
- In 2024, 3uTools Virtual Location Not Working On Vivo T2 5G? Fix Now | Dr.fone
- In 2024, 5 Best Route Generator Apps You Should Try On Vivo S18e | Dr.fone
- In 2024, 5 Hassle-Free Solutions to Fake Location on Find My Friends Of Tecno Camon 20 Premier 5G | Dr.fone
- Methods to Change GPS Location On Honor Play 40C | Dr.fone
- Sweep Viewers Off Their Feet Templates That Work Wonders
- What is Fake GPS Location Pro and Is It Good On Vivo Y100? | Dr.fone
- Title: In 2024, 3 Ways to Change Location on Facebook Marketplace for Oppo Find N3 | Dr.fone
- Author: Ava
- Created at : 2024-10-17 23:43:42
- Updated at : 2024-10-22 23:02:02
- Link: https://fake-location.techidaily.com/in-2024-3-ways-to-change-location-on-facebook-marketplace-for-oppo-find-n3-drfone-by-drfone-virtual-android/
- License: This work is licensed under CC BY-NC-SA 4.0.