
In 2024, A Detailed VPNa Fake GPS Location Free Review On Poco C51 | Dr.fone
A Detailed VPNa Fake GPS Location Free Review On Poco C51
As I stumbled upon this query that has been recently posted on a leading online forum, I realized that so many people don’t know about the VPNa Fake GPS app. If you are also an Android user who would like to change your device’s location, then VPNa Fake GPS APK might meet your requirements. Since there are so many location spoofing tools out there, I decided to give VPNa Fake GPS location app a try and have come up with its genuine review here.
Part 1: VPNa Fake GPS Location Free: Features, Pros, Cons, and More
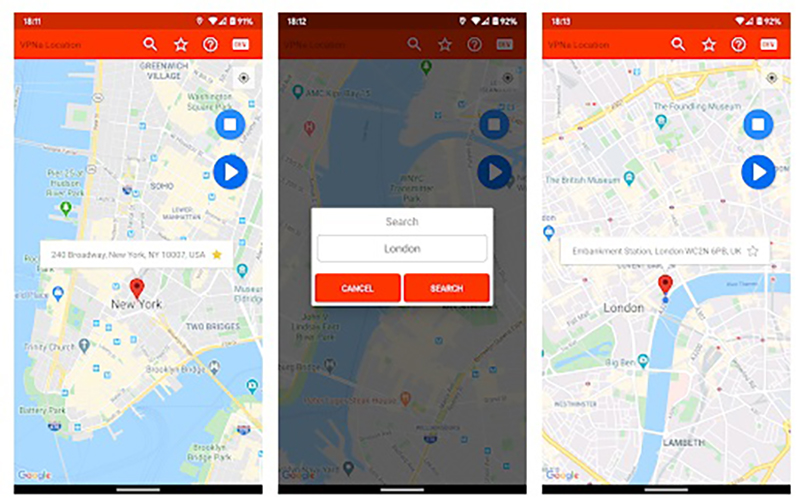
Developed by XdoApp, VPNa Fake GPS is a popular application that can change the location of your Android virtually. Using it, you can spoof your device location to almost anywhere in the world. This would be reflected in almost all the installed gaming, dating, and other apps on your phone automatically.
- You can look for any location on the interface of VPNa Fake GPS by entering keywords (name/address) or the exact coordinates (longitude and latitude) of the place.
- To fake GPS using VPNa, you would be presented with a map-like interface and can easily move the pin around to spoof your location to an exact place.
- Besides that, if there is a location that you change frequently, then you can also mark it as a favorite.
- The VPNa fake GPS location APK would also maintain the record of the past locations that you have spoofed.
- Using VPNa Fake GPS, you can change your location as many times as you want without paying anything.
Pros
- The changed location would be reflected in almost every dating and gaming app.
- The basic version of VPNa Fake GPS is available for free and doesn’t need root access.
- The overall interface of VPNa Fake GPS APK is pretty user-friendly and smooth.
Cons
- At times, some advanced apps (like Pokemon Go) can detect it and might get your account banned.
- While using the free VPNa fake GPS version, you would get in-app ads.
- Sometimes, the location is not spoofed even after consecutive attempts.
Pricing: While you can access the basic version of VPNa Fake GPS for free, you can pay $2.99 for an ad-free experience.
Compatibility: Android 4.4 and newer versions
Play Store Rating: 3.6/5
Important Note
Don’t get confused by the name of VPNa Fake GPS as it is not a VPN, but only a location spoofing solution. If you are looking for a VPN app, then you should consider other options.
Final Verdict
Overall, VPNa Fake GPS location free is worth a try. It is pretty lightweight, easy-to-use, and supports almost all the prominent apps. Since you don’t have to pay anything to use VPNa Fake GPS, you can give it a try, and explore it on your own.
Part 2: How to Use VPNa Fake GPS Location Free to Spoof Your Location?
Now when you know how VPNa fake GPS Location Free works, let’s quickly understand how to use it to change the location on any Android phone.
Step 1: Enable Developer Options on your phone
To set up a mock location app, you need to first enable the Developer Options on your device. To do this, just go to its Settings > About Phone and tap on the “Build Number” feature 7 consecutive times.
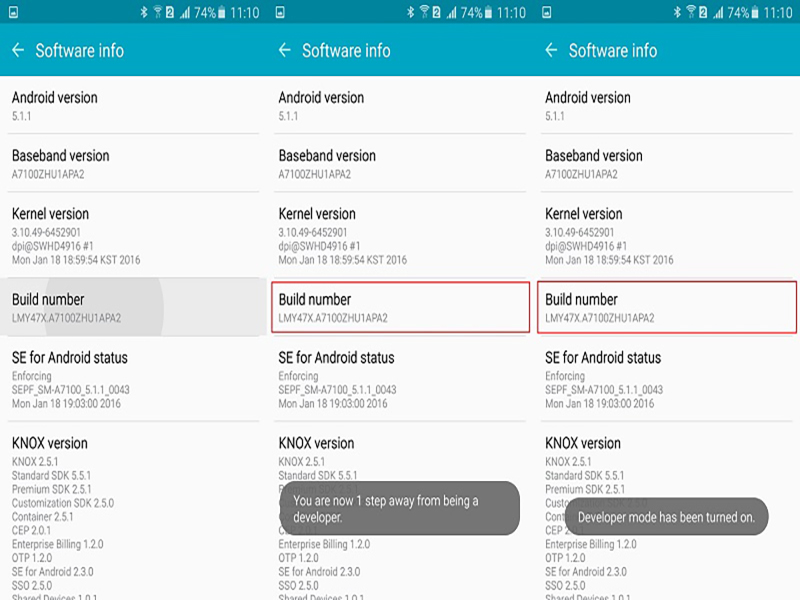
Once it is done, go to its Settings > Developer Options and turn on the option to set a mock location on your phone.
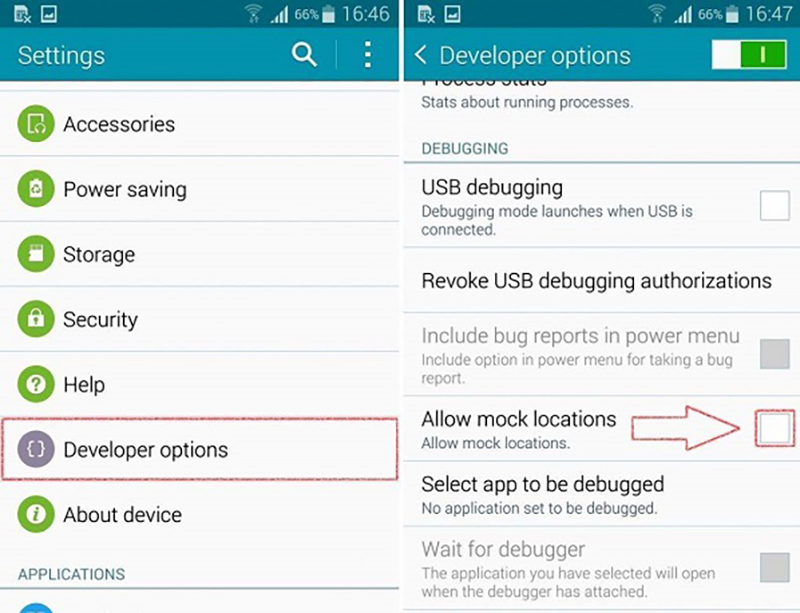
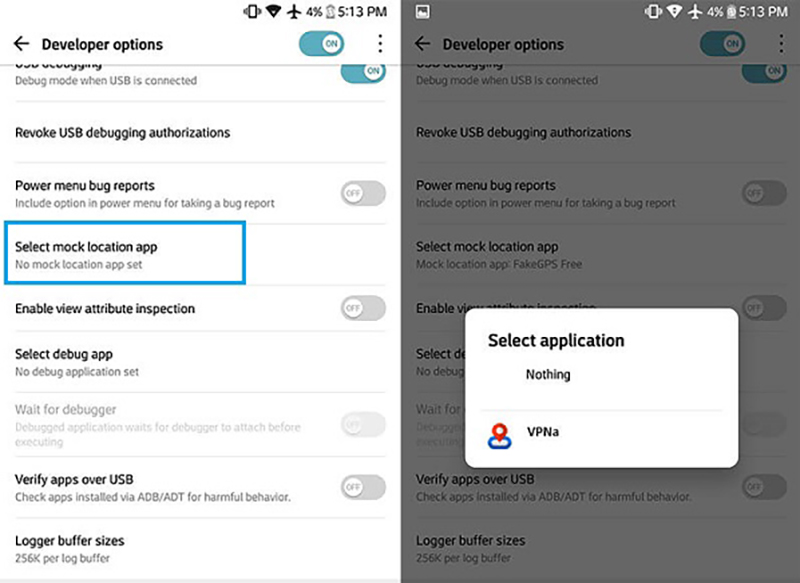
Step 2: Make VPNa Fake GPS as the default mock location app
Now, you can just go to the Play Store and download the VPNa Fake GPS Location app on your device. After the app is installed, you can just go to its Developer Options again and set it as a default mock location app.
Step 3: Spoof your Android’s location
That’s it! Whenever you wish to change the location of your device, simply launch VPNa Fake GPS APK. You can enter any location’s address or coordinates in the search bar and wait for it to be loaded on the interface.
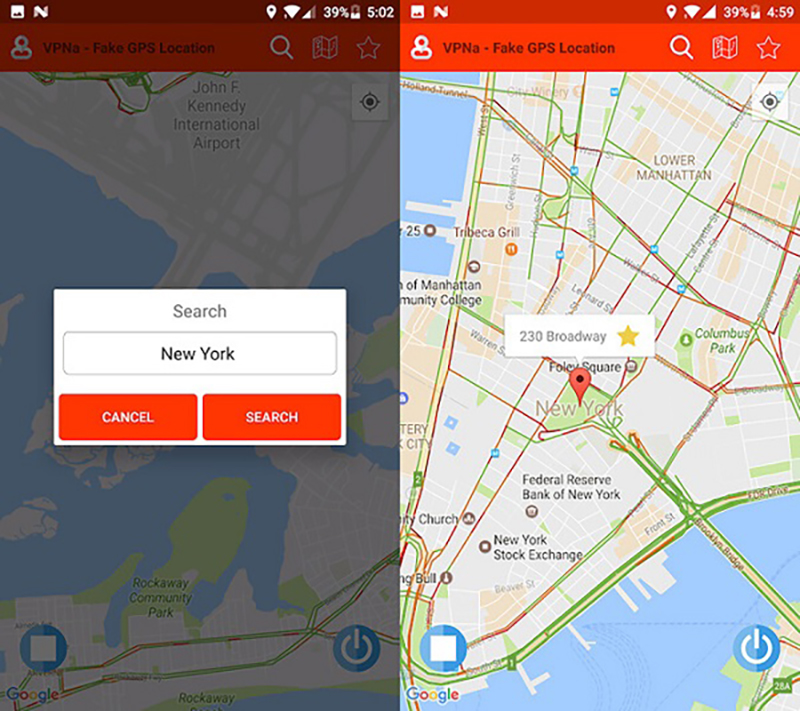
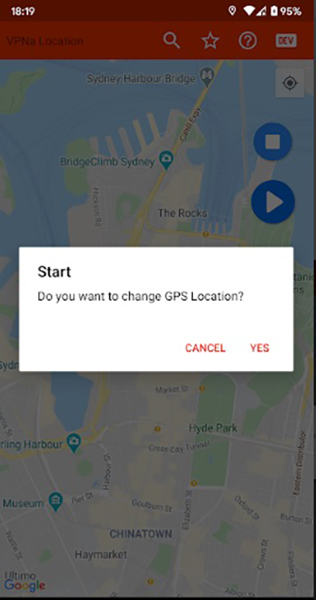
Later, you can move the pin around and drop it anywhere you like. Tap on the Start button and confirm your choice to spoof your device’s location.

Part 3: Bonus Tip: How to Spoof an iPhone Location without Jailbreak
While Android users can take the assistance of VPNa Fake GPS, iOS users often find it hard to change their device location. Well, in this case, you can consider Dr.Fone - Virtual Location(iOS) . It is a user-friendly application that can spoof your iPhone location to any other place by entering its address or exact coordinates. Besides that, you can also simulate the movement of your device between different spots.
Step 1: Connect your iPhone and launch the tool
At first, you can just connect your iPhone to your computer and launch the Dr.Fone toolkit. Select the “Virtual Location” feature from its home and click on the “Get Started” button.

Step 2: Look for a location to spoof
The application will automatically detect your device’s location and would display it. To change it, click on the Teleport Mode icon from the top, and enter the address/coordinates of the place in the search bar.

Step 3: Change your iPhone’s location
After entering the target location, the interface would also change. You can move the pin, zoom in/out, and drop it to the designated place. In the end, just click on the “Move Here” button to spoof your iPhone’s location.

This brings us to the end of this detailed VPNa Fake GPS Location Free review. To help you use the VPNa Fake GPS APK, I have listed its features, pros, cons, and even a detailed tutorial. On the other hand, if you are an iPhone user, then you can simply use Dr.Fone - Virtual Location(iOS) and change your device’s location to anywhere you want.
5 Easy Ways to Change Location on YouTube TV On Poco C51
Through YouTube TV, people can access different TV channels such as news, sports, and entertainment. However, as every YouTube TV works in accordance with the assigned home area, sometimes you can forget or are unable to change the home area, which can lead to certain restrictions. If you want to change the location of YouTube TV to access more services, this article is for you.
Continue reading this article to learn how to change your YouTube TV location with the help of easy methods so that you won’t tire yourself. You can easily bypass YouTube TV restrictions by following this authentic guide.
Part 1: Change your Home Area to Change Location on YouTube TV
Before jumping on the method to change YouTube TV location, keep in mind that YouTube only allows changing the location twice a year. In this part, we will provide a manual method to change location on YouTube TV for both iOS and Android devices:
How to Change Your Home Area on an iOS Device
Step 1: Start logging into your YouTube TV account and navigating to your profile icon. Select “Settings” and then tap on “Area.”
Step 2: Afterward, tap on “Home Area” and then choose the option “Update” right next to it.
How to Change Your Home Area on a Computer or Android
Step 1: Signing to your YouTube TV on your Poco C51 or through a web browser. Afterward, tap on your profile icon to proceed.
Step 2: Go to “Settings” from the profile and then select “Area.” Now, locate the “ Home Area” option and click on it.
Step 3: Tap on the “Update” option next to the “Home Area” option.
Part 2: Using VPN to Bypass YouTube TV Restrictions
Sometimes, users encounter certain YouTube TV restrictions due to their home area changes. This section will suggest four amazing VPNs to help you bypass any YouTube TV restrictions.
1. NordVPN
NordVPN is a well-trusted VPN that provides exceptional security and protection from malware attacks. Furthermore, by using this VPN, you can change your device or computer location to any country by selecting a fast and secure server from its available options. Hence, you can enhance your cyber security to a great level through this platform while accessing inaccessible content.

2. Surfshark
Do you want to encrypt your browsing activity on your devices? Use Surfshark to browse in a secure manner so that no one can steal or track your information. You can also change your location through this platform to strengthen your privacy across online sites. You can access any specific YouTube TV content by selecting any location from its US servers category.

3. ExpressVPN
ExpressVPN enables the users to change the server’s location anytime and from anywhere across the world. It gives great reliability access to the server location in 94 countries. Moreover, you can enjoy internet browsing with great network speed through it.

4. CyberGhost
To bring your digital security to the next level, CyberGhost is a good option to rely upon. It is a one-click location changer VPN that helps you connect anywhere within seconds with a secured IP address. After that, you can anonymously visit and use online sites through its encrypted VPN protocols and safely hide your identity.

NordVPN | Surfshark | ExpressVPN | CyberGhost | |
Ranking | 1 | 2 | 3 | 4 |
Max Contract Length | 24 Months | 24 Months | 12 Months | 39 Months |
Torrenting | ✔ | ✔ | ✔ | ✔ |
Monthly Plan Cost | $11.99 | $12.95 | $12.95 | $12.99 |
IP Addresses | 5000 Servers | 3200 Servers | 3000 Servers | 8000 Servers |
Support System | Windows, Mac, iOS, Android | Windows, Mac, iOS, Android | Windows, Mac, iOS, Android | Windows, Mac, iOS, Android |
Support Main Streaming Platforms | Netflix, Amazon Prime, Disney+ | Netflix, HBO Max, Hotstar | Netflix, Apple TV+, Hulu | Netflix, HBO Max, Disney+ |
Part 3: One-stop Tool to Change GPS Location on iOS and Android
Although VPNs provide a great way to change YouTube TV location through IP address, it still lacks accuracy with the location. To be more precise with region accuracy, Dr.Fone – Virtual Location changes GPS location to connect your Poco C51 with a particular area in a specific city. As VPNs change the location by connecting to the city’s server via IP address, Dr.Fone targets the exact location in any city by using GPS.
Dr.Fone - Virtual Location helps the users locate a precise location for YouTube TV to access specific TV channels and features. Moreover, you can instantly change your YouTube TV location with a single click. Using this tool, you can fake your location anywhere in the world with excellent speed.
For changing YouTube TV location through Dr.Fone, use the below instructions:
Step 1: Navigate Virtual Location
Download Dr.Fone on your computer and open its main home page. Select “Virtual Location” from the displayed options by clicking on it. Now connect your smartphone to your computer via a USB cable.

Step 2: Show Current Location
A new window will pop up displaying your current location on a map. However, if you cannot locate it, click on the “Center On” icon that will show your current location.

Step 3: Turn On Teleport Mode
To turn on the teleport mode, click on the second icon that you can locate on the top right. Then, type the area in the search box and press the “Go” button.
Step 4: Confirm Location
Confirm by clicking on the “Move Here” option on the pop-up message. Once done, your phone will be connected to the chosen location, and thus YouTube TV location will be changed automatically.
Part 4: FAQs
- Is it allowed to watch YouTube TV other than the home area?
Yes, it is allowed to watch YouTube TV other than the home area in the US, but the channels will differ from location to location. You can watch national programs, including local programs and other YouTube videos, while traveling domestically in the US.
- How to modify the time zone on YouTube TV?
To change the time zone on YouTube TV, open your YouTube TV and click on your profile icon. Next, go to the “Settings” and tap on the “Area.” Now, locate “Home Area” and upgrade the time zone concerning your home area.
- Is it possible to watch YouTube TV in multiple locations?
You can easily watch YouTube TV in multiple locations, but to be careful, you should check your home area frequently in a month to be aware of local networks.
- Are users allowed to watch YouTube TV at two different houses?
YouTube has provided easy access through membership that allows the users to watch YouTube TV at two different houses. You can create a family group and let 5 members watch YouTube TV.
Conclusion
This writing comprises a detailed guide regarding the YouTube TV change location and the exact steps. We have also mentioned some of the well-trusted VPNs to change YouTube TV location, but to be precise in the results, we have suggested Dr.Fone - Virtual Location as a complete and advanced tool for changing the location.
How to Use Life360 on Windows PC For Poco C51?
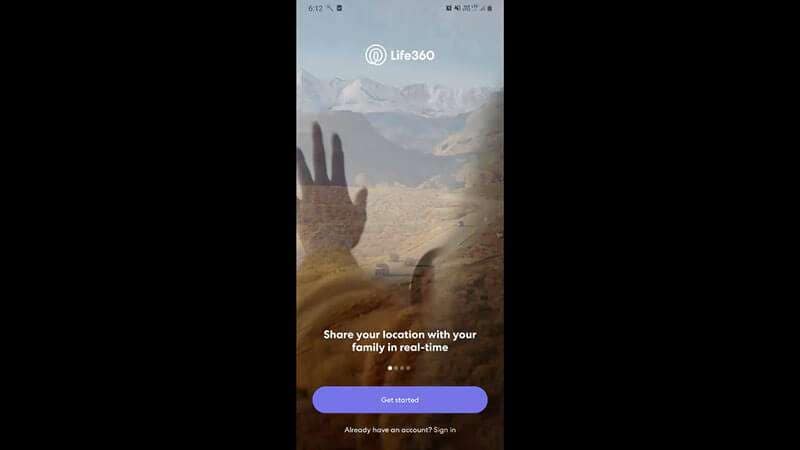
Life360 is an online platform that utilizes geo-location services to help users share their real-time location with friends and family. The app allows people to create a family group and stay connected to each other through features like chatting, sharing location, sending safety alerts, etc.
As of now, you cannot run Life360 on computer as it is only available for Android and iOS. Why? Because as opposed to a PC, one can easily carry their device everywhere! It means whether your kid is stuck in traffic and needs your help or your parents have lost their way back home, Life360 will instantly send you an alert on your device.
However, that doesn’t mean you cannot use Life360 on a PC. While it may seem a bit odd, there are a couple of methods that’ll allow you to get the Life360 app for Windows. In today’s guide, we are going to share some of these methods that’ll help you run the Life360 app on Windows.
So, without wasting another second, let’s dive straight into the guide.
Part 1: Why people seek to use Life360 on PC?
First things first; why would anyone want to use a family locator app like Life360 on their PC? Well, the truth is everyone has their own reason to get Life360 for PC. For instance, let’s say you are in the middle of an important project and don’t want to be bothered by alerts on your smartphone. However, you still don’t want to compromise with the safety of your family members.
In this situation, you can simply run the Life360 app on PC. This will allow you to directly keep track of the whereabouts of family members on your Windows system and you won’t have to constantly check your phone.
Life360 can also be used on a computer when your phone’s battery has completely drained and there’s no power outlet nearby. In this case, you can simply power-on your laptop, start the Life360 app and send your current whereabouts to family members.
Part 2: Is it possible to use Life360 on Windows PC?
Life360 is an extremely useful app for people who are always concerned about their closed ones. The app is basically designed with a vision to keep family members connected and safe. In addition to location sharing, the app also provides exclusive features like crash detection, place alerts, speed alerts, battery monitoring, etc.
The app also makes it easier for parents to monitor their child’s movement. Using the app, you can always know that your kids have safely reached school and back home. For any parent, knowing whether the kids are safe, is one less thing to worry about.
However, as we mentioned earlier, Life360 hasn’t been released for Windows yet. So, there’s no direct way to install and run the app on a Windows PC. While Life360 may release a dedicated Windows software in the future, as of now, you can only run it using the alternative methods.
These methods include:
Part 3: Use Life360 on Windows PC with Android emulator
The first and the most convenient way to run Life360 on computer is to use an Android Emulator. An emulator is basically a software that creates a virtual Android system on your computer. As a result, you’ll be able to run Android apps on your computer.
While there are dozens of Android emulators, Bluestacks seems to be the most popular and user-friendly option among all. Unlike other emulators, Bluestacks is easy to set up and use.
Here’s how you can run Life360 on a computer using Bluestacks Android emulator./
Step 1: Head over to Bluestacks official website and tap the download button.
Step 2: Open the installer and tap the “download” button. This will initiate the download process on your System.
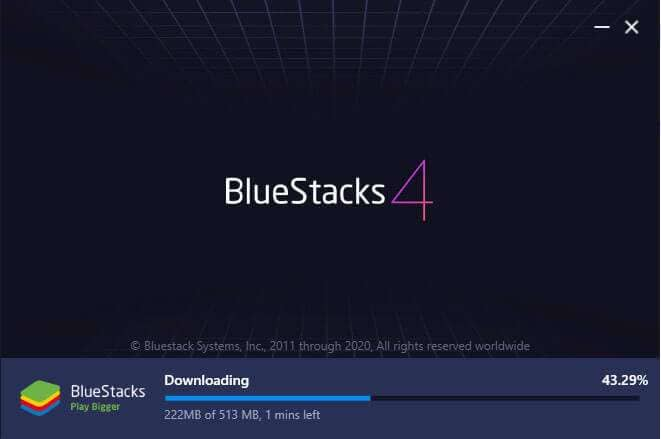
Step 3: Once the installation process completes, Bluestacks will start to boot. Keep in mind that the first boot may take some time, depending on your system configurations.

Step 4: In the home screen, tap the “Google Play Store” icon. You’ll be asked to sign-in with your Google account. Enter the right credentials and log-in to the Google Play Store.

Step 5: In the top search bar, type-in Life360 and tap the “install” button to download the app.

Step 6: Life360 is now installed on your computer. Open the app and enter your login details. You’ll now be able to run Life360 on your PC.

Part 4: Use Life360 by mirroring Android to Windows PC
While running an emulator is a great way to get Life360 on PC, it has its own set of challenges. For instance, running an Android emulator is not easy when you have a low-configuration PC. Emulators like Bluestacks requires high system configuration otherwise they take forever to load.
In this situation, we have another alternative for you to run Life360 on PC. You can simply mirror your Android to your Windows system. Mirroring the Android device will allow you to see its content on the PC itself.
Here’s how you can mirror the Android device on your PC.
Step 1: Make sure that Bluetooth is activated on both devices.
Step 2: On your Windows PC, open “Settings” and select the “Systems” tab.

Step 3: Choose the “Projecting to this PC” option in the left menu-bar and make sure that “Available Everywhere” is selected.

Step 4: If you’re running Android Pie or above on your device, scroll down to open notification drawer and select “Smart View” (or “Cast” in some devices). You’ll see your PC listed here. Tap the button to start Android mirroring.

Step 5: It may take some while for the connection to establish. Once it does, you’ll be able to cast your device screen onto your computer and you’ll be able to run life360 on your system.
Keep in mind that you’ll still require your device to navigate through the content on your computer. Any action that you perform on your device will be replicated on your computer screen as well.
Final Verdict
Life360 is probably among the top family locators for Android users. Apart from its extensive range of features, the app provides a user-friendly interface, which allows it easier for even elders to use the app without any issues. Even though there isn’t a dedicated Life360 software for Windows, you can follow the above-mentioned methods to run the Life360 on PC.
You Might Also Like
Location-based apps
GPS spoof for dating apps
GPS spoof for social apps
Pokemon Go on PC
AR game tricks

Change Phone GPS Location Easily
- ● Teleport GPS location to anywhere
- ● Play AR games without moving
- ● Spoof Location on the popular Apps
Also read:
- [Updated] Binge on Savings Top TikTok Items Now at Bargain Prices on Amazon
- 2024 Approved Digital Enlightenment A Treasury of AR/VR Quotations
- 2024 Approved DIY Football Viewing Watch, Record, Cut on the Cheap
- 2024 Approved Rectifying GoPro Video Warping A Step-by-Step Guide
- Dose Life360 Notify Me When Someone Checks My Location On Nubia Z50 Ultra? | Dr.fone
- Dose Life360 Notify Me When Someone Checks My Location On Tecno Spark 20 Pro+? | Dr.fone
- How To Fake GPS On Oppo Reno 10 5G For Mobile Legends? | Dr.fone
- How To Fake GPS On Vivo T2x 5G For Mobile Legends? | Dr.fone
- How to Fix Life360 Shows Wrong Location On Vivo Y200? | Dr.fone
- In-Depth Analysis & Ratings by Tom's Hardware Specialists
- No More Lag - Stable Playthrough of Assassin's Creed Odyssey on Windows!
- Quick Routine: Updating AMD in Win 10/8
- What is Fake GPS Location Pro and Is It Good On Vivo V29 Pro? | Dr.fone
- Title: In 2024, A Detailed VPNa Fake GPS Location Free Review On Poco C51 | Dr.fone
- Author: Ava
- Created at : 2024-10-04 17:47:40
- Updated at : 2024-10-05 17:44:01
- Link: https://fake-location.techidaily.com/in-2024-a-detailed-vpna-fake-gps-location-free-review-on-poco-c51-drfone-by-drfone-virtual-android/
- License: This work is licensed under CC BY-NC-SA 4.0.