
Is pgsharp legal when you are playing pokemon On Tecno Spark 20 Pro+? | Dr.fone
Is pgsharp legal when you are playing pokemon On Tecno Spark 20 Pro+?
Pokémon Go is the phenomenon that hit us in 2016 and made us obsessed with the AR game based on real-time location. If you are one of those players who have been to all the local PokeStops in hopes of finding your favorite rare Pokémon, then it might be time for you to consider spoofing your location while playing PoGo.

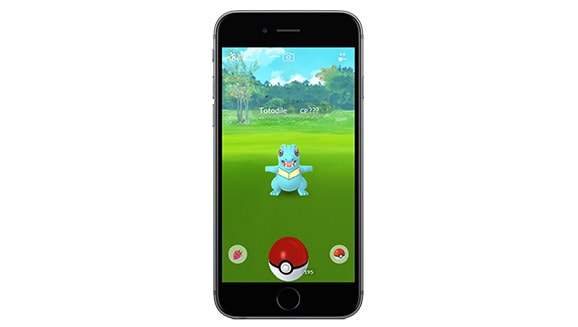
Pokémon Go relies on GPS coordinates and real-time tracking to let players catch Pokémon s in real locations. Hence, spoofing comes to the discussion of “catching them all.”
‘Spoofing’ location makes your phone, and thereby the game thinks that you’re in another location, which opens up the possibility to catch new and rare Pokémon s from gyms and PokeStops around the world.
Part 1: Is Pgsharp legal?
No game developer likes to see their game played in unfair ways. Thus, Niantic (PoGo’s Dev) made some strict rules against exploiting their game, giving some players an unfair advantage over others.
So, is PGSharp legal? No, Spoofing location, in general, is illegal. Hence, any apps like PGSharp, or Fake GPS Go, used to disguise actual real-time location and fake it, will result in an account ban.
According to Niantic’s terms and conditions:
- “Using any techniques to alter or falsify a device’s location (for example through GPS spoofing).
- And _”_Accessing Services in an unauthorized manner (including using modified or unofficial third party software).”
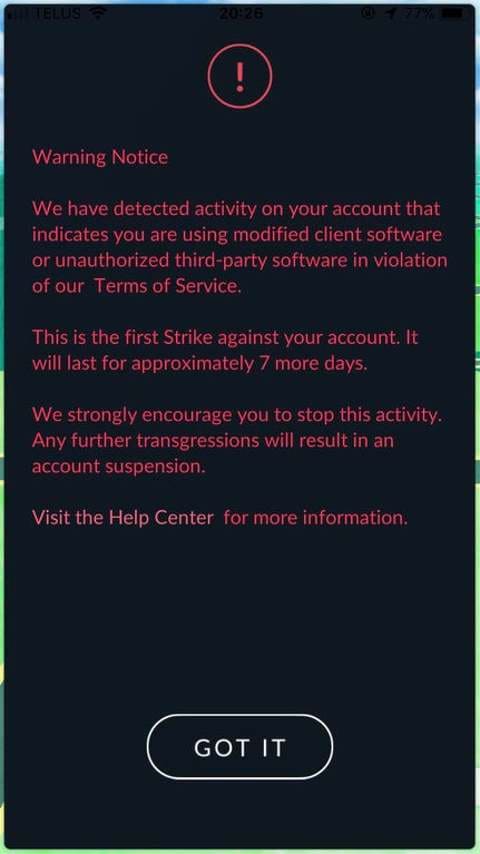
If Niantic detects usage of a fake location or GPS spoofing app while playing Pokémon Go, they will impose a strike on your account.
- The first strike would make rare Pokémon s not visible to you for seven days.
- The second strike would temporarily ban you from playing the game for 30 Days.
- The third strike will permanently ban your account.
You can appeal these strikes to Niantic if you think you’ve been banned without violation of any terms.
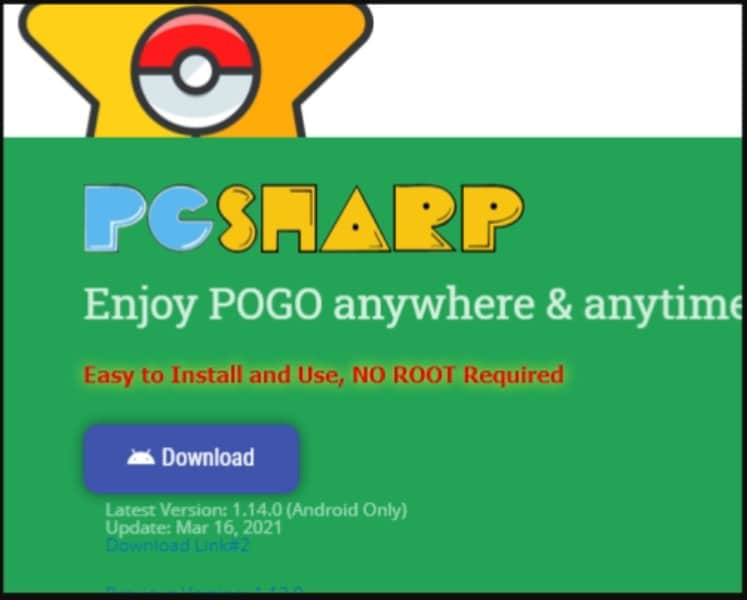
- PGSharp :

PGSharp is one of the most reliable ways to spoof your location while playing Pokémon Go. Niantic does not easily recognize its simple map-like UI as a fake location app.
Note: It is recommended not to use your main account while spoofing; rather, you should use your PTC (Pokémon Trainer Club) account.
- To spoof the location with PGSharp, go to Google’s “Play store,” search “PGSharp,” and install it.
- After installation, there are two versions: Free and Paid. For trying the app with the free version, a beta key is not required anymore, while for the paid version, a key from the developer is required.
- For the paid key, visit PGSharp’s official website and generate a license key.
You must note that it may take two or more tries to generate a working key, and often it may show an “out of stock.” message.
- After opening the app and applying the key, you can spoof the location with ease.
Note: You may need to allow “Mock location” from debugging options. For this, go to “Settings,” then to “About Phone,” then you need to tap on “Build number” seven times to enable developer’s mode, and finally go to “Debugging” to allow “Mock location.”
- Fake GPS Go:
Fake GPS Go is another location spoofer app for Android that is reliable and free. This app allows you to fake your real-time location and enables you to spoof it to any place in the world. This is one of the easiest solutions to playing Pokémon Go while spoofing location without getting detected with its real-map-like UI. Moreover, this app does not even require root access.
- To install Fake GPS Go, go to Google’s “Play store,” search “Fake GPS Go,” and install it.
- Then, go to your phone’s “Settings” and then “System” followed by “About Phone,” and tap on the “Build Number” 7 times to enable the Developer Options.
- Then you need to go to “Debugging” in “Developers Options” to allow “Mock location.”
- And then, you can use this app to not only spoof your location but virtually walk around a route at a designated pace to make it look as real as possible for being undetected by developers like Niantic.
- VPN:
 Any DRM Removal for Win:Remove DRM from Adobe, Kindle, Sony eReader, Kobo, etc, read your ebooks anywhere.
Using a Virtual Private Network (VPN) App is the safest option to spoof your location while playing PoGo, as it masks your IP address and uses a server in any other location.
Moreover, some VPNs would also encrypt your data, so it would not be easy for Game Devs to track it.
- To install a VPN, go to Google’s “Play store,” search the VPN of your choice and install it.
- Close the Pokémon Go app from running in the background to prevent detection of the VPN.
- Now, select a location server to any place before opening the PoGo app again.
Note: Some Free VPNs only mask your IP address and do not spoof your location, nor do they encrypt your data. Hence, selecting a good VPN app is imperative, which will spoof GPS location and data encryption.
You can use both VPNs (which do not spoof GPS location themselves) and the Fake location app simultaneously for extra reliability.

Part 3: Best way to spoof on iOS – dr.fone Virtual Location
Spoofing the GPS location on iPhones is more difficult and much more complex than it is on Android. However, there is a solution. Dr.Fone comes to the rescue with their Virtual Location tool that works seamlessly. This program is easy to use and allows you to simulate your location between 2 and multiple spots with ease. Apart from that you can teleport anywhere with ease. Let us know how this tool works.
Step 1: Download the tool on your PC from the official website of drfone. Select “Virtual Location” given on the first page of the program.

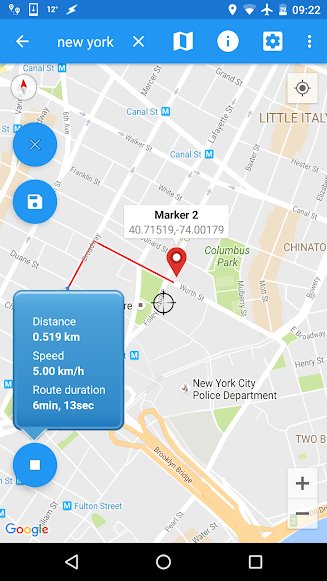
Step 2: Now, have your iPhone connected to your computer. Then select “Get Started”. Now a map will open in a new window, showing your actual location.

Step 3: Enable the “teleport mode” by the third icon in the right-upper corner of the map. Then, enter the location you want to spoof your phone’s GPS to in the text box in the map’s left-upper section. Select “Go”.

Step 4: Now select “Move here.” And you will have successfully spoofed your location on your iOS device. To confirm, open the maps app on your device.

Pro-Tips:
- Do not spoof or change location very frequently, as this might raise suspicion to the Game Dev (Niantic), and the account may get terminated, stating violation of terms.
- Do not use spoofing too frequently. The best way to not get your account suspended is to replicate actual travel patterns.
- Please select a new spoof location and scout it for a couple of days before going to a close-by spoof location. After you are done with the country in the spoof-location, you can move on to neighboring countries before returning to your original location (i.e., switching off the spoof.)
- After you are done with your gaming, always remember to close the game from the background before turning off the spoof location.
- Do not always play with the spoof location. Play with your original location for a couple of weeks before spoofing your location.
- Do not spoof location to countries on different continents within a short time.
Following these tips will help you to behave like an actual traveler who’s on a Pokémon hunt. This will make it even harder for game devs to detect any discrepancies.
How to Fix Life360 Shows Wrong Location On Tecno Spark 20 Pro+?
Life360, the app for family and friends, allows you to see where your loved ones are when you open the app. The app shows the current location of your contacts and will tell you the last time they were seen and if they are in an emergency.
However, there’s a good chance that you’ve seen this message multiple times: “Your phone is missing from Life360. Please contact your cellular carrier and try again”. This message indicates that your phone is not connected to the internet.
As a result, your contacts, photos, and messages are not showing. Life360 may be using cellular data instead of Wi-Fi, but it’s not certain. To avoid this, let us read what we should know.
Part 1: Why is Life360 Location Wrong?
Interference From Nearby Devices/Networks
In some cases, Life360 may not be able to determine the location of your device because it is being interfered with by other nearby devices or networks. For example, if you have an iPhone or iPad, it may be using the same cell tower as your Tecno Spark 20 Pro+.
The Life360 app has to use the closest available cell tower to determine your location. So if another device uses the closest tower, Life360 will use that instead.
Poor Signal
A poor signal in a particular region, particularly if you’re commuting, is the most common cause of Life360’s incorrect location. When your phone is in a poor signal area, the app will use the internet instead of cellular data to determine the location of your contacts.
Therefore, it is important to keep an eye on the network lines to determine whether or not this is indeed the source of the problem that prevents your Life360 from being found.
To get more information about how often does life360 update location, read about the Life360: Learn How Everything Works!
Part 2: How to Fix Life360 Shows Wrong Location Issue?
There are several ways to fix the Life360app problems that life360 not updating its location. Let’s check them out one by one.
Method 1: Review the Internet settings
The weak internet access contributes to the location display’s unreliability in life 360. If you notice that life360 is displaying the wrong location, you should examine your Internet connection settings to prevent life360 from displaying an inaccurate location.
Switch off the option that saves power and then turn on the wireless Internet connection.
You may turn off your smartphone’s power-saving mode by heading to the status bar and selecting the appropriate option.

Please note that this is just for Android users. Also, do not forget to consider that your Android smartphone’s settings may vary from those listed below.
The “switch off low power mode” option may be found in the “Settings”> “Battery” menu on an iOS device.
Android users should also follow this procedure if life360 displays an incorrect location. For battery conservation, numerous programs are disabled when the low power state is engaged.
Method 2: Double-check Your Current Location in the Settings
If life360 shows the incorrect location, the smartphone’s location services significantly come into play. The location settings must be activated to prevent the life360 location issue, and the current program must be updated accordingly.
Scrolling horizontally on the status bar on an Android device is all that is required for consumers to visit the website. Of course, you can also run the software in the background, which may be accomplished in a variety of straightforward but distinct ways based on the Tecno Spark 20 Pro+ device’s model.

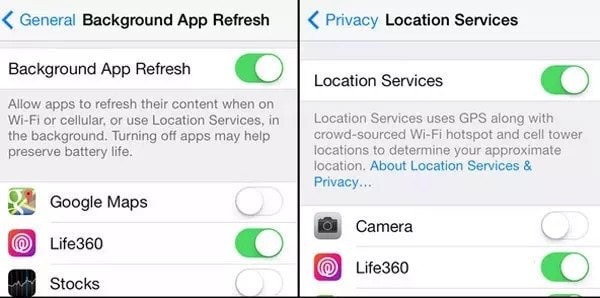
You may access the Background App Refresh function by going to the settings menu on your iOS device and selecting “Settings,” followed by “General,” and then selecting “Background App Refresh.” Next, launch the location services function by navigating to “Settings”> “Privacy”> “location services” and selecting “Location Services” from the drop-down menu.
After that, touch on the symbol that represents Life360, as shown below; this will take you to a screen where you may change “Allow Location Access” to “Always” and “Enable Precise Location.”
Method 3: Connecting One Device at a Time
Only one device may be used to sign in to the Life 360 app at a time. To prevent the life360 false location problem, log out of all other devices and use just one. When many devices are logged into Life 360 simultaneously, the user’s location might be incorrectly determined.
If you want reliable results, you must be logged in from the same device. If you use numerous devices simultaneously to log in to Life360, it will report incorrect location errors for each one. Therefore, it is possible to get inaccurate data. Use a single device to log into life360 to prevent the issue of a wrong location showing up.
Part 3: How to Keep Your Location on Life360 in One Place?
Two of the most important and easy ways to keep your location on life360 in one place are:
1. Stopping both Wi-Fi and Cellular Data Transmissions
If you disconnect from the internet, Life360 will no longer work, and your last known position will be shown.
Because all other applications are disconnected, this solution has a significant drawback: it prevents alerts, instant messengers, and other applications from working properly. In addition to the fact that you’re unable to use the internet, people in your circle will notice something wrong. In addition, it may not be adequate to fake your location.

Those with an iPhone have the advantage of being able to disable the usage of cellular data directly inside the application’s settings. However, those with an Android device will need to resort to other approaches.
iPhone users may access the Cellular setting by going to the Settings app and tapping on it. This will switch off the cellular data for the Life360 app. Turn off Life360 by swiping the switch to the off position mentioned above. Life360 will not be able to provide an accurate location report for you so long as there is no Wi-Fi access.
Advantages:
- You can use only one device to connect to the internet.
- No need to manually switch between apps.
- You can easily manage all your data.
Disadvantages:
- You cannot use other devices at the same time.
- If you lose the connection, you need to reconnect.
 Software Update Pro - Check and update software installed on your computer.
2. Faking Your Location
It seems like everyone has their own way to try and fiddle with their location in real life. Some may use satellite images or even old maps and coordinates, while others will buy old phones and ship them to a random location. Whatever your method is, it’s probably not the best one out there.
However, a fast but secure option is the use of Dr.Fone - Virtual Location , which is the best virtual location application right now. You canuse it to change your location to any place on earth.
One of Wondershare’s most popular products, Dr. Fone, is a data management and recovery tool. It is compatible with both iOS and Android smartphones, and it comes packaged with a wide variety of control toolkits.
When it comes to faking a location on iOS devices, Dr. Fone- Virtual Location (iOS) is one of the most effective solutions currently available on the market. It is possible to use it to teleport the iOS device to any location in the globe with just one click, and all you have to do is input the address of the place to which you wish to be moved.
Simulating GPS movement from one place to another or along a predetermined course is also possible by simply picking locations on a map that you want to go through.
Using Dr. Fone-Virtual Location iOS, you can customize your route by selecting how many times you want to go through it and how fast you want to relocate it.
To free yourself from any hassle, consider using a third-party tool instead, such as Dr.Fone, which will make the entire process super easy and accurate.
Advantages:
- The application is easy to install and use.
- It doesn’t require you to go through a lot of settings.
Disadvantages:
- • It is not a mobile application.
Dr.Fone - Virtual Location
1-Click Location Changer for both iOS and Android
- Teleport from one location to another across the world from the comfort of your home.
- With just a few selections on your computer, you can make members of your circle believe you’re anywhere you want.
- Stimulate and imitate movement and set the speed and stops you take along the way.
- Compatible with both iOS and Android systems.
- Work with location-based apps, like Pokemon Go , Snapchat , Instagram , Facebook , etc.
3981454 people have downloaded it
Conclusion
Life360 has released a major update for Android and iPhone users, fixing the shows being sent to the wrong location. This has caused many problems for many users and is a rather annoying problem to fix. However, you can get help from Dr.Fone - Virtual Location (iOS/Android) application which is an absolute fix to all of your problems.
How to Share Location in Messenger On Tecno Spark 20 Pro+?
We usually host a gathering once in a while and invite our friends to come over. Most of us are already used to organizing such activities because we’ve been doing that for a long time now. However, we cannot deny that it’s much easier nowadays than years ago. Why so? Simply because the communication channels available today at our disposal are more digital and more capable. For instance, Facebook Messenger now allows users to share their whereabouts in a snap of a finger. Yes. That feature is called Live Location.
The Live Location feature on Messenger works beyond sending the address or coordinates of your exact location. It basically visualizes your whereabouts by means of an interactive map and updates the details from time to time. That means the receiver can view not only your position but also your movements. Is that helpful? Absolutely yes. It’s indeed a game-changer in today’s already convenient world. Is it highly recommended? With proper handling and adequate caution, Messenger’s Live Location can definitely do more good than harm to the users.
In this article, we will delve into the highlights and benefits of Facebook Messenger’s location-sharing features. We will also provide some tutorials on how to share Live Location on Messenger. Continue reading below to learn more.
Part 1. Everything You Should Know About Messenger’s Live Location
Facebook is well aware that sharing location details is essential to its users. That’s why developers have come up with a brilliant idea and rolled out Live Location on Messenger. It basically works like other location-sharing features. However, Live Location provides more precise and thorough location information. It’s in map form, where you can view the exact location and track the movements of the sender. You’ll continue to see updates for as long as the sharing is not halted on the other end. To navigate it properly, try to read tutorials on how to share Live Location on Messenger.

What if you wish to send a particular address from another location? There is no problem with that. Messenger allows users to search for a specific place, trace it on the map, and share the details. The receiver can view it in map form and get directions if necessary. See? It’s very easy and convenient. No need to type in long addresses just to share a particular location with your friend. You just have to find it precisely on the map and send the information afterward.
Convenience is just one thing. Messenger’s location-sharing feature has a lot more to offer to users. One of which is the accuracy of the shared location information. Since the details are automatically generated through GPS, you can be sure that it is correct and definite. If you go out and track it down the neighborhood, you can certainly find the location in no time. Just make sure that the location services on your smartphone are activated so you can view your progress in real time. Also, stay vigilant while you’re out and keep yourself safe from any harm. Remember that safety remains a priority and comes above convenience.
 SwifDoo PDF 2-Year Plan
How to Grant Facebook Messenger the Permission to Access Your Location?
Facebook Messenger’s location-sharing feature will not work without the necessary access. That’s why you should first configure the permission settings on your mobile device to avoid unwanted disruptions. Don’t worry. It’s indeed a piece of cake. Check out the tutorial provided below.
- 1: Go to Settings.
- Step 2: Click Apps.

- Step 3: Find and click Messenger.

- Step 4: Click Permissions.

- Step 5: Click Location.

- Step 6: Select Allow Only While Using the App. If you’re quite conservative regarding this matter, click Ask Every Time instead. After that, Facebook Messenger will have access to your location information.
 dotConnect for Oracle is an ADO.NET data provider for Oracle with Entity Framework Support.


Part 2. How to Share My Location on Messenger?
How do I share my location on Messenger? As mentioned earlier, it’s very easy to use Facebook Messenger for location sharing. All it takes is just a few clicks on the platform. No need to manually type in the address or sketch the landmarks. Messenger does the rest of the work for you. In actuality, there are three ways to share your location on Messenger. Any of them can be of great help to you, depending on your current situation. Do you want to try them now? Check out the tutorials below.
Method 1: Share location on Facebook Messenger via Live Location
How to share my location on Messenger? Well, the first option you can try is through Live Location. It works best if you wish to tell somebody where exactly you are and give updates from time to time. Don’t worry. Although it looks complicated at a glance, in reality, it’s actually not rocket science. It only takes a few seconds to complete. Below is a tutorial on how to share Live Location on Messenger in easy steps.
- Step 1: Open the Facebook Messenger application on your mobile device.
- Step 2: Browse through your conversation feed and find the contact with whom you wish to share your Live Location. Click on it.
- Step 3: Click the More (+) icon at the bottom-left corner of the screen.

- Step 4: Right after, click Location.

- Step 5: Click Start Sharing Live Location. Immediately, your current location details will be available and forwarded to the intended receiver. Live Location lasts for 60 minutes at maximum. If you wish to terminate it, simply click Stop Sharing Live Location.

Method 2: Share location on Facebook Messenger via Pinned Location
Let’s say there is a specific place you want to visit with your friend. Is there a way to share the address of the venue without you being there at the moment? Fortunately, it is possible. Apart from sharing your current location in real-time via Live Location, you can also send pinned locations on Messenger. You just need to search for it and then redirect the details to your friend. Yes. It’s just as simple as that. Do you want to try it on your smartphone? If so, follow the guide below.
- Step 1: Launch the Facebook Messenger application on your mobile device.
- Step 2: Scroll through your conversations and find the receiver from the list. Click on it.
- Step 3: On the text field, click the More (+) icon at the bottom-left corner.
- Step 4: Then, click Location.
- Step 5: Locate the search bar above the interactive map and type in the location you want to share.

- Step 6: Choose one from the suggested results and then click on it. The details will then be forwarded immediately to the intended receiver.
Method 3: Share location on Facebook Messenger via Google Maps location
How do I share my location in Messenger if I cannot find it on the map provided? Yes. That happens sometimes. There are certain places that are untraceable on the messaging platform. As a result, it doesn’t appear on the map when you try to search for it. But don’t sweat it. If you experience the same issue, you can instead use Google Maps to share location details. How to do it? Check out the tutorial provided below.
- Step 1: Launch the Google Maps application on your mobile device.
- Step 2: Click on the Search bar at the top and then type in the location.
 PDF application, powered by AI-based OCR, for unified workflows with both digital and scanned documents.
- Step 3: Choose one from the suggestions and then tap on it. Make sure that it is exactly what you’re looking for.

- Step 4: Access the menu bar below the map and then click Share.


- Step 5: From there, click Chats or the Facebook Messenger logo.
- Step 6: Find the receiver from the provided list and then click the Send button next to its name.


NOTE: Of course, you can only send pinned locations via Google Maps. The Facebook Messenger’s Live Location is available within the platform only.
BONUS TIP: Protect Your Privacy With Wondershare Dr.Fone
There’s no denying that the location-sharing feature of Facebook Messenger is useful to many of us. It always comes in very handy whenever we need to meet people somewhere or invite them to our places. However, we should not become too complacent and let our guard down. Sharing sensitive information like whereabouts always comes with risk, regardless of the platform and the intention. Therefore, make it a habit to protect your privacy at all costs. In this regard, Wondershare Dr.Fone has something special to offer. Its Virtual Location feature, capable of modifying and simulating your location records, can be of great help for you. Don’t worry. It’s very easy to use. Here’s a short guide for you.
- Step 1: Download Wondershare Dr.Fone from its official website. Right after, install it on your computer.
- Step 2: Launch the newly installed software on your desktop. Once it fully loads up, connect your smartphone using a data cable. Follow the on-screen instructions and perform the steps accordingly to ensure the connection between the two devices is stable enough to handle the succeeding operations.
- Step 3: Navigate to the left-side panel and then click Toolbox. On the main dashboard, click Virtual Location. Is it your first time using this feature? If so, allow Wondershare Dr.Fone to download additional resources. Don’t sweat it. It will only take a few minutes to complete.
- Step 4: Once the downloading process has concluded, Wondershare Dr.Fone - Virtual Location will automatically open on a separate window. From there, go to the top-right menu bar and then click Teleport Mode. It is the first icon that appears in the row.

- Step 5: Head over to the top-left corner and enter your desired location into the search bar. Choose one from the suggested results. After that, click the Enter icon.
- Step 6: The details regarding your chosen location will be displayed on the computer screen. Review the information and make sure that it is the specific location you’re looking for. Once confirmed, click Move Here to proceed.
 Allavsoft Batch Download Online Videos, Music Offline to MP4, MP3, MOV, etc format
- Step 7: Immediately, the location settings on your smartphone will be changed according to the inputs you have provided to Wondershare Dr.Fone. You can verify it by checking the current location registered on your Maps app. After confirming that your mobile device is now showing a different location, you can now start browsing without worrying about your location’s privacy.

NOTE: Resort to Wondershare Dr.Fone - Virtual Location if your internet browsing does not require you to provide your real address. If you wish to restore your original location settings, simply close the Wondershare Dr.Fone application and restart your smartphone.

Conclusion
Gone are the days when you had to write invitation cards manually and deliver them one by one. Nowadays, all you need to do is go online and use Messenger’s location-sharing feature. Have you already tried it? If not, you should take it into consideration and use it on your next agenda. Refer to the tutorial above on how to share Live Location on Messenger. It can certainly help you get started. How do I share my location on Messenger without physically being there? That’s simple. Use Messenger or Google Maps’s pinned location. Furthermore, download Wondershare Dr.Fone on your computer. Its Virtual Location feature, capable of modifying your location settings, can provide protection for your privacy. Just connect your Tecno Spark 20 Pro+ to the computer and set it up from there.
- Title: Is pgsharp legal when you are playing pokemon On Tecno Spark 20 Pro+? | Dr.fone
- Author: Ava
- Created at : 2024-08-01 19:55:46
- Updated at : 2024-08-02 19:55:46
- Link: https://fake-location.techidaily.com/is-pgsharp-legal-when-you-are-playing-pokemon-on-tecno-spark-20-proplus-drfone-by-drfone-virtual-android/
- License: This work is licensed under CC BY-NC-SA 4.0.