
iSpoofer is not working On Vivo Y17s? Fixed | Dr.fone
iSpoofer is not working On Vivo Y17s? Fixed
Pokemon Go is one of the most appreciated games across the world. Yes, it has been banned in a few regions because of the controversial concept of the entire game but that’s one of the reasons why people turned to spoofer apps. While wanting to catch more Pokemon is the main reason for location spoofing, to evade the boundary barriers of the game is one more reason.
However, if you have checked recently, iSpoofer has gone - MIA. You don’t find relevant sources to download the application and you don’t see your desperate attempts bringing any fruitful results. Does this mean that the good old days of iSpoofer’s popularity are over? Do we have to find an alternative or there are chances we might get the location changer back?
You will find the answers to all these questions in the clearly guided write-up below and yes, it i applicable for both Android and iOS users.

Part 1 - Does iSpoofer Still Work. Why?
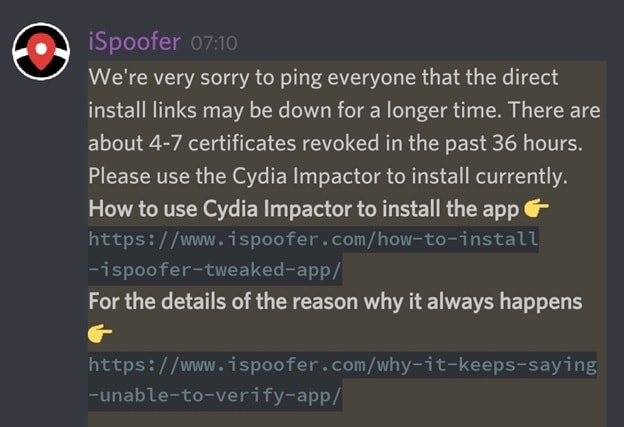
If you have encountered the iSpoofer not working problem, then you are among the several Pokemon Enthusiasts who have been desperately waiting for an update. But the sad news is we never know if it will knock on our doors or not. The app still remains - non-functional. If you have the older version on your phone - uninstalled - and just lying there, you will notice that you will get a maintenance message saying that the app is under ‘maintanence’.
Your search through several blogs will tell that the app is going through some changes and might come back soon. But this may not be the case. Everything that goes around in the gaming world is to draw some recognition and revenue. iSpoofer has already gained its popularity among the gamers and revenue was coming in strongly - until the inevitable happened.
One of the main reasons for iSpoofer Pogo not working is its ban by the makers of Pokemon Go. Niantic is very particular about the rules that it had laid down for the players. One of them is a strict no to use any third-party apps while playing the game.

iSpoofer not only changes the way you play the game but also defies the very concept of how the game should be perceived. You have to ‘Go’ out of the house. So, when Niantic banned the app, iSpoofer lost its very loyal customers. The main target audience were the players of Pokemon Go so you can expect how hard of an impact the loss must have brought to the revenue of iSpoofer.
So, the wise and safest option they had is to pull out and give it some time. It looks like Nianticis in no mood to give a nod to the Spoofing app (isn’t that obvious?) so iSpoofer Pokemon Go not working will remain to be a problem for a while.
There were high expectations that iSpoofer will revive back during 2020, owing to everyone staying home and being in desperate need of such spoofing apps but the audience only met with silence from their end. So, there are high chances that the very useful location spoofing app may not be around for a while at least.
Part 2 - How can I spoof on iOS safely?
If there is someone who is very disappointed with iSpoofer going off of the chart, then it must be the iPhone users. iOS doesn’t provide diverse options to do something as ‘adventurous’ as changing the location on the Vivo Y17s device. You have very little apps to choose from the play store.
If you are facing the iSpoofer iOS not working problem, then you can adopt one of the listed ways -
VPNs - This doesn’t imply that every VPN that is on the internet will help you spoof your location. There are certain blessed ones that come with an in-built location spoofing option that makes the job easier. If I have to name one - then you can use Surfshark. It can sustain you as long as you do not change your location too obnoxiously that the makers can detect the very quick change from point A to Point B that is humanly impossible. However, even if it is not as effective as iSpoofer, and definitely not an alternative, you at least get to enjoy temporary benefits.

Apps on App Store - This is one of the first things that anyone would do when they are in serious need of a location change. Go to the App Store and search for the ‘Fake GPS Location Changers’. However, you have to resort to the Trial and Error method here. Not all apps are going to work - some will be detected pretty quickly - while the others will simply take up space and nothing else. Until you settle on the suitable one, the search continues.
If you are looking for a sure shot at changing your location without any hassle, then the best suggestion would be to use Dr. Fone’s Virtual Location Changer. WIthin 3-4 steps you can easily change your location to anywhere in the world. This is how you do it -
Dr.Fone - Virtual Location
1-Click Location Changer for both iOS and Android
- Teleport from one location to another across the world from the comfort of your home.
- With just a few selections on your computer, you can make members of your circle believe you’re anywhere you want.
- Stimulate and imitate movement and set the speed and stops you take along the way.
- Compatible with both iOS and Android systems.
- Work with location-based apps, like Pokemon Go , Snapchat , Instagram , Facebook , etc.
3981454 people have downloaded it
It is as simple as that with Dr.Fone - Virtual Location . So, if you are looking for an alternative until iSpoofer comes back for iOS devices then Wonderhare’s Dr.Fone can be a perfect choice.
Full Guide to Fix iToolab AnyGO Not Working On Vivo Y17s
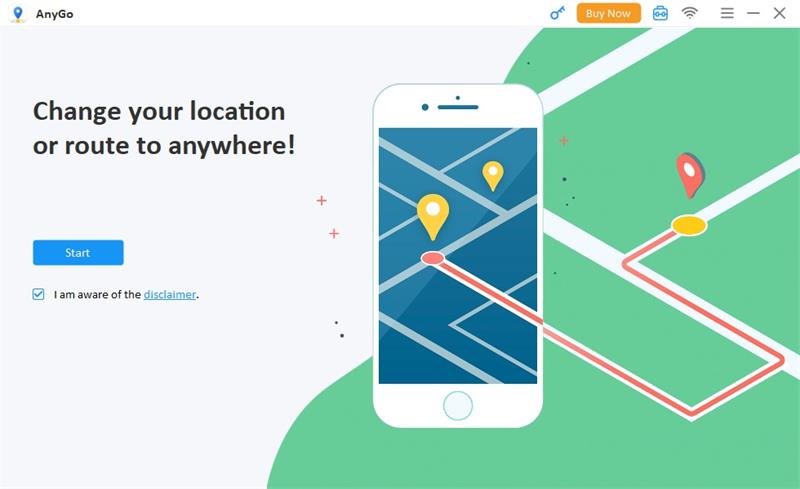
If you want to go anywhere in the world without moving an inch from your home and wondering how to change location on your iPhone, then iToolab AnyGO is the app for you. Not literally, but it allows you to teleport your current location anywhere around the globe. It is considered the most famous and widely used GPS spoofing locator, which offers various options than merely faking your current location.
It also allows you to simulate GPS movement, which helps you play games after importing GPX route files. You can use a joystick or keyboard to simulate easily anywhere. But users of this app are experiencing some technical problems and improper functionality and hence can not seem to get on with it. And if you are among those unlucky guys and wondering if iToolab AnyGO not working, how to fix it? Then you’re at the right place.
In this article, you will get to know exactly how to fake location on iPhone and fix iToolab AnyGO when it is not working. Though there are numerous problems that users are complaining about, here you will know the most common problems faced by many users. So stay tuned.
Part 1. What is iToolab AnyGo?
This app is a GPS spoofing app that changes location on iPhone anywhere around the globe. But the fun part with this app is that now you can gain access to the location-based games and apps that you normally could not access. This opens gates to endless possibilities where you can watch any TV show, download any location-based app, and play games. In short, this app removes any geo-based restrictions on you without jailbreaking your phone.
Here are some prominent pros of the app in a nutshell:
- Spoof GPS location on your iPad/iPhone with jump mode.
- Change locations multiple times.
- Works perfectly with geo-based games like Pokemon GO.
- Play AR games naturally.
- Enable 2-spot or multi-spot movement or follow the GPX route.
And here are some of the drawbacks:
- It is difficult to change locations multiple times and your account may also suspend.
 HD Video Converter Factory Pro
Part 2. How to fix the iToolab AnyGo not working issue?
Issue 1: The map does not appear in the program
First, check your network connection if iToolab AnyGO doesn’t show on the map. Then, if the internet is available, download the latest iToolab AnyGO. You can check it out by clicking the menu and hitting the “Check for updates” button. Alternatively, you can uninstall and re-install AnyGO to acquire the latest version.
Issue 2: iPhone/iPad unable connecting AnyGO
Follow these step-by-step guides if your iPhone/iPad cannot connect with iToolab AnyGO.
- Try to re-plug and unplug your device, and connect again after restarting the program.
- Also, try different USB ports and original USB cables, as maybe there’s an issue with the USB connection.
- Also, make sure that your computer and your device are correctly connected. If not, then iTunes cannot detect your device.
Note: Make sure that your iOS version should be compatible with AnyGO. iOS 8 or the latest versions ensure compatibility.
If this issue still exists, try to re-open the program again and again. If crashing continues, send program log files to the support team.
For Mac:
Head to the top menu of Mac and click Go, then click the Options button over the keyboard. A drop-down menu will appear with library options. Go to library>logs>Diagnostic reports and find log file”iToolab AnyGO” for mac crash.
For Windows:
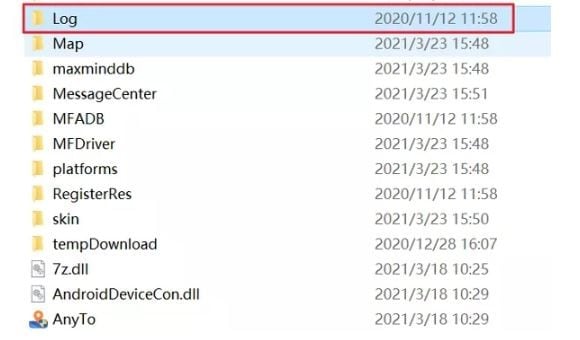
On AnyGO, Go to the installation path. Locate the log folder and compress it before sending it to the support team.
Tips: iToolab AnyGo still not working? Switch to Dr.Fone - Virtual Location for seamless and reliable location simulation. Say goodbye to issues and enjoy hassle-free location control. Try It now!
Part 3. Best iToolab AnyGo Alternative Program You Can Use in 2024
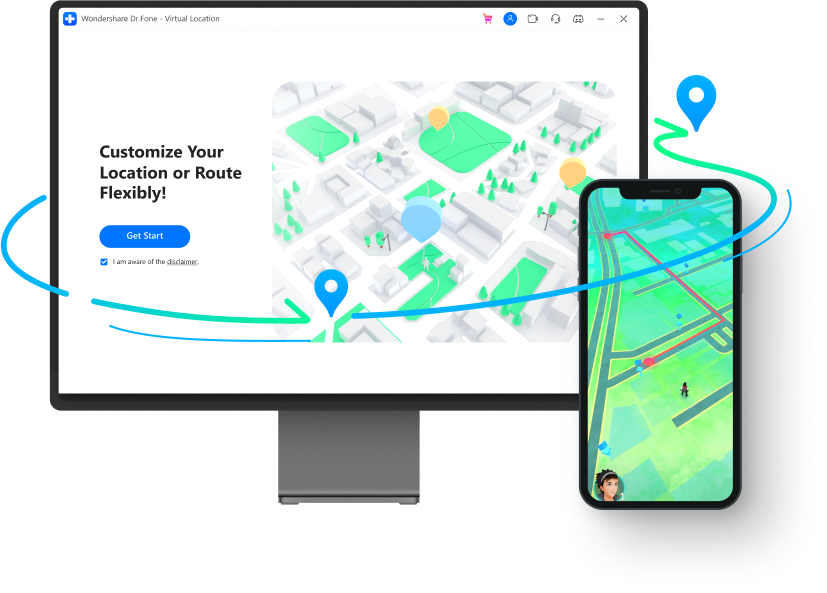
If you are searching for an alternative app to the iToolab AnyGo, look no further and check out the Dr.Fone - Virtual Location . It is similar to other GPS spoofing apps but promises a smooth, natural, and realistic simulation of any GPS location.
Games are always fun playing with joysticks. And if you play games like Pokemon GO with it, you will experience better and seamless control over your Pokemon character in the simulation.
The app has a low detection rate which prevents you from jailbreaking and avoids getting your account banned. The developers are always alert and constantly updating the app, so you get the most benefit from Dr. Fone Virtual Location. In addition, it is highly compatible with devices running the latest version, so you do not have to worry if the app will work on your device if you are running iOS 17 or Android 12 or later versions.
One great feature that Dr. Fone Virtual Location consists of is sharing your fake location with your family. So you can play pranks with them and have a great time. You can also connect with new friends and get to know their whereabouts.
So much of the talk. If you are wondering how to use Dr.Fone - Virtual Location app? Here’s what you should know. Follow the below step-by-step guide:
How to use the joystick for flexible and smooth GPS control
- The joystick feature is located in the teleport option at the upper-right corner in the 5th location.

How to simulate movement along the route using 2 spot location
- Go to “One-Stop mode” at the corner on top.
- Select the spot on the map you wish to go. The pop-up will tell you how far it is.
- Drag the slider to select how fast you wish to move. Choose between cycling, walking, and driving. Let’s take cycling for example.
- Enter a number to decide how many times you want to cycle between the two locations. Now click “Move Here”. Your character will start moving.
How to export and import GPX location
- Click the export button to store the path as a GPX file
- Import the shared GPX file to your Dr. Fone Virtual Location.
- Download it from another website. Now click the “Open” button.
- Wait some time to complete the import process. Once done, it is now ready for use.

How to teleport anywhere around the globe
Firstly download the Dr. Fone Virtual Location app. Though the app’s current version has an old interface, the functionality is cleared from any glitches. The latest interface will soon be available. Now click on the “Virtual Location” from the options and connect your Android/ iPhone to your computer, and hit “Get Started”.
Now in the window, find your existing location on your map with the help of the “center on” icon, which is located on the right sidebar. You will go to your current location upon clicking.
Now hit “teleport mode” at the top right. Enter your desired teleport located and hit the “Go” icon. Let’s visit Rome for this example.
You have successfully teleported to Rome. Click “Move Here”
Now your location is fixed to Rome.
How to add your route as a favorite
- On your virtual location screen, click on the five-star beside the route and add it to your favorite.
- Once you have added, hit the five-star icon again at the right-sidebar and locate the route you wish to use. Now hit the “Move” button and start walking along your favorite route again.
 vMix Basic HD - Software based live production. vMix Basic HD includes 4 inputs, 3 cameras, streaming, recording, playlist.
How to simulate movement along the route using multi-spot
- Choose multi-spot mode at the top right corner.
- The left sidebar tells how far it will travel to reach the location. Now set the moving speed and specify the number of times to cycle between the locations. Now click “Start Moving”.
You can watch the video below to fix iToolab AnyGo not working
Conclusion
If you are experiencing issues in the app and thinking iToolab AnyGo not working how to fix it? This is the answer. But if you are looking for an alternative, look no other than Dr.Fone - Virtual Location (iOS/Android). The app is very easy to use, teleports you in one click, and lets you use any location-based apps and games that are otherwise impossible to play.
 Epubor Audible Converter for Win: Download and convert Audible AAXC/AA/AAX to MP3 with 100% original quality preserved.
 safe & secure
Methods to Change GPS Location On Vivo Y17s


The Internet is a vast space and you have a plethora of content on different websites and platforms. You can call it a two-way - give and take relationship when it comes to the dynamics of data exchange between the world wide web and the users.
When you visit websites, they use cookies to track your activities. When you visit a restaurant, the phone detects and saves the GPS in the memory. You click a picture in the Maldives, your phone seeks out geographic points to prepare the right time and date stamps.
You need your GPS to download and use certain apps. Similarly, your GPS might be the reason you are unable to play some games or use some applications. Change GPS Location Vivo Y17s and this won’t be a problem for you.
But if you are wondering how can I change my location on my iPhone? These 5 methods will help you get fruitful results.
Part 1: Change GPS Location on Vivo Y17s using a Professional PC Program
The PC Programs are entirely Software based and do a tremendous job to spoof Vivo Y17s iOS 16 Location . You don’t have to buy any new equipment and you will be operating using your computer.
You can get this done within minutes if you have the right program with you. One of the best options in the market is Wondershare’s Dr.Fone. This is how you use Dr. Fone Virtual Location spoofer for GPS Spoofing iPhone.
![]() FX PRO (Gold Robot + Silver Robot(Basic Package))
FX PRO (Gold Robot + Silver Robot(Basic Package))
Dr.Fone - Virtual Location
1-Click Location Changer for both iOS and Android
- Teleport from one location to another across the world from the comfort of your home.
- With just a few selections on your computer, you can make members of your circle believe you’re anywhere you want.
- Stimulate and imitate movement and set the speed and stops you take along the way.
- Compatible with both iOS and Android systems.
- Work with location-based apps, like Pokemon Go , Snapchat , Instagram , Facebook , etc.
3981454 people have downloaded it
Step 1: Go to the official website of Dr.Fone - Virtual Location (iOS) . This is easily available when you google it or you can also follow this link here. Then you can download the executive file, install and then launch the application. Once the home page opens, you will find several options - Opt for ‘Virtual Location’. It is usually at the bottom of the page.

WPS Office Premium ( File Recovery, Photo Scanning, Convert PDF)–Yearly

Step 2: Now take your Vivo Y17s device and connect it to the computer that has Dr. Fone. Then click on ‘Get Started’.

Step 3: Now, the world map will display on the screen and you can clearly see the coordinates and directions as well. On the top right corner, the third icon is called the ‘Teleport Mode’. Click on that and enter the name of the place in the search box. You can even pinpoint it, if you are sure about the place.

Step 4: If you are completely sure that you got the address right, click on the ‘Move Here’ option. It moves your Pin from your present location to your new virtual location.

If you are looking for a way to change Vivo Y17s Location without Jailbreak, then this is one of the safest options for you. Also, you have other additional features like Phone Transfer, and Whatsapp Transfer along with Location spoofing. The application will never go to waste, won’t occupy much of your computer/PC/Laptop’s space and you can get the fake location iOS within minutes.
Part 2: Change GPS Location on Vivo Y17s using External Device
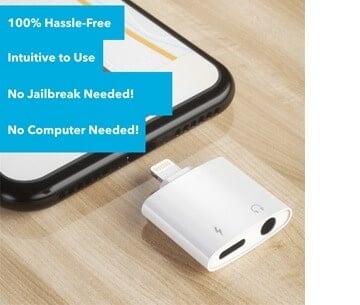
You can achieve the iOS Spoof Location using External devices as well. These devices do not cause any inconvenience to you. They are meant to be small, fit into the lightning port of your iPhone, and act as an external source that will spoof the Vivo Y17s location and the same will reflect in every app that uses or detects your iPhone’s geographic location.
The best external device to change phone location Vivo Y17s is Double Location Dongle. This simple device can be utilized by following the steps below -
Step 1: The Double Location Dongle is a very small, white rectangle that connects to your iPhone’s port. But along with it, you also have to install the Companion app for location spoofing. Once you have both of them ready, connect the Vivo Y17s device to your iPhone.
Note: The Companion App is not available on the App store. You have to download it from Double Location’s official website.
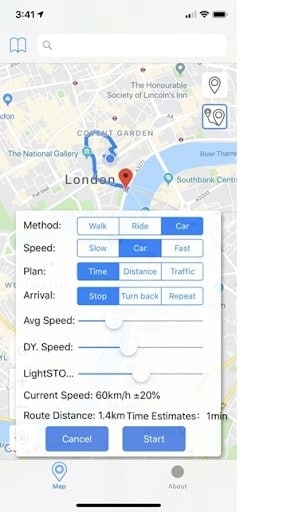
Step 2: The next step is to open the Double Location iOS companion app and then settle on the Map Tab.


Step 3: Unlike what we had seen in the Dr. Fone step, we cannot enter the location into any search box. You should move the pin to the location that you want to virtually shift to. Double Location provides some very good options that will help you during gaming. You can change all the appropriate settings and proceed.
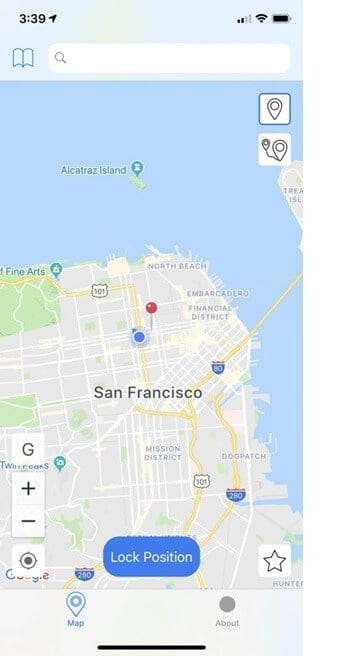
Step 4: On the bottom of the screen, Go for the lock position option. Once you do that, there will be a virtual shift in your geographic position and all your apps will register your new coordinates.

Part 3: Change GPS Location on Vivo Y17s using XCode
You can change the geolocation Vivo Y17s by using your coding expertise as well. That is why XCode exists. This Computer Program lets you change your Location in Vivo Y17s by giving some GIT Commands to the PC while your Vivo Y17s stays connected to it. By following these steps, you can understand how to do it. But if you’ve never had a liking for programming and coding languages, then you should probably skip this -
Step 1: Download and install XCode from the AppStore, directly to your Mac device. Launch the application.

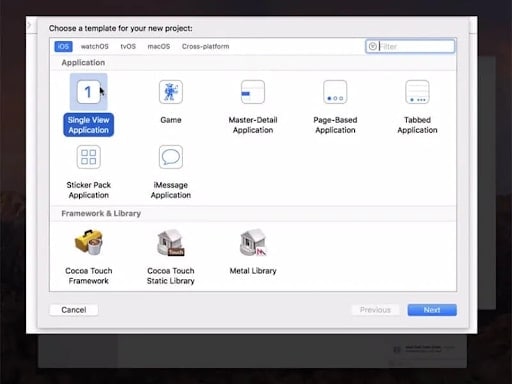
Step 2: Once you see the XCode window open, Go for the ‘Single View Application’ to start a new Project and go on by clicking on ‘Next’. You can set up a name and details for this particular project.
Step 3: A screen display will appear asking you about your identity. This is where the minimal coding part starts. You need to enter some GIT Commands to continue with the project.
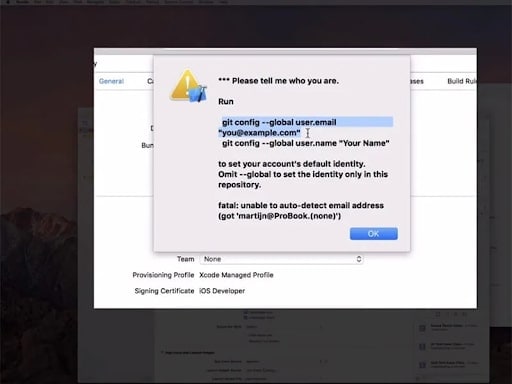
Step 4: Launch and run the terminal on your Mac device and enter these commands - git config –global user.email “[email protected]“ and git config –global user. name “your name”.You need to add your own details in the quoted space and continue to verify your identity.
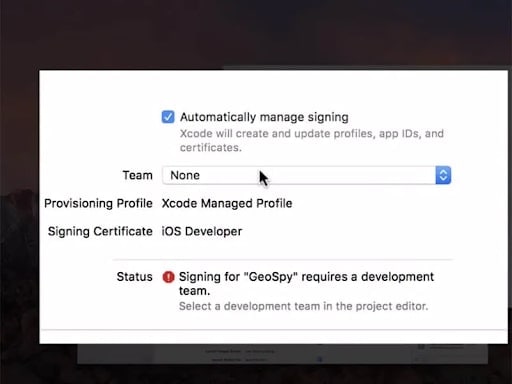
Step 5: Once you enter the commands, go to the next step and establish the Development Team. Then you can proceed to connect your Vivo Y17s device to your Mac device. Use the normal cable to do that.

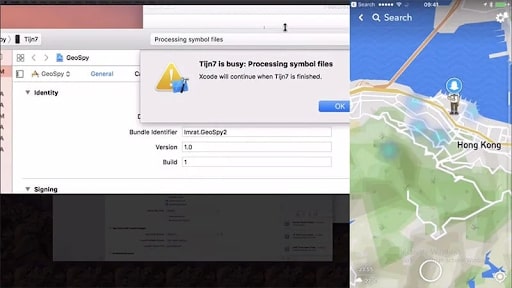
Step 6: To allow the program to process the Symbol Files, you will have to choose the model of your device. Go to the ‘Build Device’ option and continue as per the prompts. However, make sure that you keep your Vivo Y17s unlocked for quick detection by the computer software.
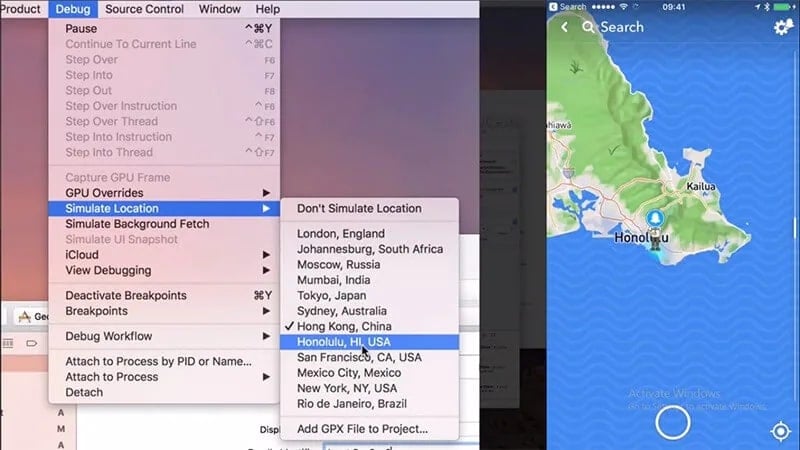
Step 7: Once that is done, you can come back to the actual location spoofing part. Go to the debug Menu > Simulation Location and specify the exact location that you want to virtually shift to. Once you are okay with it, the same will reflect on your Vivo Y17s as well.
Part 4: Change GPS location on Vivo Y17s using Cydia Location Faker App
Cydia is also based on software applications and changes location in seconds, However, you need to note that you have to jailbreak your phone. If you don’t know how to do it or do not want to take the risk, Cydia’s LocationFaker app may not be the right fit for you. But if you are a jailbreak expert, this is a very comfortable GPS Changer for iPhone.
Step 1: Download the Cyndia LocationFaker app from the official website. LocationFaker8 is available for the iOS 8.0 model.
Step 2: After launching the app, enter the virtual location into the search box.
 DEX 3 RE is Easy-To-Use DJ Mixing Software for MAC and Windows Designed for Today’s Versatile DJ.
Mix from your own library of music, iTunes or use the Pulselocker subsciprtion service for in-app access to over 44 million songs. Use with over 85 supported DJ controllers or mix with a keyboard and mouse.
DEX 3 RE is everything you need without the clutter - the perfect 2-deck mixing software solution for mobile DJs or hard-core hobbiests.
PCDJ DEX 3 RE (DJ Software for Win & MAC - Product Activation For 3 Machines)
Step 3: If you are done with choosing the new location, shift the toggle from ‘OFF’ to ‘ON’ at the bottom of the page.
Step 4: Now we can decide which apps can access our new virtual location. At the bottom of the page, you will find an ‘i’ icon. Go click on it and choose the ‘White List’ option. This one will then take you to the app list and you can decide which of them will have access to the phone’s location.
Part 5: Change GPS Location on Vivo Y17s using Location Handle
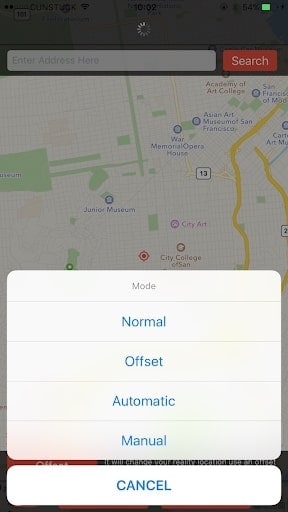
Location Handle is another useful application that you can use to change your location by a few meters or simply go with an automated movement system that changes your location gradually as if you are moving from one place to another. This is how you use it -
Step 1: Download the Location Handle app from the website or App store
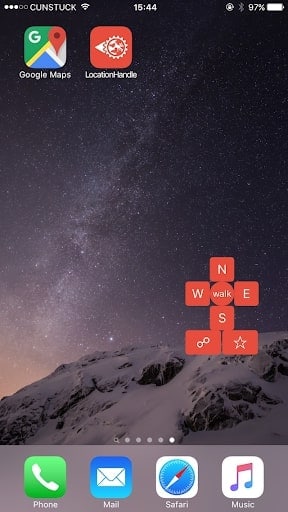
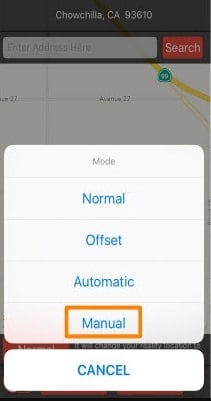
Step 2: There are four different types - Normal Mode - teleport to a new location; Offset Mode - Move a few feet away from the present location ; Automatic Mode - Slowly change your location from one point to another, as if walking ; Manual Mode - Change your location using a joystick.
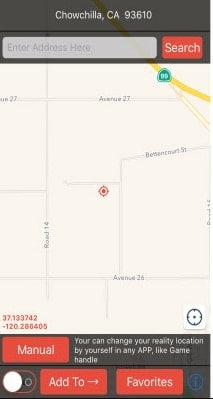
Step 3: Consider the Manual mode, because we want to change location to a far-off place and not necessarily for gaming.
Step 4: Once the Manual mode is activated, the map will be displayed and you can change the pin location. You can enter the location name in the search box.
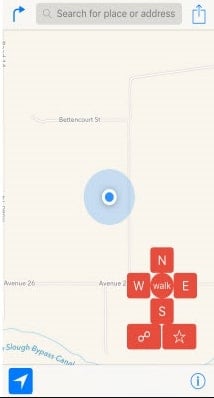
Step 5: The Joystick will appear on the page and you can use it to shift your location to wherever you want. Once you fix on the location, proceed and the new location will be updated.
Conclusion
We hope you are no longer wondering How to change Location services on Vivo Y17s. These 6 methods are very effective and you can always opt for the one that is most comfortable for you. If you want a hassle-free PC program, we have that narrowed down for you. If you are a coding enthusiast, then we’ve listed a method that best fits you. Whatever the reason, with an iOS Fake GPS, life becomes much easier and sometimes even safe on the internet. You can explore beyond the boundaries without moving from your couch!
- Title: iSpoofer is not working On Vivo Y17s? Fixed | Dr.fone
- Author: Ava
- Created at : 2024-08-01 20:02:38
- Updated at : 2024-08-02 20:02:38
- Link: https://fake-location.techidaily.com/ispoofer-is-not-working-on-vivo-y17s-fixed-drfone-by-drfone-virtual-android/
- License: This work is licensed under CC BY-NC-SA 4.0.