
Prank Your Friends! Easy Ways to Fake and Share Google Maps Location On Itel S23+ | Dr.fone
Prank Your Friends! Easy Ways to Fake and Share Google Maps Location On Itel S23+
Google Maps is a virtual map for mobile and PC use. With it, you can check routes and street maps with unreal aerial imagery. However, sometimes you might want to fake Google Maps location. Google maps location. For example, you might want to tag your friends or followers with a new fake location. Or, you might want to prevent apps like Google Chrome from accessing your actual location. Whichever the case, this article teaches you how to fake GPS on Google maps without breaking a sweat. Let’s learn!
Part 1: How to Fake or Spoof Your Location in Google Maps?
You may think I should be turning off the location setting and wifi services to show fake locations on google maps. Well, I tried this, but it did not work, unfortunately. Google Maps can still track me. This is because Google Maps can use the signal strength of cell towers around me to guess my location, and believe me, this guess is usually very accurate. Also, the IP of the phone can be used. Here, we provide two effective methods for you to fake and change location in Google Maps at ease.
 HD Video Converter Factory Pro
Method 1: Spoof location in Google Maps with a tool for both iOS and Android
If you want to fake Google maps location on iPhone, then you’ll have to put more effort than an Android device. Just installing an app might not work out to spoof Google Maps location on an iPhone. Nowadays, region-based games and apps are boring, and people need more options to explore. It is possible to share fake Google map locations by using different regions through a few clicks. Dr.Fone - Virtual Location has much more innovative ways to do that.
You need to download this app to use its incredible features. It’s a 1- click location-changing software that can outdo any other software in the market. This is the safest way to change Android and iPhone Locations without Jailbreak. Also, you get to enjoy other useful features of this software such as Phone Transfer, WhatsApp Transfer with the location changing.
Features:
- Allows users to simulate GPS movement along a route as they draw.
- One-click teleportation of GPS location to anywhere system available.
- There is a joystick available to spoof GPS movement comfortably.
- You can use this software with various location-based apps, like Pokemon Go, Snapchat, Instagram, etc.
- It’s compatible with both iOS and Android operating systems.
Here is a video tutorial for you to have a quick view on Google maps location changing.
 SwifDoo PDF Perpetual (2-PC) Free upgrade. No monthly fees ever.
 safe & secure
Step-by-step Guide to Fake Google Maps Location with Dr. Fone Virtual Location:
Step 1: First, you need to download, install and launch the Dr. Fone Virtual Location software on your computer. From the software’s home page, you need to select the “Virtual Location” option from a bunch of other options.

Key features:
• Import from any devices and cams, including GoPro and drones. All formats supported. Сurrently the only free video editor that allows users to export in a new H265/HEVC codec, something essential for those working with 4K and HD.
• Everything for hassle-free basic editing: cut, crop and merge files, add titles and favorite music
• Visual effects, advanced color correction and trendy Instagram-like filters
• All multimedia processing done from one app: video editing capabilities reinforced by a video converter, a screen capture, a video capture, a disc burner and a YouTube uploader
• Non-linear editing: edit several files with simultaneously
• Easy export to social networks: special profiles for YouTube, Facebook, Vimeo, Twitter and Instagram
• High quality export – no conversion quality loss, double export speed even of HD files due to hardware acceleration
• Stabilization tool will turn shaky or jittery footage into a more stable video automatically.
• Essential toolset for professional video editing: blending modes, Mask tool, advanced multiple-color Chroma Key

Step 2: Next, you need to connect your Itel S23+ to the computer by using a cable.

Step 3: On the next window, you’ll find the world map on your screen, and the coordinates and directions are clear on the map. You need to click on the third icon called the “Teleport Mode” from the top right corner of your screen. Then type in the place’s name in the search box where you want to change your location. There is also a way to pinpoint the area if you know it properly.


Step 4: After becoming sure of your new location, click on the “Move Here” button to change your location from the real one to the virtual one you selected.

Method 2: Change location in Google Maps with a VPN
An array of VPN apps come with built-in location spoofing features on top of the usual IP address masking. For example,
1. Nord VPN
NordVPN includes additional features to stay ahead of Hulu’s VPN blocks. It has a Smart DNS tool, to unblock streaming apps on games consoles and Smart TVs, and a functional app for Amazon Fire TV, too, though, it isn’t quite as fast as ExpressVPN, but it’s more than fast enough for HD streaming.
Pros
- Affordable price tag
- Useful Smart DNS feature
- IP and DNS leak protection
Cons
- Speed Slower than ExpressVPN
- Only one Japan server location
- Unable to pay by PayPal
2. ExpressVPN
ExpressVPN can bypasses many streaming blocks, like Hulu’s, and it delivers a fast long-distance speeds connecting to America from overseas compared to other vpns. Also, it provides many Japanese server locations, including the main big cities in Japan, Tokyo and Osaka.
Pros
- Fast speed
- In-built DNS and IPv6 leak protection
- Smart DNS tool
- 14 US cities and 3 Janpanese location severs
Cons
- More expensive than other VPN providers
3. Surfshark
Surfshark is relatively new to the market and only emerged some time back in 2018. It’s available now at a great price compared to current top dogs in the market.
Pros
- Affordable price tag
- Safe & private connection
- Smooth user experience
Cons
- Weak social media connection
- New to industry, unstable for sometime
VPNs change your perceived location by swapping out your real IP address with that of the VPN server. IP addresses are unique sequences of numbers and decimals that identify every device on the internet. An IP address can be used to approximate a device’s location.
Step-by-step guide for faking location in Google Maps with a VPN
No matter what VPNs you are using, the steps are basically as same as the following:
- Open a VPN app on your phone.
- Choose a country IP address that you hope to change to.
- Switch the button to make a connection on VPN.
- Refresh or reopen your Google Map, and then input your desired location on its search section.
- It’s complished when the desired location is found.
 ZoneAlarm Pro Antivirus + Firewall NextGen
Part 2: How to Share Your Location in Google Maps?
For iPhone users, you can share your Google map location through the following steps:
- Start Google Maps on your Itel S23+.
- Click on your profile avatar, and in the menu, click Location sharing. If you are already sharing your location, you will tap New share.
![]()
- Now select the contact you want to share your location with and also how long you will share.

- Click Share.
Or you can directly mark a location you wanna go to first, and tap the “Share” button, then choose the channels you want to share. You can share through WhatsApp, Telegram, Instagram, etc.

Also, follow the steps below if you are using an Android phone:
- On your Itel S23+ or tablet, open the Google Maps app Google Maps.
- Search for a place. Or, find a place on the map, then touch and hold to drop a pin.
- At the bottom, tap the place’s name or address.
- Tap the Share icon. If you don’t see this icon, tap More and then Share.
- Choose the app where you want to share the link to the map.
Part 3: FAQ: All You Wanna Know about Location Changing on Your Itel S23+

1. How can I add my favorite route as favorite?
In the reallocation screen, you’ll be able to find the five-star icon on the proper sidebar and, therefore, the new window after you use the three provided modes. A simple click to feature the route to your favorites. After you boost features, it’ll show you “collection successfully,” and also the five stars icon will display a red icon, and you’ll also enter to test what percentage you have ever strengthened.
2. How to turn off your location on an iPhone device?
You can do that by changing the settings on your device. Settings >> privacy options>> location services, then turn the icon to the left, which will indicate that your location is off.
3. How to turn off your history on an iPhone device?
To turn off the History, stick to the same icon of settings, and from the system services, check your significant locations, and you can delete them as well.
4. How does one give someone your location from your Itel S23+?
Start with opening the “Find My” app on your Itel S23+ and choose the “People” tab. Select share my location and enter the name or number of the person you wish to share your location with. In the end, tap send and share your site with someone you want to share.
Final Words
We’ve discussed the fake Google maps location through different methods in this detailed guide. Android and iOS users can use various apps to fake their location. For iOS users, Dr.Fone - Virtual Location is a perfect choice to spoof Google maps location without doing much work. Sharing fake locations in Google maps is a straightforward thing to do. Whether you want to use it to prank your friends, otherwise, you may have a more serious reason. By following the above steps outlined in this article, you will convince Google that you are anywhere within the world.
How to Fix Itel S23+ Find My Friends No Location Found?


In this time of modern technology, it is hard to be away from your phone or even leave it at home. When any task that we plan to do, usually already have an application released for the sole purpose of doing that task and needing to do it on your phone. When we message our friends, have a video call with our family, or just simply order food to eat at home, you can do all of them on the Itel S23+ device in your palm.
Another advantage of having our phones with us all the time is that you can also see the current location of either your friend or family. For Apple phone users, they have an app that is called “Find My Friends” that will show you the locations of the people that you are tracking. But what if you cannot find the location of the friend? We will find out the causes as to why no location can be found and how you can fix this in just a few simple steps.
Part 1: Why does an Itel S23+ say “no location found”?
When you are searching for your friend’s current location and it shows that “no location found”, there could be numerous reasons as to why that is happening. We have listed down the possible reasons why there is no location found.
 Screensaver Factory, Create stunning professional screensavers within minutes. Create screensavers for yourself, for marketing or unlimited royalty-free commercial distribution. Make screensavers from images, video and swf flash, add background music and smooth sprite and transition effects. Screensaver Factory is very easy to use, and it enables you to make self-installing screensaver files and CDs for easy setup and distribution. Screensaver Factory is the most advanced software of its kind.
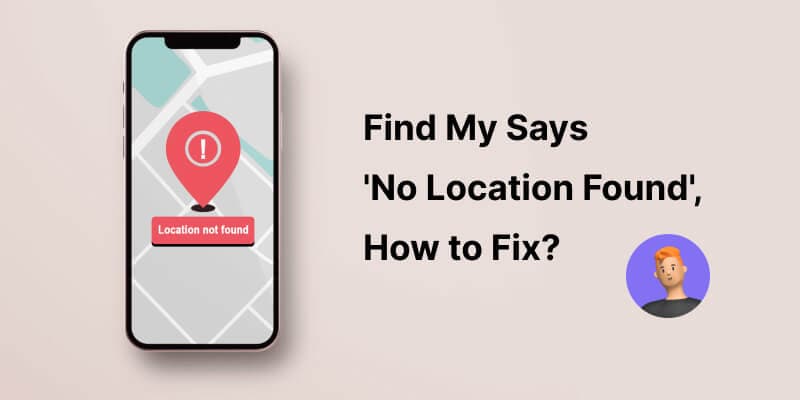
Option #1: Your friend has not signed in to the “Find My Friends” application. Make sure that they are registered in the application before tracking their location.
Option #2: The other person’s mobile is not connected to the internet or their phone is off. This could also be another common reason why you cannot see their location.
Option #3: Make sure that their “Location Services” is turned on. Some users would turn this feature off which hinders the application from checking their current location.
Option #4: The other user must have set up the wrong date and time. If the date and time do not correspond to the global time, then it will cause problems and difficulty with tracking that user.
Option #5: The application might not have been enabled under “Location Services”. Make sure that the application has the permission to track your current location and you can do this by following the steps below.
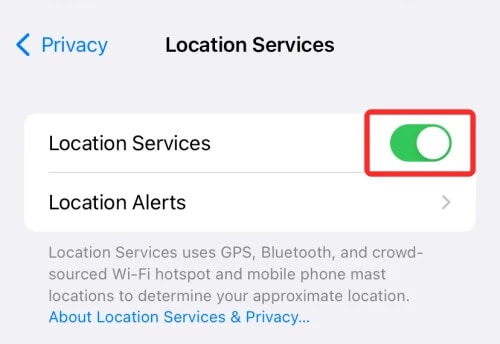
- Step 1: Go to “Settings” and then “Privacy”.
- Step 2: You can then go to “Location Services” and make sure that the application “Find My Friends” is enabled to track your location.
Part 2: Tips To Fix “No Location Found” Available
If you encounter an issue that says “No Location Found”, there are numerous ways you can fix the “No Location Found” message on “Find My Friends” and we will share them with you.
Option #1: Adjust your phone’s date and time. You can reset your time by following the steps.
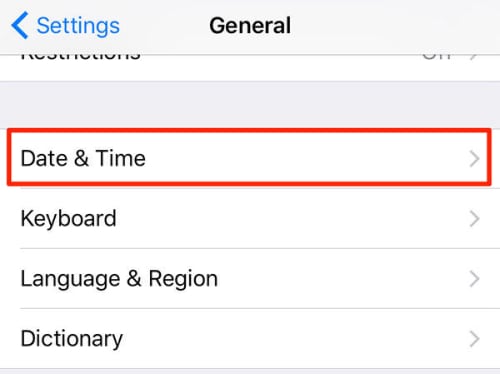
- Step 1: Go to “Settings” and choose “General”.
- Step 2: Then click on “Date & Time” and you can manually or automatically set the time.
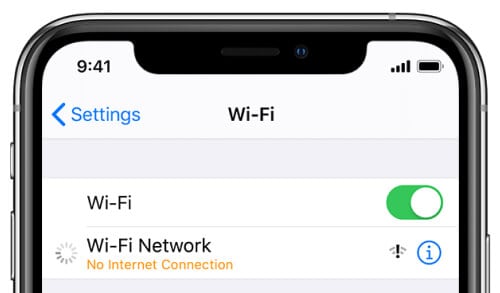
Option #2: Make sure that you or the other user is connected to the internet. Double-check if your phone is connected to the internet.
Option #3: Turn off and turn on your “Location Services”. Usually, this simple troubleshooting can fix this issue, you can try this out and check if you can see their location now. They can turn it on by following the steps below.
 The BootIt Collection covers multi-booting, partitioning, and disk imaging on traditional PC’s using the standard BIOS and newer PC’s using UEFI. The collection includes BootIt Bare Metal (BIBM) for standard BIOS systems and BootIt UEFI (BIU) for UEFI system.
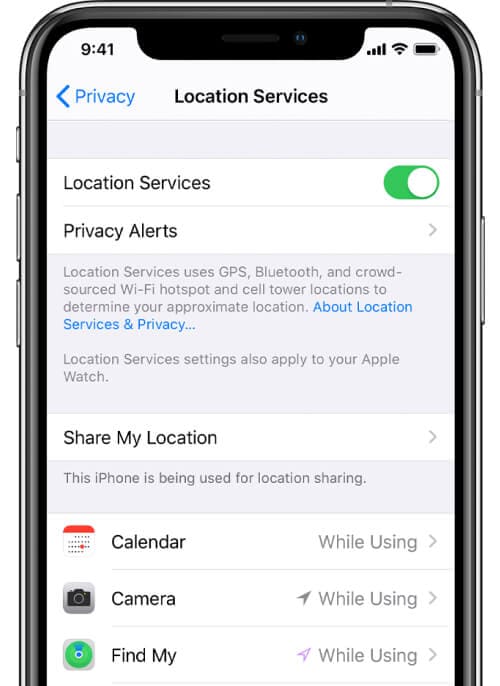
- Step 1: Go to “Settings” and choose “Privacy”.
- Step 2: After, you can look for “Location Services” and enable it.
Option #4: Enable “Location Services” for the “Find My Friends” application. There could be instances where your “Location Services” is not enabled for the application.
Part 3: How to Share Your Location with Find My Friends App?
If you want to share your location in the “Find My Friends” application, you can do that by following the steps below.

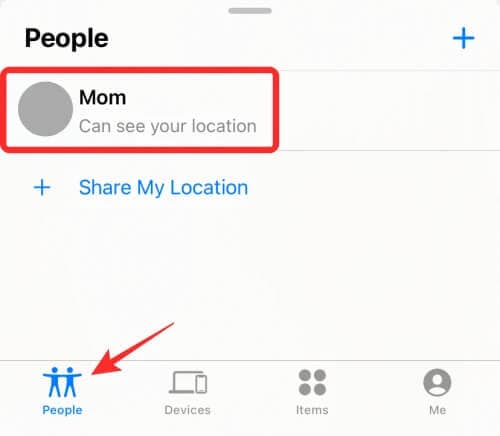
- Step 1: Open the “Find My Friends” application and select “People”.
- Step 2: Then you can tap on “Share My Location” and from there, you can type the phone number of the person you want to share your location too. You can also specify the amount of time you will share your location.
Part 4: How to Share a Fake Location to Others in Find App?
Sometimes we want our location to be kept secret and send a fake one to our friends and family. You can do that in our app, “Dr. Fone - Virtual Location “ which allows you to share a fake location with your friends.
Dr.Fone - Virtual Location
1-Click Location Changer for both iOS and Android
- Teleport from one location to another across the world from the comfort of your home.
- With just a few selections on your computer, you can make members of your circle believe you’re anywhere you want.
- Stimulate and imitate movement and set the speed and stops you take along the way.
- Compatible with both iOS and Android systems.
- Work with location-based apps, like Pokemon Go , Snapchat , Instagram , Facebook , etc.
3981454 people have downloaded it
You can use this application by following the steps below.
Step 1: Download the “Dr. Fone - Virtual Location” software on your laptop. Open and choose “Virtual Location”.
 WonderFox DVD Ripper Pro
Step 2: You can then connect your phone to your computer and click on “Get Started”.

Step 3: You will then be redirected to your current location on the new page.

Step 4: If you want to change your location, you will need to turn on the “Teleportation” mode by clicking on the first icon, typing the location you want, and then clicking on the “Go” icon.
Step 5: Click on “Move Here” and your current location will show up as the location that you typed on Your Itel S23+.
 PaperScan Professional: PaperScan Scanner Software is a powerful TWAIN & WIA scanning application centered on one idea: making document acquisition an unparalleled easy task for anyone.
Conclusion
We hope the tips we shared helped fix the “No Location Found” issue on your phone. Sometimes basic troubleshooting such as restarting your phone or turning off and on your GPS. You can also use our tip to use a fake location that you can send to your friends if you want to play a prank on them.
How to Stop Google Chrome from Tracking Your Location On Itel S23+?
Do you know your web browser is continually sharing your actual location online? You might not have noticed, but the number of websites using your location has increased. As you are well aware of the dangers of the internet, it doesn’t make sense to turn your Chrome into a beacon for ill-intentioned people. Luckily, it is possible to fake a location on Chrome with the right tool.
Are you wondering how to fake the browser location or which tool to use? You can get all your answers by reading this article till the end.


Part 1: How Does Chrome Know Your Location?
Before discussing Google Chrome’s fake location, it is important to know how Chrome detects your physical location. Google Chrome uses many ways to pinpoint your exact location, like your IP address, GPS, Wi-Fi, Bluetooth, and Cell Tower data. Every internet connection has an IP address bound to a location that enables Chrome to identify your location.
Similarly, GPS location can easily be tracked if your phone device has it enabled. All the Wi-Fi and Bluetooth connections around you also have location information embedded in them. They can help Chrome track you as long as your device can detect them. If you use cell data, Google Chrome can also track you through cell towers.
Part 2: How to Hide Location Services in Chrome?
If you are worried about Google Chrome detecting your physical location and sharing it with websites and apps, you can hide it easily. The process of hiding your location on Google Chrome is simple, even if you are using multiple devices. Below is the step-by-step process of hiding location services in Google Chrome on computer, Android, and iOS devices.
Method 1: For Laptop and Desktop PCs
Step 1: Launch Google Chrome on your computer and click the “Three Dots” icon to open the Google Chrome Settings. Here, tap “Privacy and Security” from the left sidebar and select “Site Settings.”
 SwifDoo PDF 2-Year Plan
Step 2: Navigate to “Permissions” and click on “Location.” To hide the location on Google Chrome, select the “Don’t allow sites to see your location” option.

Method 2: For iPhone or iPad
Step 1: Navigate to “Settings” on your iPhone and open it. Scroll down until you find the “Chrome” app option and select it.

Step 2: Press “Location” on the next screen to open the location options for Google Chrome. Here, choose “Never” to stop Google Chrome from detecting your location.

Method 3: For Android
Step 1: Open Google Chrome on your Itel S23+, press the “Three-Dots” icon, and tap “Settings” from the options.

Step 2: In Chrome Settings, press “Site Settings.” Now select “Location” and hide your location by toggling off the “Location” option.

One way to protect your privacy and stop websites from tracking your location is to turn off the location, but it has many disadvantages. If you have turned off your location, you can’t use any location base service like food delivery, e-shopping, ride-sharing, etc. That’s why it is better to use a fake location on your browser. Below we have explained four methods for Chrome fake location.

Method 1. Best Tool to Fake Chrome Location On iOS and Android Phones
The easiest and quickest way to fake your location on Google Chrome is to use Dr.Fone - Virtual Location . Since smartphones contain a wide range of apps that require location access, it provides a stable way to fake Chrome locations on Android and iOS phones. No website or app will be able to detect that you are using a fake location when using Dr.Fone - Virtual Location for faking GPS location.
Key Features
- Dr.Fone - Virtual Location can be used for any social media app like Facebook, Twitter, or Instagram with a fake location.
- With the help of this tool, you can also spoof real-time tracking apps like Life360 to protect your privacy.
- If you are an iPhone user, you don’t have to jailbreak your iPhone to spoof your device’s location.
How to Fake Chrome Location On iOS/Android Phones via Dr.Fone - Virtual Location
Faking your Chrome location with Dr.Fone - Virtual Location is very straightforward. You only need the Dr.Fone mobile toolkit and a USB cable to connect your Itel S23+. Follow these steps to spoof Chrome location on Android and iOS phones:
Step 1: Connect Your Android/iOS Device to Your Computer
Connect your Android or iOS phone to your computer using a USB cable. Launch the Dr.Fone robust toolkit on your computer and select “Virtual Location.”
Step 2: Activate the Teleport Mode
Press “Get Started” on the next page to open the map window. First, select your actual location by pressing the “Center On” icon from the right sidebar. Afterward, click on the “Teleport” icon from the top right corner to activate the Teleport Mode.
Step 3: Add the Desired Fake Location
Once the Teleport Mode is activated, add your desired location and press “Go.” Your desired location will open on the map. Select it, and a pop-up window will appear where you need to press “Move Here.” With that, your Android or iPhone’s Chrome location has been changed.
Method 2. Manually Change Your Location Using Google Chrome DevTools
It is also possible to fake browser location on Chrome using the Google Chrome Developer Tools. It is a built-in feature of Chrome and can be used to manually change or turn off your browser’s location. Follow these steps for changing location on Chrome with DevTools:
Step 1: After opening Google Chrome, click the three-dots icon from the top right corner. It will open the Chrome menu where you need to select “Developer Tools” after clicking “More Tools.”

Step 2: A window will open on the right side with all the developing tools you can use in Chrome. Click on the three-dots icon located near “Console” in the bottom left corner of the window. Choose “Sensors” from the pop-up menu.
 ZoneAlarm Extreme Security NextGen

Step 3: Access the newly selected “Sensor” option, and here you can change the browser’s location by either selecting a Google’s pre-set location or adding your desired location manually. Once the location is selected or added, your browser’s location will change.
Parental Control Software
Limitations
- The interface of the Google Chrome DevTools can be very confusing and overwhelming for non-technical users.
- Apart from pre-added locations, it can be hard to add a specific location as your fake location.
Method 3. Fake Your Location Using Chrome Extension
Many fake location Chrome extensions are available on Google Chrome which can be used to alter your location on Chrome. You can find these extensions on Google Chrome Web Store and add them directly to your browser. Below we have explained the steps for using such an extension “Location Guard “ to fake your location on Google Chrome:
Step 1: Open the “Location Guard” on Chrome Web Store and click “Add to Chrome” to add it to your browser. Once the “Location Guard” extension is added, open it and press “Options.”

Step 2: In the options, you can choose different options like Privacy Levels, Protection Area, and Time for Location Cache. It is recommended you choose a higher level for more protection.


Step 3: You can also use the “Fixed Location” feature to set up a fake location as a permanent location for your browser. The fixed location can be added by using the market or clicking on the desired place on the map.

Limitations
- Location Guard doesn’t protect your IP address. It means some websites can still detect your real location using the IP address.
- The app is not updated for quite a while, that’s why the map of the fixed location feature is quite restricted.
Method 4. Spoof Your IP Using a VPN Server
Another way you can fool websites and your browser by displaying a fake location online is to use a VPN server. VPNs fake your IP address to fool websites and apps into detecting your location. NordVPN is a VPN that can be used to spoof your IP by following these steps:
Step 1: Download and install NordVPN on your computer or phone and log in using your account. If you don’t have a NordVPN account, you must create one first.
Step 2: If you want to just change the location of your device, you can select “Quick Connect.” Using it will enable the program to automatically find the most suited fake location for you.


Step 3: You can also choose the desired location as your fake Chrome location in NordVPN. To do that, scroll down the list of countries and locations and choose your desired locations to connect to.
Limitations
- NordVPN can only spoof your IP address and will not work for geo-restricted applications.
- Using a VPN usually affects your internet speed and can make browsing slower and more difficult.
Part 4: FAQs
1.What is Geolocation?
Geolocation is a term used for the process of pinpointing the location of a device connected to the internet. The location can be determined using methods like IP address, GPS, and mobile tower data. Apps and websites commonly use it to provide location-based services.
2.What is the HTML5 Geolocation API?
The HTML5 Geolocation API is a browser API used to determine a user’s geographical location. Developers use it to build location-aware websites and apps that use users’ locations as the basis for providing their services. It can detect location through GPS, Wi-Fi, Bluetooth, IP addresses, etc.

3.Why should you hide or spoof your Location?
Hiding or spoofing your location protects your privacy and stop application and websites from tracking you. It also allows you to access geo-restricted apps and play location-based games. You can also fake your location to get the latest updates of your favorite apps.

Conclusion
The fact that Google Chrome in your devices can track your location with an accuracy of up to 20 meters is very unsettling for users. Even when you try to be careful in granting location permissions to apps and websites, many can still bypass this by adding location access requirements in terms and conditions.
That’s why having a tool like Dr.Fone - Virtual Location to fake GPS online is essential nowadays. It can ensure your privacy and helps in protecting you from the dangers of the internet.
- Title: Prank Your Friends! Easy Ways to Fake and Share Google Maps Location On Itel S23+ | Dr.fone
- Author: Ava
- Created at : 2024-08-01 20:37:28
- Updated at : 2024-08-02 20:37:28
- Link: https://fake-location.techidaily.com/prank-your-friends-easy-ways-to-fake-and-share-google-maps-location-on-itel-s23plus-drfone-by-drfone-virtual-android/
- License: This work is licensed under CC BY-NC-SA 4.0.