
Prevent Cross-Site Tracking on Vivo Y78+ and Browser | Dr.fone
Prevent Cross-Site Tracking on Vivo Y78+ and Browser
Have you ever wondered why you get the advertisements of the websites you visited a few minutes ago on your social media sites? Here comes to Cross-Site Tracking, also termed CST, and it is a process where third-party cookies and sites track your browser history.

![]()
The CST process is like invading your privacy by collecting your browser history and personal information. So, to prevent these services, there are several ways by which you can cross-site tracking on your system as well as Vivo Y78+ phone browsers. Keep reading to learn how to stop cross-site tracking on both Vivo Y78+ and browser.
Part 1: Why Do We Need to Stop Cross-site Tracking?
Cross-site Tracking is all about collecting your browsing data and other information for advertising purposes. Though the process can prove convenient for many as it provides additional information about the products and services you have searched for and offers tailor-made content, it is intrusive and about breaching your privacy.
Cross-site tracking collects information about your browsing history. The third-party cookies also monitor the content type you have visited and your personal information, which is risky.
Besides invading privacy, the CST also poses several other issues. Based on your browsing history, additional content you have not asked for is loaded on your visited sites, slows down the page loading process, and puts an extra burden on your battery. Moreover, too much-unwanted content can interfere with the basic information you are looking for.
So, it is always better to prevent cross-site tracking for all the above and more reasons.
Further reading: A detailed guide on faking location in Mozilla Firefox . Don’t worry about your location privacy anymore!
 Forex Robotron Gold Package
Part 2: Can Private Browsing be traced?
Yes, private browsing can be traced. When you work in private browsing mode, the web browser does not save the browsing history, which means that anyone who uses your system will not check your online activities. But websites and cookies can track your browsing history as well as other information.
Part 3: How to Disable Cross-website Tracking on Safari for iOS Devices?
Safari is the most commonly used platform by iOS users. So, to prevent CST for Safari on your iOS devices and Mac systems, below is a complete guide.
Deactivate Safari cross-website tracking for iPhone & iPad
Safari cross-site tracking can be prevented using the below steps on your iPhone and iPad.
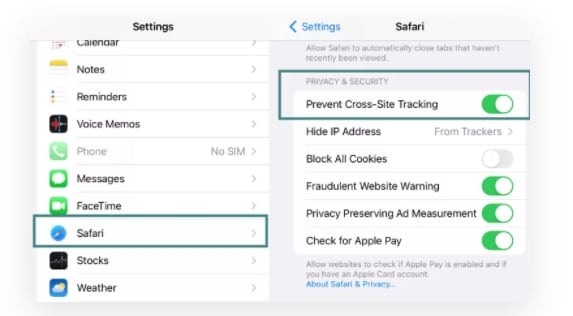
- Step 1. Launch the Settings app on your iOS device.
- Step 2. Find the Safari option by scrolling down the menu.
- Step 3. Move the slider to turn on “Prevent Cross-Site Tracking” under the PRIVACY & SECURITY option.
Deactivate Safari cross-website tracking for Mac
Use the steps below to turn off cross-site tracking on Safari on your Mac systems.
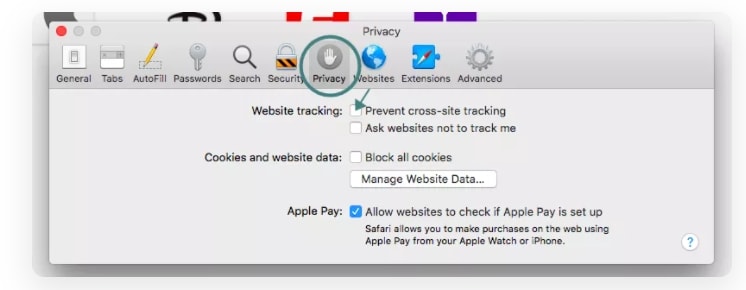
- Step 1. On your Mac system, open the Safari app.
- Step 2. Move to Safari > Preferences > Privacy
- Step 3. Enable the “Prevent cross tracking” option by clicking on the box next to it.
Part 4: How to Disable Cross-site Tracking on Google Chrome
Chrome is used widely on Windows systems and Android devices, and to prevent the CST from your browser, a detailed guide is given below.
 DEX 3 RE is Easy-To-Use DJ Mixing Software for MAC and Windows Designed for Today’s Versatile DJ.
Mix from your own library of music, iTunes or use the Pulselocker subsciprtion service for in-app access to over 44 million songs. Use with over 85 supported DJ controllers or mix with a keyboard and mouse.
DEX 3 RE is everything you need without the clutter - the perfect 2-deck mixing software solution for mobile DJs or hard-core hobbiests.
PCDJ DEX 3 RE (DJ Software for Win & MAC - Product Activation For 3 Machines)
Enable “Do Not Track” on Google Chrome for Android
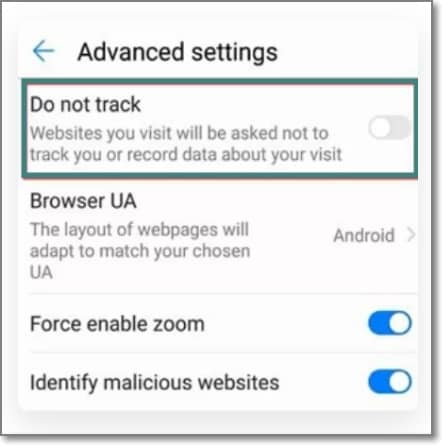
- Step 1. On your Vivo Y78+, open the Chrome app.
- Step 2. At the right side of the address bar, click on the More option and choose Settings.
- Step 3. Choose the Privacy option from the Advanced tab.
- Step 4. Click on the “Do Not Track” option to turn on the feature.
Enable “Do Not Track” on Google Chrome for Computer
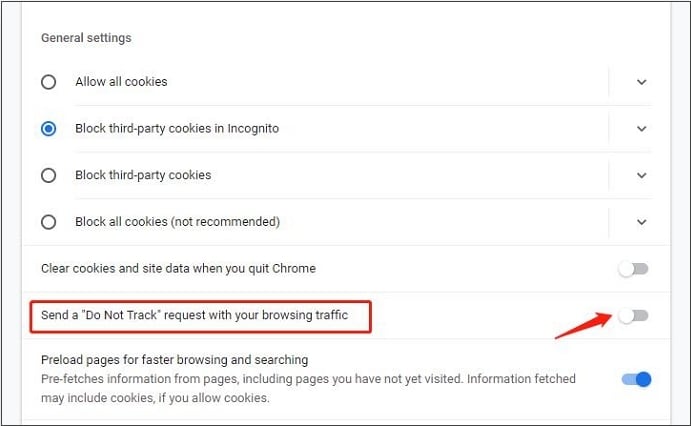
- Step 1. Launch Chrome on your system, and from the menu at the upper-right corner, click on the Settings option.
- Step 2. From the “Privacy and Security” tab, choose the “Cookies and other site data” option.
- Step 3. Tap and enable the slider next to “Send a “Do not track” request with your browsing traffic.”


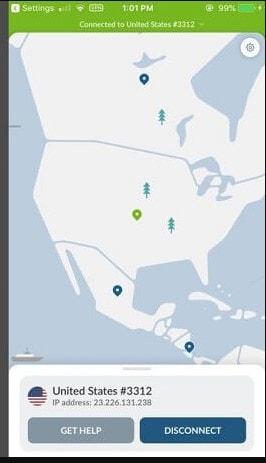
Part 5: Recommended Solution: Fake a Location to Stop Cross-Site Location Tracking Using Dr. Fone
What if you let the sites and cookies track your phone location without worrying about your privacy? Yes, it can be done by spoofing your location. So, if you set a fake location while browsing the internet, you will not have to worry about cross-site tracking, as anyways, the sites and cookies will get misled browsing information that cannot harm you in any manner.
Setting a fake location on your iOS devices, a professional tool is needed, for we recommend Wondershare Dr.Fone - Virtual Location as the best tool. Using this Android and iOS-based software, you can set any fake GPS location on your device. The tool is simple to use and does not require any mastery of technical know-how.
Key features
- Simple tool to teleport to any GPS location in a single click.
- Allows simulating GPS movement along the route.
- All popular models of Android and iOS devices are compatible.
- Compatible with all location-based apps on your phone.
- Compatible with Windows and Mac systems.
Here is a video tutorial for you to take an overview of how to use Dr.Fone - Virtual Location to fake location on your Android and iOS devices.
 safe & secure
Steps to set fake location on your Android and iOS devices using DrFone-Virtual Location
Step 1. Download, install and launch the software on your Windows or Mac systems. On the main software interface, choose the Virtual Location option.

Step 2. Connect your iPhone or Android device to your system using a USB cable and then tap on the Get Started option on your software interface.

Step 3. A new window on the software interface will open, showing your connected phone’s real and actual location. If the detected location is incorrect, click on the “Center On” icon to display the right device location.

Step 4. Next, you need to activate the “teleport mode” and click o the 3rd icon at the upper-right corner.
Step 5. Next, you have to enter now the fake location to which you wish to teleport to at the upper-left corner. Click on Go.


Step 6. Finally, tap on the Move Here button and the new fake location for your connected Android or iOS device at the pop-up box.

Check the new location of your phone from the app.
 ZoneAlarm Extreme Security NextGen

Wrap it up
Preventing Cross-site tracking can be done on different browsers and devices using the guides listed in the above parts of the article. Settings a fake location for your device using Dr. Fone-Virtual Location is another interesting way to prevent tracking your browsing history by spoofing the sites and cookies. Setting a fake place will not only avoid monitoring your browsing history but will also work with all location-based apps on your phone.
safe & secure
8 Solutions to Fix ‘Find My Friends Location Not Available’ On Vivo Y78+
There is no doubt that Find My Friends is an excellent application for location tracking. It allows users to track the location of their friends and family members through a variety of devices. So, when Find My Friends says the location is not available, it can be a frustrating situation. But don’t stress over this because we are here to assist you in Find My Friends not working. Go through this guide, and you’ll know what to do to take care of the problem.


When the “Location Not Available” message appears on Find My Friends, it means that you have disabled location sharing or have turned off your device’s location services. This message can also appear if your device is in an area with poor network coverage or if your device is turned off. In some cases, the message can indicate that you have logged out of your iCloud account or that there is an issue with the iCloud server.
Does “Location Not Available” mean that there is something wrong with Vivo Y78+ ?
Not! This message does not necessarily mean that you have blocked yourself or there is something wrong with your device. If you frequently see the “Location Not Available” message, you may need to check your own device’s settings or contact your friends to confirm their location-sharing preferences.
How to distinguish “No Location Found” and “Location Not Available”?
“No Location Found” means that the Find My app is unable to locate the Vivo Y78+ device being tracked. This can happen for a variety of reasons, such as if the Vivo Y78+ device is turned off, not connected to the internet, or if location services are disabled.
“Location Not Available” means that the Vivo Y78+ device is not currently sharing its location with the Find My app. This can happen if the Vivo Y78+ device is in Airplane mode or if the user has turned off location sharing for the Find My app. It can also happen if there is a temporary issue with the iCloud servers.
In summary, “No Location Found” means the app could not locate the Vivo Y78+ device, while “Location Not Available” means that the Vivo Y78+ device is not currently sharing its location.
Part 2: Possible Reasons For Find My Friends Location Vivo Y78+ Not Available
Why does Find My Friends say location not available? Before we get to the solutions, let’s explore the possible reasons behind this problem. It is apparent that when the location is not found on Find My Friends, there is an underlying problem. Here are the possible reasons that could cause this error:
- Your friend’s device has an inaccurate date
- The other device isn’t connected to a network, or it’s off
- Hide My Location feature is active on your friend’s phone
- The Location Services are also turned off on the friend’s device
- Your friend hasn’t signed in to the service
- The location of your friend is in a country or region where Apple doesn’t provide this feature
All these reasons can be the ones causing trouble on your Vivo Y78+ and Android phones. Hence, you will have to look for some conventional methods to fix the unavailable location error.
Part 3: 8 Tips To Make “Find My Friends Location” Available
When the Find My Friends app location is not available, here are some more tips that can help get rid of this issue.
Tip 1: Check if Find My Friends is Supported in Region/Country
The foremost thing you should do when the Find My Friends location is not available is to check the region/country’s location. Apple Inc still hasn’t provided the Find My Friends feature in all countries and regions due to local laws and technical issues. So, the most plausible reason for the app not working properly is solely because it is not available in that particular country/region.
Tip 2: Quit and enable GPS or Location Services again
After verifying that the feature is available in your region, enable the GPS & Location Services. In case you’ve already enabled the feature, turn it off, quit the app, and again enable the service. It might fix the location not found on the Find My Friends issue you’ve been facing. Just open Settings > Privacy & Security > Location Services and toggle the bar to turn the feature on or off.
 PCDJ DEX 3 for Windows & MAC is the total entertainment DJ software solution, offering audio, video, and karaoke mixing ability. Automatic beat-sync, smart looping, 4 decks, DJ MIDI controller support, Karaoke Streaming and much more.
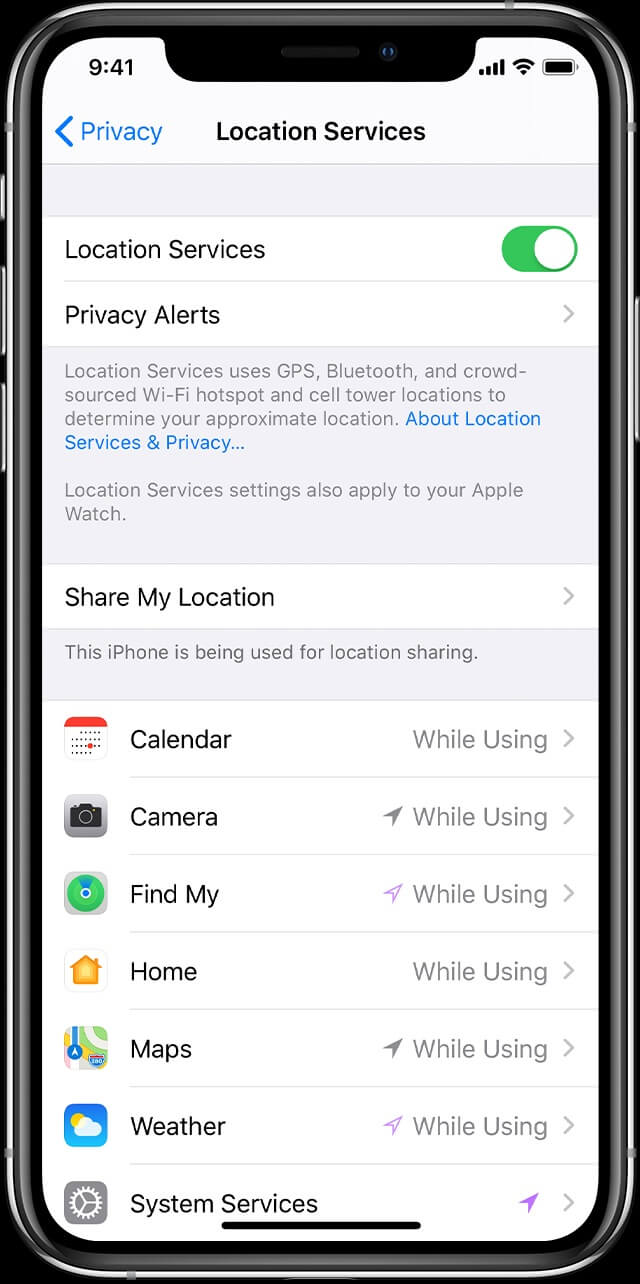

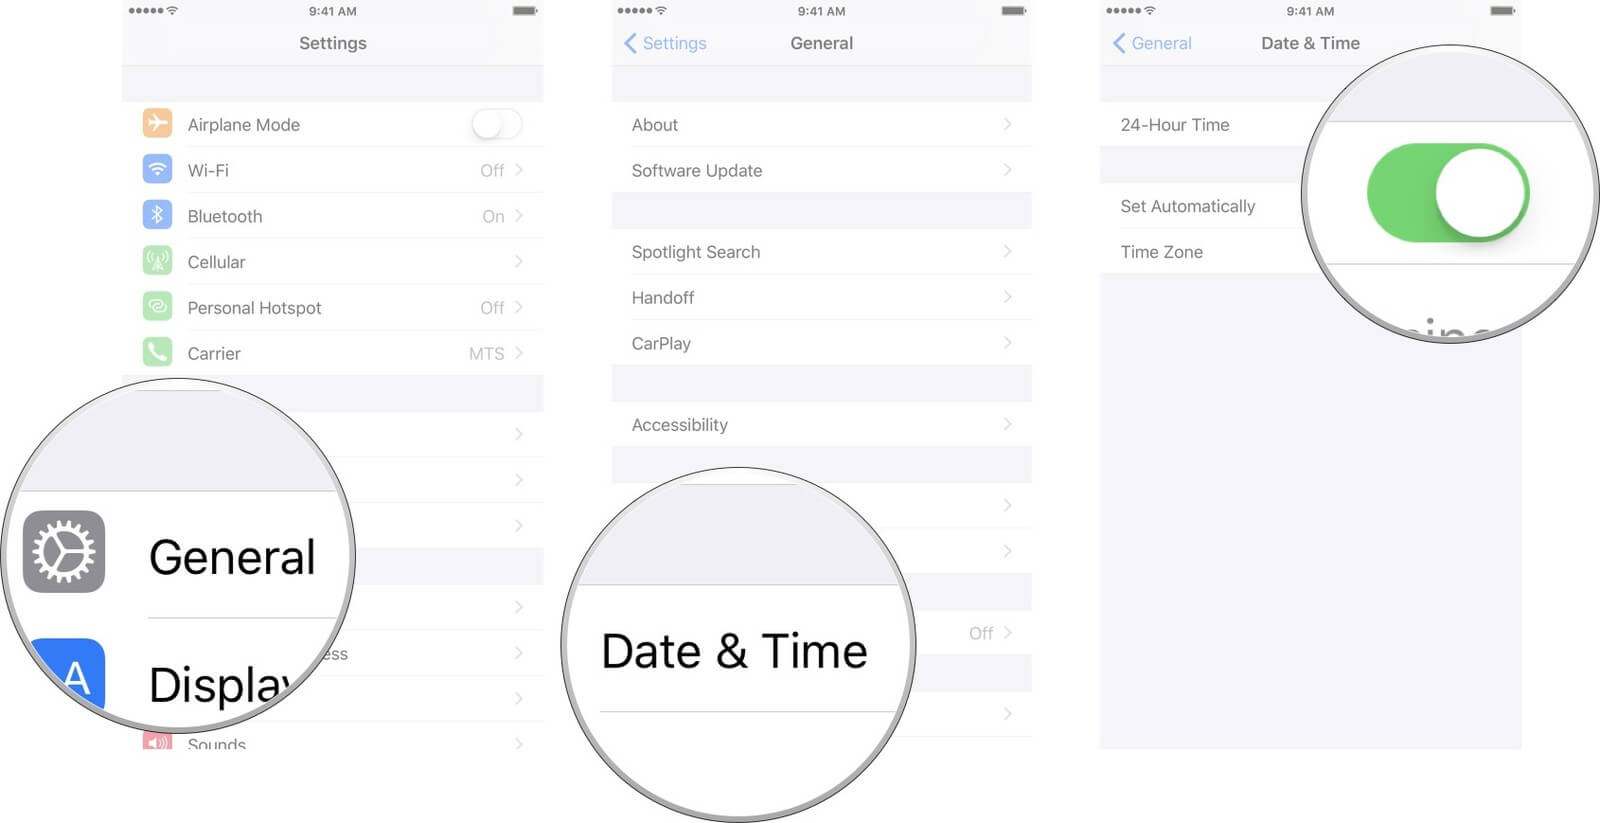
Tip 3: Adjust Vivo Y78+ Date and Time
As we stated in the possible reasons, incorrect dates and times also result in this problem. If you have manually set the date and time, change the settings and set it to “Set Automatically” in General Settings. Hopefully, this will resolve the problem when the Find My Friends location is not available.
 dotConnect for Oracle is an ADO.NET data provider for Oracle with Entity Framework Support.
Tip 4: Check the Internet
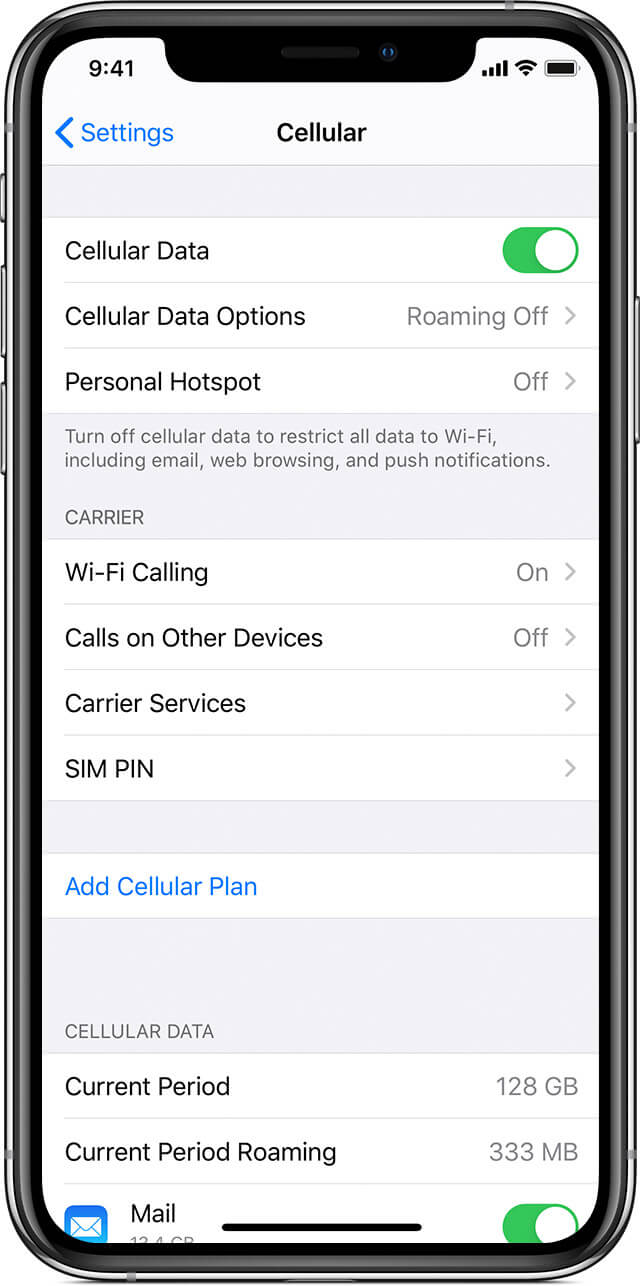
Before you conclude that there is something wrong with the Find My Friends app, check your internet connection. There is a chance that location is not available on the Vivo Y78+ because your device doesn’t have internet access. Try opening Settings > Mobile Data/Wi-Fi and turning it on and off. Alongside, make sure that you have signal strength, whether you are connecting to cellular data or a Wi-Fi network.

Tip 5: Enable Share My Location
Another tip to try out when your friend’s location is not available is to make certain that you’ve enabled Share My Location feature. To do this, follow the steps given below:
Step 1: For Vivo Y78+ users: get to the “Settings” app and go to “Privacy & Security”. You will find the “Location Services” feature, click on it, and see the “Share My Location” feature.

Toggle on the option to enable it. Once the feature is enabled, your friends will see your location, and you can see theirs.
For Android users, go to “Settings” > “Additional settings” > “Privacy” > “Location”, and choose the location mode to enable it.
Tip 6: Restart the Vivo Y78+ or Android Phones
The next tip to use when Find My Friends says location not available is restarting your phone. For most devices, the method is common. But for Vivo Y78+ X and 11, the steps are slightly different. For other Vivo Y78+ models, press the Power button and wait until the slider appears. For Vivo Y78+ X and 11/12/13/14, you’ll have to hold the Volume button and the Power button together to make the slider appear on the screen.

Drag the Power slider to the right side and wait for the Vivo Y78+ device to shut down. Wait for a minute before you restart the Vivo Y78+ device, and hopefully, the feature will start working again as usual.
Tip 7: Check That Your Friend Has Signed into Find My Friends
Another tip that can help you resolve to Find My Friends location not available is checking that your friend has signed into the app. It is apparent that if your friend hasn’t logged into the feature, you won’t access his/her location.
Open the Find Friends app, log into it, and enable the location-sharing feature.
 Screensaver Factory, Create stunning professional screensavers within minutes. Create screensavers for yourself, for marketing or unlimited royalty-free commercial distribution. Make screensavers from images, video and swf flash, add background music and smooth sprite and transition effects. Screensaver Factory is very easy to use, and it enables you to make self-installing screensaver files and CDs for easy setup and distribution. Screensaver Factory is the most advanced software of its kind.
Tip 8: Quit Find My Friends App and Open It Again
Last but not least valuable tip to use when the Find Friends location is not available is to quit the app. There is a possibility that you’ve faced the problem only because of a momentary issue or some random glitch. Make sure that you also clear the cache memory before opening the app again. It might fix the problem entirely.
 Glarysoft File Recovery Pro - Helps to recover your lost file/data, even permanently deleted data.
Extension: Can I send the fake location by Find Friends to others?
With Dr. Fone - Virtual Location software, you will be able to share a fake or any location you want with your friends and family. Alongside this, Dr. Fone will also pace up your movement to ensure that your friends and family members won’t find out that you share fake locations with them. The video below teaches you how to teleport your Vivo Y78+ GPS location, and more tips and tricks can be found in the Wondershare Video Community .
Here is a video for you to learn how to fix Vivo Y78+ Find My Friends location not available:
To use Dr.Fone - Virtual Location, here are the steps you need to follow:
Step 1: Download the virtual location app for both iOS and Android and install it on your system carefully. Then, launch the app and select the “Virtual Location” option from the toolkit.
Step 2: The next step is to set up the phone’s connection. Connect your Vivo Y78+ and click on the “Get Started” button. Now, detect your current virtual location by clicking on the “Current Virtual Location” icon.

Step 3: Now go to the search box and type the location you want to switch to. Once the location gets detected, click on the “Move Here” option, and the location of your Vivo Y78+ or Android phone will change to the one you specified.
As you can see, when you have Dr.Fone - Virtual Location software, you can share any location with just one click. And it would seem that your Find My Friends app is working fine.
FAQs You May Want to Know about Vivo Y78+ Location
1. Is there a way to check if someone has stopped sharing their location with you on their Vivo Y78+ ?
If someone stops sharing their location with you on their Vivo Y78+ , you will see “Location Not Available” next to their name in the Find My app or Messages app. You can check the status of location sharing by tapping their name in the Find My app.
2. Can I track a stolen Vivo Y78+ if it is turned off?
You may still be able to track a stolen Vivo Y78+ if it is turned off using the Find My app or iCloud website. However, this depends on several factors, such as whether the Vivo Y78+ device is connected to a Wi-Fi or cellular network, and whether the person who stole the Vivo Y78+ device has turned off location services.
3. Can I track someone else’s Vivo Y78+ location without their permission?
No, you cannot track someone else’s Vivo Y78+ location without their permission. The Find My app only allows you to track the location of devices that are signed in with your Apple ID, and you need the other person’s permission to share their location with you.
4. Can I prevent someone from tracking my location?
Yes, you can take steps to prevent someone from tracking your phone’s location. Here are some measures you can consider:
- Turn off location services or GPS.
- Adjust app permissions.
- Use airplane mode.
- Use a VPN or professional location changer tool like Dr.Fone - Virtual Location to change your phone location .
- Check for spyware.
- Turn off Wi-Fi and Bluetooth.
- Review privacy settings.
- Be cautious with social media.
- Use encrypted messaging.
- Avoid public Wi-Fi.
- Clear location history.
Taking these precautions can help safeguard your phone’s location and enhance your privacy. It’s important to stay vigilant and be aware of the privacy settings and permissions on your device.
Dr.Fone - Virtual Location
1-Click Location Changer for both iOS and Android
- Teleport from one location to another across the world from the comfort of your home.
- With just a few selections on your computer, you can make members of your circle believe you’re anywhere you want.
- Stimulate and imitate movement and set the speed and stops you take along the way.
- Compatible with both iOS and Android systems.
- Work with location-based apps, like Pokemon Go , Snapchat , Instagram , Facebook , etc.
3981454 people have downloaded it
Conclusion
Hopefully, now you know “why is find my friends not working” and several ways to fix the Find Friends location not available. In this guide, we learned all these tips to make it easy for Vivo Y78+ users to rectify the issues with the Find Friends app. Check all the tips carefully and implement them whenever you face issues like this.
6 Ways to Change Spotify Location On Your Vivo Y78+

Spotify’s booming audio business is proof that people are in love with its services. If you want to listen to your favorite retro song, or you want to discover the latest hits, Spotify has everything. You can also listen to some really good podcasts and album hits. But what most of us don’t know is that your Spotify Location can determine what kind of content you might come across on the platform.
Your playlist suggestions depend on the country and region you are staying in. And in case you are unable to access any particular song or album, that can be because of your location too, If you are planning on Spotify Change Location, then here are 6 effective ways that will instantly get the job done or you, no matter where you are in the world.
Part 1: By-Passing geo Restrictions in Spotify
Before we find out about the 6 different ways to update location Spotify, let us understand why it is important to by-pass these geo-restrictions and what are these hindrances in the first place.
Region Specific Content
The main reason anyone would want to change their Spotify location is when they change countries. If you want to access content relevant to this new region, it is best to go with Spotify Change Country. When you change our spotify location, you will get the regionally most-played songs or most liked podcasts as suggestions. This way, you can access quality content of this place that you’ve shifted to.
Geo-Based Suggestions
Now, your coordinates can decide what kind of playlists Spotify compiles for you. The music streaming app can surprise its fans by bringing together some of the best songs from the region. Depending upon your location, only the most liked songs of that location are brought together. This makes life easier for those who like to listen to songs and content in their regional languages.
But is Spotify available everywhere?
How we wish this was true! However, Spotify is not available in all the countries. Though ts has decided to extend its services to most of the Asian and European countries, currently, it is available in roughly 65 countries only. By the end of 2021, it might be available in over 170 countries, Until then, tweaking location becomes important.
The problem with Spotify update location is that - you can only change your country when you installed Spotify in a particular country and then shifted to a new one. If you are trying to change location within the same geographical boundaries, it doesn’t support those actions. Also, the free users have to change their location manually while the Premium Subscribers can access the content available in all the Spotify Hosting countries.
Part 2: Best Tools to Fake GPS on iPhone
Most of the users want to make the best use of this tremendously efficient Music-streaming app. It is having a keen eye for quality audio and also hosts some of the best podcasts and content. To make that possible, you can use some of the best online tools to fake spotify location whenever you want. Instead of going for the regular Spotify Update Location, you can use these third-party applications to change the location on your iPhone devices (will reflect in Spotify too).
The Wondershare’s Dr. Fone is a very good application that lets you change location Spotify with a few easy steps. It hardly takes a few minutes and this is how you go about it-
Dr.Fone - Virtual Location
1-Click Location Changer for both iOS and Android
- Teleport from one location to another across the world from the comfort of your home.
- With just a few selections on your computer, you can make members of your circle believe you’re anywhere you want.
- Stimulate and imitate movement and set the speed and stops you take along the way.
- Compatible with both iOS and Android systems.
- Work with location-based apps, like Pokemon Go , Snapchat , Instagram , Facebook , etc.
3981454 people have downloaded it
Step 1: Go to the official website of Dr. Fone - Virtual Location (iOS) and you will find the download versions for Mac, and Windows. Download and launch the application.
Step 2: Once you launch it, from the options displayed on the screen, go for Virtual Location (usually at the bottom).
Step 3: Then connect your iPhone to your computer and click on ‘Get Started’.
 The Tube Sites Submitter is a fast and efficient tool for anyone who needs to upload videos quickly, easily and automatically to hundreds of tube sites in mere minutes .
Step 4: A map with the coordinates of the entire world will appear. On the top right corner of the page, click on the third icon - Teleport Mode. Now, choose the place that you want to virtually shift to.
Step 5: Click on ‘Move Here’.
The new Virtual Location will display on your iPhone Location Settings as well and Spotify update location will also be the same.
The process doesn’t take much of your time and you can change your location any number of times that you want. Not only on Spotify, your other social media apps and location using apps will also record the new virtual location.
Cydia - Location Faker App
For the Spotify Change Region, Cydia’s Location Faker App is the perfect choice for iPhones. The software is also available in different versions to choose for your device model. You won’t need a computer for this and everything happens over your iPhone only.
Step 1: Download the Locationfaker version suitable for your phone. Locationfaker8 is available for the 8.0 version of iPhone.

Step 2: You will notice a map appear on the screen. You can either move your pin-point to the new location or enter the address or coordinates into the search box on top of the page.
 With Screensaver Wonder you can easily make a screensaver from your own pictures and video files. Create screensavers for your own computer or create standalone, self-installing screensavers for easy sharing with your friends. Together with its sister product Screensaver Factory, Screensaver Wonder is one of the most popular screensaver software products in the world, helping thousands of users decorate their computer screens quickly and easily.
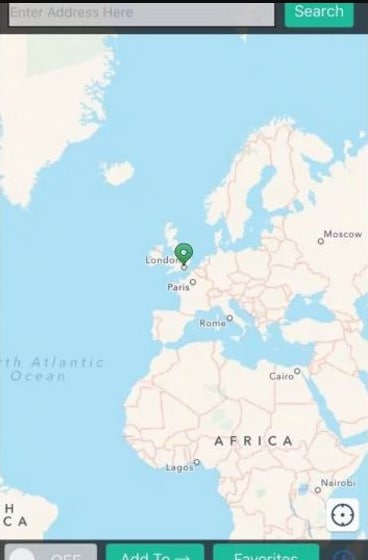
Step 3: Once you settle with the coordinates, shift the ‘Off’ toggle to ‘On’. It is present at the bottom of the page.
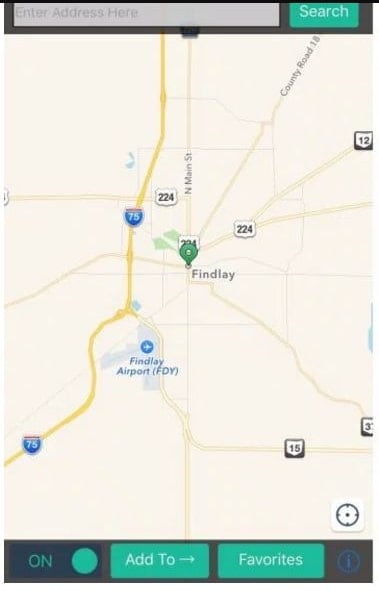
Step 4: On the bottom of the page, in the same line as the toggle, you will find the ‘i’ icon. Click on that and several options will open. From there, choose ‘White List’. All the apps that need access to your new location will display. Search for Spotify and enable it.
Cydia - Location Handle App
To change spotify region, the Location Hanle App from Cydia might bring in more benefits than the usual location spoofing options. This is usually a very good choice for those people who play games and like to fool their friends with a fake location. However, for Spotify update Location, it still does a great job.
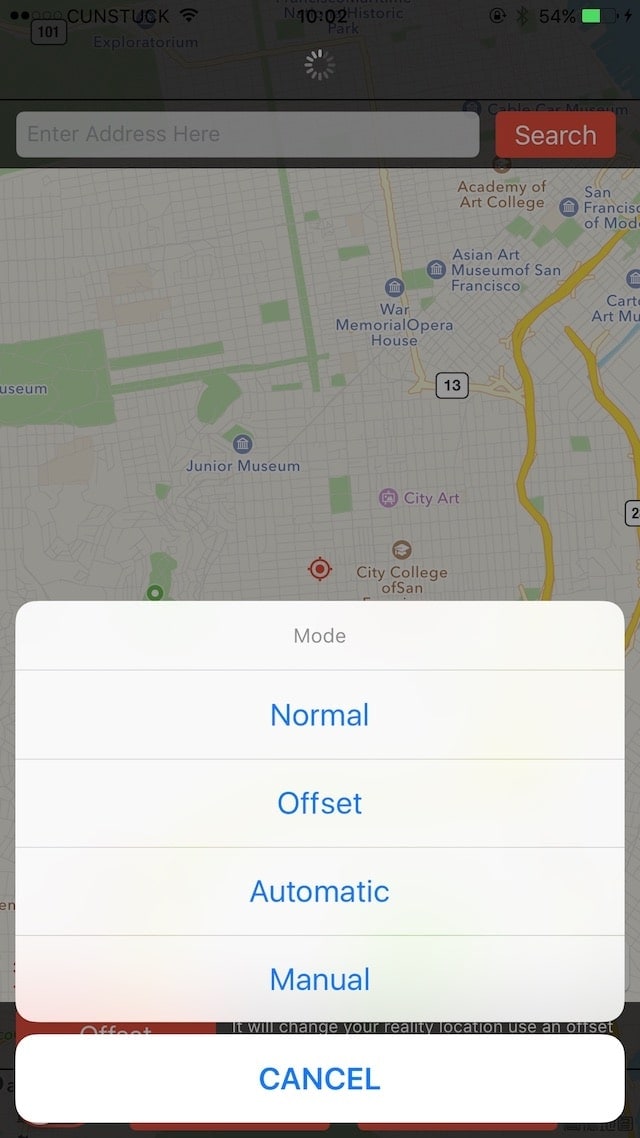
Step 1: You can download the Location Handle application either from their website or the app store. Wait till it completely installs.
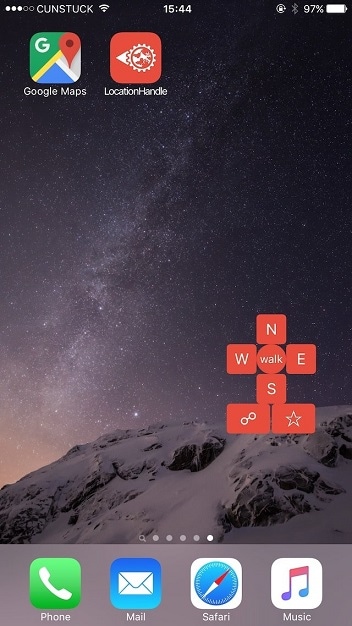
Step 2: Now, the map tab will appear along with an option to choose from 4 location changing types.
Cydia - Location Handle App
- Normal Mode - Change the location to anywhere
- Offset Mode - Change to a location that is only a few feet away.
- Automatic mode - Change to a new location slowly, as if you were walking.
- Manual Mode - change to a new location by using the joystick to navigate.
 ZoneAlarm Pro Antivirus + Firewall NextGen
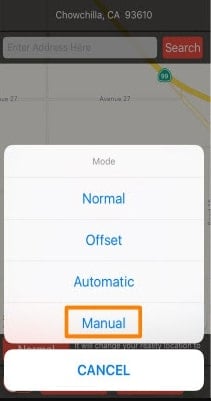
Step 3: Here, we are learning how to achieve Manual Spotify Change Region. So, go with the Manual Mode
Step 4: Now the map will appear on the page, more clearly with the pin and a search box for entering coordinates will also display. You can update Spotify location there.
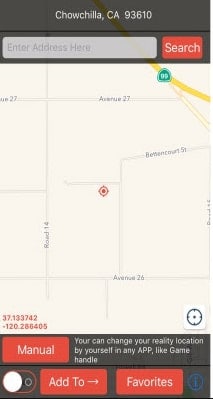
Step 5: The Joystick will show you the different directions and when you move it, your location on the map also changes. Settle on the one that best fits you and proceed.

Part 3: Best Tools for Fake GPS on Android
We have seen how to chive the Spotify Location update using the tools that work great in iPhones. In fact, you can use Dr. Fone on Android as well. Here are some other efficient GPS Faking tools that you can specifically use with your Vivo Y78+s.
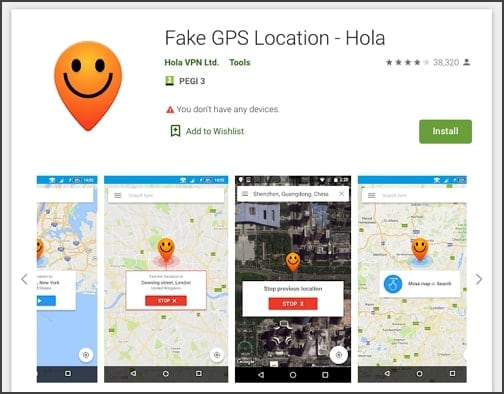
Hola Fake GPS
Hola Fake GPS is a direct Android app that you can use to change country on Spotify.
Step 1: In the Google Play Store, Search for ‘Fake GPS-Location - Hola’. The app appears with a smiley pin-point as an icon. Click on that and install on your Vivo Y78+.
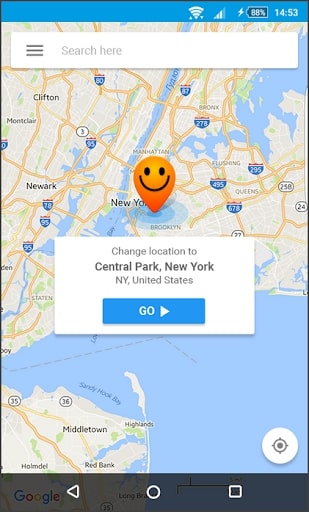
Step 2: Now, a map will appear showing your current location in the world. You can shift the pin to a new location or simply type the address into search bar.
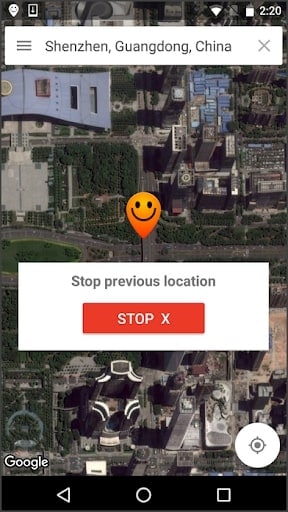
Step 3: The location pin will slowly start moving from current location to new location. At any point if you want to ‘STOP’, you can click on the Stop button that is present on the screen at this point.
Fake GPS by Lexa
This is a free app that helps to Change region Spotify within a few minutes. You can also use it for making some advanced changes if you are gaming or trying to access restricted content on other apps.
Step 1: Go to the Google Play Store and download Fake GPS by Lexa.
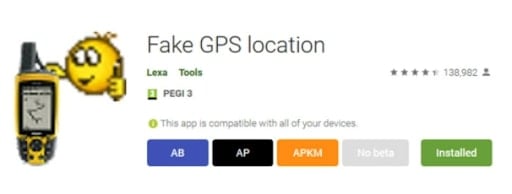
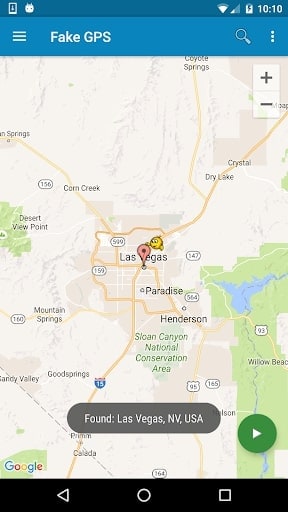
Step 2: Once you launch the app, the mp with your current location will be displayed. Enter a new location in the search box.
 Nero Burning ROM:
The ultimate burning program for all your needs!
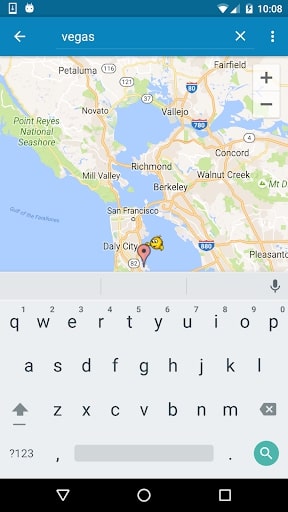
Step 3: The app will try to detect the new location that you have entered. Once it is successfully done, you will find that your new location will reflect in all the apps that have access to your Vivo Y78+’s location. Including Spotify.
Part 4: How to use a VPN to change Spotify Location?
The Virtual Private Network apps will change your server and your location and IP address will be masked completely. We suggest that you use NordVPN, that is quite easy to work with.
Step 1: Download NordVPN from the App Store or Google Play Store
 WonderFox DVD Ripper Pro
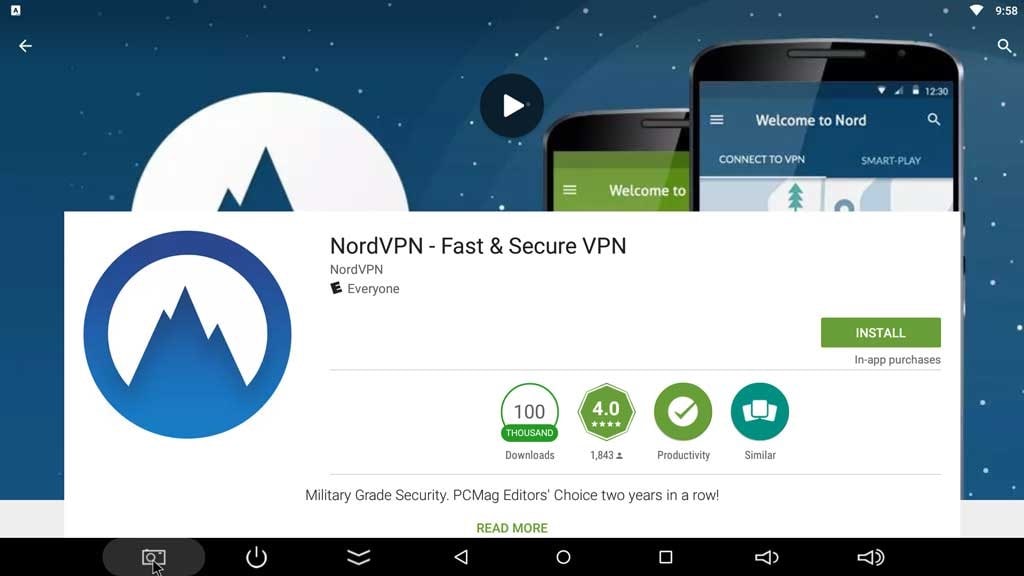
Step 2: To change Location on Spotify, Sign Up and NordVPN will find the nearest server for you.
Step 3: If you do not prefer the server that they connected to you, disconnect from that server. You can update location on spotify using another server.
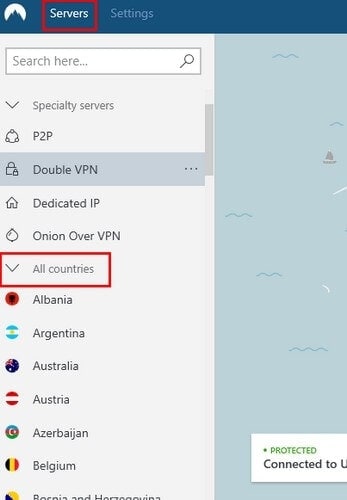
Step 4: Then go to ‘More Options’ > Servers > All countries and choose the country that you want. The same will reflect on Spotify too.
 Greeting Card Builder
Conclusion
If you want to update location on spotify, then these are the 6 methods that you can use to change location in Spotify anywhere, anytime and any number of times. Avail all the benefits of this supreme audio application by choosing to be anywhere in the world ‘virtually’.
You Might Also Like
Location-based apps
GPS spoof for dating apps
GPS spoof for social apps
Pokemon Go on PC
AR game tricks
![]() FX PRO (Gold Robot + Silver Robot(Basic Package))
FX PRO (Gold Robot + Silver Robot(Basic Package))

Change Phone GPS Location Easily
- ● Teleport GPS location to anywhere
- ● Play AR games without moving
- ● Spoof Location on the popular Apps
- Title: Prevent Cross-Site Tracking on Vivo Y78+ and Browser | Dr.fone
- Author: Ava
- Created at : 2024-08-01 20:50:18
- Updated at : 2024-08-02 20:50:18
- Link: https://fake-location.techidaily.com/prevent-cross-site-tracking-on-vivo-y78plus-and-browser-drfone-by-drfone-virtual-android/
- License: This work is licensed under CC BY-NC-SA 4.0.