
Ultimate Guide to Free PPTP VPN For Beginners On Realme 12 5G | Dr.fone
Ultimate Guide to Free PPTP VPN For Beginners On Realme 12 5G
PPTP, which stands for Point to Point Tunneling Protocol is one of the oldest and most trusted ways of implementing a VPN. It was developed by Microsoft and uses a GRE tunnel with a TCP control channel to bypass various geo-based restrictions. Since free PPTP VPN has been around for years now and is pretty easy to setup, it is quite popular as well. Read on and learn the basics of PPTP VPN free with a free PPTP VPN list as well.
Part 1: What is PPTP VPN?
The free VPN PPTP was earlier introduced by Windows, but was later adopted by all the other platforms like Linux, macOS, iOS, Android, etc. Even though the layer of encryption in free PPTP VPN is not as secure as other protocols, it makes it pretty fast. Due to this, the PPTP VPN is widely used to bypass location-based restrictions.
- The free VPN PPTP supplies data into packets and send them through a tunnel to attain a secure communication.
- Data is encrypted and its authenticity is kept intact. Due to this, the free PPTP VPN is extensively used in public networks as well.
- It supports the 128-bit Point to Point encryption.
- It is quite easy to setup PPTP free VPN (only the server address, username, and password are needed).
- Even though PPTP is secure and pretty fast, it is not as safe as other protocols (that support 256-bit encryption). It is believed that the government is now able to crack it.
- The tunneling is of two types in PPTP – Voluntary and Compulsory. Voluntary tunneling is initiated from the client’s end while compulsory tunneling is initiated from the server’s end. Compulsory tunneling should be supported by the router.


By attaining a free VPN PPTP server, you can easily connect to it. For instance, if you wish to connect to Singapore, you would need free PPTP VPN Singapore host IP. We have provided a free PPTP VPN list in the next section.
Part 2: Free PPTP VPN Server List
To make things easier for you to connect to a free PPTP VPN server, we have come up with a working and free PPTP VPN list right here. This includes free PPTP VPN Singapore, Canada, UK, USA, and other countries.
| Server | Username | Password | Country | |
| 1. | us1.vpnbook.com | vpnbook | 88wxtet | USA |
| 2. | us2.vpnbook.com | vpnbook | 88wxtet | USA |
| 3. | ca1.vpnbook.com | vpnbook | 88wxtet | Canada |
| 4. | de233.vpnbook.com | vpnbook | 88wxtet | Germany |
| 5. | fr1.vpnbook.com | vpnbook | 88wxtet | France |
| 6. | it.vpnjantit.com | vpnjantit.com | i0ryj | Italy |
| 7. | sg1.vpnjantit.com | vpnjantit.com | i0ryj | Singapore |
| 8. | sg2.vpnjantit.com | vpnjantit.com | i0ryj | Singapore |
| 9. | sg3.vpnjantit.com | vpnjantit.com | i0ryj | Singapore |
| 10. | usa1.vpnjantit.com | vpnjantit.com | i0ryj | USA |
| 11. | gr.vpnjantit.com | vpnjantit.com | i0ryj | Germany |
| 12. | uk.realfreevpn.com | realfreevpn | 25570 | UK |
| 13. | de.realfreevpn.com | realfreevpn | 93937 | Germany |
| 14. | fr.realfreevpn.com | realfreevpn | 76216 | France |
| 15. | us1.superfreevpn.com | free | 1596 | USA (Miami) |
| 16. | us2.superfreevpn.com | free | 2737 | USA (Chicago) |
| 17. | uk.superfreevpn.com | free | 7833 | UK (London) |
| 18. | ca.superfreevpn.com | free | 1251 | Canada (Montreal) |
| 19. | nl.superfreevpn.com | free | 2988 | Netherlands (Brabant) |
| 20. | us.websitevpn.com | websitevpn.com | freevpn | USA |
| 21. | uk.websitevpn.com | websitevpn.com | freevpn | UK |
| 22. | ca.justfreevpn.com | justfreevpn | Canada Free VPN Account | Canada |
| 23. | uspptp.hotfreevpn.com | free | 1234 | USA |
| 24. | 51.15.151.165 | pptp | ykDJYnCIirN | France |
| 25. | 128.199.221.154 | contassh | abcd1234 | Singapore |
| 26. | 128.199.96.14 | contassh | abcd1234 | Singapore |
| 27. | 188.166.6.170 | contassh | abcd1234 | Netherlands |
| 28. | 188.166.155.99 | contassh | abcd1234 | Netherlands |
| 29. | 138.68.140.197 | contassh | abcd1234 | UK |
| 30. | 138.68.64.68 | contassh | abcd1234 | UK |
| 31. | 159.203.111.101 | contassh | abcd1234 | USA |
| 32. | 139.59.244.147 | sshagan | abcd1234 | Singapore |
| 33. | 139.59.237.15 | sshagan | abcd1234 | Singapore |
| 34. | 128.199.214.71 | sshagan | abcd1234 | Singapore |
| 35. | 178.62.38.164 | sshagan | abcd1234 | UK |
| 36. | 46.101.79.161 | sshagan | abcd1234 | UK |
| 37. | 192.241.184.169 | sshagan | abcd1234 | USA |
| 38. | 192.241.179.120 | sshagan | abcd1234 | USA |
| 39. | 162.243.33.71 | sshagan | abcd1234 | USA |
| 40. | 162.243.15.104 | sshagan | abcd1234 | USA |

Part 3: How to Setup Free PPTP VPN on Your Computer?
After getting to know about so many free PPTP VPN Singapore, USA, Canada, UK, and other countries, you can easily learn how to set up a PPTP VPN free. The process is quite simple and can be implemented in all the leading versions of Windows (and other operating systems). Though, there could be a slight change in the overall interface of the OS you are using. To set up free VPN PPT, follow these steps:
1. To start with, launch Control Panel and go to the Network and Sharing Center.
2. From here, you need to select the “Set up a new connection or network” option to start the process.
 Any DRM Removal for Mac: Remove DRM from Adobe, Kindle, Sony eReader, Kobo, etc, read your ebooks anywhere.
3. This will launch a new wizard that can be used to setup a PPTP VPN free. Out of all the provided options, select the “Connect to a workplace” option.

4. On the next window, you would be given an option to either dial directly or use a VPN. Click on the “Use my Internet Connection (VPN)” option to continue.


5. Great! Now, you need to provide information related to the host and server. You can refer the free PPTP VPN list we have provided in the previous section and pick the server (and hostname) of your choice.
6. As you would proceed to the next window, you need to provide the username and password of the PPTP VPN free you are using. The same can be obtained from our free PPTP VPN list.
7. In the end, just click on the “Create” button to use your VPN. It will be listed under the available networks.
8. Sometimes, we have to change Network Settings to make it work. To do this, just select the VPN you have created and visit its Properties.

9. Go to the Security tab and make sure the type of VPN is listed as PPTP (Point to Point Tunneling Protocol). Also, the data encryption option should be “Optional Encryption (Connect even if no encryption)” and the option for “Challenge Handshake Authentication Protocol (CHAP)” should be selected for “Allow these protocols”.
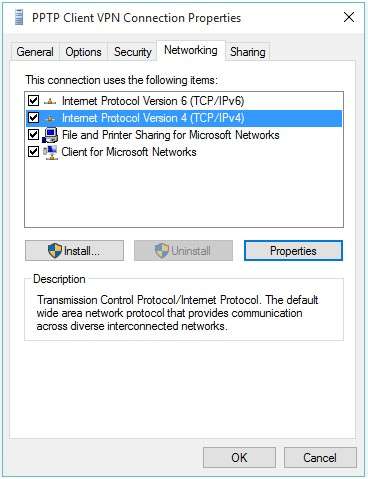
10. Furthermore, you can go to the General tab to make sure the server is specified correctly.
11. Once it is done, you can save these changes and exit the interface. Now, go to the list of available networks and connect to the free PPTP VPN you have created.


That’s it! By following these steps, you would be able to create a free PPTP VPN Singapore, USA, UK, Canada, Germany, or any other location. Simply give this tutorial a try and pick the preferred option from our free PPTP VPN list. If you also have a suggestion for a free VPN PPTP that you want to add to your list, then let us know about it in the comments below.

Part 4: An Easier Alternative to Setup VPN
You may find that there is a steep learning curve ahead to master PPTP VPN setup. In addition, the ways to set up PPTP VPN are quite different for various devices and PCs.
Is there an easier alternative to setup VPN?
Yes. There are quite a few easy-to-use VPN services available in the market, among which, NordVPN is one considered reliable by many users.
Some of its advantages are as follows:
- Supports VPN access on PCs and phones (even browser plugins available).
- Intuitive interface and easy operations.
- Offers 24/7 customer service.
- As low as about 3 USD per month.
Dr.Fone - Virtual Location
1-Click Location Changer for both iOS and Android
- Teleport from one location to another across the world from the comfort of your home.
- With just a few selections on your computer, you can make members of your circle believe you’re anywhere you want.
- Stimulate and imitate movement and set the speed and stops you take along the way.
- Compatible with both iOS and Android systems.
- Work with location-based apps, like Pokemon Go , Snapchat , Instagram , Facebook , etc.
3981454 people have downloaded it
 vMix Pro - Software based live production. vMix Pro includes everything in vMix 4K plus 8 channels of Replay and 8 vMix Call
How to Change Google Play Location On Realme 12 5G
Google Account has unlimited advantages as it provides quick access to multiple platforms like Google Drive, Google Calendar, and Google Play Store. By accessing these platforms, users can increase their functionality to ease their daily tasks. For example, Google Play Store offers tons of apps and tools in every category that millions of people install on their devices.
However, some featured apps on the Play Store are restricted region-wise, and some users cannot download them. This article will guide you on how to change the country in Play Store to access all the apps.
Part 1: What Should We Know Before Changing Google Account Location?
By changing the country on Google Play Store, you can install some unavailable apps in your region. You can quickly enjoy the applications and services on your phone by simply changing the country’s location. Before knowing how to change location on Google, you should know some essential aspects.
Warnings About Changing your Location
- Often, users are deprived of some services and features apps if they are not available in the newly chosen region.
- Changing the Google Play Store location is easy, but you can only change the settings once a year. This depicts that you can change the location settings of your Google Account after 365 days.
- After changing the country’s location, you won’t be able to utilize the previous Google Play balance of the old country.
- Once you have changed your country’s server location in settings, the Google Play Store takes 48 hours to change the location.
Part 2: How to Change Google Account Location?
This section will offer easy ways to change play store country and location on Google in every circumstance. By doing so, you can easily install restricted applications in your region.
 Power Tools add-on for Google Sheets, Lifetime subscription
How to Change Location on Google on Android
Situation 1: How to Change Country in Google Play Store on Android
Through your Realme 12 5Gs, you can change the location on both Google Play Store and Google Account easily. To know more details about how to change the country in Google Play Store, read the following guidelines:
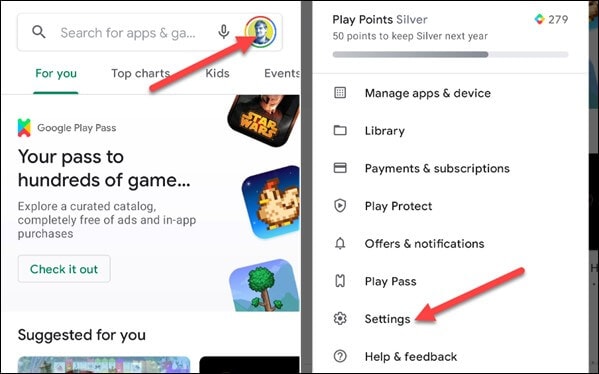
Step 1: Open your Google Play Store from your Realme 12 5G. Navigate to the profile icon from the corner and select “Settings” from the displayed menu.
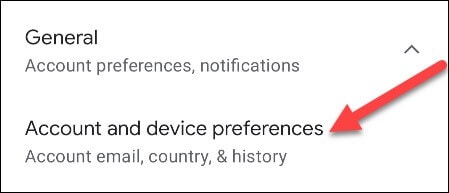
Step 2: Tap on the “General” section to locate the option of “Account and Device Preferences.” Afterward, find the “Country and Profiles” option by scrolling down. From there, you can see your current country location.
Step 3: Now click on “Switch to the Country Play Store” to change the location. For verification, click on “Continue” when a pop-up message appears on your screen asking if you want to change the location.

Step 4: Now, you will be automatically assisted in changing the payment methods of the new country. However, if you don’t come across the option to change the country, either you have already changed the country location within a year or your IP address is not synchronized with your new country.
Situation 2: How to Change Google Account Location on Android
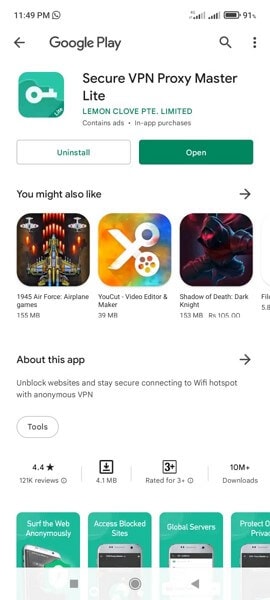
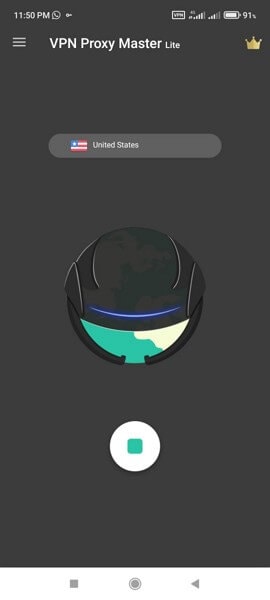
In this particular situation, you don’t have to change the Play Store country; instead, you can only change the Google location on your Realme 12 5G. We will recommend the VPN Proxy Master Lite , which works effortlessly to change Google‘s location. This tool flawlessly hides your IP address so that you can easily use any country’s location to access all the applications and services. Moreover, it’s highly secured and well-protected so that no virus can harm your Realme 12 5G.
To use this powerful VPN tool, we have jotted down some basic steps through which you can change the location on your phone easily:
Step 1: Start installing VPN Proxy Master Lite on your Realme 12 5G from your Google Play Store. Once this app is successfully installed, open this app to proceed.
Step 2: After opening this app, tap on the country’s name list displayed above the picture of Earth. Tap on that list to view all the available countries.
 NeoDownloader - Fast and fully automatic image/video/music downloader.

Step 3: Select any country from the displayed list by tapping on it. Meanwhile, make sure that your phone is connected to a strong internet connection. This tool will automatically change your Google location by tapping on the country’s name.
How to Change Location on Computer
Situation 1: How to Change Country in Google Play Store on Computer
In this situation, we will help you change the country’s location on your Google Play Store through your computer. Just follow the below-given steps.
Step 1: Start by navigating to your PC’s browser and then open Google Play . Once done, click on the “Settings” displayed on top of your screen.
Step 2: After opening the settings menu, go to “Payments and Profile” and locate the option of “Country/Region.” Proceed by tapping the edit icon next to it.

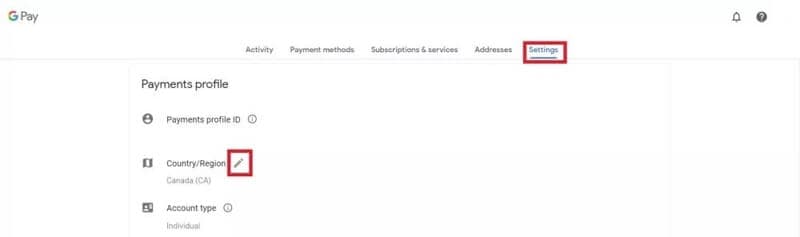
Step 3: To connect with the new country’s location, tap on the option “Create a new profile.” Afterward, you can see the on-screen instructions on your computer, so follow them to complete the process. Once done, Google Play will change the location after 48 hours, and you can search for the applications you want to install.

Situation 2: How to Change Google Account Location on Computer
If you want to change Google location on your computer without changing country on Google Play Store, use ExpressVPN by downloading it. This tool is a well-trusted platform and offers an instant way to change Google location easily. In addition, you can rely on its platform to connect with more than 94 countries worldwide by changing the location anytime you want.
Moreover, the process is fast and fully secured to protect your computer from unwanted bugs. To change the location using ExpressVPN, the steps are:
Step 1: Begin launching ExpressVPN on your computer and open its interface. Once done, turn on the VPN button and tap on the “Location Bar” to change the location.
Step 2: You can explore regions by either navigating to the “Recommended” or “All Locations” tab. Select the location you want to change with from the displayed list.
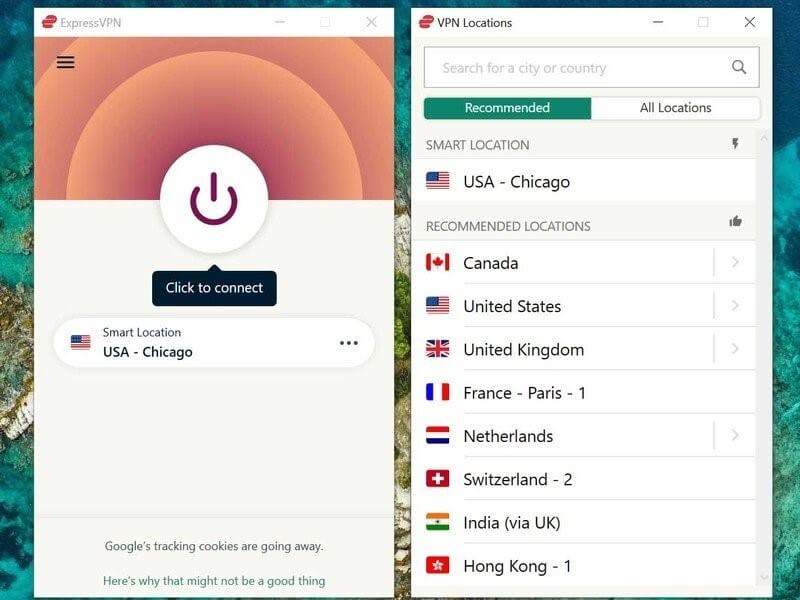
Step 3: After clicking on any country’s location, your computer’s Google Account location will be automatically changed.
 PDF application, powered by AI-based OCR, for unified workflows with both digital and scanned documents.
 Part 3: The Most Effective Way to Fake Location on iOS and Android
We have mentioned methods to change Play Store country manually and through VPN, but they still have a few limitations. Once you change the country’s location on Google Play manually, the Play Store requires 48 hours to accept this modification. Moreover, you can only change the country’s server location once a year. With VPN, many country servers are unreachable, and some servers can be reached only through a paid version. This makes the process expensive and time taking.
To avoid these hurdles and chaos, we recommend you to use Dr.Fone – Virtual Location to fake your location on both Android and iOS devices. This tool works in every situation and allows users to travel the globe through their phones free of cost. You can also travel with an exact GPS location just with a single click. Hence, this tool will work amazingly in faking your location without requiring you to change Google Play country’s location.
 vMix HD - Software based live production. vMix HD includes everything in vMix Basic HD plus 1000 inputs, Video List, 4 Overlay Channels, and 1 vMix Call
Dr.Fone - Virtual Location
1-Click Location Changer for both iOS and Android
- Teleport from one location to another across the world from the comfort of your home.
- Fake location on your phone with a few clicks.
- Support most mainstreaming apps and geo-based games, including Pokemon Go, Snapchat, Tinder, and so on.
- Compatible with both iOS and Android systems.
3981454 people have downloaded it
To change country Google Play using Dr.Fone - Virtual Location, here are the steps:
Step 1: Choose Virtual Location Feature
Begin with launching the tool of Dr.Fone on your computer. Open its interface and tap on the “Virtual Location” option from the home page.

Step 2: Connect your Phone
Now connect your smartphone to the phone with the help of a USB cable. Once done, click on “Get Started” to proceed further.

Step 3: Find your Current Location
After connecting your phone, you will be able to see your current location on the new window. If not, tap on the “Center On” icon displayed on the right side to find your current location.

Step 4: Enable Teleport Mode
Tap on the first icon displayed on the top right to enable the teleport mode. Now enter the location you want to navigate the search box and click on “Go” to continue.
 LYRX is an easy-to-use karaoke software with the professional features karaoke hosts need to perform with precision. LYRX is karaoke show hosting software that supports all standard karaoke file types as well as HD video formats, and it’s truly fun to use.
Step 5: Change Location
A notification will pop up for confirmation once you have entered a new location. Tap on “Move here” to proceed. Once done, your new location will be set on your smartphone automatically. Now head back to Google Play Store and search for the applications you want to access.

 safe & secure
Conclusion
There are plenty of ways to execute Google One change location across various platforms to execute Google One change location. For example, people usually change Play Store country to access restricted applications in their region. This article will offer a detailed guide for changing Google location through manual and VPN means. However, to avoid any hassle, we recommend Dr.Fone - Virtual Location to change the location of your smartphone and Google Play instantly and conveniently.
How to Stop Google Chrome from Tracking Your Location On Realme 12 5G?
Do you know your web browser is continually sharing your actual location online? You might not have noticed, but the number of websites using your location has increased. As you are well aware of the dangers of the internet, it doesn’t make sense to turn your Chrome into a beacon for ill-intentioned people. Luckily, it is possible to fake a location on Chrome with the right tool.
Are you wondering how to fake the browser location or which tool to use? You can get all your answers by reading this article till the end.

Part 1: How Does Chrome Know Your Location?
Before discussing Google Chrome’s fake location, it is important to know how Chrome detects your physical location. Google Chrome uses many ways to pinpoint your exact location, like your IP address, GPS, Wi-Fi, Bluetooth, and Cell Tower data. Every internet connection has an IP address bound to a location that enables Chrome to identify your location.
Similarly, GPS location can easily be tracked if your phone device has it enabled. All the Wi-Fi and Bluetooth connections around you also have location information embedded in them. They can help Chrome track you as long as your device can detect them. If you use cell data, Google Chrome can also track you through cell towers.

Part 2: How to Hide Location Services in Chrome?
If you are worried about Google Chrome detecting your physical location and sharing it with websites and apps, you can hide it easily. The process of hiding your location on Google Chrome is simple, even if you are using multiple devices. Below is the step-by-step process of hiding location services in Google Chrome on computer, Android, and iOS devices.
Method 1: For Laptop and Desktop PCs
Step 1: Launch Google Chrome on your computer and click the “Three Dots” icon to open the Google Chrome Settings. Here, tap “Privacy and Security” from the left sidebar and select “Site Settings.”

Step 2: Navigate to “Permissions” and click on “Location.” To hide the location on Google Chrome, select the “Don’t allow sites to see your location” option.
 Easy and Safe Partition Software & Hard Disk Manager

Method 2: For iPhone or iPad
Step 1: Navigate to “Settings” on your iPhone and open it. Scroll down until you find the “Chrome” app option and select it.

Step 2: Press “Location” on the next screen to open the location options for Google Chrome. Here, choose “Never” to stop Google Chrome from detecting your location.

Method 3: For Android
Step 1: Open Google Chrome on your Realme 12 5G, press the “Three-Dots” icon, and tap “Settings” from the options.


Step 2: In Chrome Settings, press “Site Settings.” Now select “Location” and hide your location by toggling off the “Location” option.
 Glarysoft File Recovery Pro - Helps to recover your lost file/data, even permanently deleted data.

One way to protect your privacy and stop websites from tracking your location is to turn off the location, but it has many disadvantages. If you have turned off your location, you can’t use any location base service like food delivery, e-shopping, ride-sharing, etc. That’s why it is better to use a fake location on your browser. Below we have explained four methods for Chrome fake location.

Method 1. Best Tool to Fake Chrome Location On iOS and Android Phones
The easiest and quickest way to fake your location on Google Chrome is to use Dr.Fone - Virtual Location . Since smartphones contain a wide range of apps that require location access, it provides a stable way to fake Chrome locations on Android and iOS phones. No website or app will be able to detect that you are using a fake location when using Dr.Fone - Virtual Location for faking GPS location.
Key Features
- Dr.Fone - Virtual Location can be used for any social media app like Facebook, Twitter, or Instagram with a fake location.
- With the help of this tool, you can also spoof real-time tracking apps like Life360 to protect your privacy.
- If you are an iPhone user, you don’t have to jailbreak your iPhone to spoof your device’s location.
How to Fake Chrome Location On iOS/Android Phones via Dr.Fone - Virtual Location
Faking your Chrome location with Dr.Fone - Virtual Location is very straightforward. You only need the Dr.Fone mobile toolkit and a USB cable to connect your Realme 12 5G. Follow these steps to spoof Chrome location on Android and iOS phones:
Step 1: Connect Your Android/iOS Device to Your Computer
Connect your Android or iOS phone to your computer using a USB cable. Launch the Dr.Fone robust toolkit on your computer and select “Virtual Location.”
Step 2: Activate the Teleport Mode
Press “Get Started” on the next page to open the map window. First, select your actual location by pressing the “Center On” icon from the right sidebar. Afterward, click on the “Teleport” icon from the top right corner to activate the Teleport Mode.
Step 3: Add the Desired Fake Location
Once the Teleport Mode is activated, add your desired location and press “Go.” Your desired location will open on the map. Select it, and a pop-up window will appear where you need to press “Move Here.” With that, your Android or iPhone’s Chrome location has been changed.
 PCDJ DEX 3 for Windows & MAC is the total entertainment DJ software solution, offering audio, video, and karaoke mixing ability. Automatic beat-sync, smart looping, 4 decks, DJ MIDI controller support, Karaoke Streaming and much more.
Method 2. Manually Change Your Location Using Google Chrome DevTools
It is also possible to fake browser location on Chrome using the Google Chrome Developer Tools. It is a built-in feature of Chrome and can be used to manually change or turn off your browser’s location. Follow these steps for changing location on Chrome with DevTools:
Step 1: After opening Google Chrome, click the three-dots icon from the top right corner. It will open the Chrome menu where you need to select “Developer Tools” after clicking “More Tools.”


Step 2: A window will open on the right side with all the developing tools you can use in Chrome. Click on the three-dots icon located near “Console” in the bottom left corner of the window. Choose “Sensors” from the pop-up menu.

Step 3: Access the newly selected “Sensor” option, and here you can change the browser’s location by either selecting a Google’s pre-set location or adding your desired location manually. Once the location is selected or added, your browser’s location will change.

Limitations
- The interface of the Google Chrome DevTools can be very confusing and overwhelming for non-technical users.
- Apart from pre-added locations, it can be hard to add a specific location as your fake location.
Method 3. Fake Your Location Using Chrome Extension
Many fake location Chrome extensions are available on Google Chrome which can be used to alter your location on Chrome. You can find these extensions on Google Chrome Web Store and add them directly to your browser. Below we have explained the steps for using such an extension “Location Guard “ to fake your location on Google Chrome:
Step 1: Open the “Location Guard” on Chrome Web Store and click “Add to Chrome” to add it to your browser. Once the “Location Guard” extension is added, open it and press “Options.”


Step 2: In the options, you can choose different options like Privacy Levels, Protection Area, and Time for Location Cache. It is recommended you choose a higher level for more protection.

Step 3: You can also use the “Fixed Location” feature to set up a fake location as a permanent location for your browser. The fixed location can be added by using the market or clicking on the desired place on the map.

Limitations
- Location Guard doesn’t protect your IP address. It means some websites can still detect your real location using the IP address.
- The app is not updated for quite a while, that’s why the map of the fixed location feature is quite restricted.
Method 4. Spoof Your IP Using a VPN Server
Another way you can fool websites and your browser by displaying a fake location online is to use a VPN server. VPNs fake your IP address to fool websites and apps into detecting your location. NordVPN is a VPN that can be used to spoof your IP by following these steps:
Step 1: Download and install NordVPN on your computer or phone and log in using your account. If you don’t have a NordVPN account, you must create one first.
Step 2: If you want to just change the location of your device, you can select “Quick Connect.” Using it will enable the program to automatically find the most suited fake location for you.

Step 3: You can also choose the desired location as your fake Chrome location in NordVPN. To do that, scroll down the list of countries and locations and choose your desired locations to connect to.
Limitations
- NordVPN can only spoof your IP address and will not work for geo-restricted applications.
- Using a VPN usually affects your internet speed and can make browsing slower and more difficult.
Part 4: FAQs
1.What is Geolocation?
Geolocation is a term used for the process of pinpointing the location of a device connected to the internet. The location can be determined using methods like IP address, GPS, and mobile tower data. Apps and websites commonly use it to provide location-based services.
2.What is the HTML5 Geolocation API?
The HTML5 Geolocation API is a browser API used to determine a user’s geographical location. Developers use it to build location-aware websites and apps that use users’ locations as the basis for providing their services. It can detect location through GPS, Wi-Fi, Bluetooth, IP addresses, etc.
3.Why should you hide or spoof your Location?
Hiding or spoofing your location protects your privacy and stop application and websites from tracking you. It also allows you to access geo-restricted apps and play location-based games. You can also fake your location to get the latest updates of your favorite apps.
The fact that Google Chrome in your devices can track your location with an accuracy of up to 20 meters is very unsettling for users. Even when you try to be careful in granting location permissions to apps and websites, many can still bypass this by adding location access requirements in terms and conditions.
That’s why having a tool like Dr.Fone - Virtual Location to fake GPS online is essential nowadays. It can ensure your privacy and helps in protecting you from the dangers of the internet.
- Title: Ultimate Guide to Free PPTP VPN For Beginners On Realme 12 5G | Dr.fone
- Author: Ava
- Created at : 2024-08-01 21:27:21
- Updated at : 2024-08-02 21:27:21
- Link: https://fake-location.techidaily.com/ultimate-guide-to-free-pptp-vpn-for-beginners-on-realme-12-5g-drfone-by-drfone-virtual-android/
- License: This work is licensed under CC BY-NC-SA 4.0.