
Will the iPogo Get You Banned and How to Solve It On Lava Agni 2 5G | Dr.fone
Will the iPogo Get You Banned and How to Solve It On Lava Agni 2 5G
Pokemon Go has graced one of the most popular mobile games right from the day it was launched. It requires players to move around one place to the other in reality to capture Pokémon. But if you don’t want to go out of his way and search for Pokémon then iPogo is a tool for you. It is a location spoofer that can change the location of your device. It allows you to move from one place to another with just one-tap. As it is a cheat tool, you might want to know can iPogo get you banned? There are chances of getting an iPogo ban, but they are relatively high depending on how you use the tool.

Part 1: How does the iPogo work for pokemon
iPogo comes with tons of add-on features that can be used to boost your Pokémon collection 10 folds. But it does that by breaking many rules and regulations created by Niantic. Here are some features of iPogo for Pokemon Go that are not by the books:
- Play from anywhere, anytime:
iPogo allows users to play Pokemon go anytime from anywhere in the world. All you will require is a decent internet connection, and you are good to go. And this is something that Niantic strongly opposes.
- Spoofing:
Niantic has arranged several ban waves once a week for players who were found cheating. The humorous thing to note here is that most of such players were caught spoofing. And this app lets you do exactly that. This also had a stimulating effect on the iPogo ban rates.
- It works like a Go-Plus
This app works like a virtual go-plus, enabling your device to change its location via switching servers. But that doesn’t assure any safety from the likes of Niantic.
- Third-party software
This app also works as a third-party software as it runs in the background while you are playing the game. Sometimes Niantic can detect that as well, and you might have to face an iPogo ban.
 Forex Robotron Gold Package
Part 2: What’s the rate of iPogo ban
 vMix 4K - Software based live production. vMix 4K includes everything in vMix HD plus 4K support, PTZ control, External/Fullscreen output, 4 Virtual Outputs, 1 Replay, 4 vMix Call, and 2 Recorders.
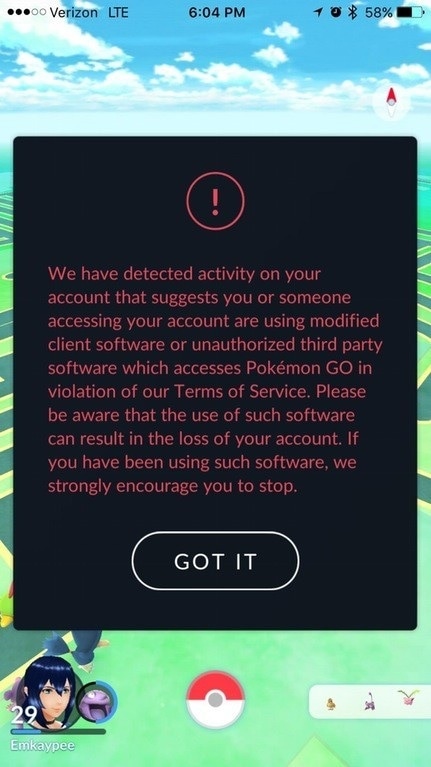
Players mostly use iPogo for location spoofing, which is very common in Pokémon go. Niantic releases various patch notes to stop players from spoofing and catch those who are doing it. In Pokémon Go players, are banned on a 3-Strike basis.
If you are using iPogo as a location spoofer, kindly note that it is perilous to do that. If you receive the 1st strike as an iPogo ban, I strongly suggest you never use iPogo again because Niantic will keep a close watch on you. So if your question is, can iPogo get me banned? Then yes, it definitely can.
Part 3: How to avoid getting banned by Pokemon Go while using a fake GPS tool?
Using a fake GPS tool in Pokemon Go is against the game’s terms of service and can result in a ban. However, if you want to avoid getting banned, here are some tips to help you avoid getting banned while faking Pokemon Go GPS :
Avoid suspicious behavior: Niantic monitors player activities for any unusual or suspicious behavior. Avoid sudden changes in your location, and jumping between distant places within a short period, as these actions can raise red flags and increase the risk of a ban.
Be aware of detection methods: Niantic employs various detection methods to identify players who are using fake GPS tools or engaging in spoofing activities. These methods can include analyzing movement patterns, comparing location data with known landmarks, or detecting inconsistencies in player behavior. It’s important to understand that detection methods can evolve, and it’s difficult to completely avoid detection.
Stay informed: Keep yourself updated with Pokémon Go’s terms of service and any changes or announcements made by Niantic. They may introduce new measures to combat cheating, and being aware of these updates can help you avoid unintentional violations.
Use a trusted tool: When using a fake GPS tool for Pokémon Go, it is crucial to choose a reliable and trusted app. Avoid using any random or unverified GPS spoofing apps. There is a reliable is recommended in the following part. Read on!
Part 4: Better safe tool to iPogo?
We have provided many answers to your question, “Can iPogo get you banned?”. But we know knowing it can get you banned is not enough. Because many players don’t even know which tool they should use, that will not lead to a ban. Don’t grieve, we are here to help with a brilliant virtual location changer for iOS, which is “Dr.Fone - Virtual Location (iOS/Android) .”
Using this tool, you can change the location of your iPhone with just one click. You can use it to trick Niantic or any other location-based app. This app uses a virtual GPS location that makes every location-based app think that you have moved from one place to another. That is not all; you even set the speed of mocking location.
Confusing? Let us clarify, so every location spoofer provides static location change, which means you will instantly pop-up at the place you chose. But, with Dr. Fone, you can choose between walking, cycling, or driving to that particular spot. This is a perfect option to make the game think you are moving at a normal speed.
This app offers many other features like Joystick & keyboard control, easy location changing, etc. This will also save you from avoiding the iPogo ban. You can use this tool with other apps as well. Below are some amazing uses of Dr. Fone Location Changer.
- You can use it to change location on dating apps or other location-based apps.
- WhatsApp location spoofing is also supported.
- Change GPS and play Pokemon Go without going out.
- Easy to use GPS fake, which can teleport you anywhere you want.
- It simulates a more authentic gaming experience with the help of realistic mode, fluctuation mode, and cooldown timer feature, decreasing the risk of detection.

Step-by-step guide for using Wondershare Dr. Fone to Teleport Anywhere
Dr. Fone’s virtual location is the best spoofing tool that you can use for playing Pokemon Go. It can quickly teleport your Pokemon trainer from one place to another. Below is a step-by-step guide you follow to perform that:
Step 1: Get the Program Installed and Launched
Download and install the tool on your computer. Once the installation is successful, run the program. From the option available click on “Virtual Location”.

Step 2: Connect iPhone to PC
Wait for a few seconds; in the meantime, connect your iPhone to the computer using the original lightening cord. Once it’s connected, click on “Get Started.”

Step 3: Check the Location
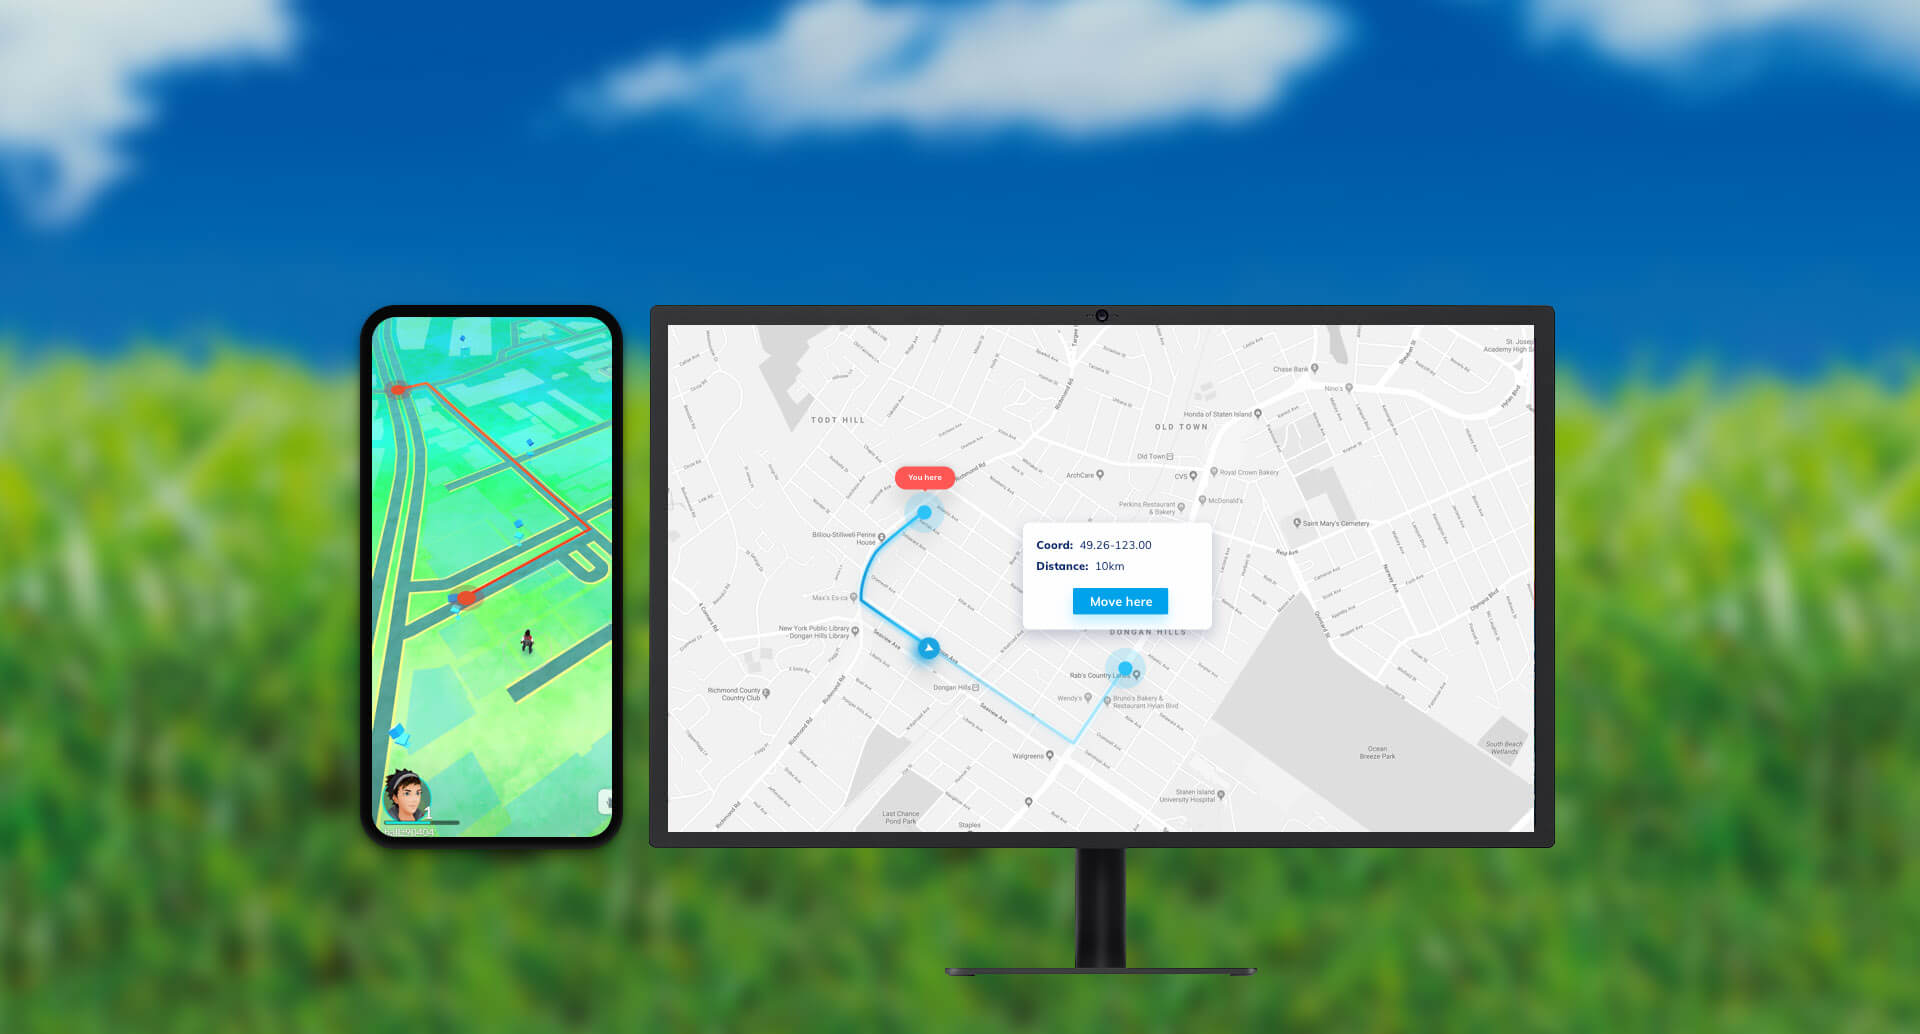
A new window will pop-up where you will see your current location. If the location is not accurate, click on “Center On” present in the lower-right corner.

Step 4: Activate Teleport Mode
Now click on the 1st icon on the upper right corner, which will enable you to teleport. After that, you will be compelled to enter the name of the location you want to move to.

Step 5: Confirm the Location
Confirm the exact location on the pop-up that appears now and click on “Move here.”


Step 6: Check Location on the deivce
After this, you have successfully changed your location. You can cross-check this by pressing the “Center on” icon.
 Easy and Safe Partition Software & Hard Disk Manager

To be certain, you can also check the location on your iPhone. Just open maps on your device, and you will see your selected location.

 SwifDoo PDF 2-Year Plan
Conclusion
Can iPogo get you banned? Yes, it can, and it eventually will. It would help if you understood why can iPogo get you banned and why you should not use that application for location spoofing. We also provided you with a perfect solution to avoid iPogo ban using Wondershare’s Dr.Fone - Virtual Location . We also provided a step-by-step guide to use Dr. Fone for teleporting and changing your iPhone’s GPS location. That was all for this article; if you have any queries related to this article, you can comment below. We will make sure you get the necessary assistance for the same.

A Detailed Guide on Faking Your Location in Mozilla Firefox On Lava Agni 2 5G
Mozilla Firefox is one of the most famous browsers known for its security. Like other browsers, it also tracks your location and shares it with websites. Although Firefox asks for your permission before sharing your location, it can still be a privacy concern for many people. For many reasons, disabling your location is disadvantageous, so Firefox spoof location can resolve your concerns.
It is not hard to change or spoof your location in Mozilla Firefox. Stick with this article to learn different ways to fake a location in Firefox on devices.

Part 1: Preparations Before Spoofing Your Location in Firefox
Before starting with Firefox location spoof, you must be aware of how the platform and websites determine your location. There are many ways a browser can detect your location. It includes services like IP addresses, GPS tracking, Wi-Fi, and Bluetooth. The main tool browsers and websites use to determine your location is HTML5 Geolocation API.
1. Basic Understanding of the HTML5 Geolocation API
Basically, a browser API called HTML5 Geolocation API is used by websites and browsers to detect a user’s location using longitude and latitude coordinates. It is strictly based on user permissions for detecting location. That means you will receive a permission prompt whenever a website or browser uses it to detect your location. If you refuse the permission, they can’t use this API for location determination.
2. How Does HTML5 Geolocation Work?
HTML5 Geolocation determines your location using the longitude and latitude coordinates with the help of GPS. If your device doesn’t have GPS tracking, it uses Wi-Fi and cell tower signals to detect the Lava Agni 2 5G device’s location. The location detected by HTML5 Geolocation is highly accurate with accuracy up to street level. Due to its high precision in locating users, it can create privacy issues for users.
Part 2: How to Fake Your Location in Mozilla Firefox on Computers
Many ways are available for you to fake or disable your desktop location in Mozilla Firefox to address your privacy concerns. You can either disable or change the location in the browser or use a third-party app or extension. Below, we have explained the three most common ways to fake or disable your location in Firefox.
Method 1: Disable Geolocation in Firefox
If you want to stop websites from accessing your location from Mozilla Firefox, you can disable the geolocation feature using Firefox Settings. The process to disable your location in Mozilla Firefox is covered using these steps:
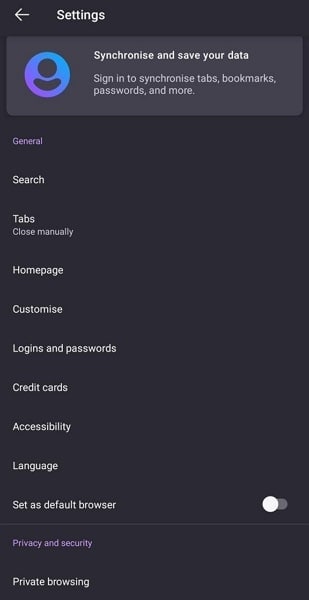
Step 1: Open Mozilla Firefox on your computer to disable its location. Click the “Three Vertical Bars” icon to select “Settings.” Now, tap “Privacy & Security” from the left sidebar and navigate to “Permissions.”

Step 2: Click “Settings” in front of “Location” to manage the location settings. It will open a window with a list of all the websites that can access your location. Depending on your needs, you can choose between “Remove Web Site” or “Remove All Web Sites” to remove their location access.
 Easy GIF Animator is a powerful animated GIF editor and the top tool for creating animated pictures, banners, buttons and GIF videos. You get extensive animation editing features, animation effects, unmatched image quality and optimization for the web. No other GIF animation software matches our features and ease of use, that’s why Easy GIF Animator is so popular.
Step 3: If you want to block the websites from accessing your location indefinitely, you can select the “Block new requests asking to access your location” option. Once selected, click “Save Changes” to disable your geolocation on Firefox.

Method 2: Manually Change Your Firefox Location
Disabling your location on Mozilla Firefox can stop websites from accessing your location. It also means websites with location-based services will no longer work. That’s why it is better to spoof the location on Firefox rather than disabling it. Firefox allows you to manually change your location using its advanced settings. The steps required for this process are given below:
Step 1: Once Mozilla Firefox is open, type “about:config” and press Enter. You will see a warning screen as you modify advanced settings. You have to click on the “Accept the Risk and Continue” button to proceed further.

Step 2: First search for “Geo.enabled,” and when it appears, toggle its value from “True” to “False” to disable geolocation. To spoof your location, search for “geo.provider.network.url” and press the “Pen” icon to edit it.

Step 3: You can enter your desired location using its latitude and longitude coordinates. The format to enter your location coordinates should be:
“data:application/json,{“location”: {“lat”: LATITUDE VALUE, “lng”: LONGITUDE VALUE}, “accuracy”: 27000.0}.”
Once done, your geolocation will be changed to your desired location.

Method 3: Use The Location Guard Firefox Extension
Another way you can protect your location from websites is to use the “Location Guard “ add-on in Mozilla Firefox. It is generally recognized as an extension, also available in the Add-Ons Store of Firefox. The steps to add “Location Guard” and use it to alter your location are following:
Step 1: Click on the “Three Vertical Bars” icon from the top left corner of your Firefox and select “Add-ons and themes.” Tap “Extensions” from the left sidebar and search for “Location Guard” in the Add-Ons Store. Once located, click “Add to Firefox” to add it to your browser.

Step 2: You can choose between two options to protect your location’s privacy. Using the “Privacy Levels” option, you can select a privacy level and location range to add noise when a website tries to locate you. It stops websites from detecting your accurate location, though they can still locate the general area.

Step 3: Using its “Fixed Location” feature from the left sidebar, you can change your location. Here, select any location from the map by placing the “Marker” on it to change your browser’s location.

WPS Office Premium ( File Recovery, Photo Scanning, Convert PDF)–Yearly

Part 3: How to Fake Your Location in Mozilla Firefox on Phones
It is not only on computers where you can use Firefox fake location but also on smartphones. You can easily disable or change your Firefox location on your iOS or Android device. Three different methods to disable or change the location in Mozilla Firefox are summarized below:
Method 1: Disable Geolocation Sharing on the Firefox Browser
If you use the Firefox browser on your phone, it allows you to disable your location using a couple of simple steps. Disabling location services for the Firefox browser differs on Android and iOS devices. A detailed step-by-step process for disabling location is given below for both platforms:
On Android
Step 1: Open the Firefox browser on your phone and press the “Three Dots” icon from the bottom right corner. Select “Settings” from the menu and navigate to the “Privacy and Security” section.

Step 2: Now, tap “Site Permissions” and select “Location.” In the “Location” option, select “Blocked” to disable the location access on the Firefox browser.
 Any DRM Removal for Win:Remove DRM from Adobe, Kindle, Sony eReader, Kobo, etc, read your ebooks anywhere.
On iPhone
Step 1: On your iPhone, open “Settings” and scroll down to “Firefox.” After locating the app, select it and press “Location” on the next screen.
 Software Update Pro - Check and update software installed on your computer.

Step 2: In the “Location” menu, you can select “Never” to completely disable the location access for the Firefox browser. To only stop Firefox from detecting your accurate location, turn off the toggle of the “Precise Location” option.


Method 2: Spoof Your Location in Firefox Using Dr.Fone - Virtual Location
Nowadays, many websites work with the help of location-based services. Disabling geolocation from the Firefox browser means they won’t work. It means you need a tool that can change your Firefox location without affecting your favorite platforms.
Wondershare Dr.Fone - Virtual Location provides you with an excellent way to do Firefox location spoofing. You will not have to worry about websites or apps detecting your location as fake when using this tool.
Dr.Fone - Virtual Location
1-Click Location Changer for both iOS and Android
- Teleport from one location to another across the world from the comfort of your home.
- With just a few selections on your computer, you can make members of your circle believe you’re anywhere you want.
- Stimulate and imitate movement and set the speed and stops you take along the way.
- Compatible with both iOS and Android systems.
- Work with location-based apps, like Pokemon Go , Snapchat , Instagram , Facebook , etc.
3981454 people have downloaded it
Main Features of Dr.Fone - Virtual Location
- Dr.Fone - Virtual Location allows you to play location-based games. It includes games like Pokémon Go, Minecraft Earth, and Jurassic World Alive, all from the comfort of your bed.
- If you use a dating app like Tinder or Bumble, you can increase your likes and matches using this tool.
- You can bypass the geo-restriction of apps and enjoy their content with the tool’s help.
Steps Required for Spoofing Location in Firefox via Dr.Fone - Virtual Location
Using Dr.Fone- Virtual Location to spoof your location in Mozilla Firefox is simple and quick. You will need to install Dr.Fone on your computer and follow these steps for location spoofing:
Step 1: Install Dr.Fone on Your System
Download and install Dr.Fone on your computer and connect your phone to it. Access Dr.Fone, select “Virtual Location,” and click “Get Started” on the next screen to begin the process.

Step 2: Activate the Teleport Mode on Dr.Fone
After clicking “Get Started, “ a map will open where you must select your original location. It can be done using the “Center On” icon from the right sidebar. To choose your fake location, you will need to activate “Teleport Mode” from the top right corner.
Step 3: Spoof Your Location in Firefox
Enter your desired fake location in the provided space and press “Go” once the mode is activated. It will take you to the entered location, where you need to select “Move Here” to complete the process. You can confirm the location spoof by opening any location-based app on your phone.
 vMix HD - Software based live production. vMix HD includes everything in vMix Basic HD plus 1000 inputs, Video List, 4 Overlay Channels, and 1 vMix Call
Method 3: Change Your Location in Firefox Using ExpressVPN
Browsers like Mozilla Firefox tracks your location by using your IP address. You can use a VPN to spoof your IP location to protect your actual location from websites. ExpressVPN is a VPN that is available for both Android and iOS devices. You can use these steps to change your location using ExpressVPN:
Step 1: Install ExpressVPN on your phone and create an account for it. If you are already a user of ExpressVPN, then log in with your account.
Step 2: Select your desired fake location from the “Smart Location” tab after logging in. Once a location is selected, press “Connect” to change to the desired fake location.

Conclusion
In today’s digital world, you have to compromise your privacy to some extent. However, it doesn’t mean that you should not try to use tools available to you to protect your privacy to the limit. Dr.Fone - Virtual Location solves your concerns regarding location sharing with ease. With this tool, you can fake location in Firefox and still enjoy all the features and services offered by location-based websites and apps.
Prevent Cross-Site Tracking on Lava Agni 2 5G and Browser
Have you ever wondered why you get the advertisements of the websites you visited a few minutes ago on your social media sites? Here comes to Cross-Site Tracking, also termed CST, and it is a process where third-party cookies and sites track your browser history.
 WinUtilities Pro
![]()
The CST process is like invading your privacy by collecting your browser history and personal information. So, to prevent these services, there are several ways by which you can cross-site tracking on your system as well as Lava Agni 2 5G phone browsers. Keep reading to learn how to stop cross-site tracking on both Lava Agni 2 5G and browser.
Part 1: Why Do We Need to Stop Cross-site Tracking?
Cross-site Tracking is all about collecting your browsing data and other information for advertising purposes. Though the process can prove convenient for many as it provides additional information about the products and services you have searched for and offers tailor-made content, it is intrusive and about breaching your privacy.
Cross-site tracking collects information about your browsing history. The third-party cookies also monitor the content type you have visited and your personal information, which is risky.
Besides invading privacy, the CST also poses several other issues. Based on your browsing history, additional content you have not asked for is loaded on your visited sites, slows down the page loading process, and puts an extra burden on your battery. Moreover, too much-unwanted content can interfere with the basic information you are looking for.
So, it is always better to prevent cross-site tracking for all the above and more reasons.
Further reading: A detailed guide on faking location in Mozilla Firefox . Don’t worry about your location privacy anymore!
Part 2: Can Private Browsing be traced?
Yes, private browsing can be traced. When you work in private browsing mode, the web browser does not save the browsing history, which means that anyone who uses your system will not check your online activities. But websites and cookies can track your browsing history as well as other information.
Part 3: How to Disable Cross-website Tracking on Safari for iOS Devices?
Safari is the most commonly used platform by iOS users. So, to prevent CST for Safari on your iOS devices and Mac systems, below is a complete guide.
Deactivate Safari cross-website tracking for iPhone & iPad
Safari cross-site tracking can be prevented using the below steps on your iPhone and iPad.
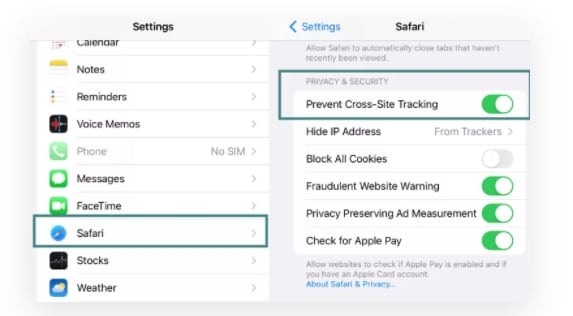
- Step 1. Launch the Settings app on your iOS device.
- Step 2. Find the Safari option by scrolling down the menu.
- Step 3. Move the slider to turn on “Prevent Cross-Site Tracking” under the PRIVACY & SECURITY option.
Deactivate Safari cross-website tracking for Mac
Use the steps below to turn off cross-site tracking on Safari on your Mac systems.
 CollageIt Pro
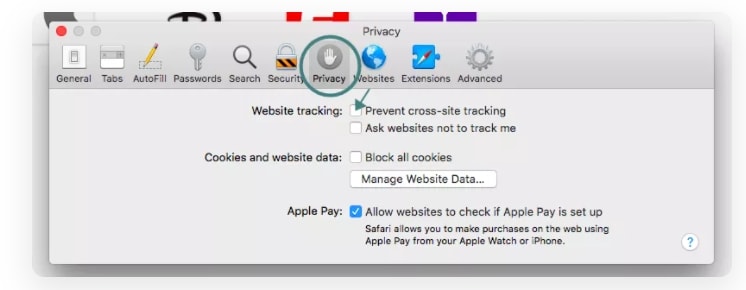
- Step 1. On your Mac system, open the Safari app.
- Step 2. Move to Safari > Preferences > Privacy
- Step 3. Enable the “Prevent cross tracking” option by clicking on the box next to it.
Part 4: How to Disable Cross-site Tracking on Google Chrome
Chrome is used widely on Windows systems and Android devices, and to prevent the CST from your browser, a detailed guide is given below.
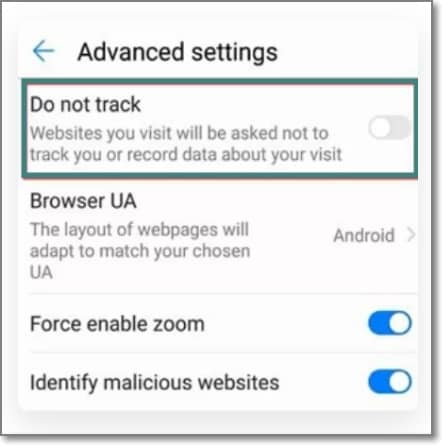
Enable “Do Not Track” on Google Chrome for Android
- Step 1. On your Lava Agni 2 5G, open the Chrome app.
- Step 2. At the right side of the address bar, click on the More option and choose Settings.
- Step 3. Choose the Privacy option from the Advanced tab.
- Step 4. Click on the “Do Not Track” option to turn on the feature.

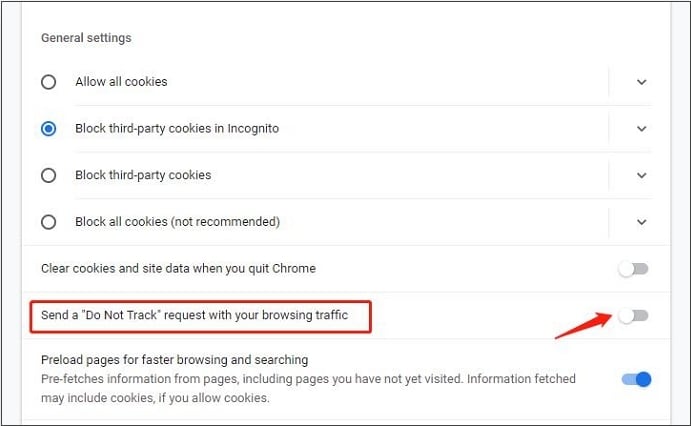
Enable “Do Not Track” on Google Chrome for Computer
- Step 1. Launch Chrome on your system, and from the menu at the upper-right corner, click on the Settings option.
- Step 2. From the “Privacy and Security” tab, choose the “Cookies and other site data” option.
- Step 3. Tap and enable the slider next to “Send a “Do not track” request with your browsing traffic.”
Part 5: Recommended Solution: Fake a Location to Stop Cross-Site Location Tracking Using Dr. Fone
What if you let the sites and cookies track your phone location without worrying about your privacy? Yes, it can be done by spoofing your location. So, if you set a fake location while browsing the internet, you will not have to worry about cross-site tracking, as anyways, the sites and cookies will get misled browsing information that cannot harm you in any manner.
Setting a fake location on your iOS devices, a professional tool is needed, for we recommend Wondershare Dr.Fone - Virtual Location as the best tool. Using this Android and iOS-based software, you can set any fake GPS location on your device. The tool is simple to use and does not require any mastery of technical know-how.
Key features
- Simple tool to teleport to any GPS location in a single click.
- Allows simulating GPS movement along the route.
- All popular models of Android and iOS devices are compatible.
- Compatible with all location-based apps on your phone.
- Compatible with Windows and Mac systems.
Here is a video tutorial for you to take an overview of how to use Dr.Fone - Virtual Location to fake location on your Android and iOS devices.
 safe & secure
Steps to set fake location on your Android and iOS devices using DrFone-Virtual Location
Step 1. Download, install and launch the software on your Windows or Mac systems. On the main software interface, choose the Virtual Location option.
Step 2. Connect your iPhone or Android device to your system using a USB cable and then tap on the Get Started option on your software interface.
Step 3. A new window on the software interface will open, showing your connected phone’s real and actual location. If the detected location is incorrect, click on the “Center On” icon to display the right device location.
Step 4. Next, you need to activate the “teleport mode” and click o the 3rd icon at the upper-right corner.
Step 5. Next, you have to enter now the fake location to which you wish to teleport to at the upper-left corner. Click on Go.

Step 6. Finally, tap on the Move Here button and the new fake location for your connected Android or iOS device at the pop-up box.
Check the new location of your phone from the app.

Wrap it up
Preventing Cross-site tracking can be done on different browsers and devices using the guides listed in the above parts of the article. Settings a fake location for your device using Dr. Fone-Virtual Location is another interesting way to prevent tracking your browsing history by spoofing the sites and cookies. Setting a fake place will not only avoid monitoring your browsing history but will also work with all location-based apps on your phone.

safe & secure
- Title: Will the iPogo Get You Banned and How to Solve It On Lava Agni 2 5G | Dr.fone
- Author: Ava
- Created at : 2024-08-01 22:12:32
- Updated at : 2024-08-02 22:12:32
- Link: https://fake-location.techidaily.com/will-the-ipogo-get-you-banned-and-how-to-solve-it-on-lava-agni-2-5g-drfone-by-drfone-virtual-android/
- License: This work is licensed under CC BY-NC-SA 4.0.