
Complete Tutorial to Use VPNa to Fake GPS Location On Vivo X100 Pro | Dr.fone
Complete Tutorial to Use VPNa to Fake GPS Location On Vivo X100 Pro
In the present day, there’s barely any webpage or app that may not require your Geological location. This has been a major strategy of the site/app owners to push only the content that is relevant to your needs or may interest you. Therefore, every other webpage or app first fetches your Geological location and then behave accordingly.
For instance, there are several apps that only work in the US and not outside of it. But there is workaround for it too. You can actually make the app “think” that your Geological location is somewhere in US currently, instead of where you actually are. You can achieve this with a powerful vpna fake gps location apk. You may now wonder, hot to set it up and make use of it. So, without much delay, let’s now understand step by step tutorial on vpna fake gps location.
Part 1. About VPNa
Before we move any further with the tutorial, it is vital to understand what vpna fake gps location apk is! Just a small halt, though. But it’s worth the time. Out of the several apps available for your mobile devices to spoof your GPS location, VPNa fake gps apk is certainly the safest bet.
It is a known fact that your simply cannot alter the actual GPS location of your device but yes there is little workaround (a function) in Android that is utilized to test the GPS locations settings. And it is how VPNa fake gps location apk spoofs your device location with any preferred location on the face of the Earth. It makes use of “Enable Mock Locations” feature in the “Developer Settings” of your Vivo X100 Pro. Be it London, New York, Paris or Rome or any other location. Eventually, hiding your identity and furnishing you with absolute anonymity and online privacy.
Here are some of the main highlights of the VPNa fake gps location apk:
- First and foremost, you do not actually need to root your device to make use of this app.
- You can play prank with your friends by spoofing your location and making them believe that you’re travelling out of the country.
- Extremely user friendly app. Simply, look up for the desired fake location and hit Start.
- What’s more? Well, you can even save locations to make use of them later like a one click thing.
Part 2. Where to Download VPNa?
When it comes to downloading VPNa, the process is a breeze as far as Android users are concerned. The app is available on the Google Play Store , and all the Android users need to do is search it and download it. Moreover, it lies on the lighter end when it comes to app size, meaning users don’t need to have large free space.
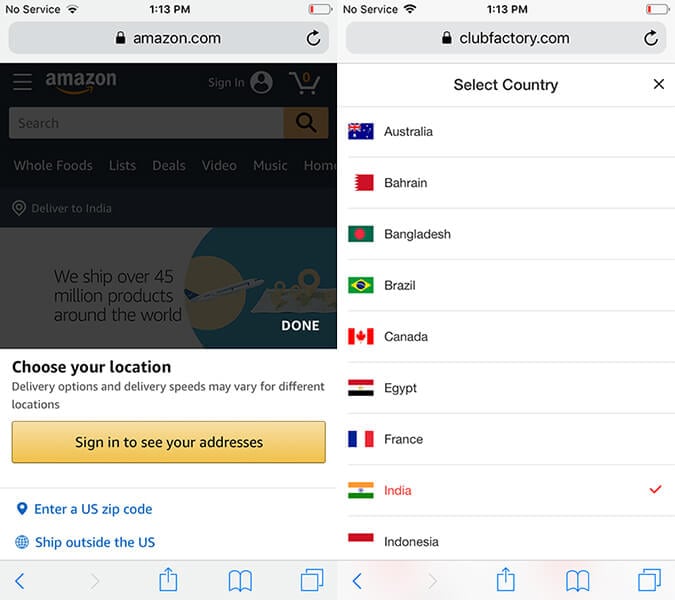
For iOS users, however, this app no longer exists. The app has discontinued its support for iOS devices and is no longer available on the Apps Store. However, there is no need to be disappointed as many better and well-reputed alternatives exist. Read the article till the end to discover the best location spoofer for iOS devices.
Part 3. Must-reads before using VPNa
Here in this section, we’re going to critically determine both the goods and bad of the vpna fake gps location apk. Let’s explore!
Pros of VPNa
- The app works at a lightning fast speed and is extremely useful to fake gps location for free.
- Functionality to save locations for further utilization in the near future makes it a one click solution.
- The best thing about vpna fake gps location apk is don’t actually have to Root your Vivo X100 Pro!
- Extremely simple process. Opt for the desired location and get started.
Cons of VPNa
- Reportedly, the newer version of the VPNa app is not able to spoof location in Pokemon Go, like the way it used to do.
- VPNa fake gps location free apkrequires the Google Play Service version 12.6.88. But upon installing the aforementioned version, reportedly, usersstarted to experience other issues like YouTube isn’t launching.
- Moreover, even if the newer version of the app does spoof the geological location properly. It is just not able to maintain it any longer than a few seconds. Implies, your spoofed location returns back to your actual location after a few seconds.
- You may get banned or suspended by some games or apps for spoofing your location. Making use of this app isn’t advised at all.
Part 4. How to set up VPNa on your Android to fake GPS
Ah! There we are. After acquiring all this valuable information, we’re now finally proceeding to learning about the step by step process on setting up and activating the vpna fake gps location free apk. Here’s all that you need to do on your Vivo X100 Pro to fake GPS.
Step 1: Download the vpna fake gps location free apk
- Visit the Google Play Store and navigate to the “vpna fake gps location” app. The search results may get piled up with several similar options, both paid and free.
Note: If you get along with any other app, it may require your Vivo X100 Pro to be rooted in the first place.
- Ensure to opt for the “vpna fake gps location” listing only as this app doesn’t require a rooted Android device. But your Vivo X100 Pro must be running on the OS version 4.0 or higher.
- Install the app and launch it afterwards.
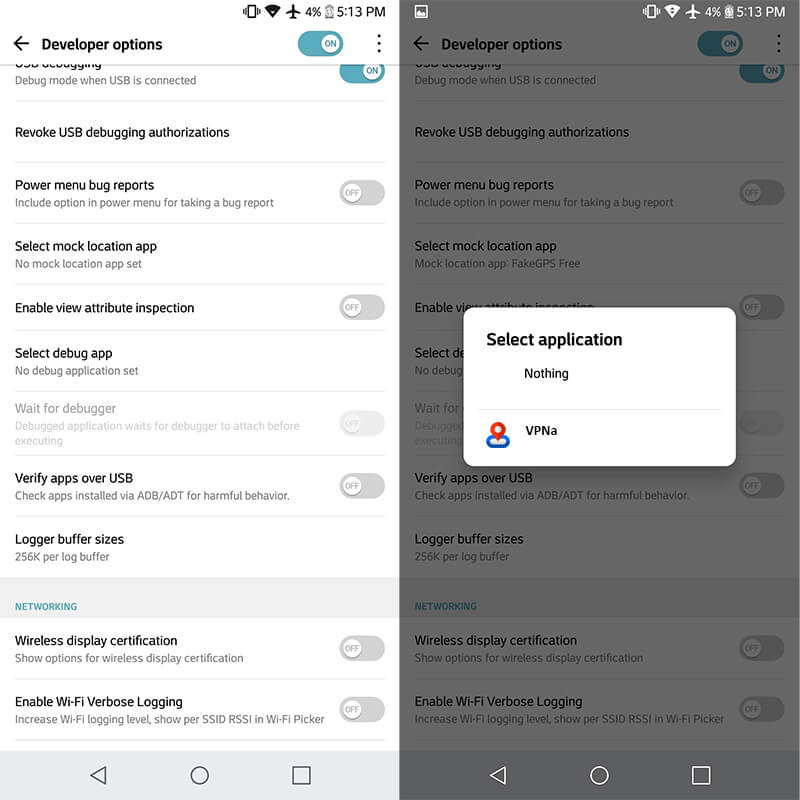
Step 2: Enable Mock Location on Android
- When you’re on the mainscreen of the app, you’ll be asked to “ENABLE MOCK LOCATIONS”. Tap on the pop up and then the “Developer options” screen will come up.
Note: The “Developer options” aren’t pre-enabled, you may require enable it manually first. For this, head to the “Settings” > “About Phone” > hit on “Build Number” – x7 times.
- Now, on “Developer Settings” opt in for “Select Mock location App” followed by selecting the “VPNa” app from the appearing options.
Step 3: Search for a fake location and get started
- As soon as the fundamentals are set in place, you’re all ready to get started. Simply, hit the back button while on Developer Settings screen to get back into the vpna fake gps location app.
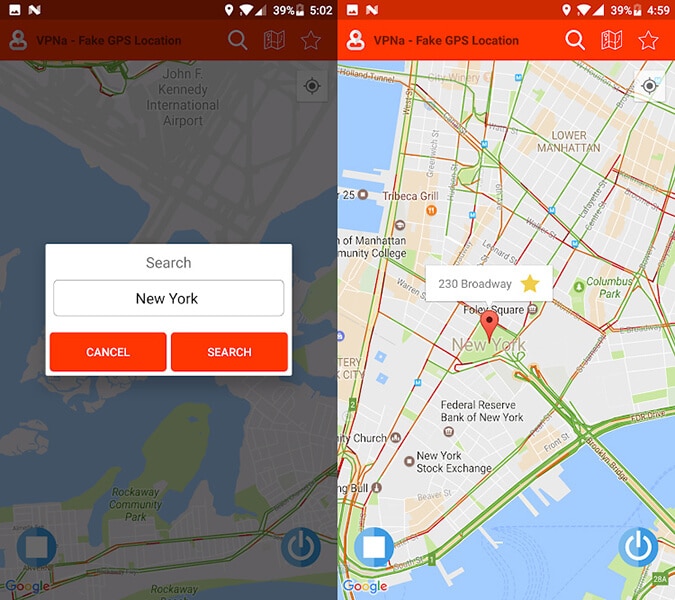
- Next, “Search” for the desired location using the search icon over the top. Lastly, push “Start/Power” button to activate the fake GPS location.
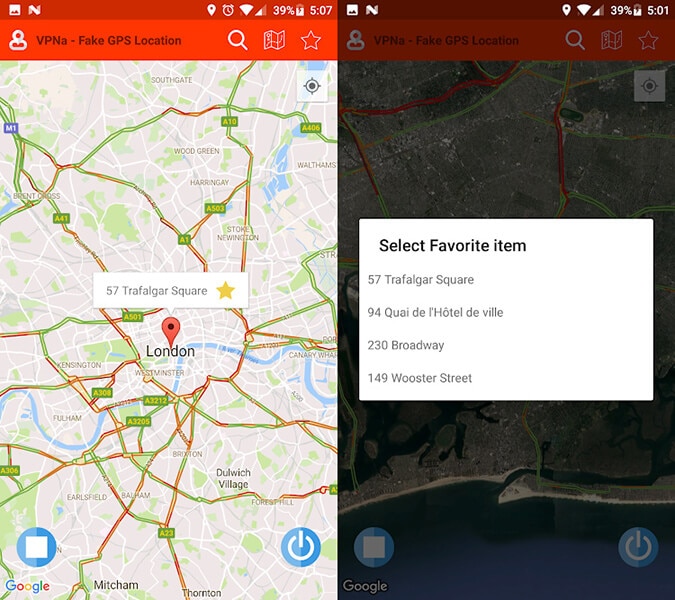
Note: You can also make use of the “Star” button on the “location marker”to pin the selected location over the map as your favorite.
Part 5. Example where VPNa does work
By faking GPS location with VPNa app, you can access desired content by bypass the Geo-restrictions. There are several instances where VPNa is successful solution for your GPS spoofing requirements. For instance, by spoofing location with VPNa you certainly:
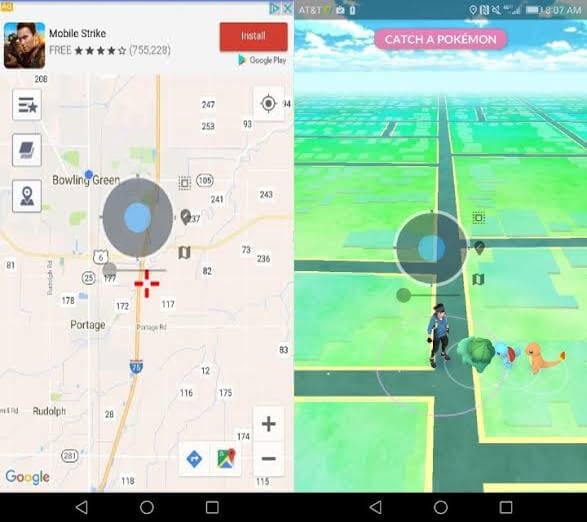
Can catch Pokemons of different variants in the Pokemon Go game. Without having to travel to several places.
Part 6: VPNa iOS version discontinued? How to fake GPS on iPhone?
Knowing that VPNa fake GPS location app no longer supports iOS can be a disappointment. However, we are at your rescue if you’re an iOS user. Wondershare has come up with a great tool named as Dr.Fone – Virtual Location (iOS&Android) that fulfills all your needs regarding faking location. In this section, we will learn about how you can fake location with this tool so that you don’t have to worry about the discontinuation of VPNa fake GPS apk’s iOS version. Here is how:
Mode 1: Teleport to Anywhere
Step 1: Download this VPNa fake GPS apk’s alternative on PC and install. Launch and hit “Virtual Location”.

Step 2: Establish connection between iPhone and PC. Click on “Get Started” right after that.

Step 3: You will be able to see the actual location on the map. Or you can hit “Center On” icon at the right side to get the accurate location displayed.

Step 4: Click on the “Teleport mode” which can be found as the first icon at the upper right corner. Put the place to teleport and hit on “Go” button.

Step 5: A pop up will appear once the system gets the place you want. From that pop-up, hit “Move Here” button.

Step 6: You are good to go now. The location will be changed as desired. You will see the chosen location fixed whenever you click the “Center On” icon. Also, the same location will be shown in the location-based apps. See, there is no need for any iOS version of VPNa fake GPS apk for the purpose when you have Dr.Fone - Virtual Location (iOS&Android).

Mode 2: Simulate Movement Between two Places
Step 1: You can choose the “One-stop route” i.e. the third icon in the upper right after launching the program.
Step 2: Please opt for the place where you wish to move and you will get aware of that place’s distance.
Step 3: Now, you need to set the speed for how fast you wish to travel. You can choose walk, cycling speed or car speed by sliding the slider given at the bottom. Once done, hit on “Move Here” from the pop-up.

Step 4: In the next pop-up, you are supposed to enter the number defining the number of times you wish to move between the two places. Once this gets done, click “March”.

Step 5: The simulation of the movement will now begin and you can track the position being moved with the selected mode of speed.

Mode 3: Simulate Movement for Multiple Places
Step 1: In this case, select the fourth icon at the upper right side. This icon denotes the “Multi-stop route”. Subsequently, select the locations one by one from where you want to travel.
Step 2: Note the pop-up box that now comes. It will make you know how far you are going to travel. Choose the moving speed.

Step 3: The next pop-up will ask you to enter the number for how many times you wish to show back and forth movements. Click “Start Moving” once done.

Step 4: The movement simulation will begin and your location will be seen moving as per your selected route.
Final Words
That was a completed tutorial about the vpna fake gps location apk, starting from gaining the insights of the app to understanding both the goods and bad of it. And finally the detailed step by step tutorial will help you get along with faking gps location smoothly.
Complete Tutorial to Use GPS Joystick to Fake GPS Location On Vivo X100 Pro
The web world offers many apps, including Google, Facebook, Uber, etc. that provide location-based services. This means such apps will need your location to work. However, there are some rare occasions when users don’t find this service welcoming and thus, they wish to fake GPS location.
One of the instances comprises a well-known location-based game – Pokemon Go, where users might want to mislead the app and make the phone not understand where they exactly are. There might be other cases as well. No matter what reason you want this to be done, we are here to introduce you GPS joystick app that helps you for the same. Here we go!
Part 1: Fake GPS Location - GPS JoyStick the App
GPS joystick is an app that helps the users to fake GPS with the help of an overlay joystick control. It is easy to use and works instantly when you wish to modify the GPS location. Providing a unique “Joystick” option, this app can be considered a useful fake GPS joystick apk. On a plus, the app has the best algorithm so that it can offer realistic GPS values.
Features:
- Able to make modifications in the location wherever you point the joystick.
- You can choose the current location with the help of a map or joystick.
- You can also get the GPX files imported and exported to favorites, routes, or custom markers.
- It offers a good amount of setting options to provide complete user customization.
- You can manage the settings regarding size, type, and opacity for the joystick.
- With the help of this fake GPS joystick apk, you can get an opportunity to show the distance and cool-down time information.
- There is also a hide option available to help you decide whether you want to hide or show the joystick on your screen.
- Moreover, you get 3 customizable speeds for the joystick.
Disadvantages:
- It requires a hell lot of steps that are confusing and tough to perform.
- Users have reported that the app only works for a few minutes after the first time of installation. Afterward, the app function to fake GPS location dies and is then good for nothing.
- You need to be tech-savvy to fake GPS location with a GPS joystick.
- Fake GPS joystick for Pokemon Go cannot perform well for it as reported by the users. Also, it drives the same result for other popular location-based apps or games.
Part 2: How to set up GPS JoyStick
Though, it is quite difficult to get through the process of setting up the GPS joystick apk to a fake GPS location. Remember, we’ve always got your back. Therefore, we would like to bring you up with a detailed streak of steps (if followed properly) to install and set up the fake GPS joystick apk easily.
Basically, the tutorial is categorized into 3 different streaks depending upon the different Android OS security patches and OS version. Therefore, before we begin with steps, let’s understand what you need to do to find your Android OS version or the Security Patch. Depending on the Security Patches or Android OS version, follow the tutorials mentioned below with falls compatible for your device.
- Take your Vivo X100 Pro handy and launch the “Settings”.
- Now, scroll down to the “About phone” option at the bottom and then hit on it.
- Lastly, look for the “Android version” entry and “Android security patch level” entry from the information displayed over your screen.
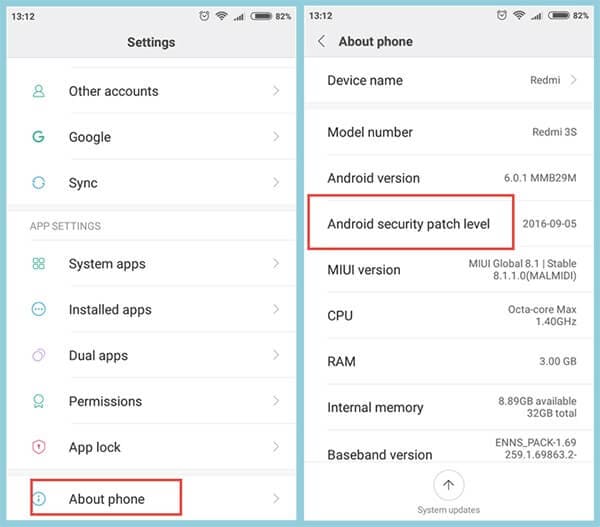
Note: Remember the date mentioned besides the “Android security patch level” is when it was first released. Please do not take it otherwise, that it is the date when you might have installed Google’s security patch.
2.1 For Android 6.0 and Above (New Security Patch) - AFTER March 5, 2017
If you own an Android device that runs on the Android OS version 6.0 or higher updated to “New Security Patch” released “AFTER March 5, 2017”. You need to follow the steps mentioned below.
First, you need to make sure that the Google Play Services app installed over your Vivo X100 Pro is running on version 12.6.85 or lower. If that’s the case, you no longer require performing the lengthy steps below. Instead, directly skip stepping number 7 below.
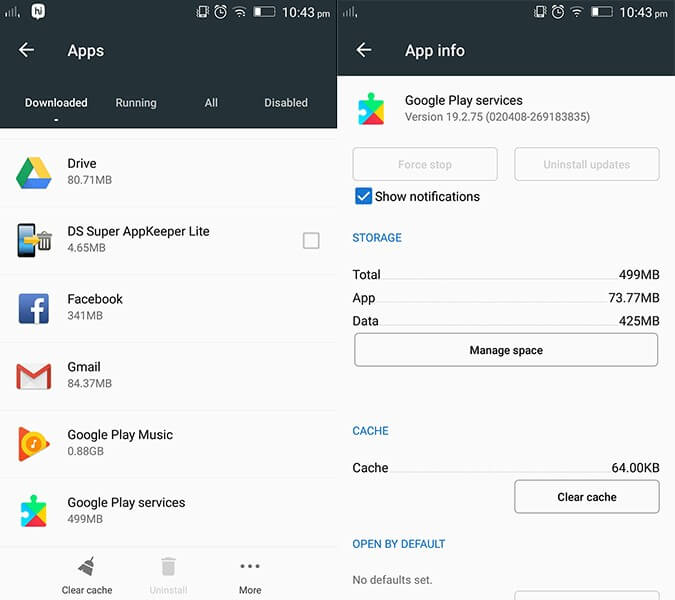
Note: To verify the Play Services version, launch “Settings” followed by selecting “Apps/Applications”. Scroll down to “Google Play Services” and hit on it. You will then see the app version at the top of the screen.

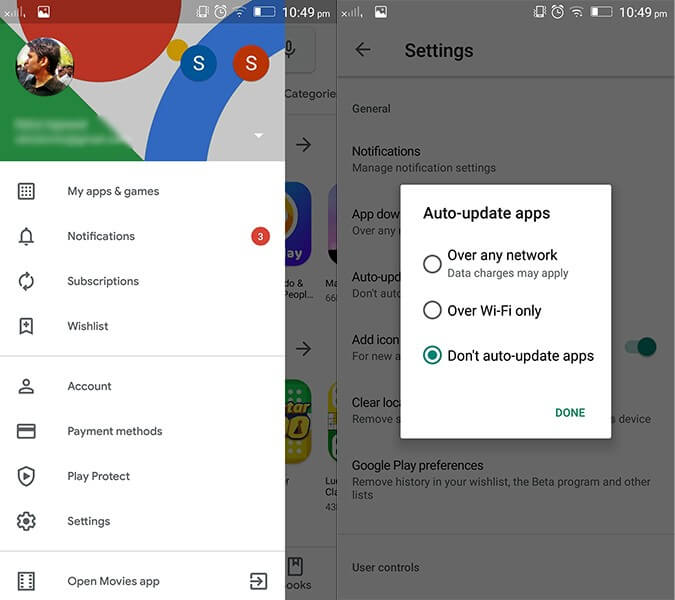
But if that’s not the case, you’re required to disable the Play Store’s auto-updates. For this, launch the Play Store and hit the “3 horizontal bars” at the top. Then, tap on “Settings” option from the appearing left panel followed by Auto-update apps available under “General” settings. Lastly, hit on the “Do not auto-update apps” option.
Next, get hold of Google Play Services (an older version) from the link here: https://www.apkmirror.com/apk/google-inc/google-play-services/google-play-services-12-6-85-release/
Note: Ensure to download the Google Play Services apk file that is closest to your Android version. But, remember not to install it now.
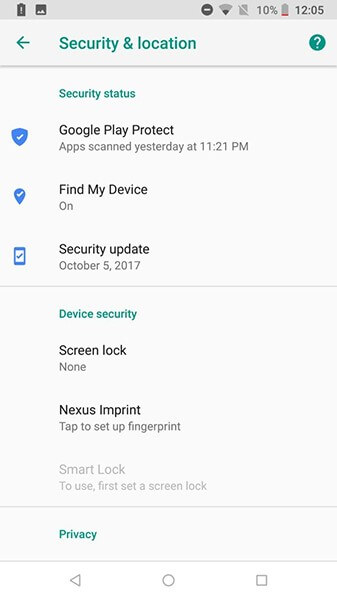
Once done, if “Find My Device” is enabled over your device, you need to get it disabled too. To do this, get into “Settings” followed by “Security & Location”. Now, hit on “Find my device” and toggle it off.
Likewise, disable “Google Play” and uninstall all its updates as well. To remove updates, get into “Settings” followed by “Apps/Applications”. Scroll down to “Google Play Services” and hit on “Uninstall updates”.
Note: If you’re unable to get this done, then you may need to disable the Android device manager in the first place. For this, get to “Settings” > “Security” > “Device Administrators” > disable “Android Device Manager first”.
Now is the time when you should install the Google Play Services apk (downloaded in step 3 above). Reboot your device afterwards.
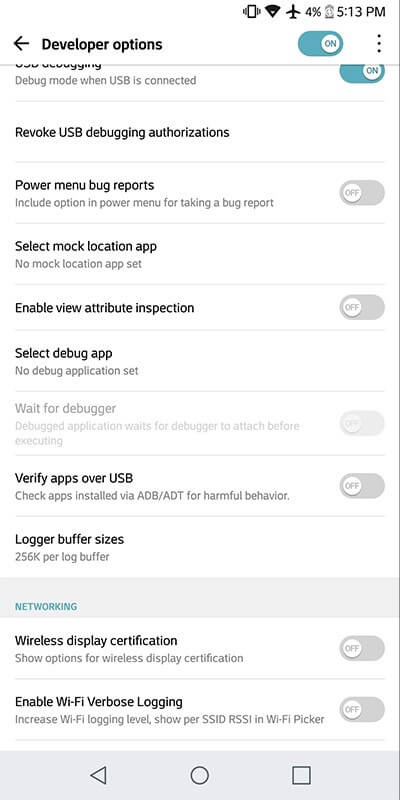
Subsequently, you need to again get into the “Settings” and then opt for “Developer Options”. Now, hit on “Select mock location app” and opt for “GPS JoyStick” here.
Lastly, launch the “GPS JoyStick app” and navigate to “Settings” followed by toggling on the “Enable Suspended Mocking” switch.

2.2 For Android 6.0 and Above (Old Security Patch) - BEFORE March 5, 2017
That was a detailed tutorial about the Android security patch level released “AFTER March 5, 2017”. But if your Android security patch level is before March 5, 2017, what would you have to do? Well, worry not, here is exactly what steps you need to follow to make use of the GPS joystick app to fake GPS location.
First, you need to navigate to the “Settings”. Then, opt for “Developer Options” and hit on “Select mock location app” followed by selecting the “GPS JoyStick” app here.

Lastly, launch the “GPS JoyStick app” to fake GPS location and navigate to “Settings”. Thereafter, toggle on the “Indirect Mocking” switch, and you’re done.

2.3 For Android 4 or 5
For the users of Android OS version 4 or Android OS version 5, there’s not much you need to do. Here is the exact method that you need to get through.
Get the “GPS JoyStick apk” installed over your device and then proceed to “Developer Options” available under the “Settings” menu. Then, hit on the “Select mock location app”.

Now, “GPS JoyStick app” to fake GPS location and get started with the FGL pro joystick control.
You will then have the FGL pro joystick control is visible on your Android screen. Thereafter, head back to the “Developer Options” and get the “Mock Locations” disabled.
Lastly, launch the “Pokemon GO” and you’re all set to fake GPS go with a joystick.
Part 3: How to bypass the blacklist of games like Pokemon GO
There are chances when you get caught by Pokemon Go for spoofing GPS location and get blocked/blacklisted for making use of fake GPS location apk. Here’s a workaround for bypassing the blacklist of games like Pokemon Go.
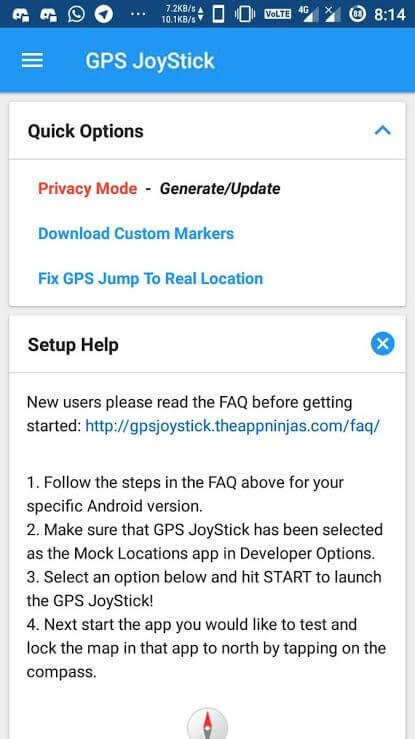
Download and then install the most recent version of GPS JoyStick apk. Now, launch it, and then hit on the “Privacy Mode” link available under the “Quick Options” section on the home screen. This will generate a unique copy of the app specifically for you.
Next, you need the generated app installed and get through with the setup process with the streak of steps listed below.
Now, you need to uninstall the original fake GPS joystick for Pokemon Go. Also, ensure that to uninstall every other spoofing/fake GPS apps that can potentially be on the Pokemon GO blacklist.
Thereafter, make use of the specifically generated GPS joystick on Pokemon Go to bypass the blacklist warning!
Lastly, utilize the “Update” button after hitting on the “Privacy Mode” link under the “Quick Options”. Then, navigate to the previously generated app from the appearing pop up. This will generate the update for it, and you’re all done.

Part 4: How to Use GPS Joystick to Fake Location on iPhone
When you fake GPS Joystick location, you can double the joy in playing location-based games like Pokemon go, Ingress, Zombies, Run, Geocaching, etc. All these games make use of the phone location, and it will be quite interesting if you move on with exciting places worldwide.
Do you want to fake GPS Joystick on iPhone?
Are you tired of searching for an effective GPS Joystick to fake location on the iPhone?
You would have ended up with a conclusion that there are no reliable and effective apps to fake location on the iPhone.
Dr. Fone’s specialist team presents Dr.Fone - Virtual Location for the gaming lovers to fake GPS Joystick on iPhone. You can now move the joystick to the desired location in no time using Dr.Fone.
Stepwise procedure to fake GPS with a joystick on iPhone
Step 1: Launch the app
After a successful download, install the app through the guiding wizard. Click the Dr.Fone app icon to explore its features. Using a USB cable, attach your iPhone with your PC.
Step 2: Set a virtual location
On the first screen of Dr.Fone app, choose the ‘Virtual Location’ option.
Step 3: Modify the location address
Tap ‘Get Started’ option then add a new address in the ‘Teleport’ mode. To choose ‘Teleport’ mode, you have to select the first icon at the top-right screen. Next, enter the address at the top left side of the window. You can enter any address around the globe to fake GPS joystick location.
Step 4: Changed Location in the app
Now the Dr.Fone app displays your desired address as your current location. You can verify it by spotting the location on the map view.
Step 5: Location on iPhone
Next, you must check your default current location in map view on iPhone, and you will witness the modified location in pace with your desired address.

Step 6: Play Pokemon Go without moving
Now use the “one-stop route” or “multi-stop route” to simulate the real-world movement without moving. Just play Pokemon go to explore new Pokemons on different locations and gain more points through an effective fake GPS joystick location app Dr.Fone.
8 Solutions to Fix ‘Find My Friends Location Not Available’ On Vivo X100 Pro
There is no doubt that Find My Friends is an excellent application for location tracking. It allows users to track the location of their friends and family members through a variety of devices. So, when Find My Friends says the location is not available, it can be a frustrating situation. But don’t stress over this because we are here to assist you in Find My Friends not working. Go through this guide, and you’ll know what to do to take care of the problem.

Part 1: What Does “Location Not Available” Mean on Find My Friends?
When the “Location Not Available” message appears on Find My Friends, it means that you have disabled location sharing or have turned off your device’s location services. This message can also appear if your device is in an area with poor network coverage or if your device is turned off. In some cases, the message can indicate that you have logged out of your iCloud account or that there is an issue with the iCloud server.
Does “Location Not Available” mean that there is something wrong with Vivo X100 Pro ?
Not! This message does not necessarily mean that you have blocked yourself or there is something wrong with your device. If you frequently see the “Location Not Available” message, you may need to check your own device’s settings or contact your friends to confirm their location-sharing preferences.
How to distinguish “No Location Found” and “Location Not Available”?
“No Location Found” means that the Find My app is unable to locate the Vivo X100 Pro device being tracked. This can happen for a variety of reasons, such as if the Vivo X100 Pro device is turned off, not connected to the internet, or if location services are disabled.
“Location Not Available” means that the Vivo X100 Pro device is not currently sharing its location with the Find My app. This can happen if the Vivo X100 Pro device is in Airplane mode or if the user has turned off location sharing for the Find My app. It can also happen if there is a temporary issue with the iCloud servers.
In summary, “No Location Found” means the app could not locate the Vivo X100 Pro device, while “Location Not Available” means that the Vivo X100 Pro device is not currently sharing its location.
Part 2: Possible Reasons For Find My Friends Location Vivo X100 Pro Not Available
Why does Find My Friends say location not available? Before we get to the solutions, let’s explore the possible reasons behind this problem. It is apparent that when the location is not found on Find My Friends, there is an underlying problem. Here are the possible reasons that could cause this error:
- Your friend’s device has an inaccurate date
- The other device isn’t connected to a network, or it’s off
- Hide My Location feature is active on your friend’s phone
- The Location Services are also turned off on the friend’s device
- Your friend hasn’t signed in to the service
- The location of your friend is in a country or region where Apple doesn’t provide this feature
All these reasons can be the ones causing trouble on your Vivo X100 Pro and Android phones. Hence, you will have to look for some conventional methods to fix the unavailable location error.
Part 3: 8 Tips To Make “Find My Friends Location” Available
When the Find My Friends app location is not available, here are some more tips that can help get rid of this issue.
Tip 1: Check if Find My Friends is Supported in Region/Country
The foremost thing you should do when the Find My Friends location is not available is to check the region/country’s location. Apple Inc still hasn’t provided the Find My Friends feature in all countries and regions due to local laws and technical issues. So, the most plausible reason for the app not working properly is solely because it is not available in that particular country/region.
Tip 2: Quit and enable GPS or Location Services again
After verifying that the feature is available in your region, enable the GPS & Location Services. In case you’ve already enabled the feature, turn it off, quit the app, and again enable the service. It might fix the location not found on the Find My Friends issue you’ve been facing. Just open Settings > Privacy & Security > Location Services and toggle the bar to turn the feature on or off.
Tip 3: Adjust Vivo X100 Pro Date and Time
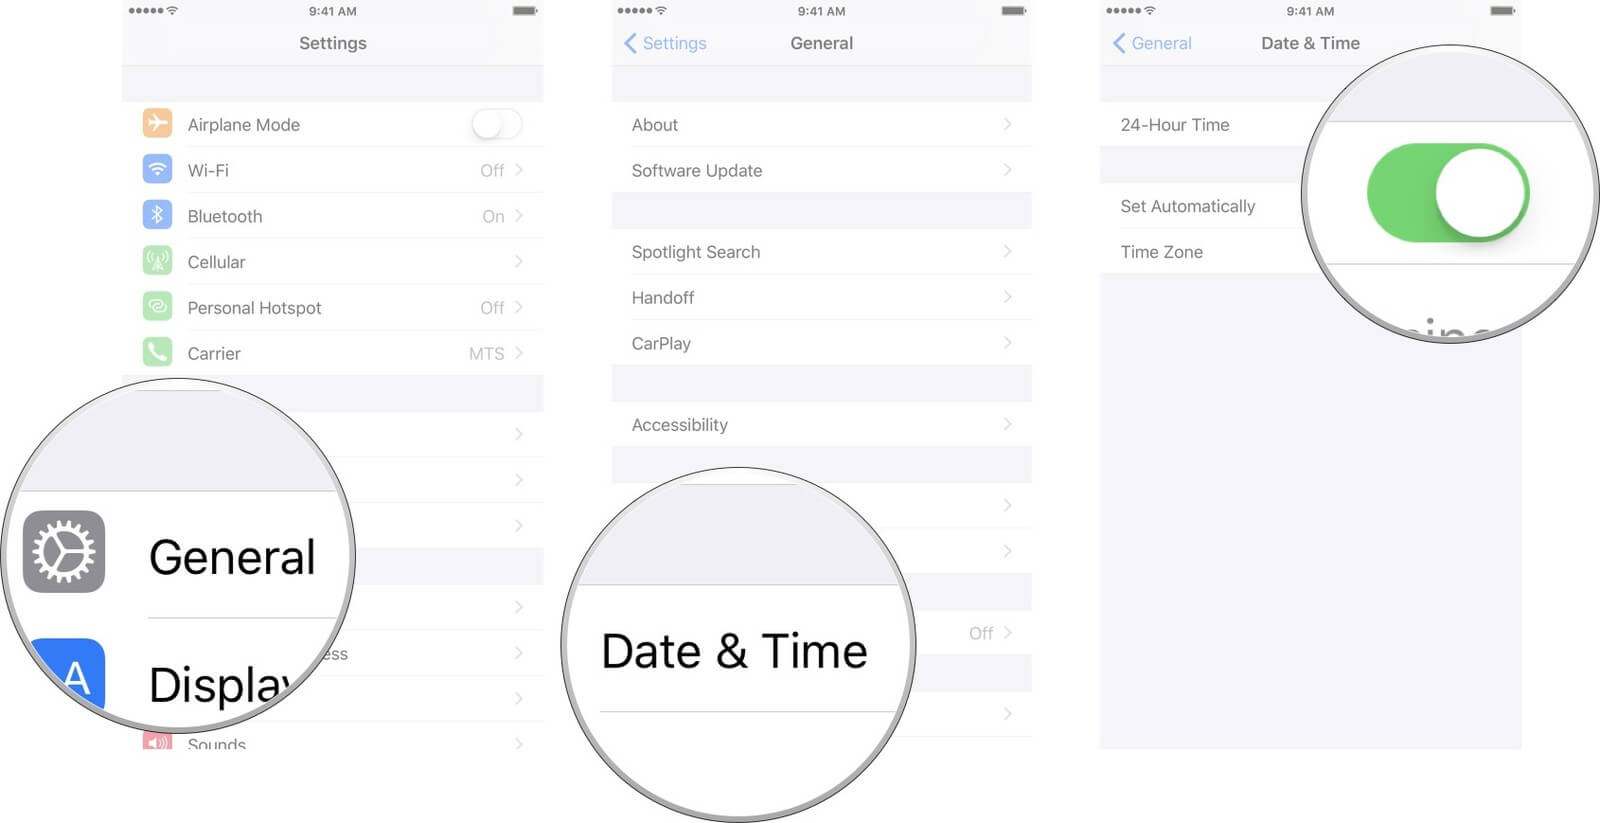
As we stated in the possible reasons, incorrect dates and times also result in this problem. If you have manually set the date and time, change the settings and set it to “Set Automatically” in General Settings. Hopefully, this will resolve the problem when the Find My Friends location is not available.
Tip 4: Check the Internet
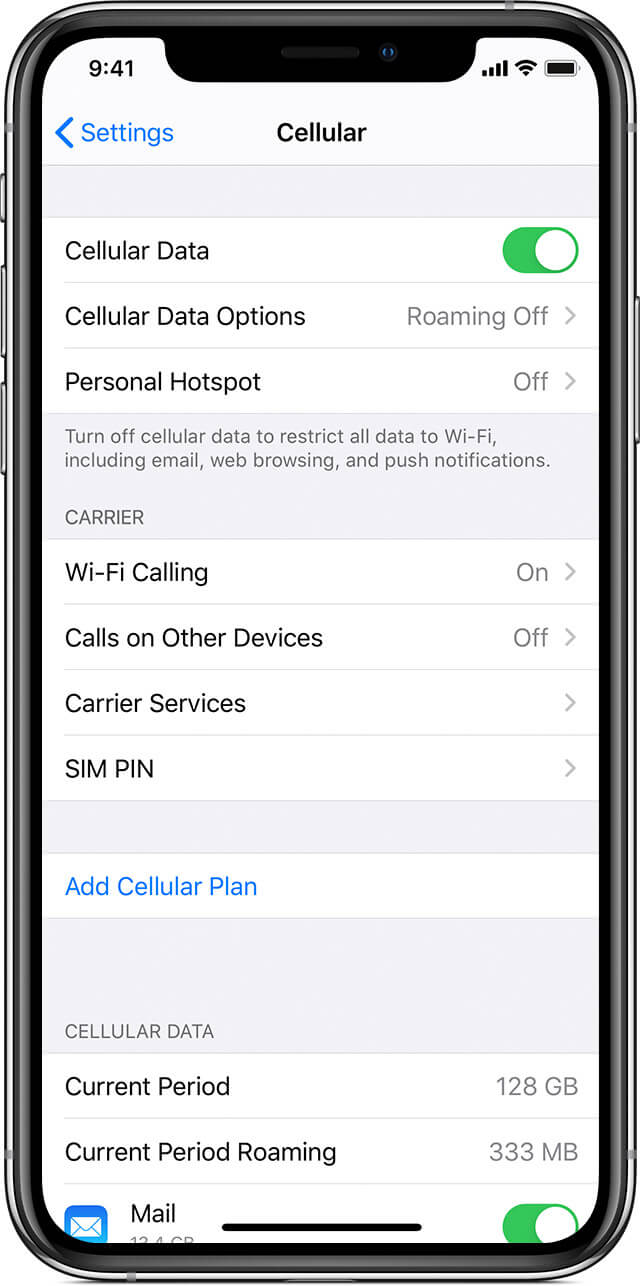
Before you conclude that there is something wrong with the Find My Friends app, check your internet connection. There is a chance that location is not available on the Vivo X100 Pro because your device doesn’t have internet access. Try opening Settings > Mobile Data/Wi-Fi and turning it on and off. Alongside, make sure that you have signal strength, whether you are connecting to cellular data or a Wi-Fi network.
Tip 5: Enable Share My Location
Another tip to try out when your friend’s location is not available is to make certain that you’ve enabled Share My Location feature. To do this, follow the steps given below:
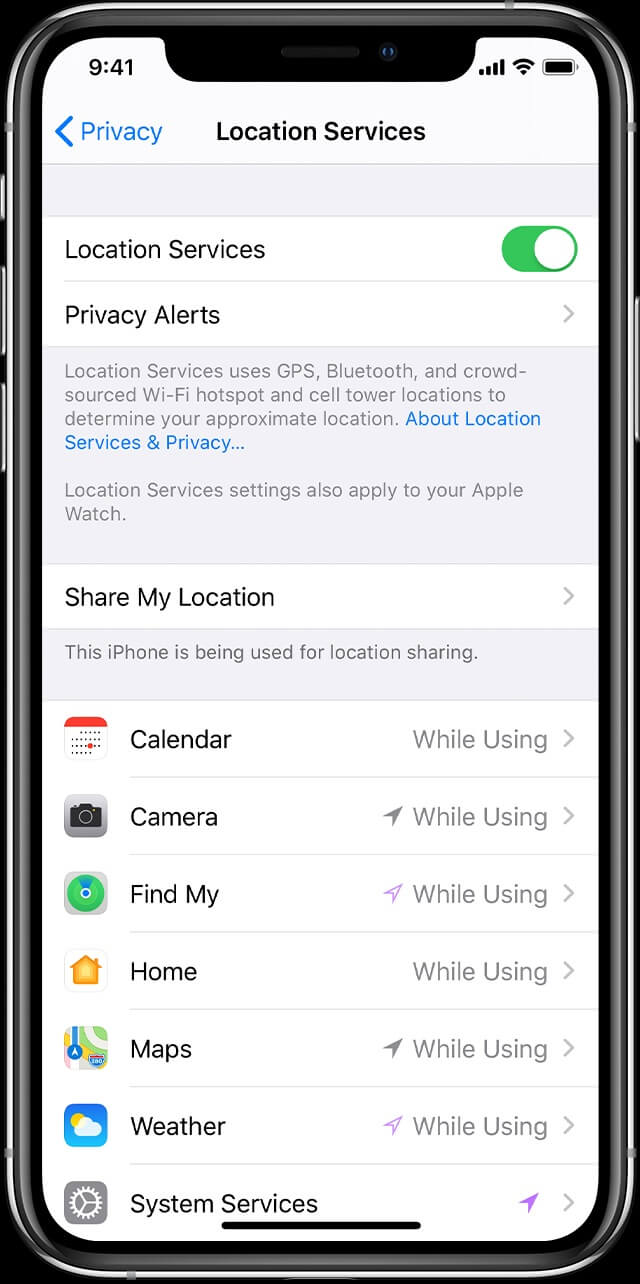
Step 1: For Vivo X100 Pro users: get to the “Settings” app and go to “Privacy & Security”. You will find the “Location Services” feature, click on it, and see the “Share My Location” feature.

Toggle on the option to enable it. Once the feature is enabled, your friends will see your location, and you can see theirs.
For Android users, go to “Settings” > “Additional settings” > “Privacy” > “Location”, and choose the location mode to enable it.
Tip 6: Restart the Vivo X100 Pro or Android Phones
The next tip to use when Find My Friends says location not available is restarting your phone. For most devices, the method is common. But for Vivo X100 Pro X and 11, the steps are slightly different. For other Vivo X100 Pro models, press the Power button and wait until the slider appears. For Vivo X100 Pro X and 11/12/13/14, you’ll have to hold the Volume button and the Power button together to make the slider appear on the screen.

Drag the Power slider to the right side and wait for the Vivo X100 Pro device to shut down. Wait for a minute before you restart the Vivo X100 Pro device, and hopefully, the feature will start working again as usual.
Tip 7: Check That Your Friend Has Signed into Find My Friends
Another tip that can help you resolve to Find My Friends location not available is checking that your friend has signed into the app. It is apparent that if your friend hasn’t logged into the feature, you won’t access his/her location.
Open the Find Friends app, log into it, and enable the location-sharing feature.
Tip 8: Quit Find My Friends App and Open It Again
Last but not least valuable tip to use when the Find Friends location is not available is to quit the app. There is a possibility that you’ve faced the problem only because of a momentary issue or some random glitch. Make sure that you also clear the cache memory before opening the app again. It might fix the problem entirely.
Extension: Can I send the fake location by Find Friends to others?
With Dr. Fone - Virtual Location software, you will be able to share a fake or any location you want with your friends and family. Alongside this, Dr. Fone will also pace up your movement to ensure that your friends and family members won’t find out that you share fake locations with them. The video below teaches you how to teleport your Vivo X100 Pro GPS location, and more tips and tricks can be found in the Wondershare Video Community .
Here is a video for you to learn how to fix Vivo X100 Pro Find My Friends location not available:
To use Dr.Fone - Virtual Location, here are the steps you need to follow:
Step 1: Download the virtual location app for both iOS and Android and install it on your system carefully. Then, launch the app and select the “Virtual Location” option from the toolkit.
Step 2: The next step is to set up the phone’s connection. Connect your Vivo X100 Pro and click on the “Get Started” button. Now, detect your current virtual location by clicking on the “Current Virtual Location” icon.
Step 3: Now go to the search box and type the location you want to switch to. Once the location gets detected, click on the “Move Here” option, and the location of your Vivo X100 Pro or Android phone will change to the one you specified.
As you can see, when you have Dr.Fone - Virtual Location software, you can share any location with just one click. And it would seem that your Find My Friends app is working fine.
FAQs You May Want to Know about Vivo X100 Pro Location
1. Is there a way to check if someone has stopped sharing their location with you on their Vivo X100 Pro ?
If someone stops sharing their location with you on their Vivo X100 Pro , you will see “Location Not Available” next to their name in the Find My app or Messages app. You can check the status of location sharing by tapping their name in the Find My app.
2. Can I track a stolen Vivo X100 Pro if it is turned off?
You may still be able to track a stolen Vivo X100 Pro if it is turned off using the Find My app or iCloud website. However, this depends on several factors, such as whether the Vivo X100 Pro device is connected to a Wi-Fi or cellular network, and whether the person who stole the Vivo X100 Pro device has turned off location services.
3. Can I track someone else’s Vivo X100 Pro location without their permission?
No, you cannot track someone else’s Vivo X100 Pro location without their permission. The Find My app only allows you to track the location of devices that are signed in with your Apple ID, and you need the other person’s permission to share their location with you.
4. Can I prevent someone from tracking my location?
Yes, you can take steps to prevent someone from tracking your phone’s location. Here are some measures you can consider:
- Turn off location services or GPS.
- Adjust app permissions.
- Use airplane mode.
- Use a VPN or professional location changer tool like Dr.Fone - Virtual Location to change your phone location .
- Check for spyware.
- Turn off Wi-Fi and Bluetooth.
- Review privacy settings.
- Be cautious with social media.
- Use encrypted messaging.
- Avoid public Wi-Fi.
- Clear location history.
Taking these precautions can help safeguard your phone’s location and enhance your privacy. It’s important to stay vigilant and be aware of the privacy settings and permissions on your device.
Dr.Fone - Virtual Location
1-Click Location Changer for both iOS and Android
- Teleport from one location to another across the world from the comfort of your home.
- With just a few selections on your computer, you can make members of your circle believe you’re anywhere you want.
- Stimulate and imitate movement and set the speed and stops you take along the way.
- Compatible with both iOS and Android systems.
- Work with location-based apps, like Pokemon Go , Snapchat , Instagram , Facebook , etc.
3981454 people have downloaded it
Conclusion
Hopefully, now you know “why is find my friends not working” and several ways to fix the Find Friends location not available. In this guide, we learned all these tips to make it easy for Vivo X100 Pro users to rectify the issues with the Find Friends app. Check all the tips carefully and implement them whenever you face issues like this.
Also read:
- [New] Significant 20 Public Domain PUBG Snapshot Packs
- [New] The Ultimate List of DJI Phantom 4 Supplements for 2024
- [Updated] In 2024, Create, Captivate Independent Animation Innovations
- 2024 Approved Find Your Favorite General Knowledge Quiz Channel of the Year, '24
- Boost Conversion Rates: Discover the Advanced Capabilities of Cookiebot Analytics
- Can Life360 Track You When Your Honor 90 GT is off? | Dr.fone
- Ensuring Compliance: Key Points for Successful Legal Email Marketing Campaigns with MassMail
- How To Simulate GPS Movement With Location Spoofer On Infinix Note 30 Pro? | Dr.fone
- How To Simulate GPS Movement With Location Spoofer On Realme 12 Pro+ 5G? | Dr.fone
- In 2024, 5 Hassle-Free Solutions to Fake Location on Find My Friends Of Lava Blaze Curve 5G | Dr.fone
- Repairing a Damaged USB Key Without Reformatting: Top 8 Easy Methods!
- Title: Complete Tutorial to Use VPNa to Fake GPS Location On Vivo X100 Pro | Dr.fone
- Author: Ava
- Created at : 2024-12-23 16:14:06
- Updated at : 2024-12-29 16:32:52
- Link: https://fake-location.techidaily.com/complete-tutorial-to-use-vpna-to-fake-gps-location-on-vivo-x100-pro-drfone-by-drfone-virtual-android/
- License: This work is licensed under CC BY-NC-SA 4.0.